To avoid these ads, REGISTER NOW!

How to Save Old Orphan Cordless Tools! BD ==> Ryobi

pauls_workshop

Well-known member
Joined
Mar 7, 2013
Messages
2,788
Location
Indiana, USA - Underappreciated Place to Live!
So most of us know that the cordless tools are useful and for many are the only tools they have now for a given type of tool. But those who have been around a while also know that the changes in voltages and battery styles (9.2, 12, 14.4, 16.8, 18, 19.2, 20, etc) and then being abandoned and orphaned by the manufacturer every few years as they force you to rebuy tools and batteries gets really old. This particular example will be Black and Decker and Ryobi.

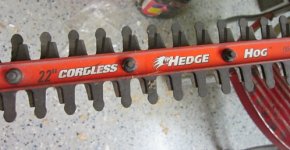
I had a couple 18 volt slide style Black and Decker yard tools - a weedwacker and a bush hedger that had dead batteries. I think of B&D more as Dewalt lite than junk. Their yard tools are really very good for the cost but their batteries have been pretty terrible. I picked up both of these and the dead batteries for $15 from a garage sale. I love their corded 8.5 amp 4.5" grinder too as high value for the dollar, but that is another story.

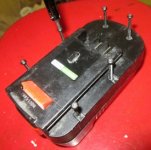
Anyway, I wanted to use and save these tools but did not want to buy new batteries or repack these old ones either. I mainly have Ryobi 18 v one + cordless tools and many of them. So for convenience, I wanted to convert these old tools to use Ryobi 18v batteries. This thread will show how I did that. The principles here can apply to ANY tool! The details of the process will vary depending on what you are going from to what you are going to. This whole project took me about 4 hours of shop therapy time to make it work. I enjoyed it! Also, I'm by no means the first to do this - many others have too, but my version uses the same battery click feature as the original Ryobi tools had, so they fit tight and snug and you don't notice it was a B&D doctored up when you are done. This method uses the old battery pack to be a converter pack for the new Ryobi battery to fit. Another way to do it is to directly modify the tool itself to directly use the new battery pack. I've done that too in the past. Older Craftsman C3 to Ryobi batteries work great for that because they are only slightly different anyway.

Legal: No guarantees on anything working for you. Manufacturers obviously will have a cow about this and I am not endorsing anyone do this nor responsible if you do, but this was my experiment! Generally, you are safe to use same voltage on new as old or slightly higher (18 could use 20 volt pack, 14.4 to 18, etc, but your mileage may vary and there could be some tools that don't like whatever you try to do.) Have fun! - Paul
 

Attachments

  • 476b.jpg
    476b.jpg
    81.5 KB · Views: 214
  • 474a.jpg
    474a.jpg
    104.4 KB · Views: 164
To avoid these ads, REGISTER NOW!
OP
P

pauls_workshop

Well-known member
Joined
Mar 7, 2013
Messages
2,788
Location
Indiana, USA - Underappreciated Place to Live!
The B&D tools here use a horizontal sliding type 18v pack. The Ryobi below is a vertical post type pack. The electrical connections on the B&D are the two top openings at the end of the slide grooves on the left photo. Farthest up is the + one, lower one is the - one:
 

Attachments

  • 450a.jpg
    450a.jpg
    88.3 KB · Views: 88
  • 449a.jpg
    449a.jpg
    130.7 KB · Views: 77
Last edited:
OP
P

pauls_workshop

Well-known member
Joined
Mar 7, 2013
Messages
2,788
Location
Indiana, USA - Underappreciated Place to Live!
More on Ryobi battery details. Note the various plastic bulges on the top surface where it plugs in and also the two side latches. The side latches have about a 3/4" long horizontal beam at the top that must grab and latch into the converter housing. Also there are 2 little 3/16" vertical beams in the latch and two just outside the latch. The top of the battery has a + and - vertical metal strip on either side of the post to connect to the tool/converter.

For those with Craftsman 18v C3 tools, their battery posts are TALLER vertically but use the same connectors at the top otherwise. They also use an identical battery latch system but they are moved over about an inch from where they are on the Ryobi. To let a C3 use a Ryobi battery directly, you just take them apart, move the electrical connector vertically down lower in the tool, and recreate a new latch setup to match where the Ryobi latch is with a dremel and or epoxy if needed. Not hard.
 

Attachments

  • 452a.jpg
    452a.jpg
    77.4 KB · Views: 72
  • 454a.jpg
    454a.jpg
    91.5 KB · Views: 76
Last edited:
OP
P

pauls_workshop

Well-known member
Joined
Mar 7, 2013
Messages
2,788
Location
Indiana, USA - Underappreciated Place to Live!
Next thing to do is disassemble the B&D battery pack with the 6 screws and remove the batteries. Cut the two wires as long as you can from the battery pack to reuse.

Details on B&D bottom half of converter are here. You have to cut out sections for all of the plastic bumps on the top surface of the Ryobi battery to fit in the bottom of the B&D converter. A dremel works great. Use eye protection always when using a dremel. Sometimes the wheel cutting bits and sometimes a grinding type bit can work well. The plastic in the housing is ABS and cuts easily. If you screw up, use a little two part epoxy and just fill in and repair it and cut it over again! No worries. The photo on the right shows the horizontal groove and 4 little vertical groove features you must put in either side of the bottom of the converter so the Ryobi will snap in. The distance to the horizontal groove from bottom of converter is critical so it snaps in fully but also can come out easily.
 

Attachments

  • 457a.jpg
    457a.jpg
    104.2 KB · Views: 93
  • 456a.jpg
    456a.jpg
    87.8 KB · Views: 87
Last edited:
OP
P

pauls_workshop

Well-known member
Joined
Mar 7, 2013
Messages
2,788
Location
Indiana, USA - Underappreciated Place to Live!
Here are the details for the top half of the clamshell B&D converter pack. You need to first of all create two vertical metal strips to clamp onto the top of the Ryobi battery electrical connections. There is a + and a -. The Ryobi has a third strip in the middle but you can ignore that completely. Here I reused a connector for that from an old Craftsman C3 16.8v drill I had ($1 from another sale!). Had to bend it just a little in the end to fit in the converter properly. If you don't have one of these, you can just make your own out of some metal and solder an electrical wire to it. Bend to fit.

Now I had some epoxy so I mixed it up with some sawdust filler and just filled in around this electrical clamp connector to the right height of the Ryobi post to fit. I first wrapped the area with a little Gorilla tape to act as a bucket to hold the epoxy mix as it dried. You can also use Sugru (google it), which is Silicone Caulk with a filler. Dries hard. I wrapped the Ryobi battery in an ethylene plastic bag (grocery bag) which epoxy won't stick to and stuck it in so it molded the perfect shape for the bottom to have.

It is best to glue in the connector well up front. I actually did the connector part after the epoxy and just cut out where the connector had to go, then drilled a slot vertically for each wire to come out of the connector. That works too. You want this to be tall enough support so the post of the Ryobi battery is supported, but it can be a little rubbery and doesn't have to be extremely rigid. Silicone Sugru is fine. In this case, the back of the converter pack is tight to the red snap in plastic piece at the back of the B&D pack that will go in later, so there is just Gorilla tape alone on the back part of the post support. No problems.

When it is all dry, you solder the two wires to the two existing wires in the B&D pack. I happened to use a connecting wire that had a slide on crimp on the end for one of them and just bent the flat sheet metal in half and slid it in this connector to make it easier. The other wire reached far enough that it didn't need a connecting wire. Solder everything when done. You have to check fitups carefullly and may need to adjust something slightly or use the dremel a bit if needed to all fit. The right photo shows the two clamshell halves of the converter pack together.
 

Attachments

  • 466a.jpg
    466a.jpg
    113.6 KB · Views: 114
  • 468a.jpg
    468a.jpg
    90.7 KB · Views: 98
  • 455a.jpg
    455a.jpg
    95.1 KB · Views: 97
Last edited:
OP
P

pauls_workshop

Well-known member
Joined
Mar 7, 2013
Messages
2,788
Location
Indiana, USA - Underappreciated Place to Live!
Here is the final assy and how it looks when done. The bottom photo shows the details of the Ryobi latch into the converter. One side of mine I still have to adjust slightly for best fit, but it holds well as it is. Now I can go looking for more abandoned B&D 18v tools for almost free from garage sales next year! Also, I had heard that Harbor Freight 18v cordless use this same B&D pack so I'm going to look for those now too! These tools run really good with the Ryobi batteries, maybe 4x as powerful as they were when the B&D batteries worked a little. String trimmer is almost as good as an engine powered one now! - Paul
 

Attachments

  • 470s.jpg
    470s.jpg
    78.7 KB · Views: 79
  • 471a.jpg
    471a.jpg
    97.1 KB · Views: 81
  • 472a.jpg
    472a.jpg
    99.4 KB · Views: 77
  • 473a.jpg
    473a.jpg
    87.7 KB · Views: 85

Danglerb

Well-known member
Joined
Sep 6, 2007
Messages
9,736
Location
SoCal
Nice work, but I think it might have been easier to have the packs rebuilt, or trade with somebody until you have a matching set of tools.

I've been thinking about going the slop fix, make a good belt pack, and add cord and disconnect to the tools.
 

devoncoolman

Well-known member
Joined
Mar 17, 2013
Messages
2,096
Location
quakertown pa
This option is ok if you have free time on your hands. Me on the other hand i can barily find time to mow my grass let alone spend time doing this. Non the less. Goid job rejuvinating perfectly good tools.
 
OP
P

pauls_workshop

Well-known member
Joined
Mar 7, 2013
Messages
2,788
Location
Indiana, USA - Underappreciated Place to Live!
This option is ok if you have free time on your hands. Me on the other hand i can barily find time to mow my grass let alone spend time doing this. Non the less. Goid job rejuvinating perfectly good tools.

Hah ha. Well, I don't have much free time, but I find in life I need a little play time in the shop or with hobbies to maintain sanity levels. These 4 hours for me came over a 3 week period my friend! :) This is why I call it "shop therapy". This little project was also waiting in the wings for me for about 2 years to complete it! I'm off a few days around Christmas here so finished it up and posted this for others to enjoy.

On the battery repack, yes, this is valid and pretty easy with B&D packs. In fact, people have bought the cheap Harbor Freight pack and put these in the B&D for less than a $15 repack about the same as the original B&D battery power. There is a posting on that over at http://www.instructables.com/id/Cheap-Black-Decker-18Volt-battery/ if you want to check that option out further.

But in my case, I wanted the following: 1. Didn't want to have two systems of batteries around to charge and use and wanted to consolidate these tool lines a bit and with the old batteries dead, this was the opportunity. 2. Wanted the increased power and duration of the Ryobi line of lithiums over the original weak B&D nicads. I'm talking about a 2x or more increase in tool performance here, not equal at all to the old. So for me, this was a great option. 3. I believe in being "green" and recycling when I can and this is a way to do that and not waste tools otherwise that are good to use. I think as long as people have batteries that work for a tool line, no reason to try to do this to consolidate but when the batteries are dead AND the tool line is orphaned by the manufacturer, as these older B&D are now, this type of idea could make sense for people so I am sharing how I did mine.

Also, while it took a little time to make the converter, now that I have it, I don't have to spend time again for each tool and I will use this for years! Just pull it out and pop it in the next tool. It is a one time 4 hour cost of time. This is the plus of the converter pack idea. The minus is it makes a little more bulky tool/battery system, but for yard type tools, who cares. For a drill, yes, may not be ideal for tighter spaces if that is how you use your drill.

The other way to do it is mod each tool to directly plug in the other type battery. This makes a compact battery system when done but you have to do each tool. I did that to a C3 florescent light to use the Ryobi battery directly because Ryobi doesn't sell the florescent in the US (they do in Europe and did for Craftsman line). Some C3 are licensed only for Sears use and Ryobi can't sell the exact same in their lineup in the US as a result. That worked well, but again, each tool needs the 3-4 hours with that approach.

Another approach is the cord to battery pack on your body somewhere mentioned above! I don't like this one as much, but you can do this too. This is much easier to wire and get working for your tool but then you have a cord attached to it. For lower amp requirements in a tool, you can also make a corded version out of most cordless tool using a DC wall wart or Laptop DC power supply to the cordless tool and plug it in the house wiring outlets. I did that to an older drill once. That is fine but it becomes a corded tool then. This wouldn't work well for higher amp tools because it is hard to find massive DC power supplys that make high amps. About 5 amps is the practical limit.

I'd really really like to see what others have done to other tools in other tool lines this way! Please post your ideas so I can learn more (and we all can). How do we similarly go from brand X to brand Y? Show us! - Paul
 
Last edited:
To avoid these ads, REGISTER NOW!
OP
P

pauls_workshop

Well-known member
Joined
Mar 7, 2013
Messages
2,788
Location
Indiana, USA - Underappreciated Place to Live!
Doing a little research, I found that Black and Decker has created and canceled far more cordless tool lines than just about anyone else on the planet! They did do one thing interesting though, their more recent 24 v line of tools uses the same sliding pack as the 18 volt sliding one in this thread, but with a couple proud plastic lines on top of the battery to slide it in the tool. This would make it not work with the old 18v line of tools unless you removed those plastic bits with a dremel (easy to do). But you can easily slide the old 18v battery (or my converter) in the 24 volt tool and run it. Now, using the B&D 18 v pack, you would not likely want to do this as it would be very underpowered, but using the Ryobi as I have and 4 amp hour, I'm thinking this would still be a big upgrade. Anyone try the older 18 v packs in the 24 v tool format or anyone try a modded 24 v pack in an older 18v tool and run it overvolted a bit?

Unfortunately, their newer 20v line of tools is a different pack than the older 18 v here. That format would need a different converter pack to make it work. - Paul
 

whyNick?

Well-known member
Joined
Jul 10, 2013
Messages
1,016
Location
Midwest
A clever solution to what is probably a constant problem for most of us, I may try it with a few orphaned tools I have.

I like B&D tools myself, they are decent homeowner-grade tools and can be had cheap, especially if you can find an outlet store. Last weekend I found my first cordless drill in a box in the attic. It's a B&D 9.6v drill that I bought in probably 1997 and it's been in storage for the better part of a decade. Amazingly the battery was still partially charged when I found it and it still works great!
 
OP
P

pauls_workshop

Well-known member
Joined
Mar 7, 2013
Messages
2,788
Location
Indiana, USA - Underappreciated Place to Live!
A clever solution to what is probably a constant problem for most of us, I may try it with a few orphaned tools I have.

I like B&D tools myself, they are decent homeowner-grade tools and can be had cheap, especially if you can find an outlet store. Last weekend I found my first cordless drill in a box in the attic. It's a B&D 9.6v drill that I bought in probably 1997 and it's been in storage for the better part of a decade. Amazingly the battery was still partially charged when I found it and it still works great!

Thanks Nick, yes, this kind of idea I think can help many out there. Major Kudos also to DEWALT (ironically owned by B&D) and Ryobi for keeping their tool lines compatible with with older tools when changing to newer technology. There is simply NO REASON for companies to force non-compatibility between most older and newer tool lines if the voltages are close (like 18 and 20). It is pretty annoying and I've had enough! Let's all rebel! We can overthrow this conspiracy for getting into our wallets every other year! :) - Paul
 

wmartin

Well-known member
Joined
Jun 16, 2011
Messages
1,645
What I'd like would be, say, an 18V Milwaukee transformer that is shaped like a battery but plugs into the wall. I'll bet you could pick up tools for way cheap if they are part of an orphan lineage.
 
OP
P

pauls_workshop

Well-known member
Joined
Mar 7, 2013
Messages
2,788
Location
Indiana, USA - Underappreciated Place to Live!
What I'd like would be, say, an 18V Milwaukee transformer that is shaped like a battery but plugs into the wall. I'll bet you could pick up tools for way cheap if they are part of an orphan lineage.

That's pretty easy to do! You just need an 18 or 20ish voltage laptop power supply (I like Lite On) that puts out at least 4 amps and preferably 5. Easy to wire up the + and - in the tool to a female matching plug that the power supply can then plug into. You do have to have a power supply though because all the cordless tools run on DC only, so gotta convert from wall outlet AC over to DC via a power supply. Easily done! On Ebay, they even sell these already made up for you for Ryobi tools. Might for other brands too. - Paul
 

teal95

Well-known member
Joined
Dec 24, 2013
Messages
584
Location
Grass Lake, MI
Before they closed all of their outlets I used to hit the B&D stores regularly as I pass one in OH and another in PA when I was traveling for work. They would usually have at least one good deal (like when I got a 14.4 drill with 2 batteries for $25). But now I have too many of those batteries that are weak of won't charge at all so I'm in the process of rebuilding the packs. Of the 3 I took apart only one used full size sub-C batteries, the other 2 were 4/5 sub-C with a spacer in the bottom of the pack. So the rebuilds should be significantly better than the old ones.

steve
 

daparrothead

Well-known member
Joined
Dec 21, 2013
Messages
200
Hmmm...I have 5-6 Dewalt 18 volt XRP tools that the battery packs won't recharge any more. I've been wondering about doing something like this myself. Can a Dewalt XRP battery be rebuilt or possibly upgraded to a Li-ion battery ?
 

doan

Well-known member
Joined
Sep 25, 2012
Messages
585
Location
Frisco, TX
Hmmm...I have 5-6 Dewalt 18 volt XRP tools that the battery packs won't recharge any more. I've been wondering about doing something like this myself. Can a Dewalt XRP battery be rebuilt or possibly upgraded to a Li-ion battery ?

Dewalt sells 18v Li-ion batteries. Very expensive but they have them. The Li-ion charger with charge the old nicads but not the other way around.

http://www.amazon.com/DEWALT-DC9180--Volt-Lithium-Ion-Battery/dp/B000YDBPT8/ref=sr_1_1?ie=UTF8&qid=1390144267&sr=8-1&keywords=dewalt+18v+lithium+ion+battery
 
To avoid these ads, REGISTER NOW!
Top Bottom