To avoid these ads, REGISTER NOW!

Chas Parker 975 Vise Restoration

gregthor

Well-known member
Joined
Feb 24, 2010
Messages
267
Location
MICHIGAN
Dear friends at GJ,
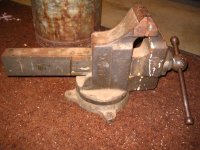
I picked up this Chas Parker 975 last summer. I normally don’t buy vises unless I can see them but I made an exception because I have a soft spot for Chas Parkers. The good – all the parts are there. The bad – I think this vise was the winner in an “ugly vise contest”. It has 6 layers of paint. Both handles are bent. I did a vise restoration thread on a 974 ½ with more detail but in this thread I will just cover stuff unique to this vise. If you need more detail on a parker see that thread.


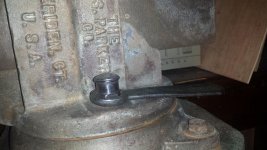
I had to buy a 1 1/2 socket to get the swivel apart.


I got a little worried when I saw these extra parts.


I am feeling better the main screw is in great shape.


The main nut is also in great shape.


The pin was there but was sheared off at the nut.


The main handle is bent. I will fix that later.


The swivel handle is bent. It is a Parker #3 all my other smaller parkers have a #2 swivel handle.


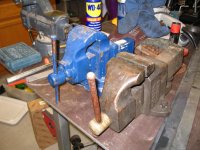
This gives me the chance to us my new toy...I mean..I mean ... my totally useful new tool.


A few tries and it is straight again. Of course you could do this with a vise and hammer but this is more fun.


Perfect like new again.


Now unto the paint issue. My son has the battery charger so no e-tank, the angle grinder was taking forever, the sandblaster was taking forever so I decided to try stripper.


That stripper smells horrible!!!


After a half hour Katie started to sneeze and look at me with those sad puppy dog eyes that said "muuust haaaave air!!!"


So despite the fact it was 17F outside we opened the door and got some freash air. Katie never fails me, when she says we need fresh air, we need fesh air!!!


After the stripper all the parts were scrubbed in the parts cleaner so I don't have my new paint falling off from residual stripper.


Here are all the parts nice and clean.


You will not believe this but Chas Parker used bondo...YES BONDO. This was under 6 layers of paint so it had to be original!! I am scarred for life. I will need vise therapy for months.....If Chas Parker used bondo, then it makes me think that Superman wasn't real ?? Every thing I believed in is compromised.


Well unto the jaws. I put them in my daily vise, a parker with no bondo...and used a wire wheel aligned with the serrattions to clean up the jaws.


This is an example of when it is nice to have a swivel vise on your bench. It helps to get the angle to set up best to wire wheel the jaw with the wire going into the serrations.


After a little work the jaws look good.


I always draw file the burrs off the dynamic jaw so they don't get stuck in the static jaws. See the shiny spot by the pencil point. Thes burrs can cause problems.


Next I grind off any high spot on the bottom of the swivel. If this vise is mounted on a steel bench these high spots can cause problems and in worst cases can cause an ear to break off. See centerpunch pointing at high spot


The jaws are as tight as a .......drum. Sorry I love that scrooge movie with the line "tight as a drum". So I decided not to remove and just clean them up with a flap wheel.


Not too bad, the big divets are still there but overal better than before.


Next step is painting. Stay tuned.
 
To avoid these ads, REGISTER NOW!

oldldh

Well-known member
Joined
May 22, 2012
Messages
3,700
Location
Fairhope, AL
Not too shabby...

If the paint job is up to snuff, I may award you a "Ya dun......

We await with baited breath...
 

fullthrottle24

Well-known member
Joined
Oct 22, 2010
Messages
367
Location
Ohio
Looking good so far. I used to mask off my vise slides also, however, I found using aluminum foil works well and saves time and money on tape. I was curious about the arbor press on the wrench, does it leave marks? I need to straighten my parker handle, but no arbor press(On my wish list). I wondering if my pipe vise and cheater bar might work.
 
OP
G

gregthor

Well-known member
Joined
Feb 24, 2010
Messages
267
Location
MICHIGAN
Full throttle
The arbor press was a bit dramatic actually. You can almost bend those swivel handles with your bare hands. The arbor did not mark it at all. It was pre marked from 75 years of use. Normally I use body shop masking paper to wrap the slide but I couldn't get to it. Foil is a good idea!
Greg
 

laser3kw

Well-known member
Joined
Nov 17, 2012
Messages
7,276
Location
northen IL
You will not believe this but Chas Parker used bondo...YES BONDO.
wait until you strip a Bridgeport for refurb. Not uncommon for old iron to be "smoothed" with filler from the factory. The factory knew aesthetics sell just as much as function.
 

drivesitfar

Well-known member
Joined
Oct 23, 2013
Messages
36,029
Location
Pacific Northwest
very nice pictures with explanations too. Your Parker may not have been the prettiest to start, but you were right the parts are all there in good shape.

Patiently awaiting pictures after you paint and since it's snowing outside your door do you have an oven in the garage or does your bride allow Mr. Parker and his relatives in the house's oven?

I think your dog was related to mine that's been gone for about 5 years now. I might change her to my Avatar because she was a happy puppy for almost 13 years. yours looks like she is a great dog when you are not trying to gas her.

:thumbup::thumbup::thumbup:
 

Attachments

  • 100_0630.jpg
    100_0630.jpg
    144.1 KB · Views: 42
OP
G

gregthor

Well-known member
Joined
Feb 24, 2010
Messages
267
Location
MICHIGAN
laser - Thanks for the heads up on the bondo, A bridgport is on my wanted to buy list.

drivesitfar - no oven, the stripper was done at room temp, 65F when door is shut, a little cooler when garage door is open.
13 years on a golden is great. Katie is 5 but her older brother Axel also a golden is almost 9. I hope he goes to 13.

flash - no decision on color, I like the wilton green, but I don't want Mr. Parker to get mad at me!! The bondo might fall off! I am leaning towards a bronze hammered.
 

454ragtop

Well-known member
Joined
Mar 24, 2008
Messages
5,011
Location
Carver, MA
Looks like a real gem hiding under all that old paint! I've never seen that style swivel lock before, how does it work? Is that short curved piece of iron part of the swivel lock too? Don't know if you have them, but a fwd axle nut socket may have worked for the center bolt, maybe a 36 or 38mm.
Thanks, Jim
 
OP
G

gregthor

Well-known member
Joined
Feb 24, 2010
Messages
267
Location
MICHIGAN
454- about the swivel, think about a drum brake system on a car. The parker swivel is very similar. I will take a picture tomorrow of it with all pieces in place instead of random like now in the picture. That little piece with the angles is attached to the swivel handle, as you tighten the handle it pulls up and wedges against the 2 long pieces to spread tight against the base. Clear as mud?? I will show in a picture later.
Greg
 

ZRX61

Well-known member
Joined
Aug 15, 2006
Messages
28,716
Location
Solar Blight Valley, SoCal
You mentioned you tried the blaster & gave up.... Get some plastic beads for it next time. Strips paint & everything else.. then if it needs it you can swap media & use glassbeads on the parts that will ultimately be polished.
 

Outlawmws

Well-known member
Joined
Aug 9, 2011
Messages
39,258
Location
The Badlands
Looking like another really great restore shaping up! So, are you going to replace the bondo? It DID come from the factory that way! :evil:

Another vote for "Arrest me Red"!
 

melliott28

Well-known member
Joined
Jul 26, 2010
Messages
181
Location
Plano, TX
I was admiring the pictures of the process and just as I got to the paint stripping picture, my wife walked in thought I was looking at some sort of ****** weapon, LOL!

Anyway, impressive work. I'm looking forward to seeing the completed restoration.
 

Outlawmws

Well-known member
Joined
Aug 9, 2011
Messages
39,258
Location
The Badlands
I was admiring the pictures of the process and just as I got to the paint stripping picture, my wife walked in thought I was looking at some sort of ****** weapon, LOL!

Anyway, impressive work. I'm looking forward to seeing the completed restoration.

Yeah, the one shot could be used as some sort of scene in an "Alien" type movie! :lol:
 
OP
G

gregthor

Well-known member
Joined
Feb 24, 2010
Messages
267
Location
MICHIGAN
Hi Guys,
I am in Dallas on business so no work this weekend. Watch out guys in Dallas I will be on CL if I have time.

454 ragtop – below are some pictures of the swivel parts for Chas Parkers

melliot28 – That is hilarious about your wife walking in.. that happens to me too. I can flip thru 25 channels on the TV and the second there is a naked woman on the screen, my wife will walk in and say “what are watching???”

about the “arrest me red”…I did two Columbians in red and posted them a month ago on the vises of garage journal. I liked them but I have a mental block about red. In my very early days of reading the vises of garage journal thread there was a discussion on color and one of my vise mentors Nick (autopts) said something like a big vise should never be painted red!! I just can’t get over that… If I can get a blessing from autopts then maybe arrest me red will work.
Speaking of paint. I actually name several of my vises. I bought a Reed C1 on opening day of deer hunting and got it for a low bid because no one was bidding since in Michigan, where I live, they are all out in the woods hunting. I call that C1 the "deer hunting vise". This Chas Parker will be called the "painted vise". For several reasons, one it had layers of paint when I bought it and now it has layers of primer. My son was painting with 2 part epoxy and had some left over so he shot the vise with about 3 thick coats, I don’t know what it is but paint just goes to this vise!!!
Greg

The parts


The parts as they are when assembled to vise
 

wrenchguy

Well-known member
Joined
Sep 22, 2011
Messages
4,698
Location
NW Indiana
A hint 4 u guys from a ol'furniture stripper. Gob it on as heavy as u can and cover with plastic and try to eliminate all the air u can. leave a day or 2 and it'll melt layers of down to bare metal. i use saran wrap on small pieces and areas.
good luck.
 
To avoid these ads, REGISTER NOW!

ral4

New member
Joined
Sep 4, 2010
Messages
1
Does anyone know where I could purchase the bolt that screws into the wedge? I was taking apart my Chas Parker 824 vise and I broke the bolt in half. The bolt I'm referring to is the one in gregthor's picture shown below with the wrench on the bolt. Are the bolt sizes specific to the vise model or is there a range of models that use the same bolt?

Also, since the threaded half is still stuck in the wedge does anyone have any suggestions on getting it out. I was planning on using an easy-out. What is good to soak it in to loosen it up? Is it best to use a small or large easy-out?

Also would it help to heat the wedge up with a propane torch right before using the easy-out?

Thanks for your help.


100_6605_zps4f7e3fb6.jpg


100_6604_zps40a7e230.jpg
 
Last edited:
OP
G

gregthor

Well-known member
Joined
Feb 24, 2010
Messages
267
Location
MICHIGAN
Dear friends at GJ,
I am baaaack!!!! …….and I am finally going to finish the Chas Parker 975. I had a hell of a run the last 10 months… just after I made the last post for this thread in January my elderly mother passed away and we had an estate to settle, I lost my job, we took on responsibility for my 91 year old father in law(a cool guy, he was a paratrooper in WW2 and has great stories), my wife had major eye surgery and was out of work 8 ½ weeks, I had minor eye surgery…… the list goes on and on but I don’t want to put you all asleep with my boring personal issues. I think you get the idea why this thread just stopped suddenly.

So I went out the barn after all this time and there sitting on the bench was the lonely, dusty Chas Parker 975. I could tell the vise was mad at me. So after apologizing to the vise for abandoning it I promised it I would finish it soon.

So here is the rest of the story of the 975 Chas Parker!


I put a light coat of primer on the internal parts to stop rust even though they never were painted from the factory.
View media item 44513

Next I sprayed cast gray on the swivel handle and nut.
View media item 44514
I let you guys talk me into "arrest me red". I am still unsure how I feel about this color on a big vise. Nick (autopts) what do you think?? And of course the ever present Katie in the background. That dog is never more than 6 feet from me, I think she has a little red over spray on her at the moment.
View media item 44515
Next, it was time for assembly so in went the main nut and pin. I bent the pin to fit nice against the nut so backlash would be minimum
View media item 44516
Now, I polish off any paint and make sure sliding surfaces are smooth to get the vise working like it was on ball bearings.
View media item 44517
The handle needed a little correction so I had to use the 40 ton to straighten it out. I went very slow and a little at a time but got it almost perfectly straight.
View media item 44518View media item 44519
Then I started the lettering.
View media item 44520
That's all for now. I hope to finish it soon.
Greg
 

orchidlane

Well-known member
Joined
Jan 9, 2014
Messages
126
Location
Chandler AZ
Hi, Great job on the vise, I like the raw finish look on vises. but paint is nice too.. someday I have to rebuild mine..
 

Attachments

  • Picture 1543.jpg
    Picture 1543.jpg
    143.4 KB · Views: 80
  • Picture 2370.jpg
    Picture 2370.jpg
    148.9 KB · Views: 77
OP
G

gregthor

Well-known member
Joined
Feb 24, 2010
Messages
267
Location
MICHIGAN
I finished the Chas Parker 975 this weekend!! I paint this part of the swivel base (where I am pointing with the pencil) because on some vises it shows a little. I added never-seize to help it swivel smoothly View media item 44786
Then I lube any two parts that move against one another and all threads.
View media item 44787
I lube where the dynamic jaw slides.
View media item 44788
This is a heavy vise and I don’t want to scratch the paint rolling it over on the bench and trying to get all the swivel parts in place so I put it on two bricks and install swivel nut from the bottom.
View media item 44789View media item 44790
Then I flip it over on a towel to tighten the swivel nut.
View media item 44791
Next I slide the dynamic jaw in and out several times to make sure it is smooth.
View media item 44792
Next is trial and error for shimming out backlash from the spindle. This vise needed .135 inch of shims.
View media item 44793
And at last the finished vise.
View media item 44794
A front shot.
View media item 44795
another side shot.
View media item 44796
Jaws look ready for action.
View media item 44798
It stands tall at 12 inches.
View media item 44799
I have to admit the arrest me red is growing on me!!
View media item 44800
 
OP
G

gregthor

Well-known member
Joined
Feb 24, 2010
Messages
267
Location
MICHIGAN
KershawMan - I get the shims at hardware stores. They are usually in one of those plastic trays that slide out in the fastener section. Often they are called "machine bushings". I have collected several over the years from several stores to get different sizes and thicknesses. Sometimes they are near the tractor plow section of farm supply sections also.

onemore & jeepinerdeep - Thanks for the kind words.
 

KershawMan

Active member
Joined
Aug 16, 2011
Messages
38
Thanks for the tip. I found the bushings (shims as I previously called them) right where you said I would. Ready to move forward again on my restoration of a Parker 954 1/2. I plan on painting it right after the holidays.
 

Mr_P

Well-known member
Joined
May 29, 2015
Messages
557
Location
Tinley Park, IL
Greg, I have the same vise, and have slowly been chipping away at where I can. Just a couple of days ago, I tried my skills at Polishing....

attachment.php


I hope to, one day, be as good as Bagged. :lol:
 

Attachments

  • 20151122_230135.jpg
    20151122_230135.jpg
    148.2 KB · Views: 481
Last edited:

JeeperAz

Well-known member
Joined
Jun 23, 2005
Messages
80
Location
SoCal
Thanks for posting the resto pics. They'll help me. I just found my first vintage vise today.... a Chas Parker 974. It was at an 'farm' estate sale. They didn't have it out for sale but I knew there had to be one on the premises so I asked and one of the guys said "I think there may be an old vise back there. Follow me". Bingo!
 

Exmachanica

Member
Joined
Apr 9, 2016
Messages
7
Great Work! I know this is an old thread but I would like to know about the 975's nut. I looked at a CP 975 today and it looked OK except the nut was sooo loose in the dovetail that I could move it side to side, a lot of play., like it was too small or the dovetail metal was corroded away. Is this normal for the 975 nut to have that much play?
 

Outlawmws

Well-known member
Joined
Aug 9, 2011
Messages
39,258
Location
The Badlands
Some float is OK as it lets the nut self center on the main screw and minimizes wear. Front to back isn't good an it adds to the back lash when reversing the screw's direction, but that is easily adjusted.
 
To avoid these ads, REGISTER NOW!
Top Bottom