paulsomlo
Well-known member
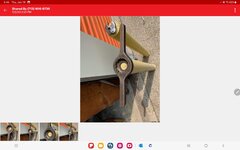
Back in January, I started a rebuild thread on this jack, a $20 CL purchase:
View media item 98844
The original thread was a bit scant on info, a bit scattered, and basically never went anywhere:
(http://www.garagejournal.com/forum/showthread.php?t=232242&highlight=blackhawk).
There have been many excellent rebuild threads here on GJ and the SJ-2 hydraulics are very basic, so I'll focus on the pieces of the rebuild that I think may prove interesting, knowing that some of this may only appeal to floor jack "junkies".
After purchasing a seal kit locally, the jack was still leaking down roughly 1/4" every two hours or so, and leaking from the tank nut oring, as well. After tearing the jack apart twice, I decided I'd had enough of the leather piston cup. Now, I'm not condemning leather, as I've found out there are many reasons that it makes an excellent material for a piston cup, even in light of more modern materials, but I wasn't about to buy another $30 kit, and I didn't know if I could buy a single cup. At this point, I had basically lost faith. So, I set out to make an adapter to allow the use of a loaded polyurethane ucup, essentially an off the shelf item, costing about three dollars and change. Here's the original piston rod, very typical, with a 1/2-20 threaded stud to secure the original piston cup, which had completely disintegrated:
View media item 98845
Here's the solution that I came up with, turned from mild steel on the lathe, with wrench flats for installation:
View media item 98846Here's the rod, having taken a skim cut to clean up the surface that the adapter mates with:
View media item 98847
And here's the adapter on the rod, with some anaerobic gasket maker applied to both the threads and the mating surface on the rod, to eliminate leaking around the adapter:
View media item 98848
Finally, here's the rod with both adapter and loaded ucup, secured with a snap ring:
View media item 98849
I tested the jack, lifting both front wheels of my vehicle off the ground just an inch or so, figuring, that from a leverage standpoint, this was the most challenging condition for the hydraulics. After 12 hours, the leak down was roughly 1/32", as measured by a yard stick leaning up against my front bumper, or about the width of one of the "tick" marks on the ruler - certainly good enough, considering that, other than tire changes, I never work without jack stands.
Now, the assumption was that when the leak down problem was fixed, the leak from the tank nut oring would go away - didn't happen. And I had replaced the original tank nut oring with a quad ring, hoping for better results. But now, every time I lifted the vehicle, a puddle formed almost immediately, with the rod dripping wet. So, I pulled the hydraulics apart again and examined the tank nut, which had a fair amount of wear, due to the rod rubbing against it. In fact, there was so much wear, that I thought the oring groove had been machined off center, as the oring appeared to be protruding from the slot far more on one side than the other. I've now got the hydraulics apart for the third time and I was intent on not making it a fourth. So, on to the tank nut.
Here's the tank nut fixtured on the lathe, using a galvanized pipe ****** from the big box store, both ends cut off, one end rethreaded on the lathe to match the tank nut:
View media item 98850
Here's the nut being bored to eliminate the wear:
View media item 98851
I ended up opening the diameter by 0.028" to get past all the wear and get back to concentricity. At this point, I had to walk away and come up with a viable design to reclaim the tank nut. Now, when I started this ordeal back in January, I didn't even have a basic understanding of how a floor jack worked, so every step included lots of "research", which included a read of the Parker Oring Handbook (http://www.parker.com/literature/ORD%205700%20Parker_O-Ring_Handbook.pdf), everything you wanted to know about orings and more.
I chose a design that included two pieces, an inner part and an outer part. The advantage to this approach was that I didn't have to machine an internal groove for the new tank nut oring and the two pieces allow removal of the rod without removing the tank nut, which was a consideration, after having taken apart the hydraulics three or four times now.
Here's the nut, after machining:
View media item 98852
Here are the two "adapters", again, turned from mild steel (12L14). These will bring back the nut bore to the rod diameter:
View media item 98853
The threads are 36 tpi, to ensure adequate thread engagement over the 0.25" span that I had available for threads.
The inner adapter sits against the shoulder formed by the old oring slot and is a slip fit in the new nut bore, just 0.001" over, to ensure concentricity.
View media item 98854
Here's the outer adapter, fitted with the quad ring on it's ID, which will seal the rod and an oring on its OD, which will seal the adapter to the tank nut bore:
View media item 98855
I used an oring "calculator" from Apple Rubber to help in sizing the orings: http://www.applerubber.com/oring-gland-calculator/
Here are the adapters installed in the nut:
View media item 98856
And with the hydraulic unit back together again:
View media item 98857
The dimple in the face of the outer adapter is from a 3/32" drill bit, which will allow removal of the adapters for seal replacement, using the same size drill bit as a sort of bastardized face spanner.
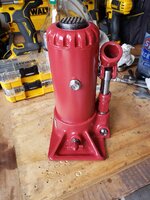
So, how did the story end? The rod is bone dry now, no more leaks, no more leak down, a jack that works the way it's supposed to. I still need a set of casters, as at some point the present ones were overloaded, bending the frames such that they hit the jack's sideplates when they swivel. And yes, I put a ridiculous amount of effort into saving an old jack whose best days had come and gone, but it was never about just getting a working floor jack. A few mouse clicks, $350, and five days later, I could have had a shiny new Hein Werner sitting on my doorstep, and lived happily ever after. Behind the scenes, were many PMs with both Edgar and Hiball, whose posts here, along with other members, inspired me to save this old beast, and learn everything I could in the process.
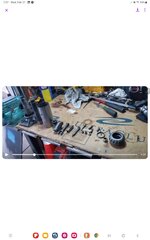
In addition to what I've shown here, although I won't go into detail, I did fill the "rash" on the piston rod with JB Weld, regrind the seats with valve grinding compound and shopmade tools, and make a vented plug for the tank. I modified my original method of removing the tank nut slightly to make it more convenient, using a steel bar, some magnets, and two pieces of 1/4" round steel. I know you guys are fond of pictures:
View media item 98858
View media item 98859
View media item 98860
View media item 98861
View media item 98844
The original thread was a bit scant on info, a bit scattered, and basically never went anywhere:
(http://www.garagejournal.com/forum/showthread.php?t=232242&highlight=blackhawk).
There have been many excellent rebuild threads here on GJ and the SJ-2 hydraulics are very basic, so I'll focus on the pieces of the rebuild that I think may prove interesting, knowing that some of this may only appeal to floor jack "junkies".
After purchasing a seal kit locally, the jack was still leaking down roughly 1/4" every two hours or so, and leaking from the tank nut oring, as well. After tearing the jack apart twice, I decided I'd had enough of the leather piston cup. Now, I'm not condemning leather, as I've found out there are many reasons that it makes an excellent material for a piston cup, even in light of more modern materials, but I wasn't about to buy another $30 kit, and I didn't know if I could buy a single cup. At this point, I had basically lost faith. So, I set out to make an adapter to allow the use of a loaded polyurethane ucup, essentially an off the shelf item, costing about three dollars and change. Here's the original piston rod, very typical, with a 1/2-20 threaded stud to secure the original piston cup, which had completely disintegrated:
View media item 98845
Here's the solution that I came up with, turned from mild steel on the lathe, with wrench flats for installation:
View media item 98846Here's the rod, having taken a skim cut to clean up the surface that the adapter mates with:
View media item 98847
And here's the adapter on the rod, with some anaerobic gasket maker applied to both the threads and the mating surface on the rod, to eliminate leaking around the adapter:
View media item 98848
Finally, here's the rod with both adapter and loaded ucup, secured with a snap ring:
View media item 98849
I tested the jack, lifting both front wheels of my vehicle off the ground just an inch or so, figuring, that from a leverage standpoint, this was the most challenging condition for the hydraulics. After 12 hours, the leak down was roughly 1/32", as measured by a yard stick leaning up against my front bumper, or about the width of one of the "tick" marks on the ruler - certainly good enough, considering that, other than tire changes, I never work without jack stands.
Now, the assumption was that when the leak down problem was fixed, the leak from the tank nut oring would go away - didn't happen. And I had replaced the original tank nut oring with a quad ring, hoping for better results. But now, every time I lifted the vehicle, a puddle formed almost immediately, with the rod dripping wet. So, I pulled the hydraulics apart again and examined the tank nut, which had a fair amount of wear, due to the rod rubbing against it. In fact, there was so much wear, that I thought the oring groove had been machined off center, as the oring appeared to be protruding from the slot far more on one side than the other. I've now got the hydraulics apart for the third time and I was intent on not making it a fourth. So, on to the tank nut.
Here's the tank nut fixtured on the lathe, using a galvanized pipe ****** from the big box store, both ends cut off, one end rethreaded on the lathe to match the tank nut:
View media item 98850
Here's the nut being bored to eliminate the wear:
View media item 98851
I ended up opening the diameter by 0.028" to get past all the wear and get back to concentricity. At this point, I had to walk away and come up with a viable design to reclaim the tank nut. Now, when I started this ordeal back in January, I didn't even have a basic understanding of how a floor jack worked, so every step included lots of "research", which included a read of the Parker Oring Handbook (http://www.parker.com/literature/ORD%205700%20Parker_O-Ring_Handbook.pdf), everything you wanted to know about orings and more.
I chose a design that included two pieces, an inner part and an outer part. The advantage to this approach was that I didn't have to machine an internal groove for the new tank nut oring and the two pieces allow removal of the rod without removing the tank nut, which was a consideration, after having taken apart the hydraulics three or four times now.
Here's the nut, after machining:
View media item 98852
Here are the two "adapters", again, turned from mild steel (12L14). These will bring back the nut bore to the rod diameter:
View media item 98853
The threads are 36 tpi, to ensure adequate thread engagement over the 0.25" span that I had available for threads.
The inner adapter sits against the shoulder formed by the old oring slot and is a slip fit in the new nut bore, just 0.001" over, to ensure concentricity.
View media item 98854
Here's the outer adapter, fitted with the quad ring on it's ID, which will seal the rod and an oring on its OD, which will seal the adapter to the tank nut bore:
View media item 98855
I used an oring "calculator" from Apple Rubber to help in sizing the orings: http://www.applerubber.com/oring-gland-calculator/
Here are the adapters installed in the nut:
View media item 98856
And with the hydraulic unit back together again:
View media item 98857
The dimple in the face of the outer adapter is from a 3/32" drill bit, which will allow removal of the adapters for seal replacement, using the same size drill bit as a sort of bastardized face spanner.
So, how did the story end? The rod is bone dry now, no more leaks, no more leak down, a jack that works the way it's supposed to. I still need a set of casters, as at some point the present ones were overloaded, bending the frames such that they hit the jack's sideplates when they swivel. And yes, I put a ridiculous amount of effort into saving an old jack whose best days had come and gone, but it was never about just getting a working floor jack. A few mouse clicks, $350, and five days later, I could have had a shiny new Hein Werner sitting on my doorstep, and lived happily ever after. Behind the scenes, were many PMs with both Edgar and Hiball, whose posts here, along with other members, inspired me to save this old beast, and learn everything I could in the process.
In addition to what I've shown here, although I won't go into detail, I did fill the "rash" on the piston rod with JB Weld, regrind the seats with valve grinding compound and shopmade tools, and make a vented plug for the tank. I modified my original method of removing the tank nut slightly to make it more convenient, using a steel bar, some magnets, and two pieces of 1/4" round steel. I know you guys are fond of pictures:
View media item 98858
View media item 98859
View media item 98860
View media item 98861
Last edited:
")