To avoid these ads, REGISTER NOW!

1950s craftsman belt/disc sander, need part

FlyingLow

Well-known member
Joined
Mar 10, 2014
Messages
127
Location
Vancouver Island
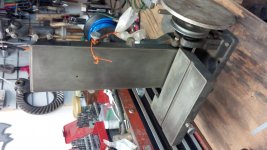
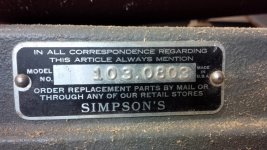
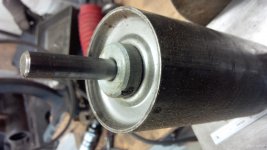
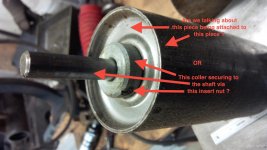
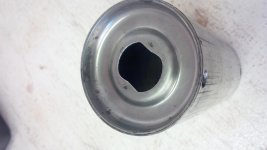
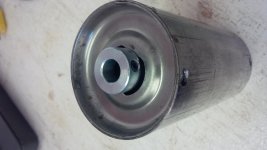
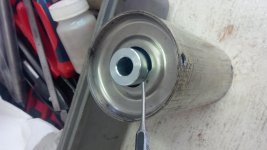
So dad picked up this belt sander from a neighbor, from what I've found with google it was sold by sears in the 50s. It has a 6" wide belt. However it needs an idler pulluy p/n 19030 which comes up unavailable from sears, no surprise. The problem with the pulley (more of a roller or drum if you ask me) is the part that is crimped in the middle to attach to the shaft has come loose on both ends, the worse one has about 0.040 of radial play. I have been wondering if a part off a more modern sander might work?

Its a pretty cool old sander and the bed can be rotated up to 90 degrees and the bed can be taken off the disc side and put at the end of the belt. I would really like to get it running and appreciate any help. Pictures coming, sorry if they end up sideways.
 
Last edited:
To avoid these ads, REGISTER NOW!
OP
F

FlyingLow

Well-known member
Joined
Mar 10, 2014
Messages
127
Location
Vancouver Island
Pics
 

Attachments

  • IMG_20140410_231631.jpg
    IMG_20140410_231631.jpg
    146.5 KB · Views: 151
  • IMG_20140410_232204.jpg
    IMG_20140410_232204.jpg
    144.6 KB · Views: 123
  • IMG_20140410_231358.jpg
    IMG_20140410_231358.jpg
    142.7 KB · Views: 140
  • IMG_20140410_230833.jpg
    IMG_20140410_230833.jpg
    152.2 KB · Views: 105
  • IMG_20140410_231748.jpg
    IMG_20140410_231748.jpg
    140.6 KB · Views: 120

jakemac

Well-known member
Joined
May 21, 2013
Messages
9,035
Location
New England
Can it be (carefully) spot welded back in place ?

or

Perhaps you can take it out, lightly "tune" the drum with a hammer to get a better pressure fit on the collar, and press it back in place ?


I agree with Taildragger, nice find.

I have the #103.08011 4x36 model, and love it. The owners manual for your model can be found on the OWWM website.
 
Last edited:
OP
F

FlyingLow

Well-known member
Joined
Mar 10, 2014
Messages
127
Location
Vancouver Island
Nice find! I have been looking for a non-Chinese belt sander, and they don't seem to come up on CL around here.

Can it be (carefully) spot welded back in place ?

or

Perhaps you can take it out, lightly "tune" the drum with a hammer to get a better pressure fit on the collar, and press it back in place ?


I agree with Taildragger, nice find.

I have the #103.08011 4x36 model, and love it. The owners manual for your model can be found on the OWWM website.

Thanks guys, the piece that secures the shaft is not steel, more like pot metal and i don't know if i can get it centered even if I can weld it.

Jakemac i assume you mean take the shaft out and tap on one end at a time?
 

4xdog

Well-known member
Joined
Aug 18, 2012
Messages
5,595
Location
Santa Fe, NM
I'm not sure I completely followed the original post, but it sounds like the issue is how to get a stable idler pulley?

Looks like pretty standard machinery. That sounds like something a machine shop -- or a lot of guys on here -- should be ale to take caremof a number of ways. Bushings? Bearings? A new pulley and shaft assembly?

Nice lookin' sander. I could find a home for one like that...
 

jakemac

Well-known member
Joined
May 21, 2013
Messages
9,035
Location
New England
I've noted the picture of the pulley (drum). Could you clarify which parts we're talking about ?
 

Attachments

  • 2.jpg
    2.jpg
    138.9 KB · Views: 85
OP
F

FlyingLow

Well-known member
Joined
Mar 10, 2014
Messages
127
Location
Vancouver Island
I've noted the picture of the pulley (drum). Could you clarify which parts we're talking about ?

It's the collar securing to the drum that is the problem, the shaft is secured to the collar by the screw you pointed out. I hope that's clear. Thanks.
 
OP
F

FlyingLow

Well-known member
Joined
Mar 10, 2014
Messages
127
Location
Vancouver Island
I'm not sure I completely followed the original post, but it sounds like the issue is how to get a stable idler pulley?

Looks like pretty standard machinery. That sounds like something a machine shop -- or a lot of guys on here -- should be ale to take caremof a number of ways. Bushings? Bearings? A new pulley and shaft assembly?

Nice lookin' sander. I could find a home for one like that...

The collars on the ends of the drum have come loose, sorry for the confusion.

How about using silver solder to stick them back together?

Bob

I could but I don't think I could get the shaft centered in the drum with that. I'd like to find a modern replacement part for it.
 

Outlawmws

Well-known member
Joined
Aug 9, 2011
Messages
39,080
Location
The Badlands
I'm still not getting it.

The collar (the one with the set screw?) is lose from the pressed on hub of drum?

Or the Hub of the drum has separate from the drum sleeve?

If the latter (pressed in?) I'd epoxy it with something like JB weld

If the former, those don't look like they are supposed to be attached?

Please clarify.
 
Last edited:

2oolhound

Well-known member
Joined
Dec 18, 2010
Messages
5,918
Location
BC Canada
My take is the pressed metal end that is spot welded into the end of the drum is wore out where it contacts the shaft. Even though the contour on the pressed metal should centre itself on the collar I could see this being a problem when there is a load on it. The collar merely locates the drum along the shaft. You could use a piece of pipe as a sleeve to make the shaft wider and carefully open up the centre of the pressed metal end to fit tight on the sleeve. This sleeve would only be as long as the drum and would fit between the collars.
OR:
Find some large heavy washers that fit the shaft and weld into the end of a piece of tubing.
 
OP
F

FlyingLow

Well-known member
Joined
Mar 10, 2014
Messages
127
Location
Vancouver Island
I'm still not getting it.

The collar (the one with the set screw?) is lose from the pressed on hub of drum?

Or the Hub of the drum has separate from the drum sleeve?

If the latter (pressed in?) I'd epoxy it with something like JB weld

If the former, those don't look like they are supposed to be attached?

Please clarify.

The collar with the set screw is loose in the hub of the drum (both ends actually).
 
OP
F

FlyingLow

Well-known member
Joined
Mar 10, 2014
Messages
127
Location
Vancouver Island
Maybe i should cut out the spot welds and take the hubs out... Then i might be able to do something from the inside. I'll look at again tonight.
 

Outlawmws

Well-known member
Joined
Aug 9, 2011
Messages
39,080
Location
The Badlands
Correct me if I'm wrong, but this is the idler drum right? so those collars with the setscrews have bearings inside to the hub right? The shaft is an axle and does not spin in outboard bearings?

if so they are supposed to be loose? :dunno:
 
To avoid these ads, REGISTER NOW!
OP
F

FlyingLow

Well-known member
Joined
Mar 10, 2014
Messages
127
Location
Vancouver Island
Correct me if I'm wrong, but this is the idler drum right? so those collars with the setscrews have bearings inside to the hub right? The shaft is an axle and does not spin in outboard bearings?

if so they are supposed to be loose? :dunno:

No it has oiled bearings that hold the shaft. I'll post a picture
 

4xdog

Well-known member
Joined
Aug 18, 2012
Messages
5,595
Location
Santa Fe, NM
I give up. Sorry, but I just can't visualize the problem with the pulley. I can't tell if it's an end float problem or a out-of-round problem or something else.
 
OP
F

FlyingLow

Well-known member
Joined
Mar 10, 2014
Messages
127
Location
Vancouver Island
I give up. Sorry, but I just can't visualize the problem with the pulley. I can't tell if it's an end float problem or a out-of-round problem or something else.

Sorry, the collar is supposed to be fixed to the pulley and the screw secures the shaft to the collar. It has become loose and spins back and forth a bit, also has some radial play. I thought someone on here may have encountered the same problem and had some insight or a line on a replacement part.
 
OP
F

FlyingLow

Well-known member
Joined
Mar 10, 2014
Messages
127
Location
Vancouver Island
Why not loosen the set screws and remove the collars?

The set screws secure it to the shaft.

I came out to the garage tonight, had a beverage and decided I couldn't mess up a messed up part. Drilled the spot welds out and this is the inside. I hope the pictures show what I'm talking about. They are all the same end but with the play at both extremes of rotation. I hope it's clear now but I think I'm faced with having ends machined.
 

Attachments

  • IMG_20140412_234948.jpg
    IMG_20140412_234948.jpg
    145.9 KB · Views: 50
  • IMG_20140412_234331.jpg
    IMG_20140412_234331.jpg
    142 KB · Views: 47
  • IMG_20140412_234313.jpg
    IMG_20140412_234313.jpg
    141.9 KB · Views: 44
  • IMG_20140412_234307.jpg
    IMG_20140412_234307.jpg
    141.8 KB · Views: 47

lilredex

Well-known member
Joined
Apr 29, 2006
Messages
5,944
Location
Toronto
Looks like a simple enough fix......put it all back together with steel collars (if those are not), Squeeze it tightly and roll it (the axle) across some parallel rails to get everything centered....then weld up as an assembly. You can get it centered close enough by tapping the cylinder as it rolls along the rails.

That would be my fix, you could spot things to try it, before you do the final welds.
 

jakemac

Well-known member
Joined
May 21, 2013
Messages
9,035
Location
New England
The set screws secure it to the shaft.

I came out to the garage tonight, had a beverage and decided I couldn't mess up a messed up part. Drilled the spot welds out and this is the inside. I hope the pictures show what I'm talking about. They are all the same end but with the play at both extremes of rotation. I hope it's clear now but I think I'm faced with having ends machined.

Ahhhhhhhhhhhh, now I get it.

I think lilredex is right.
Get it back into position, pein it tight, then lightly tack weld it in place on the inside before putting it back together. You'll have her up and running again in no time. :thumbup:
 
OP
F

FlyingLow

Well-known member
Joined
Mar 10, 2014
Messages
127
Location
Vancouver Island
Ahhhhhhhhhhhh, now I get it.

I think lilredex is right.
Get it back into position, pein it tight, then lightly tack weld it in place on the inside before putting it back together. You'll have her up and running again in no time. :thumbup:

That would have been done already but the "collars" aren't steel and there isn't much left to pean over. I might be able weld beside it though... Just something to take the load. I'll look some more tonight.
 

jakemac

Well-known member
Joined
May 21, 2013
Messages
9,035
Location
New England
Even if they aren't steel, it looks like there is enough of a lip left to gently tighten them with a hammer. Even pot metal can be moved slightly without breaking if you take your time and be patient with it. You just need a light touch.

I hope it works. Otherwise, your only options may be to machine a whole new drum. Or wait until you can find a donor sander. The question becomes, is it worth it to you.
 

lilredex

Well-known member
Joined
Apr 29, 2006
Messages
5,944
Location
Toronto
Was talking about knocking out those flanged (aluminum) collars, then pushing steel collars against that end cap....then you can weld as above.
 

nine4gmc

Well-known member
Joined
Mar 24, 2012
Messages
14,357
Location
Dallas
I'll be tearing in to mine soon and I'll see if there is anything I can think of.
 
OP
F

FlyingLow

Well-known member
Joined
Mar 10, 2014
Messages
127
Location
Vancouver Island
Well I've been busy with putting an addition on the house but now it's slowing down and I got some motivation from nine4gmc's thread. I picked up some 1/2" collars from the bearing supplier but I didn't get a chance to do much at home so I brought them to work to look at. My main issue is that the OD of the collar is smaller than the area I have to weld to. Pictures will hopefully explain clearly. I really wish I had a decent welder to use at work...
 

Attachments

  • IMG_20151002_132955.jpg
    IMG_20151002_132955.jpg
    133.7 KB · Views: 26
  • IMG_20151002_132928.jpg
    IMG_20151002_132928.jpg
    138.3 KB · Views: 25
  • IMG_20151002_133042.jpg
    IMG_20151002_133042.jpg
    137.9 KB · Views: 28
To avoid these ads, REGISTER NOW!
Top Bottom