To avoid these ads, REGISTER NOW!

Tool box restoration and semi tubular rivets

FJ 432

Well-known member
Joined
Aug 2, 2010
Messages
3,740
Location
Littleton Colorado
Forgive if this is a re post from someone else.

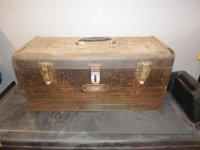
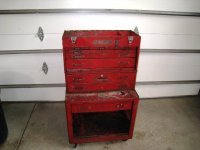
I purchased this three piece Snap On chest this past week for $100. I can't resist 1930-1940's era boxes priced this low and I knew this set had some serious issues, first and for most the lid ripped off of the K55.

I'm not sure what I will do with these (sell or cannibalize) but I wanted to share a topic that comes up from time to time.

Pop rivets have many uses but they fall short for many because their appearance doesn't duplicate what was used in the construction back in the day. Manufacturers used semi tubular rivets.

I wanted to share a couple of options.
 

Attachments

  • K55 chest.jpg
    K55 chest.jpg
    40.8 KB · Views: 477
To avoid these ads, REGISTER NOW!
OP
F

FJ 432

Well-known member
Joined
Aug 2, 2010
Messages
3,740
Location
Littleton Colorado
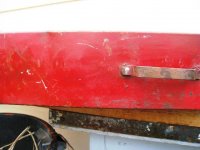
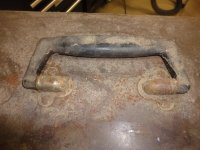
One of the handles on the bottom box had the spot weld fail and one side of the handle needed to be re attached. I figured this was a good situation to use my clincher being that the drawer slides were destroyed and couldn't be used.

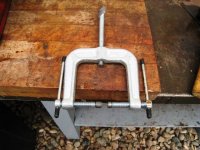
I bought the semi tubular rivet clincher (clamp looking) from a guy off of ebay who uses this to restore Tonka trucks. The rivet I used was 1/8" with a reach of 1/4". I drilled out a hole and used this tool to produce the results below. Worked very well.

The only issue with this tool is the "reach" that it has to be able to clamp on something. It works for latches and handles close to the edge but try to imagine using this to rivet the top handle for a carry box. Ain't going to work.

The other option is a traditional clincher that looks like a aluminum rod with a special end that you tap this rod on the back end while placing support pressure to the pretty end. I haven't tried this tool yet. I will report back on my efforts.
 

Attachments

  • clincher.jpg
    clincher.jpg
    62.5 KB · Views: 419
  • clincher2.jpg
    clincher2.jpg
    68.4 KB · Views: 366
  • clincher3.jpg
    clincher3.jpg
    62 KB · Views: 384
  • semi1.jpg
    semi1.jpg
    44.3 KB · Views: 413
  • semi2.jpg
    semi2.jpg
    42.1 KB · Views: 2,082

Kevin54

MEMBER EMERITUS
Joined
Jan 12, 2005
Messages
29,341
Location
Urbana, Ohio
If you can't get things to work out in your favor, let me know and I can make you a punch and seat for the rivets. I've literally made quite a few thousand over the years.
 

Kevin54

MEMBER EMERITUS
Joined
Jan 12, 2005
Messages
29,341
Location
Urbana, Ohio
Semi tubular rivets are most commonly called "drilled rivets" in which the name comes from the hole in one end. The head of a standard rivet and the head of a drilled rivet are drastically different. On your standard solid "universal rivet" the head actually has a very small flat to it, then an odd radius out from each side of the flat. A lot of people will use a ballnose endmill to make a seat for the Universal rivet, which at time works, but is not correct.

For a Universal Rivet with sizes of 1/16", 3/32", 1/8" and 3/16"....they take an 1/8", 3/16" 1/4", and a 3/8" special ground cutter and the depths are .027, .040, .054, and .080 deep. This gives the rived heat a proper seat to set in to where it will not distort the head, or leave a ring around the head when bucking the rivet. When a standard ballnose endmill is used, if you hold the depth, then you lose the diameter. If you hold the diameter, you lose the depth. Both depth and diameter are critical to one another as far as aesthetics, and also function. For example if the rivet seat is too deep, and you have a series of rivets to do, you will either deform the part trying to get the rivet tight, or the two pieces that you are riveting together will not be tight and could possibly cause problems if it is a critical part being riveted together.

Now for the "semi tubular", or "drilled rivet", the head is actually a full radius. To make a proper seat for the rivet, you have to know both the head diameter and the head depth, then figure out what the proper radius is for those two figures. You can either do that by using your math functions that you learned back in school for figuring out the diameter for the segment of a circle. Or take the easy way out and use a cad program to figure the radius for you. But the drilled rivet IS a full radius unlike a solid rivet, so all you need to know is the radius you need, find the proper ballnose endmill, and go only as deep as the rivet head specifications.

Take for example a drilled rivet/semi tubular rivet from Hanson Rivets with the following specifications:

Semi-Tubular Rivet, Oval Head Type, Steel Rivet Material, Zinc Finish, Rivet Dia 1/16 In, Rivet Length 1/8 In, Head Dia 0.109 In, Head Height 0.017 In, Grip Range 0.074 to 0.104 In, Hole Size 0.064 In, Package Quantity 100

Notice that the head diameter is .109, and the height of the head is .017. In laying it out you have to use both thew diameter of the head, and the height of the rivet as shown in the pic below to figure your radius. You end up with a .096 radius. Which multiplied by two, to get your diameter, you end up with a .192 diameter, which ideally would be your cutter diameter. Since you can't buy a cutter that size off of the shelf, and most endmills come in fractional sizes, your next closet size is .187, or 3/16" diameter, or if you can find a 13/64" or .203, you could use that. one is .005 undersize, and the other is .011 oversize, so going with the ballnose endmill slightly undersize will work with taking into consideration the tolerances of your rivet head.

So using a 3/16" diameter ballnose, you want to touch off of your tool that you are going to cut a rivet seat into and go down .017 maximum depth. Any more than that and you may end up with a loose rivet job. You could go .001/.002 less on the depth to insure that when you roll the rivet over that both pieces are tight together.

Hopefully that explains things a little bit. If anyone is interested, you can normally find rivet specs from the manufacturer, or sign up to a place like IHS GlobalSpec and find a lot of specifications. Most of your rivets are all made to the same specifications. When i was working, i had a huge notebook that i kept all of my "Standards" drawings, "rivet specs", "clinch nut specs", and so on. A lot of things that you see daily and take for granted, just like rivets.....there really is an art to all of it.

attachment.php
 

Attachments

  • rivet.jpg
    rivet.jpg
    51.1 KB · Views: 1,981

Kevin54

MEMBER EMERITUS
Joined
Jan 12, 2005
Messages
29,341
Location
Urbana, Ohio
I did notice that the rivet in the pic below has a split in it. The reason for the split is that your punch has too large of a pilot on the nose of it, plus your drilled portion of your rivet looks to be above the surface of the two pieces of metal. Ideally, you want the open end of the rivet to roll over and not so much flare out. When the tool is made properly, the rivet should roll over like an eyelet in a shoe with no splits. Like I said, it's an art when it comes to what seems so simple. But for the most part, if you have someone to help you hold things, you can use a simple post with a seat, and a punch that you can hit with a hammer. I wish I still had some pages out of my notebook to post up. I may ask the guy I gave them to, to run me off some copies and i can scan them onto here for the ones that want to make their own tooling.

attachment.php
 

JTH

Well-known member
Joined
May 4, 2012
Messages
167
Location
MO Ozarks
Kevin, it's amazing to me not only your ability to machine all of the things you have but to remember all of it. JT
 

Kevin54

MEMBER EMERITUS
Joined
Jan 12, 2005
Messages
29,341
Location
Urbana, Ohio
I did a little bit of searching for Universal Head Rivets to explain a little better as to what I was talking about when I said that they are not a full radius like a semi tubular rivet. I found a couple good pics and a chart that shows the radius and the flat. This is the common configuration of all Universal Head Rivets, and not to be confused with Round Head rivets which have a true centerline full radius.

THe first few pics show the Universal Head. The last few pics were just some other charts I ran across showing problems with some of the riveting.

SolidR11.gif


SOLID%2070-2%20GOLD%20ALUM.jpg


11138211.jpg


image012.jpg


220px-Strivet333.JPG


rivet_universal.gif


rivet_countersink.gif
 

Kevin54

MEMBER EMERITUS
Joined
Jan 12, 2005
Messages
29,341
Location
Urbana, Ohio
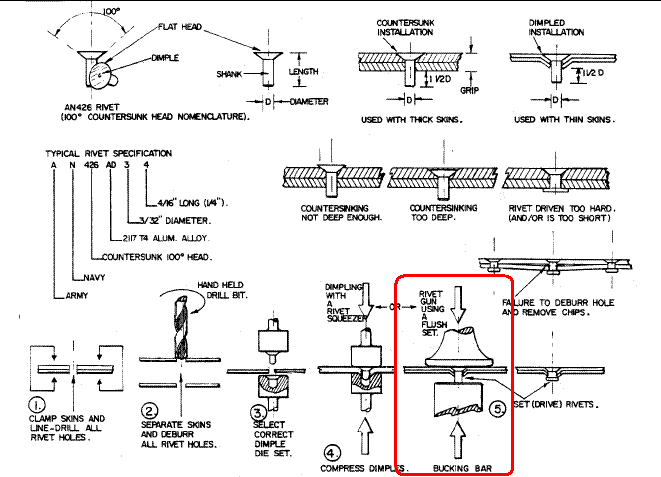
Here is a good chart showing improper tooling and some of the problems that can occur because of it. Although the pic of the "Correct way" as far as bucking the rivet, and the rivet seat itself......That is good for general riveting, but with aerospace riveting, the head shall not be deformed from the actual head shape. We had MIL Specs that we had to go by, and one of them was Specification 5S, which was a dozen or so pages that we had to know. One that sticks in my mind is tubular rivets or eyelets. Per MIL Spec, you are permitted 3 cracks in the rolled portion as long as the cracks are not into the barrel of the rolled portion.

6219006654_7c96ceab57_b.jpg
 
Last edited:

Kevin54

MEMBER EMERITUS
Joined
Jan 12, 2005
Messages
29,341
Location
Urbana, Ohio
If I get some time, I'll locate some proper drawings and specs for Clinch nuts. Even those has some close specifications, and also need proper tooling to insert them into panels. A lot of times clinch nut are handy for home use if you are planning on using screws to put a couple of panels together. The pic shows what a clinch nut is and a lot of them are made by PEM, and you may have also hear of them being called Pem-serts.

pem-pem-self-clinching-nuts-250x250.jpg
 

jgschroeder99

Well-known member
Joined
Aug 12, 2012
Messages
92
Location
NW Ohio
If you can't get things to work out in your favor, let me know and I can make you a punch and seat for the rivets. I've literally made quite a few thousand over the years.

Kevin,

Do you know of an affordable rivet press that you would recommend? I'm in the process of restoring a Craftsman 6512 toolbox.
 

Kevin54

MEMBER EMERITUS
Joined
Jan 12, 2005
Messages
29,341
Location
Urbana, Ohio
JG......you really don't need a press. A good punch, a good seat, and a good C-clamp will do what you need. We had one department that they called the "whack-n-slap" department because all of the riveting was done with a hammer and punch.

If you need a punch and seat, let me know and I can hook you up. It doesn't take very long to make tooling for a rivet. Send me a pic of the box and where you have to rivet at, and let me know what size of rivets you would be using.
 
To avoid these ads, REGISTER NOW!

jgschroeder99

Well-known member
Joined
Aug 12, 2012
Messages
92
Location
NW Ohio
JG......you really don't need a press. A good punch, a good seat, and a good C-clamp will do what you need. We had one department that they called the "whack-n-slap" department because all of the riveting was done with a hammer and punch.

If you need a punch and seat, let me know and I can hook you up. It doesn't take very long to make tooling for a rivet. Send me a pic of the box and where you have to rivet at, and let me know what size of rivets you would be using.

Here are some pics of the box. I would be using 1/8" rivets for the drawbolts and top handle, and 1/16" rivets for the craftsman badge. Thanks for all of your help!
 

Attachments

  • 2014082791_zps19442538.jpg
    2014082791_zps19442538.jpg
    82.6 KB · Views: 128
  • 2014082795_zps7075aa17.jpg
    2014082795_zps7075aa17.jpg
    121.3 KB · Views: 104
  • 2014082797_zpsdd8957de.jpg
    2014082797_zpsdd8957de.jpg
    125.7 KB · Views: 102
  • 2014082798_zpsbad965f4.jpg
    2014082798_zpsbad965f4.jpg
    105.3 KB · Views: 101
  • DSC02116_zps31279db0.jpg
    DSC02116_zps31279db0.jpg
    90.4 KB · Views: 124

Kevin54

MEMBER EMERITUS
Joined
Jan 12, 2005
Messages
29,341
Location
Urbana, Ohio
JG.....do you have your rivets yet? If you do, do you have a couple of extras? If so, can you send me a couple of each size, and I'll hook you up with a punch and seat.
 

jgschroeder99

Well-known member
Joined
Aug 12, 2012
Messages
92
Location
NW Ohio
JG.....do you have your rivets yet? If you do, do you have a couple of extras? If so, can you send me a couple of each size, and I'll hook you up with a punch and seat.

No rivets yet. If you hook me up with a punch and seat, I could just buy rivets to fit.
 

y'sguy

Well-known member
Joined
May 1, 2010
Messages
1,347
Location
Tulsa, Oklahoma
Kevin54, thanks for bringing back some old memories! My Dad was an aircraft mechanic an taught me a few things about riveting aluminum and various unlike materials. I always found it really fascinating and a quality finish is a very special thing.
 

Kevin54

MEMBER EMERITUS
Joined
Jan 12, 2005
Messages
29,341
Location
Urbana, Ohio
No rivets yet. If you hook me up with a punch and seat, I could just buy rivets to fit.

Well if that isn't just a little backwards. :lol_hitti

I need to know what size the rivets are to begin with to make the punch and seat. It's not hard to make either one, but at times, it takes a little fine tuning.

And I also need to know the thickness of the materials, both the latches, and the box, to know what length of rivet is needed. Some of the drilled rivets will vary on the depth of the drilled hole that needs to be rolled over. It's no problem to hook you up with a punch and seat, but I can't do it in the blind.

Or if you want to send me everything, I can put it back together for you. :beer:
 

RedRamRestoration

New member
Joined
Apr 26, 2020
Messages
2
Location
Detached
Hi there, New to the forum and rivets! Like jgschroeder99, I'm restoring 2 older Craftsman tool boxes I inherited for my father. I will gift them to our kids and fill them for birthdays and holidays so they have a good start when they have a place of their own.

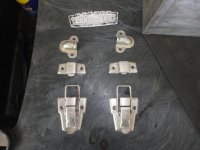
I've worked with Craftsman to receive new latches, handle holds and rivets. While I've done a ton of research into rivets and installation tools and techniques, I'm not sure what the best approach is for this application.

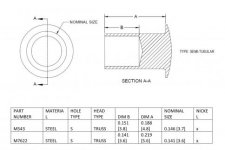
Between the hardware, there's 2 different rivets used: M7622 (RIVET 3312 X 7/32 SP1-4) and M543 (RIVET 3312X3/16NP SP1-2). The second number refers to the overall tube / stem / shaft length. Both head diameters are 5/16" or .312" and the head dome height is 1/32" or .035". Both tubes have a OD of .145" and ID of .101". Additional information about semi tubular lengths are in the attached screenshot.

Anyone have any suggestions? Much appreciated!
 

Attachments

  • Screen Shot 2020-04-26 at 11.47.37 AM.jpg
    Screen Shot 2020-04-26 at 11.47.37 AM.jpg
    19.8 KB · Views: 144
Last edited:

dreamcatcher

Member
Joined
Jun 17, 2010
Messages
7
Redram, what did you find out? I’ve got a couple craftsman toolboxes underway too. The screenshot and rivet identification you posted is very helpful. Did you locate the dies and/or squeezing tools? I’m considering building my own tool identical to the one in the OP (in fact that’s what brought me to this discussion) but I’m too ignorant to understand which dies I should purchase for it.
 

RedRamRestoration

New member
Joined
Apr 26, 2020
Messages
2
Location
Detached
First, I contacted craftsman to identify/order the rivets, then I worked with Hanson Rivet to order dies. I had to get crafty with clamps squeeze the rivets, but couldn't work out the handle ones, so I ended up taking it to a local guy with a machine shop and he was able to squeeze them in for me. Good luck... it's a journey ;-)
 

Huck

Well-known member
Joined
Jan 28, 2013
Messages
48
Location
Renfrew County, Canada
I'm renewing an old Beach B29 tool box and had an issue installing the semi tubular rivets using a buck/hammer type tool on the stays for the lid. So I dug into my junk drawer and modified a C clamp.....not too shabby I guess. Better than pop rivets anyways.
Edited to add; The flaring tool is from Hanson Rivets I can use it in my buckshee flaring clamp or use a hammer, as the die is removable.
 

Attachments

  • IMG_20220610_093835.jpg
    IMG_20220610_093835.jpg
    408 KB · Views: 99
Last edited:

Huck

Well-known member
Joined
Jan 28, 2013
Messages
48
Location
Renfrew County, Canada
Between repairs to my truck and the lawn tractor I found some time to attach the handles on my B29 box. I had to epoxy a jack post/land to clear the handle but it's working....of course a hammer would have worked on these wide/shallow drawers but this is just practice for the deep/narrow drawers where I can't swing the hammer. IMG_20220717_153130.jpgIMG_20220717_153107.jpg
 

Huck

Well-known member
Joined
Jan 28, 2013
Messages
48
Location
Renfrew County, Canada
that box looks great, Huck!
good one on the repurposed clamp to install the rivets
Thanks, I had my thinking cap on for a while to come up with that tool!
I live 30 miles from the town where the factory made these back in the day. They still command a decent price even used...
 
To avoid these ads, REGISTER NOW!
Top Bottom