To avoid these ads, REGISTER NOW!

Finally, the start of the Man Cave!

Dragfluid

ALLIANCE MEMBER
Joined
Sep 15, 2013
Messages
17,463
Location
Pillager, MN
Have been reading here for a little while. Lots of nice buildings/work areas.
Lots of good ideas to steal.;) Looks like a bunch of nice folks, too.

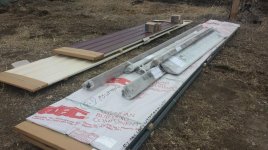
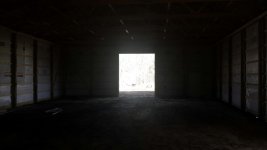
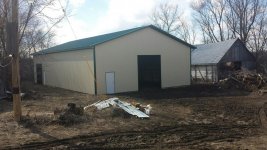
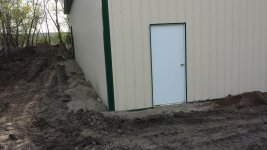
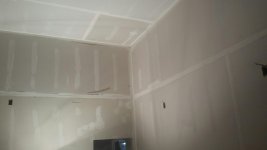
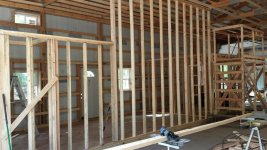
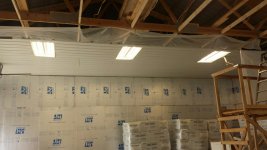
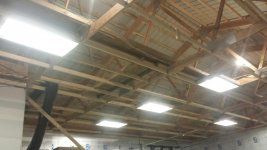
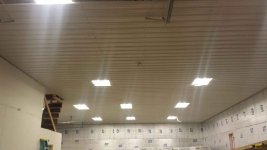
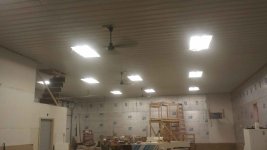
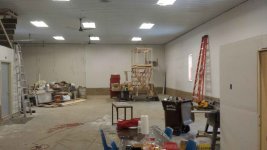
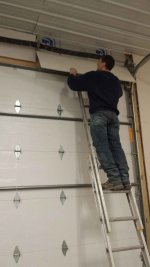
I'll be putting up pics as things progress. Building will be 42 x 72 with 14' walls. A 10 x 10 overhead on a side wall for the entrance to the hoist , and a 10 x 12 on the opposite gable end. A 3' service door by each OH door.

A little back story to go along with the first pic:
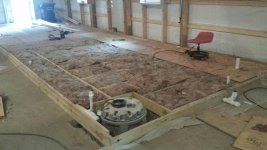
The space that the slab was on was previously occupied by a 40 x 70 quonset hut that served as the farm's machine shed when I was growing up. After I attended Trade School for automotive repair, my dad had the big idea that I was going to have my own business, rather than work for someone. So we had a floor poured, insulated, etc, etc. 11 1/2 years later, it burned to the ground. No insurance. We move on. That was in 1985.

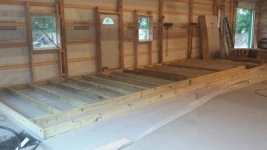
So that's why the slab is there first. And you see an above ground hoist there. That was 6 months old when the fire happened. :( After everything in the new building is done, I'll proceed to rebuild that hoist. The in ground hoist that I started out with will just be sealed up.
 

Attachments

  • slab.jpg
    slab.jpg
    143.8 KB · Views: 924
To avoid these ads, REGISTER NOW!
OP
D

Dragfluid

ALLIANCE MEMBER
Joined
Sep 15, 2013
Messages
17,463
Location
Pillager, MN
This was the first shipment of materials that arrived. 6100# of steel! Sure doesn't look like much when it's all stacked up!
 

Attachments

  • steel.jpg
    steel.jpg
    125.7 KB · Views: 573
OP
D

Dragfluid

ALLIANCE MEMBER
Joined
Sep 15, 2013
Messages
17,463
Location
Pillager, MN
I'm in Minnesota. Or, MinneSNOWta, as some of us call it!!
Right when everything was nice and dried out, we got 8" of the white stuff this month. But the crew was here the next day, drilling holes! I was greeted with this view when I came home from work on the 2nd day of construction.
 

Attachments

  • s1.jpg
    s1.jpg
    153.3 KB · Views: 749
OP
D

Dragfluid

ALLIANCE MEMBER
Joined
Sep 15, 2013
Messages
17,463
Location
Pillager, MN
Hope I'm not posting too many mundane pictures.:eek:

It's really something on the speed that a pole frame building can go up!
The foreman has been putting these up for 25 years.:bowdown:
 

Attachments

  • truss.jpg
    truss.jpg
    160.1 KB · Views: 803
OP
D

Dragfluid

ALLIANCE MEMBER
Joined
Sep 15, 2013
Messages
17,463
Location
Pillager, MN
Finally got to see some steel up. It keeps getting more exciting! You can see that I've got house wrap under the steel. The cream walls and green trim match the house.
 

Attachments

  • wall.jpg
    wall.jpg
    149.1 KB · Views: 552
OP
D

Dragfluid

ALLIANCE MEMBER
Joined
Sep 15, 2013
Messages
17,463
Location
Pillager, MN
And now, I present to you the (almost) finished product!:D:D:D:D:D
I got to see this on Friday when I came home.
 

Attachments

  • d2.jpg
    d2.jpg
    103.9 KB · Views: 755
  • d1.jpg
    d1.jpg
    133.9 KB · Views: 1,011
  • done.jpg
    done.jpg
    151.9 KB · Views: 880
OP
D

Dragfluid

ALLIANCE MEMBER
Joined
Sep 15, 2013
Messages
17,463
Location
Pillager, MN
Now, the real work on my part starts on the inside! First thing is to clean up the mud on the floor. And the overhead doors *should* be on by this Thursday, hopefully.
 

GRN96WS6

Well-known member
Joined
Dec 23, 2012
Messages
2,195
Location
SOMD
Man what a mess to have to clean up that floor, now it makes sense why they do them afterwards.

Nice building though.
 
OP
D

Dragfluid

ALLIANCE MEMBER
Joined
Sep 15, 2013
Messages
17,463
Location
Pillager, MN
It's not too bad. I spent some time Saturday scraping it with the skidloader.
When it finally dries out, the rest of it should sweep up fairly easy.

Then the next step is to dig down 24" along the bottom 2x8 for placement of 2" of XPS foam. Then pour the 10" or so strip all around the perimeter of the current slab.
 
OP
D

Dragfluid

ALLIANCE MEMBER
Joined
Sep 15, 2013
Messages
17,463
Location
Pillager, MN
Finally some progress to show. The weather hasn't cooperated very well, but we prevailed.
Rented a Trakhoe to dig a trench around the perimeter. Then went in the trench, armed with shovel, axe (for roots), hammer nails and foam. Went pretty smooth, with the damn roots taking the most time to deal with. Luckily, I keep my axes sharp!
3 plasticap nails for each panel was all that was needed, then a backfill with some recycled class 5.

Now to call the concrete guy in the morning! :)
 

Attachments

  • foam.jpg
    foam.jpg
    148.5 KB · Views: 631
  • foam1.jpg
    foam1.jpg
    153.4 KB · Views: 807
OP
D

Dragfluid

ALLIANCE MEMBER
Joined
Sep 15, 2013
Messages
17,463
Location
Pillager, MN
Wow, I'm really behind in my updates. Sorry. Is there a way to donate here to help with the bandwidth?
Anyway, before I could do anything for the shop area, I had to build a small apartment in the building for our son. 12 x 32, with a 6" raised floor off of the cement slab, and 13' 6" ceiling to make it more open looking.

That little jewel in the floor on the left is a "grinder" pump. $1300 to poop! I wonder if it's related to R2D2? It takes everything you put into it and grinds it into a slurry and pumps it out to a 2" line. 200' to my septic tank.
 

Attachments

  • tape1.jpg
    tape1.jpg
    104.2 KB · Views: 910
  • tape.jpg
    tape.jpg
    121.8 KB · Views: 981
  • bedroom.jpg
    bedroom.jpg
    145.1 KB · Views: 1,084
  • wall1.jpg
    wall1.jpg
    152.8 KB · Views: 1,025
  • floor2.jpg
    floor2.jpg
    141.4 KB · Views: 1,181
  • floor j.jpg
    floor j.jpg
    17.9 KB · Views: 1,152
Last edited:
OP
D

Dragfluid

ALLIANCE MEMBER
Joined
Sep 15, 2013
Messages
17,463
Location
Pillager, MN
Almost forgot, the first thing that I did once I got the floor clean was to build a rolling scaffold. This thing has been invaluable!
It may look a little overbuilt to some, but I didn't want it wiggling around when I was 8' above the floor, or when anyone else was on it either for that matter.
 

Attachments

  • scaf.jpg
    scaf.jpg
    77.4 KB · Views: 872
  • scaf1.jpg
    scaf1.jpg
    85.7 KB · Views: 768
  • scaf2.jpg
    scaf2.jpg
    64.3 KB · Views: 758
Last edited:
OP
D

Dragfluid

ALLIANCE MEMBER
Joined
Sep 15, 2013
Messages
17,463
Location
Pillager, MN
I'll be using steel panels for the ceiling in the shop, so I added joists every 48". All those joist hangers were a lot of nailing! Thank God for a Positive Placement nail gun.
 

Attachments

  • joist.jpg
    joist.jpg
    152 KB · Views: 883
OP
D

Dragfluid

ALLIANCE MEMBER
Joined
Sep 15, 2013
Messages
17,463
Location
Pillager, MN
Added home made vent chutes and cavity caps from 1/4" OSB.
The walls are insulated with 8 1/2" of dense pack cellulose. Then over the top of that is 1" Polyiso foam. The foam sheets act as a thermal break, plus they give another 6.5 R factor. So the walls will be at about R36. The ceiling will have 20" of cellulose blown in. It will settle down a little, so the R will be a little over R60.
 

Attachments

  • foamw1.jpg
    foamw1.jpg
    142.1 KB · Views: 1,067
  • foamw.jpg
    foamw.jpg
    136.3 KB · Views: 1,071
  • net.jpg
    net.jpg
    139.9 KB · Views: 1,079
  • cap.jpg
    cap.jpg
    143.7 KB · Views: 1,094

Techie1961

Well-known member
Joined
Feb 18, 2014
Messages
1,520
Location
Pickering Ontario Canada
Great looking shop and cool story on the slab. It's a big shop and I didn't realize how big just looking at the slab but once you got walls on there, it looks huge. Very well built as well.
 
OP
D

Dragfluid

ALLIANCE MEMBER
Joined
Sep 15, 2013
Messages
17,463
Location
Pillager, MN
When most sane people do a large project like this, they have materials brought in as they are needed. I got a better deal on the cellulose by buying it all at once, but the PITA part is having to move it around a few times. At least having a skidloader with forks helps a bunch with that. There's still 5 1/2 pallets of it sitting there. (each pallet has 42 bales, 30# each) Just moved it all again yesterday, under what ceiling that we got put up on Saturday.
 

Attachments

  • ceiling.jpg
    ceiling.jpg
    137.8 KB · Views: 851
OP
D

Dragfluid

ALLIANCE MEMBER
Joined
Sep 15, 2013
Messages
17,463
Location
Pillager, MN
To make it easier, and SAFER to blow the attic insulation, I built a catwalk down the center. 2x4's on edge with 7/16 OSB nailed on top. The short run going 90 deg off to the side goes to the attic hatch.
And lots of room to stand up straight! 7' to the peak.;)
 

Attachments

  • walk3.jpg
    walk3.jpg
    138.7 KB · Views: 809
  • walk2.jpg
    walk2.jpg
    144.6 KB · Views: 784
  • walk1s.jpg
    walk1s.jpg
    114 KB · Views: 839
  • walk.jpg
    walk.jpg
    134.2 KB · Views: 863
OP
D

Dragfluid

ALLIANCE MEMBER
Joined
Sep 15, 2013
Messages
17,463
Location
Pillager, MN
Some more progress. Getting closer with the ceiling completion. Only 14' left to go.
The HVAC guy got all the trunks connected.
 

Attachments

  • ceilinga.jpg
    ceilinga.jpg
    98.8 KB · Views: 896
  • left.jpg
    left.jpg
    113 KB · Views: 786
  • ductf.jpg
    ductf.jpg
    137.6 KB · Views: 829
To avoid these ads, REGISTER NOW!
OP
D

Dragfluid

ALLIANCE MEMBER
Joined
Sep 15, 2013
Messages
17,463
Location
Pillager, MN
Got the ceiling done! Finished the last 14' by myself, with the kid helping to get the panels on the lift, then just a bunch of trips up and down the scaffolding by me. Good leg workout! :)
Now, we're ready for the insulation next weekend! 20" of cellulose.
 

Attachments

  • final1.jpg
    final1.jpg
    98.8 KB · Views: 602
  • final.jpg
    final.jpg
    122.4 KB · Views: 653
OP
D

Dragfluid

ALLIANCE MEMBER
Joined
Sep 15, 2013
Messages
17,463
Location
Pillager, MN
Blew the attic Sunday. Approx 7200# of cellulose! 20" so it will settle to a little over 16" for over R60.
 

Attachments

  • attic.jpg
    attic.jpg
    150.3 KB · Views: 740
OP
D

Dragfluid

ALLIANCE MEMBER
Joined
Sep 15, 2013
Messages
17,463
Location
Pillager, MN
Hung the ceiling fans yesterday. Industrial type, steel blades, variable speed, reverse able and speed control via controller on wall.
Man, these things move some air! At high speed, the air movement drowns out the furnace.
 

Attachments

  • fan.jpg
    fan.jpg
    84.2 KB · Views: 845
  • fan1.jpg
    fan1.jpg
    96.2 KB · Views: 781
  • fan2.jpg
    fan2.jpg
    86.2 KB · Views: 785
Last edited:

shortykorte

Well-known member
Joined
Sep 1, 2014
Messages
8,034
Location
Tallahassee, Fl
Wow, I'm really behind in my updates. Sorry. Is there a way to donate here to help with the bandwidth?
Anyway, before I could do anything for the shop area, I had to build a small apartment in the building for our son. 12 x 32, with a 6" raised floor off of the cement slab, and 13' 6" ceiling to make it more open looking.

That little jewel in the floor on the left is a "grinder" pump. $1300 to poop! I wonder if it's related to R2D2? It takes everything you put into it and grinds it into a slurry and pumps it out to a 2" line. 200' to my septic tank.

You're on your way. :rocker:
I assume the 6" rise in the floor was for plumbing? Is the loft separate from the apartment? Also, more info on the ceiling fans please.
 
OP
D

Dragfluid

ALLIANCE MEMBER
Joined
Sep 15, 2013
Messages
17,463
Location
Pillager, MN
The rise in the floor was two fold. A place to put the plumbing, and also to get it up off of the concrete with some insulation (R19) in between.

The fans and controller are Canarm, and I bought them from Northern Tool.
http://www.northerntool.com/shop/tools/product_200436483_200436483
Here's the controller. Full speed and direction control, and I believe it was $29.00.
 

Attachments

  • contoller.jpg
    contoller.jpg
    89.3 KB · Views: 328
OP
D

Dragfluid

ALLIANCE MEMBER
Joined
Sep 15, 2013
Messages
17,463
Location
Pillager, MN
Forgot to put these up.
Built a little office area a couple of weekends ago. 8x12, with 7' ceiling. That gives me just about 6 1/2 feet above for some storage. Can stand up on top with full head clearance.
This will be a place to keep a desk and computer free of sawdust, and also when the Bride starts to feel like a garage widow, she can come out and sit in there and watch TV and putz on her laptop and visit on occasion.
R15 in the walls, and R19 in the ceiling. Insulated steel door. Yes, the door is "backwards". There's more room for it to swing out than into the room. There will be a 30" baseboard heater in it.
 

Attachments

  • office.jpg
    office.jpg
    145.1 KB · Views: 554
Last edited:
OP
D

Dragfluid

ALLIANCE MEMBER
Joined
Sep 15, 2013
Messages
17,463
Location
Pillager, MN
Got some drywall done, too a couple weekends ago. A little over half. We started at the front, going around the entrance and overhead door and the complete office, so all that cutting took up most of the day. Once we got out where you just slap the 12' sheet on the wall, they started going pretty fast, but by 4 pm, the drywall friend had enough.
We're going to finish it up today (Sunday), so more pics to follow.
 

Attachments

  • drywall.jpg
    drywall.jpg
    102.6 KB · Views: 611
  • drywall1.jpg
    drywall1.jpg
    86.2 KB · Views: 569
OP
D

Dragfluid

ALLIANCE MEMBER
Joined
Sep 15, 2013
Messages
17,463
Location
Pillager, MN
Got the rest of the drywall up today!! Went pretty quick.
The guy up on the ladder is the drywall guy, and he's putting up the last piece.

The conduit looks better than the loose cables that were previously hanging there.
 

Attachments

  • dryend.jpg
    dryend.jpg
    106.3 KB · Views: 520
  • End.jpg
    End.jpg
    96.4 KB · Views: 584
  • panel cond.jpg
    panel cond.jpg
    146.6 KB · Views: 554
OP
D

Dragfluid

ALLIANCE MEMBER
Joined
Sep 15, 2013
Messages
17,463
Location
Pillager, MN
Subscribed... this is a cool build! Can't wait to see how the apartment turns out.

Thanks
Once the shop is painted, and I've got the wiring pulled, I'll go back to doing the finishing up on the apartment. He's been living in it for some time, but there's a few things left. Upper kitchen cabinets, mount the microwave/range hood, all the door, window and baseboard trim.
Then I'll put up those pics.
 
To avoid these ads, REGISTER NOW!
Top Bottom