To avoid these ads, REGISTER NOW!

Restored vintage Skil 77 worm drive saw

BreeStephany

ALLIANCE MEMBER
Joined
May 19, 2012
Messages
862
Location
Oregon
My most recent of restorations, a vintage blue label Skil 77 7-1/4" worm drive saw, era 1942~1948. Everything says that the saw is 1942, however, the guard lever was generally not found until the end of the blue label series / beginning of the first generation black & orange label saws (1950's). It is likely that the guard is not original to the saw because of this.

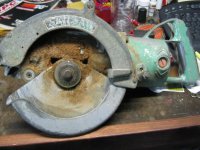
When I got the saw, it was in pretty rough shape.

Before
View media item 61243
View media item 61244
View media item 61245
View media item 61246
View media item 61247
View media item 61248
View media item 61249
View media item 61250
View media item 61251
View media item 61252
View media item 61253
Disassembling
View media item 61254
View media item 61255I let all of the screws, bolts and other fasteners soak in solvent overnight to get the HEAVY grease off and then took all of the fastener heads to the wire wheel a bit to shine them up. Those fasteners that were badly damaged were replaced with period fasteners.

View media item 61256Upon getting the saw, there was a fair amount of excess noise coming from the motor. Upon disassembling the saw, I found that both the front and back armature bearings were HEAVILY worn to the point that when I attempted to remove them, most of the ball bearings just fell out. The front armature bearing had actually eaten the retention ring and was partially seized, but despite all of this, the worm gear and brass drive gear were unphased and seemed virtually brand new.

View media item 61257front armature bearing
View media item 61258front armature bearing
View media item 61259
View media item 61260prepping for paint. I thoroughly cleaned the parts with solvent and a toothbrush inside and out, then took them to the wire wheel and stripped off all of the oil paint and exterior grime and then went over them again with solvent to pull any oil out of them.

View media item 61261
View media item 61262
View media item 61263
View media item 61264
View media item 61265
View media item 612662 coats of primer, 2 coats of paint and a coat of clear coat later

Finished
View media item 61267I replaced the bearings and brushes on the saw, cleaned the seals up and added a very LIGHT coat of rtv gasket maker, put everything back together and filled it up with oil. The brushes needed a bit of adjustment, but outside of that, everything worked wonderfully.

I generally put a standard 4' 6" cord on all of my tools because I always have an extension cord whether I go out on a project or am working around the shop and hate tons of extra cord when trying to store tools. Because I was restoring the saw for a friend as a gift for his birthday, I put an extra long 12' cord on it.

View media item 61268
View media item 61269Cleaned up the case, put on 2 coats of primer, 4 coats of paint and 2 coats of clear coat.

View media item 61270
View media item 61271
View media item 61272
View media item 61273A picture from a happy friend.
 
Last edited:
To avoid these ads, REGISTER NOW!

aj3006

Active member
Joined
Feb 29, 2012
Messages
30
Location
Il
Wow that looks great nice job should be good for another 60 yrs
 

USA Tool Supply

Well-known member
Joined
Aug 14, 2013
Messages
65
Location
Midwest
You did a great restoration ! The pics are nice. I have the same saw, given to me by my grandfather, sn # 14409. It weighs 18 lbs., but I have used it many times. Wish I had the box too. Great post, thanks.
 

acdeucey

Well-known member
Joined
Apr 11, 2012
Messages
76
Location
Whitewater, WI
Bree, as usual, great job on the restore. I enjoy seeing your work. Very high quality!

I'm currently working on this:

a>


It's a Milwaukee Model 414 Sawzall. The ORIGINAL Sawzall.

Back on topic...

I'm finishing up work on this Skil Model 825:

a>


a>


I know this saw is pre-1952 (Skilsaw Inc.), but do you know of a way to more accurately date this? To be truthful, I don't even know when they started making the 825.

Still need to add a new power cord, flush the gearbox, add new oil, and then look to source some new brushes. Where do you get your brushes?

This 825 was probably the dirtiest tool I've worked on. Although, my 90-year-old B&D Model K and my 80-year-old Thor 6076 were pretty rough too. Still, the combination of oily saw dust build-up and wood sap residue was daunting. It didn't help that a PO had gotten paint splatters all over the saw too. That paint was a ***** to get off. Also, lotso rust on the base plate.

a>


a>


Anyway, thanks for showing us your latest project. Look forward to seeing more and, perhaps, learning some new tricks.

Don
 
OP
B

BreeStephany

ALLIANCE MEMBER
Joined
May 19, 2012
Messages
862
Location
Oregon
I know this saw is pre-1952 (Skilsaw Inc.), but do you know of a way to more accurately date this? To be truthful, I don't even know when they started making the 825.

Still need to add a new power cord, flush the gearbox, add new oil, and then look to source some new brushes. Where do you get your brushes?

The 825 was introduced in the early 40's. Almost all of the blue label SkilSaw products are early to mid 40's. In the late 40's / early 50's, Skil transitioned to the orange and black color scheme and the Skil insignia as we now know it, but kept the oval nameplate design. Some of the very early saws will have the traditional label on the guard but in black. If you lightly sand / scratch the black paint, you will find traces of blue paint underneath, which is likely from them repurposing old stock. I have seen some EARLY 1950's saws with blue label guards and black body labels, but I am unsure if these were replacement parts or not.

Your 825 is consistent with early to mid 40's (1942~1948), but beyond that, it is difficult to date the saws to an exact year without ripping into the saw. As Skil moved forward in the mid 40's (1945~1946), it began using lighter materials such as aluminum in the place of steel or brass (i.e. fan / field shroud, field shroud spacers, etc.). These slight changes can help better date it.

I source all of my brushes and many of my hard-to-find bearings (ones I can't find through my local bearing shop) through Eurton Electric http://eurtonelectric.com/.

I haven't sourced brushes for the 825 as of yet, but I am going to be sending in a lot of brushes to them very soon so they can size me new ones.

If your not in a hurry, I will let you know the brush sizes when they get back to me. If you need them right away, you can call them, tell them you want to send in a set of brushes to get replacements for and they should be able to find you replacements.

Your saw looks great. I am excited to see finished results.

If your saw is not already been wired for a ground, you can drill and tap a 10/32 hole directly below the trigger and secure a grounding terminal there. This became standard practice with Skil, but I have 2 saws that never had a means of grounding.

For the cord, the easiest way to secure it is to pull it through the cord grip, up the handle and put a large zip tie on the rubber, then cut off most of the zip tie, leaving just enough so it can't pull back out through the bottom. Cut the ground and power leads to length, solder or terminal and screw the power leads to the bottom of the switch and then pull the switch down, secure the field leads, secure the switch cover to the switch and then push it all into place and put the retention screw in place. I have found this to be the EASIEST way of dealing with the switch, which can be a pain if not done just so.

Use Skil's drive lube, as it works on pretty much everything but the 107 and 127 which require a MUCH heavier oil / grease.

Hope this helps.
 

acdeucey

Well-known member
Joined
Apr 11, 2012
Messages
76
Location
Whitewater, WI
Bree, thanks for the reply. I really appreciate it.

My saw does have a ground terminal in the handle. All that remains is for me to wire in the new power cord. Oh, and, I guess, try to repair the metal piece that connects to the switch and then to the saw. That part has cracked cross-wise in the middle. Doesn't affect the operation of the switch, but it does bother me. And, no, I didn't break it.

After I re-wire the saw I'll flush/refill the gearbox and then start using it. If I can find brushes, then I'll change those too. However, in the meantime, since the saw is working, I'll use it.

I did do a Google search for brushes and Eurton came up. I perused their site, but wasn't sure what to order. Of course, I haven't measured my brushes, so doing that would help with finding replacements.

I noticed that Sears Parts Direct has parts for a Skil 825-13. Brushes too. Not sure how close this model is to mine. If I knew it was an exact/close match, then I could order parts from Sears. But, since I'm in no hurry for brushes, I think I can wait until you find a match.

It's nice to know about sending in the brushes for Eurton to match. Would eliminate the guess work. Also, guessing wrong can be bad, because, like with Sears, parts like this are NON-RETURNABLE. OUCH! Anyway, I have MANY other vintage tools that could probably use new brushes and the Eurton connection could prove invaluable.

Again, I enjoy viewing your work. You are an ARTIST, while I'm a HACKER by comparison. You go above and beyond. A real inspiration. Thanks.

Don
 
OP
B

BreeStephany

ALLIANCE MEMBER
Joined
May 19, 2012
Messages
862
Location
Oregon
All that remains is for me to wire in the new power cord. Oh, and, I guess, try to repair the metal piece that connects to the switch and then to the saw. That part has cracked cross-wise in the middle. Doesn't affect the operation of the switch, but it does bother me. And, no, I didn't break it.

The same thing actually happened to my Skil 825. I was able to tig the top piece back together and it worked for a short while until the switch finally wore out internally, which I then fixed until the outer slide wore completely through shortly after. Given the number of Skil projects I have been working on, I started picking up a lot of extra parts and was able to find a few extra switches.

If you have a tig welder or know someone who does, I definitely go that route. Last resort, you can mig it back together if your VERY careful and do a bit of grinding with a die grinder or dremel. If those avenues fail, let me know and I will see if I can help you find a switch.
 
To avoid these ads, REGISTER NOW!

ADSR

Well-known member
Joined
Jan 12, 2013
Messages
10,713
That's a great piece of history you saved.

Great work!
 

softailgarage

Well-known member
Joined
Apr 20, 2011
Messages
5,153
Location
Bullhead City, Az.
Nice job! So now I feel like a real ***. 6 months ago a neighbor gave me 2 of these. He didn't want them, figured I could do something with them. The first one, when the trigger was pulled would shoot sparks out from the motor. Tore it down and found a section of the stator had been ground down like a rock or something had gotten caught...

IMG_4222.JPG

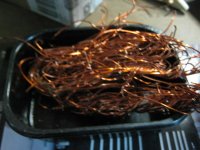
Figured it was trash, so I stripped the copper wire from the motor
IMG_4223.JPG

This is the remains
IMG_4221.JPG

The second one, I got tired of tripping over and just last night I stole the cord to use on an old drill press I'm working on
IMG_4217.JPG
IMG_4219.JPG
IMG_4220.JPG
IMG_4218.JPG

Go ahead, call me a *******...:sad:
 

rmaccrea

New member
Joined
May 28, 2014
Messages
2
I believe I have the same model with the original guards. Photos posted here:
http://www.collectorsweekly.com/stories/123846-skilsaw-model-77-possibly-1st-generation
I am looking for a switch. The saw was running GREAT! Inherited it from my grandfather. But it came to me with the chord insulation in bad shape, and today it shorted out. Replacing the chord required unsoldering it from the switch. The switch terminals loosened and now can touch (and short).
 

rmaccrea

New member
Joined
May 28, 2014
Messages
2
I believe I have the exact same model with the original narrower guard. Inherited from my grandfather. Worked great until the old, damaged chord shorted out. I had to unsolder the wires from the switch terminals, and now these terminals are loose, and might touch. Looking for a replacement switch. Photos here:
http://www.collectorsweekly.com/stories/123846-skilsaw-model-77-possibly-1st-generation. Please email me if you have any helpful information.
 
OP
B

BreeStephany

ALLIANCE MEMBER
Joined
May 19, 2012
Messages
862
Location
Oregon
I believe I have the exact same model with the original narrower guard. Inherited from my grandfather. Worked great until the old, damaged chord shorted out. I had to unsolder the wires from the switch terminals, and now these terminals are loose, and might touch. Looking for a replacement switch.

The switch is generally pretty difficult to come by as a single part, so salvaging and attempting to restore would be your best first route in attempting to repair the saw.

You have likely overheated the Bakelite and slightly melted it, which caused the terminals to become loosen.

The original cuttler hammer switches are actually serviceable but require a bit of modification to get them apart. There are two screws, top and bottom of the switch, which hold the switch together. One end of each screw is a has a slotted head and the other end has been pressed to prevent the screw from being backed out.

You will need to LIGHTLY grind the pressed end down flush with the metal plate to remove the bulging metal from being pressed. Once you have done this, you can take a slotted screwdriver and back out the screws.

After taking it apart, take a bit of super glue and put a few drops down the terminal slots in the house from the outside. You want to take apart the switch so as to not glue the inside of the switch together. After adding a few drops, let it dry and then add more to strengthen the bond.

This is your best first option.

If the switch is worn out and no longer clicks properly or sticks in the on or off position, you can adjust the contacts inside the switch to repair it.

Worst case scenario, you can generally pick up broken 77's or 67's on Ebay for $30~$50, which you can take the parts from.
 

coronwen

New member
Joined
Apr 13, 2015
Messages
1
Hello all

I'm new here and looking for what should be some simple information. Failed totally googling so I hope someone here can help!

I have a Skilsaw 807. Originally bought by my brother in 1978 when he lived upstate New York. Bought back to the UK by him and still going strong in my hands. (I also have his Craftsman radial arm saw from the same date and that's very well used but also working well.) They are both 110v and as I'm in the UK I run them with transformers. But I prefer both to the tat that's on sale here now.

Anyway here's the simple information I'm after. The Skilsaw has no rip fence and I want to buy one. The orifices for it to slide into measure 13mm wide and 3.35mm deep according to my callipers (we are metric over here). So that'd mean the bar would be 1/2" wide and 1/8" thick I think in New World measurement.

So question one is - are all Skil rip fences the same dimensions so could I buy any new Skil rip fence and expect it to fit?

And question two is what thread used for the hand screws to retain it? I'd guess it'd be coarse AF as I have some Whitworths (good old british thread) which almost fit. Even better if anyone knows where I could get two original hand screws (it has two screw holes).

Thank you in advance for any info anyone can proffer. It's such a good saw I don't want to retire it for a lesser quality modern one.
 

Backwodsurvivor

Well-known member
Joined
May 26, 2018
Messages
179
Location
Between the lakes, WI
I purchased a very similar saw to the one posted by the OP today for 10 bucks. It even has the same tool box (although much rustier).

My saw is packed with saw dust and what seems to be grease or something (saw dust soaked in oil?) Its all over the case and inside on the rotor and windings. Can anyone recommend a good way to clean the electrical bits? I've been able to scrape off the outside parts well but the guts are challenging. Thanks!
 

JHuston

Well-known member
Joined
Feb 21, 2016
Messages
301
Location
Canton, Ohio
Older Skil saws had Chicago Rawhide leather seals, and tended to seep oil when not run for long periods; like any worm drive tool that makes sawdust, the oil and dust turn into concrete over time. My solution is to use mag wheel cleaner and a wire brush, along with a few small picks for the really hardened blobs. I like Eagle one cleaner, myself.

-James Huston
 

ALLFAST

Well-known member
Joined
Feb 20, 2017
Messages
1,233
Location
Northern California
What a cool thread this turned out to be. Nice work and tips. I have a 1976, IIRC, model 77 , which came in its origin Skill dark gray toolbox. It's cast aluminum and in its natural semi matte polished state. I'm at work and away from home, so I'll post some pictures next Thursday or so.

Regards, Shawn
 

skinkwhisper

Member
Joined
Aug 5, 2021
Messages
6
I have a skill 77 type 5 that I am restoring. It's now completely disassembled and clean. I am looking for the "anatomically correct" bearing replacements...there are 5 bearings in this saw and four of them are open on one side and one is open on both sides. Not sure why the one at the top of the armature is open on one side as this one is not in the oil bath. Does anybody have a source for all these bearings or at least the correct modern bearing numbers so I can source them? I've already got the brushes, brush caps, and correct seals.
 

driftpin

Well-known member
Joined
Dec 22, 2016
Messages
11,327
Location
Miami-Dade/Broward Co. Florida
How many recall the guy w/the worm-drive Skilsaw wondering about the value to sell it in a yardsale? He was having responses in the $20 range, I was more charitable.

The saw restored well. I have an 8-1/4" worm drive Skilsaw I bought used, probably 48 years ago, when I was working construction in Miami. I don't use it much now, but it's still working fine. I bought three tubes of hypoid Skil grease for it and another 7-1/4" worm-drive from Amazon delivered for ~$20.
 

LHClll

New member
Joined
Nov 11, 2021
Messages
1
I have a skill 77 type 5 that I am restoring. It's now completely disassembled and clean. I am looking for the "anatomically correct" bearing replacements...there are 5 bearings in this saw and four of them are open on one side and one is open on both sides. Not sure why the one at the top of the armature is open on one side as this one is not in the oil bath. Does anybody have a source for all these bearings or at least the correct modern bearing numbers so I can source them? I've already got the brushes, brush caps, and correct seals.
Hi, I am new to the forum and have the same problem finding a source for bearings/seals. My saw is probably early 50's, since it doesn't have a blue label, but does have the orange/black label on the blade housing. I have sent the bearing/seal #'s to 3 different bearing suppliers with no luck. I hope you find a source!
 
OP
B

BreeStephany

ALLIANCE MEMBER
Joined
May 19, 2012
Messages
862
Location
Oregon
Hi, I am new to the forum and have the same problem finding a source for bearings/seals. My saw is probably early 50's, since it doesn't have a blue label, but does have the orange/black label on the blade housing. I have sent the bearing/seal #'s to 3 different bearing suppliers with no luck. I hope you find a source!
Were you ever able to source bearings & seals for your saw?
 
To avoid these ads, REGISTER NOW!
Top Bottom