To avoid these ads, REGISTER NOW!

Between 265 & 485 SQ/FT New 20 x 20 garage/shop in Seattle

Workspaces sized between 265 and 485 squarefeet.

RSwannabe

Well-known member
Joined
Dec 17, 2009
Messages
403
Hello,

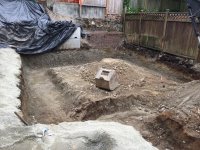
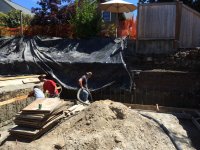
I’ve been lurking around the site for years dreaming of incredible shops and garages. Well, I am now under construction for my new garage shop and thought I’d share my plans and progress. Like most such projects, my dreams are curtailed by the realities of zoning and budget. We live in the city of Seattle on a 5,100 SF lot (102 x 50). Our house is 104 years old and is lovely, but it has no garage. I’ve had a shop space at my place of work, but I'm demolishing that building at the end of the year, so it’s time to build a shop at home before my play cars get left out in the cold and rain.

Lot coverage rules limit me to a 20’ x 20’ structure, so this will not be a Garage Mahal. I do have the benefit of a full basement under the house with exterior entry at grade (not practical for car access) and an understanding wife, so the garage will be entirely my domain and will not have to shelter daily drivers, bikes, strollers, or sundry yard implements and holiday decorations. Thus it will be small, but dedicated to my projects, foremost of which is my addiction to hotrod vintage Porsches. Luckily my cars of choice are relatively small and low ;-).

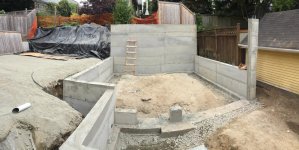
Our lot has no alley access, so the driveway runs up the south side of the house and is only 9 feet wide. The garage will be nestled into the south east corner of the back yard with almost zero setback from the property lines. The garage will have one 8’ garage door on the south half of the west face. I plan on having a four post lift there with a sliding jack plate. Thus I can stack my two 911’s and the right lift (Backyard Buddy for example) has ramps far enough apart to allow me to drop a 911 motor between them (motors are about 36” wide and the BB lift has 39.5” clear between ramps). The other half of the garage will be dedicated to work area with benches, storage, toolboxes, ext…

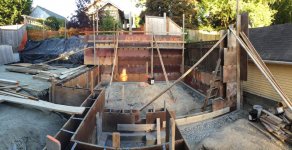
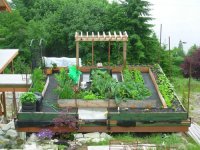
Since our entire backyard is only about 1,500 SF and the garage will take up almost a third of that, we wanted to get back as much space as possible, thus the roof of the garage will be fully structural and have a full planted garden in raised beds. The topography of our yard will allow a terraced set of steps onto the roof for easy access that don’t really take away from the usable area of the yard. The roof will therefore be mostly flat with a slight slope to allow for drainage. The low side of the roof (east) will allow for about 9’ clear ceiling height and the high side will be about 10’. It will be a little close, but my cars are low enough to allow stacking even with this relatively low ceiling height.

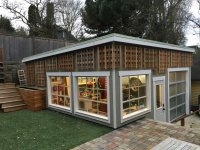
I’ll be reusing three steel sash industrial windows in the garage that measure 5x4 and the top 2/3 pivot to open. I’m salvaging these from the building my shop is currently in that I am taking down. This will allow a lot of natural light into the garage and help it feel a little more open.

The garage door is an all glass Clopay frosted unit that provide privacy from prying eyes on the street looking up my driveway, but allow even more light into the work area.

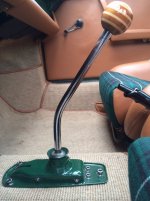
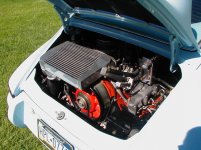
EDIT January, 2016 - Here are some preview shots from later in this thread:
 

Attachments

  • Finished Layout.pdf
    141.5 KB · Views: 646
  • Painted with tops in place 150117.jpg
    Painted with tops in place 150117.jpg
    136.4 KB · Views: 2,056
  • Kat's picture of shop 151212.jpg
    Kat's picture of shop 151212.jpg
    136.6 KB · Views: 2,144
  • Trellis work completed.jpg
    Trellis work completed.jpg
    151.3 KB · Views: 2,080
Last edited:
To avoid these ads, REGISTER NOW!
OP
R

RSwannabe

Well-known member
Joined
Dec 17, 2009
Messages
403
1/2 Cup - Thanks. The rooftop garden should be a great place to grow stuff as it'll get great light. Once I thought of doing it and started researching, I found a good model for what we want to do on a project up in Vancouver BC. Here is a picture of that one before it was done.
 

Attachments

  • Roof garden.jpg
    Roof garden.jpg
    100.9 KB · Views: 1,340
OP
R

RSwannabe

Well-known member
Joined
Dec 17, 2009
Messages
403
We started by demolished the old deck and levelling the yard. The yard used to be at many different elevations and was not very useable. We had to step down three steps to get to the yard, and then the yard went up, so you had to walk up four steps to get to the deck. The new finished elevation will be at grade with the first floor of the house and the garage floor will be about three feet below that to keep it from looming too much over the back yard.

You will notice I'm using ecology blocks, concrete blocks that measure 2'x2'x6' and weight about 3,850 lbs each ($15/ea from my local concrete plant) as part of my grading. They will be along my east and north property lines stacked two high to help hold those hillsides. The top of the upper block will be about 3' above the new finished grade of the yard. I'll build a wood fascia the will hide the blocks. The wood fascia will extend one foot above the top of the concrete to contain planting soil and then we'll use them as decorative raised planters. I plan to build a continuous bench as part of the wood fascia for the blocks too. The bench will be great for parties in the backyard as well as be a convenient place to stand when tending the raised planter beds.
 

Attachments

  • Rough Grade with ecoblock retaining.jpg
    Rough Grade with ecoblock retaining.jpg
    144.9 KB · Views: 1,056
  • Clearing and starting grading.jpg
    Clearing and starting grading.jpg
    148.2 KB · Views: 879
  • Demolishing old deck.jpg
    Demolishing old deck.jpg
    127.5 KB · Views: 920
OP
R

RSwannabe

Well-known member
Joined
Dec 17, 2009
Messages
403
Here is the subgrade going in and being levelled and compacted. It is 5" of 1/4" minus (also called road base). The 12' x 40' of yard along the back of the house will get a paver patio. The rest of the open area of the yard will get high quality artificial turf for a great looking but low maintenance lawn.

You may notice there is also a line of ecology blocks along the back of the house that are mostly buried in this picture. Those blocks are there to allow me to bring the elevation of the yard up to the level of the first floor of the house without piling dirt against the wood structure and causing rot and insect problems. I could have done this with a new concrete retaining wall as well, but using the eco blocks like this was a much lower cost option. They will be fully buried when the job is done and out of sight. The sand base for the pavers and paver patio will be installed over the top of the blocks there. Above the ecology block I'll install a trench drain along the side of the house that acts as the edge of the patio and completes the separation between the raised grade and wood structure of the house. It will of course also capture any surface runoff before it gets to the house.
 

Attachments

  • Compacting subbase for patio and yard 140617.jpg
    Compacting subbase for patio and yard 140617.jpg
    128.2 KB · Views: 885

Highbeam

Well-known member
Joined
Feb 15, 2011
Messages
2,292
Location
Mt Rainier foothills, WA
Howdy neighbor. While 1/4" minus is a fine material for what you're doing, it is certainly not road base. The smallest stuff we use under our roads here in western WA is 5/8" minus.

The ecology blocks are cheap but I've found that getting them delivered and placed is very expensive. If you can live with the looks, they are an excellent choice for a retaining wall.
 
OP
R

RSwannabe

Well-known member
Joined
Dec 17, 2009
Messages
403
Highbeam - I'm not a dirt work guy, so I was just going by what I was told that the 1/4" minus was also called road base. Didn't mean to cause confusion ;-)

Agreed the eco blocks are not perfect for all jobs, but I already had to have the backhoe on site, so placing them was not going to be an issue and the concrete yard I buy them from (Salmon Bay Sand and Gravel) is only about a mile away from my house.

For the specifics of my project, using eco blocks saved me a lot of money. As for looking at them, I don't want to over the long run, hence the fascia and turning them into raised planters as outlined above.
 
OP
R

RSwannabe

Well-known member
Joined
Dec 17, 2009
Messages
403
Here is my project superintendent.
 

Attachments

  • 10458875_10152544447601532_4050131085402223178_n.jpg
    10458875_10152544447601532_4050131085402223178_n.jpg
    88.3 KB · Views: 961
OP
R

RSwannabe

Well-known member
Joined
Dec 17, 2009
Messages
403
And here are the future occupants of the garage.
 

Attachments

  • image1383276705.jpg
    image1383276705.jpg
    80.3 KB · Views: 881
  • IMG_2225.jpg
    IMG_2225.jpg
    146.4 KB · Views: 834
OP
R

RSwannabe

Well-known member
Joined
Dec 17, 2009
Messages
403
The green one is a 1969 911E that has been heavily modified in the style of period race cars and I also brought in a lot of stylistic cues from the 356's. It has hand formed steel flares copied from factory 911 ST race flares, comprehensively upgraded suspension and brakes, a 2.8 liter short stroke RSR style motor, LSD, and numerous other performance and stylistic mods. I've owned it for 10 years and performed much of the work myself over that time to have it reflect my own vision of my ultimate 911. Its not as focused a track weapon as Jack Olsen's car, but it is very good on the track and sees a lot of enthusiastic use and long road trips. A few more detail shots attached.
 

Attachments

  • image1384138549.jpg
    image1384138549.jpg
    58.1 KB · Views: 982
  • image1384138186.jpg
    image1384138186.jpg
    54.4 KB · Views: 869
  • image1384141548.jpg
    image1384141548.jpg
    137 KB · Views: 874
  • image1384141084.jpg
    image1384141084.jpg
    79.2 KB · Views: 926
  • image1383276588.jpg
    image1383276588.jpg
    62.3 KB · Views: 968
  • image1383276376.jpg
    image1383276376.jpg
    71.8 KB · Views: 865
  • image1383276954.jpg
    image1383276954.jpg
    114.1 KB · Views: 850
Last edited:
OP
R

RSwannabe

Well-known member
Joined
Dec 17, 2009
Messages
403
The blue one is a more recent addition. It is a '81 backdated (with metal) to look like a '73 RS in Gulf Blue. Its dirty little secret is the 930 turbo drivetrain. It's fun as it is, but needs some sorting. I have lots of plans for it too :evil:
 

Attachments

  • P1010047.jpg
    P1010047.jpg
    143.8 KB · Views: 707

Bib Overalls

Well-known member
Joined
Dec 4, 2006
Messages
3,318
Location
Jonesboro, Arkansas
A garage with a garden on the roof. That may be a first for the GJ Forum.

I did a little looking at ecology blocks on line. I see them in use around here but never knew what they were called or that they were so affordable. We have a job at our rent house that a few of those could solve.

Love the early Porsches. I had a 68 912 in the same green. Picked it up new at the factory and sold it when I went back to Vietnam. Dumbest thing I ever did (just about).
 

MillerMav

Well-known member
Joined
Feb 6, 2013
Messages
269
Beautiful 911's. I am picking up an 86 Carrera in a couple weeks; its been a lifelong dream of mine to own one.

Looking forward to your build!
 

ned911

Well-known member
Joined
Oct 16, 2012
Messages
77
Location
Austin, TX
I'm in a similar situation. 2 '72 911's and a '74 914 with tow vehicle, wife's daily (btw she owns 1 911 and the 914) and my daily and we are moving to a 2 car garage.

But... my big question is.... what seats are in the '69 and where did you get them covered?
 
OP
R

RSwannabe

Well-known member
Joined
Dec 17, 2009
Messages
403
Ned - the seats are from GTS Classics and are the ST model. I supplied the leather and tartan material (McLean clan hunting tartan - my wife's family) to GTS and they built the seat up for me using amber backed fiberglass shells (as opposed to the more common black). They even have seat heaters. Stefan the owner is great to work with. This is the third set of seats I've had him make for me.
 

Attachments

  • P1070205.jpg
    P1070205.jpg
    33 KB · Views: 426
  • P1070200.jpg
    P1070200.jpg
    35.8 KB · Views: 468
  • P1070204.jpg
    P1070204.jpg
    31.5 KB · Views: 444
Last edited:
OP
R

RSwannabe

Well-known member
Joined
Dec 17, 2009
Messages
403
Footing excavations are almost done. Might be ready to start forming by the end of today.
 

Attachments

  • Footing excavation 2.jpg
    Footing excavation 2.jpg
    149.7 KB · Views: 605
  • Footing excavation.jpg
    Footing excavation.jpg
    149.5 KB · Views: 653

Hesketh

Well-known member
Joined
Oct 21, 2011
Messages
217
Location
Scotland
The blue one is a more recent addition. It is a '81 backdated (with metal) to look like a '73 RS in Gulf Blue. Its dirty little secret is the 930 turbo drivetrain. It's fun as it is, but needs some sorting. I have lots of plans for it too :evil:

ok ok the green one is :drool:
but the blue one is :evil:

but really they are very very nice thanks for the info and extra photos.

Now back to the garage build :thumbup:
 
To avoid these ads, REGISTER NOW!
OP
R

RSwannabe

Well-known member
Joined
Dec 17, 2009
Messages
403
In preperation for starting form work on Monday, today I ran the electrical conduit, the water line, and the gas piping. The drain line for the sink and low voltage conduit will go in after footings are poured.
 

Attachments

  • image.jpg
    image.jpg
    150.6 KB · Views: 524
Last edited:
OP
R

RSwannabe

Well-known member
Joined
Dec 17, 2009
Messages
403
Footings were poured today. Because of the tight constraints of my lot (9' wide pinch point between my house and my neighbor's garage), they have to use a pump truck to get the concrete to the backyard. The concrete foreman commented that this is the tightest job, in terms of clearances and available space, that he has ever worked.
 

Attachments

  • Footings ready to pour 140625.jpg
    Footings ready to pour 140625.jpg
    155.5 KB · Views: 763
  • Concrete and pump trucks 140625.jpg
    Concrete and pump trucks 140625.jpg
    150.8 KB · Views: 715
  • Fisheye view 140625.jpg
    Fisheye view 140625.jpg
    69.1 KB · Views: 694
  • Pouring footings 140625.jpg
    Pouring footings 140625.jpg
    150.9 KB · Views: 717
Last edited:

JR 42

Well-known member
Joined
Nov 2, 2013
Messages
966
Location
Sunny Seattle
Salvaged building materials and a green roof, how very Seattle! Any plans for solar and rainwater collection? :D

Seriously, though, your garage sounds like it'll be fantastic, and you've got some very nice cars to park in it. I'm looking forward to seeing pictures of the steps to the living roof. Nice work!
 
OP
R

RSwannabe

Well-known member
Joined
Dec 17, 2009
Messages
403
Walls are formed and getting poured today. The back wall of the garage is 9'10" high and designed to be backfilled to an elevation of 6'. Its full height concrete because there is no "heel" on the footing, thus allowing me to get the wall as close as possible to an existing hillside without disrupting the existing retaining wall. With no heel on the footing, the wall is designed to be braced at the top by the roof structure.
 

Attachments

  • Wall forms 140701.jpg
    Wall forms 140701.jpg
    103.6 KB · Views: 678
OP
R

RSwannabe

Well-known member
Joined
Dec 17, 2009
Messages
403
Walls poured and forms stripped. This weekend I'll be applying waterproofing, mounting drain board, and installing footing drains in preparation for backfilling next week.
 

Attachments

  • Forms stripped 140703.jpg
    Forms stripped 140703.jpg
    86.8 KB · Views: 776
OP
R

RSwannabe

Well-known member
Joined
Dec 17, 2009
Messages
403
Here is a pic from the perspective of our neighbor's yard to the east.
 

Attachments

  • image.jpg
    image.jpg
    88.2 KB · Views: 1,060

4AudiQ

Well-known member
Joined
Nov 30, 2012
Messages
167
Location
PDX
Should not the ecology blocks be staggered so that they inter-lock?
The break between the blocks should not line up with the one under it(like legos).
Subscribed.
 

SiGmA_X

Well-known member
Joined
Aug 13, 2005
Messages
1,111
Location
Portland, OR
Should not the ecology blocks be staggered so that they inter-lock?
The break between the blocks should not line up with the one under it(like legos).
Subscribed.
That's how I've always seen them, too.

This should be a good build.
 
OP
R

RSwannabe

Well-known member
Joined
Dec 17, 2009
Messages
403
Yes, the two rows of ecology blocks should be staggered to interlock them for greatest strength and stability. That is how the east retaining wall is. You are correct to point out that the north wall is not that way. That wall is not really doing much retaining work though, so I'm not worried about movement there. It is more there to match the east wall and secure about a 2 foot elevation difference.
 

metalmagpie

Well-known member
Joined
Nov 1, 2011
Messages
796
Location
Seattle
Looks great! Where are you in Seattle? Kind of looks like Wallingford, but it could be lots of places.

metalmagpie (across the lake in Kirkland)
 
OP
R

RSwannabe

Well-known member
Joined
Dec 17, 2009
Messages
403
Warren,

Have you been back anytime recently? If not, you'd be shocked by how Ballard has changed since then. It's hardly recognizable from the old Scandinavian fishing neighborhood full of dive bars. Now its full of high end restaurants, micro breweries and distilleries, and other assorted hipster bait.
 
OP
R

RSwannabe

Well-known member
Joined
Dec 17, 2009
Messages
403
Sitting around a bonfire on the beach at Golden Gardens is just as good as it ever was. Pretty great way to spend a summer night.
 
OP
R

RSwannabe

Well-known member
Joined
Dec 17, 2009
Messages
403
The garage is up against a hillside that has a lot of ground water movement much of the year. Thus last weekend I applied the waterproofing membrane to the portions of the garage walls that will have backfill against them (3'-4' on three sides). I used Miraseal (rubberized waterproofing coating) for that and then installed Delta-drain 6200 drain board over that. Footing drains then went in with drain rock and filter cloth before the rest of the backfill. These measures, along with a good capillary break and membrane under the slab should keep the garage dry.

Edit Dec 2016 - Two and a half winters in place and the garage is dry as a bone. All the below grade sealing and drainage have worked very well.
 
Last edited:
To avoid these ads, REGISTER NOW!
Top Bottom