To avoid these ads, REGISTER NOW!

Hitch Mount Portable Tire Changer Mod.....

Crow Horse

Well-known member
Joined
Dec 22, 2011
Messages
312
Location
Southern Tier, NY
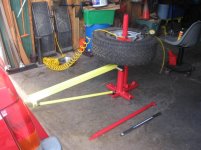
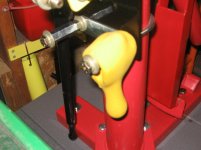
I needed to fab up a hitch mount for my Harbor Freight portable tire changer that would allow for the vehicle to be parked at an angle and keep the tire changer plumb. I was trying to do this as cheaply as possible, but I probably have $25-$30 into it. It killed me to have to buy steel at retail prices, but I didn't want to wait to get back into work.....

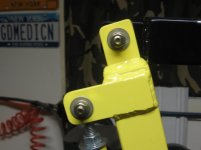
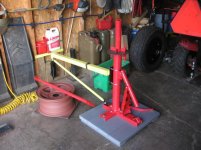
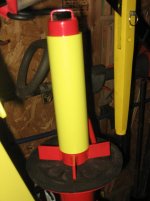
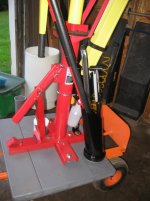
It's not completed yet but it's shaping up.......
 

Attachments

  • IMG_0488.jpg
    IMG_0488.jpg
    141.7 KB · Views: 310
To avoid these ads, REGISTER NOW!
OP
C

Crow Horse

Well-known member
Joined
Dec 22, 2011
Messages
312
Location
Southern Tier, NY
The first phase of this project is complete and pretty successful. I was able to mount a 235/75-15 without any difficulty. However, there are some refinements still to be made.

Fab or modify the original base. The one I received had a slightly distorted base plate caused by the heat from the welding. I tried to compensate with some ghetto "feet" but I was skeptical. I'm not sure if I'll make a new larger base from heavier material or make a small 30" x 30" platform for what exists.

Beef up or replace the bead breaker. Haven't used it yet but from what I've read, it is a weak point.

Fab up a new "cone" that holds the wheel in place. Again, from what I've seen, they can distort. Easy fab.......

Overall, I'm really please with the results......

I do have to admit that I couldn't figure out how to use the mounting rod properly and did use a spoon which was very easy to do.......
 

Attachments

  • IMG_0489.jpg
    IMG_0489.jpg
    96 KB · Views: 220
  • IMG_0490.jpg
    IMG_0490.jpg
    97.7 KB · Views: 171

theoldwizard1

Well-known member
Joined
Feb 22, 2011
Messages
43,123
Location
SE MI
Save your money for a NoMar Mount/Demount Bar - $125

TC-MDBar-Std-2.jpg


Also Murphy's Oil Soap (the paste) is a great lubricant for tire mounting !


murphy.jpg


You can dilute it with water and put it in a spray bottle.
 
OP
C

Crow Horse

Well-known member
Joined
Dec 22, 2011
Messages
312
Location
Southern Tier, NY
I like that but it sure is a lot of loot. I'd have a hard time justifying pulling the trigger on that one. Maybe if it were half the price........
 

Farmall 1066

Well-known member
Joined
Jul 21, 2012
Messages
1,805
Location
Suburban Rockford, NE
Beef up the bead breaker BEFORE you bend it all to hell! I didn't and it would have been less work to have done it beforehand. Plated both sides of mine with some 1/8" sheet metal, it ain't bending now!

Nice job on the mount. I made mine with a piece of square tubing, with a vertical angle iron that clamps to the changer with U bolts. Base is bolted to a piece of 3/8 plate.
 
OP
C

Crow Horse

Well-known member
Joined
Dec 22, 2011
Messages
312
Location
Southern Tier, NY
Beef up the bead breaker BEFORE you bend it all to hell! I didn't and it would have been less work to have done it beforehand. Plated both sides of mine with some 1/8" sheet metal, it ain't bending now!

Nice job on the mount. I made mine with a piece of square tubing, with a vertical angle iron that clamps to the changer with U bolts. Base is bolted to a piece of 3/8 plate.

Thanks.... Did you plate the bead breaker the entire length of the arms? I also wanted to replace the tube with some schedule 40 pipe....
 

Farmall 1066

Well-known member
Joined
Jul 21, 2012
Messages
1,805
Location
Suburban Rockford, NE
Yes, just scalloped it to clear the tube. I think if I'd have done it before it bent, one piece between, as a gusset would have been plenty. Left tube stock, and never had a problem, and I've done a lot of 30+ year old implement tires on it.
 
OP
C

Crow Horse

Well-known member
Joined
Dec 22, 2011
Messages
312
Location
Southern Tier, NY
I've got the bead breaker beefed up now. 1/8" steel on the back about 3/4's of the length of the arms and 2 pieces across the front. I think I should be good to go as far as this is concerned. Thanks for the heads up....
 

Attachments

  • IMG_0491.jpg
    IMG_0491.jpg
    84 KB · Views: 174
Last edited:

cheechi

Well-known member
Joined
Feb 29, 2012
Messages
4,384
Location
Triad, NC
If this is a dumb question, I'm just trying to learn not criticize. Why not add the hitch receiver equivalent to the wall of the garage, since you have the studs exposed just seems to make it easier and although your mod is neat, it's less necessary seems like.
 
OP
C

Crow Horse

Well-known member
Joined
Dec 22, 2011
Messages
312
Location
Southern Tier, NY
I had thought of that but when my stepson borrows it (which he will), he has cinder block walls in his shop.....

I might still do exactly what you said if I can find the correct size steel at work. In the interim, it's good to go......
 
To avoid these ads, REGISTER NOW!

cheechi

Well-known member
Joined
Feb 29, 2012
Messages
4,384
Location
Triad, NC
Cool. If you do please show us how it looks. I've been considering doing that since I only have a bumper mount anyway.
 

volleyball

Well-known member
Joined
Aug 29, 2011
Messages
4,127
Location
NY, not NYC
Make a plate that you can stand on to hold the unit in place. Have holes to be able to put spikes or screw into the current floor.
 

Farmall 1066

Well-known member
Joined
Jul 21, 2012
Messages
1,805
Location
Suburban Rockford, NE
Done everything from 13" car tires, to 4.00 x 19 tractor fronts.
Aluminum wheels on wife's truck still get remounted with spoons, but I have used the supplied bar, with a few wraps of duct tape to keep from scratching them.
 
OP
C

Crow Horse

Well-known member
Joined
Dec 22, 2011
Messages
312
Location
Southern Tier, NY
Cool. If you do please show us how it looks. I've been considering doing that since I only have a bumper mount anyway.

I started the garage mount and it was pretty simple. Being that I made "tabs" from 1/4" flat stock for the hitch mount, I just made a bracket that has one backed by a 2x4 between the studs (I actually used "polyboard").... I'll finish it up at work tomorrow....
 

Attachments

  • IMG_0498.jpg
    IMG_0498.jpg
    46 KB · Views: 71
  • IMG_0499.jpg
    IMG_0499.jpg
    81 KB · Views: 79
OP
C

Crow Horse

Well-known member
Joined
Dec 22, 2011
Messages
312
Location
Southern Tier, NY
I'm pretty much done with this project. Maybe a tweak or two but nothing major. I dismounted a tire and mounted on another rim. It worked perfectly. The base provided more stability and all it needed was one foot on it. I can see how valuable the No Mar dismount/mount bar is. The HF bar is pretty rough (casting) so I ground down the surfaces to make them mirror smooth. That's still no comparison to the No Mar as it's still metal on metal. I also covered the angle for breaking beads on the base with a thin strip of polyboard. Cut some thick rubber matting material for the rim to sit on. I'm very happy with it. I'm looking into some thermoform plastic to cover the ends of the mount/dismount bar to prevent scratching. If I can't do it on the cheap, I guess I'll be saving for the No Mar bar....
 

Attachments

  • IMG_0500.jpg
    IMG_0500.jpg
    101.2 KB · Views: 115
OP
C

Crow Horse

Well-known member
Joined
Dec 22, 2011
Messages
312
Location
Southern Tier, NY
I lied. This came to me last night and it was a no brainer. On the main arm I mounted the mini tire changer (with u-bolts)..... I'll finish it up at work tomorrow.......
 

Attachments

  • IMG_0501.jpg
    IMG_0501.jpg
    101 KB · Views: 86
OP
C

Crow Horse

Well-known member
Joined
Dec 22, 2011
Messages
312
Location
Southern Tier, NY
I found a piece of aluminum tubing that fit perfectly over the center post to act as a "bearing"......

Used some couplers to act as a "yellow thing" holder.....
 

Attachments

  • IMG_0520.jpg
    IMG_0520.jpg
    67 KB · Views: 51
  • IMG_0517.jpg
    IMG_0517.jpg
    69.6 KB · Views: 57
Last edited:
OP
C

Crow Horse

Well-known member
Joined
Dec 22, 2011
Messages
312
Location
Southern Tier, NY
Finished... I know I went overboard. Finished making a mount/dismount/spoon bar holder which swivels. I used aluminum tubing, capped using 3/4" aluminum plate and it sits on a 1/2" thick "washer" made from plastic (the type elludes me now)........

Yes, I sprung for the No Mar mount/demount bar......
 

Attachments

  • IMG_0521.jpg
    IMG_0521.jpg
    89.1 KB · Views: 60
  • IMG_0523.jpg
    IMG_0523.jpg
    73.2 KB · Views: 59
  • IMG_0522.jpg
    IMG_0522.jpg
    99.8 KB · Views: 68
To avoid these ads, REGISTER NOW!
Top Bottom