To avoid these ads, REGISTER NOW!

Modifications to the Kobalt 2-Drawer Tool Cart

CarsonConcepts

Well-known member
Joined
Jan 27, 2014
Messages
419
Location
North East, MD
Didn't see a thread for this cart and wanted to share my build.

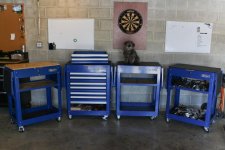
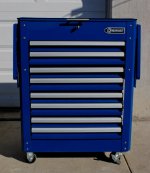
I picked up three of the carts when they went on clearance for $40 each. After looking them over I discovered the drawer sections were suspended from the top compartment and were a separate unit. Some measuring, drilling, and cutting later I ended up with a 6-Drawer cart and two shells.

The drawer units are bolted together with a 6 nuts and bolts with fender washers on each side. I used the pre-drilled top holes in each unit, to mark the bottom lip of the one above it to drill through. Also drilled a hole center of the rear lip to allow me to connect the locking mechanisms together.

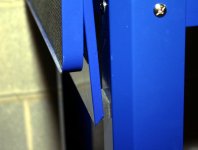
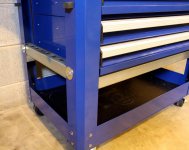
Because the drawers are mostly suspended from the top compartment, I was afraid it could not support the weight of two extra sets of drawers and contents. I used 2" uni-strut to create a base for the drawers to sit on. Two rails across the front and back, bolted to two rails running front to back, which are in turn bolted to the cart uprights. The bottom lip of the drawers are also bolted to the cross uni-strut pieces. This supports the drawers from below and ties them into the frame Made everything much more solid.

I removed the arm from two of the locking mechanisms and connected the three together with fishing line for now. Small chain or something would also work. If it breaks I'll replace it with something more robust, but it's what I had on hand at the time.

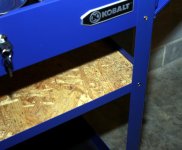
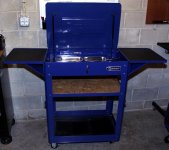
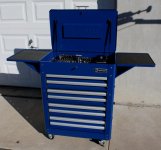
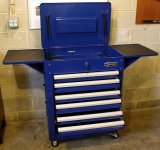
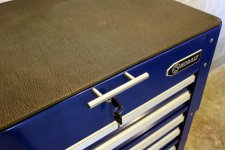
Added a handle and a mat to the lid and here is the end result.
 

Attachments

  • Kobalt Cart 1.jpg
    Kobalt Cart 1.jpg
    120.8 KB · Views: 296
  • Kobalt Cart 2.jpg
    Kobalt Cart 2.jpg
    109.9 KB · Views: 254
  • Kobalt Cart 3.jpg
    Kobalt Cart 3.jpg
    136.2 KB · Views: 242
  • Kobalt Cart 4.jpg
    Kobalt Cart 4.jpg
    51.8 KB · Views: 215
  • Kobalt Cart 5.jpg
    Kobalt Cart 5.jpg
    97.1 KB · Views: 202
Last edited:
To avoid these ads, REGISTER NOW!
OP
C

CarsonConcepts

Well-known member
Joined
Jan 27, 2014
Messages
419
Location
North East, MD
Future plans are to build a wooden top for it. The lid does not stay closed unless the key is locked, so the extra weight will keep it from opening.

The two cart shells I have left over will be turned into tear down carts. They still have the top compartment and the two folding shelves. I'll be adding a couple of shelves to the lower portion, and putting magnet parts trays in the top compartment. Should be great for parts while tearing down cars, golf carts, mowers, and such.

~ Carson
 

loranger

Well-known member
Joined
Feb 2, 2012
Messages
789
Location
DFW, TX
Thats sweet! Unfortunately I missed out on the really cheap boxes. The lowest they ever got around me was $100 before they cleared out.
 

erty67

Well-known member
Joined
Sep 30, 2012
Messages
1,151
Wow, that's nice! I got one at $64. Almost had a 2nd for $32 but it was "out of stock" when the store cancelled my online order. Haven't nodded it yet, but I'll be watching this.
 
OP
C

CarsonConcepts

Well-known member
Joined
Jan 27, 2014
Messages
419
Location
North East, MD
I got lucky when I found the three. Actually stopped in to look at something else from the Hot Deals thread and found one sitting on the floor in a corner. Asked if they had anymore and there ended up being two in the upper pallet racking. Had to stuff all three in my girlfriends Ion Coupe since I didn't have my wagon. That was a bit interesting.

It appears as though there is just enough room to put a 4th set of drawers on the bottom to make a full set. Though finding another one now is going to be difficult.

For the $120 I have into it I can't complain. Especially with two shell carts left over for further customizing.

~ Carson
 

southalabama

Well-known member
Joined
Jan 10, 2011
Messages
5,532
Location
Brewton AL
Those turned out good. I ended up with a pair and don't have any extra parts. If only I'd bought more.

The handle and top mat are nice touches. How did you mount? Tape or washers?

I had to remount the shelf mats with 3m tape.
 
OP
C

CarsonConcepts

Well-known member
Joined
Jan 27, 2014
Messages
419
Location
North East, MD
I also had to re-tape the side shelf mats on all three carts and the extra set of shelves I ended up with for my HF 4-Drawer. The 3M stuff has held up well so far.

The top mat is actually held on with small binder clips at the moment. Just clipped it over the corner edge and took off the silver arms, leaving just the black part of the clip behind. I plan on building a wood top for it and didn't want to modify anything yet but still wanted to protect it for now.

~ Carson
 
To avoid these ads, REGISTER NOW!

cheechi

Well-known member
Joined
Feb 29, 2012
Messages
4,384
Location
Triad, NC
Weren't they originally asking $199 for that cart? You made a $199 (or more) cart sir. Well done.
 

chipper

Well-known member
Joined
Feb 1, 2013
Messages
1,137
Location
Williamsburg, va
That's awesome!!! I picked up one for $27 and sold it for $100 assembled and I thought it was the strangest feature the the lid had to be locked to stay closed...you have a great cart now
 
OP
C

CarsonConcepts

Well-known member
Joined
Jan 27, 2014
Messages
419
Location
North East, MD
This is what I'm calling the "Tear-down Cart v0.5"

I'm helping a friend with an emergency motor swap this weekend and don't have time to build the tear-down cart to the plans I have sketched up. So I decided to throw something together with materials on hand.

To make the shelf I inverted the stock support L rails and cut a section of OSB to fit. It's not as strong as I would like, since the rails flex a bit, but will work for this weekend.

The top section is what I had envisioned on the final cart. I took some heavy rubber matting material and covered the screw driver holes on each side. 4 9" rectangular magnetic trays, and 4 6" round trays will help keeping bits and bolts grouped together.

I also added glue backed foam to the legs and bottom of the side shelves where they make contact with each other. Killed that rattling while rolling around the garage.

I'll eventually build proper shelves (thinking 2) that will be much stronger. Plan on bolting them to the legs with fender washers and short lag screws. Also adding a 3/4" thick wood top. This will be used mostly for small parts and bolts so it should hold up fine in it's final form. Obviously wont be throwing a transmission on top of it, haha.

~ Carson
 

Attachments

  • Tear Down Cart Version Half 4.jpg
    Tear Down Cart Version Half 4.jpg
    47.3 KB · Views: 73
  • Tear Down Cart Version Half 3.jpg
    Tear Down Cart Version Half 3.jpg
    69.7 KB · Views: 77
  • Tear Down Cart Version Half 2.jpg
    Tear Down Cart Version Half 2.jpg
    87.5 KB · Views: 88
  • Tear Down Cart Version Half 1.jpg
    Tear Down Cart Version Half 1.jpg
    86.2 KB · Views: 100
OP
C

CarsonConcepts

Well-known member
Joined
Jan 27, 2014
Messages
419
Location
North East, MD
Thanks to mrvm I was able to track down a 4th cart.

I'll be using the drawers to complete the tool cart, while the shell (left most) is another tear down cart for my girlfriend's father. I have $200 total into the 4 carts. Not bad for an 8-Drawer tool cart and three tear down carts.

I'll get pictures up of the final tool cart when I have a chance to install the last drawer set. Also have a couple little additions to the tear down carts I need to get pictures of as well.

~ Carson

attachment.php
 

Attachments

  • IMG_2331-RZ.jpg
    IMG_2331-RZ.jpg
    81 KB · Views: 408
OP
C

CarsonConcepts

Well-known member
Joined
Jan 27, 2014
Messages
419
Location
North East, MD
Got the addition of the last two drawers finished up last night. I'll have to get detail pictures later, but I'm thinking it came out great. Only down side is I now have two completely empty drawers, haha.

Ended up trimming down some 2x4's to support the bottom of the drawer stack down to the base tray. They landing almost perfectly over the caster bolts, so it should hold up well. This cart doesn't move much anyways. Got all the lock mechanisms to work correctly so all the drawers lock when needed.

Next steps are to either make a wood top, or ballast the lid in some way so I don't have to keep a key in it.

~ Carson

attachment.php


attachment.php
 

Attachments

  • IMG_2349-RZ.jpg
    IMG_2349-RZ.jpg
    65.5 KB · Views: 314
  • IMG_2352-RZ.jpg
    IMG_2352-RZ.jpg
    64.9 KB · Views: 307
OP
C

CarsonConcepts

Well-known member
Joined
Jan 27, 2014
Messages
419
Location
North East, MD
I'll have to get detail pictures this weekend. Forgot to take many as I was adding the final set of drawers, had a bit of a time crunch to finish it. I have a few vehicle projects that need to get done ASAP and I had all the drawers laid out across my benches, and the box on it's back in the middle of the floor, haha.

The first post does have a picture of basically how the drawer sections are attached. Each pair was originally suspended from the top enclosed area by 6 screws. I drilled a matching bolt pattern in the bottom lip/flange of each section, used trimmed fender washers to distribute load, and bolted the next section on. Since the top area was never intended to have 8-Drawers hanging from it, I have wooden blocks under the last section carrying the load down to the lower tray and on top of the caster mounts.

The original cart is rated at 1000#. With the drawer load resting over the caster mounts (front to back), and spanning the reinforcement ridges that run left to right along the caster mounts, it should hold up well.

~ Carson
 
To avoid these ads, REGISTER NOW!
Top Bottom