To avoid these ads, REGISTER NOW!

40' X 60' Shop Renovation

Paladin306

Well-known member
Joined
Jun 25, 2014
Messages
136
Location
Oklahoma City, OK
Greetings All:bounce:

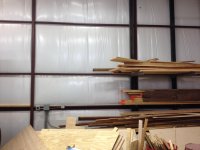
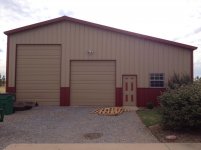
As I posted on the introductory thread I'm moving from a 24 x 36 stick shop to a 40 x 60 steel building with a slab floor. Some of this massive space will be parking / storage for my John Deere and it's trailer as well as my truck and mower. But the building will primarily be a Mancave. :thumbup:

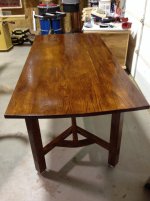
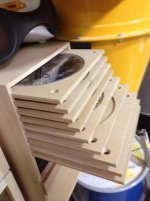
I can make sawdust by the barrel full and sometimes I make other stuff. Such as this oak dining table for my son or, this pot stand for my wife out of Eastern Red Cedar:

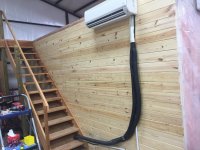
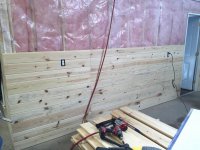
The building is already heavily insulated but is not heated or cooled. As we usually have several weeks where the temperature gets over 100 in the summer as well as into the 'teens in the winter I'll want to heat and cool it. So, I'm considering walling off the primary Mancave portion so that I can heat and cool it with a mini-split unit which require very little juice and are very efficient for large open areas.

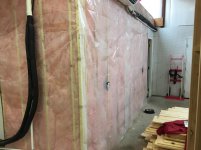
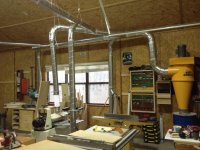
In addition, I'll probably add some stick walls to create lots of storage space and to hang my Dust Gorilla on (depicted in the bottom right photo below). But, I'm a little confused on the best way to accomplish this.

For instance, what's the best way to attach the bottom plate of the stud wall to the slab? Framing nailer, powder actuated gun or expansion fasteners such as anchor bolts?

Also, in fellow member green.bubbly's thread he recommended not fastening the wall to the steel purlins to allow for flex But, would the wall hold something like a Dust Gorilla which easily weighs around 300 pounds?

Thanks in advance and once we close on our contract I'll post some pics.

Mark
 

Attachments

  • 012167cd4cc595e2ba9dcdfd5b401572db7a7b6661.jpg
    012167cd4cc595e2ba9dcdfd5b401572db7a7b6661.jpg
    137.2 KB · Views: 696
  • 01a6d0000c54379c5df7ec43c25e8366f26d216e39.jpg
    01a6d0000c54379c5df7ec43c25e8366f26d216e39.jpg
    140.5 KB · Views: 678
  • 01e825f3563826c0c9a8a63e3933a3fdd25cbaecae.jpg
    01e825f3563826c0c9a8a63e3933a3fdd25cbaecae.jpg
    129.7 KB · Views: 800
  • 014d4dd910fd7791f918ec04ac5c1afa60372d30e2.jpg
    014d4dd910fd7791f918ec04ac5c1afa60372d30e2.jpg
    147.8 KB · Views: 590
  • 0118a2e3407199a981838b1e24479d1a533dc179e9.jpg
    0118a2e3407199a981838b1e24479d1a533dc179e9.jpg
    141.7 KB · Views: 743
  • 0178c28fa070840ea38c77153695324cdda5d1ceff.jpg
    0178c28fa070840ea38c77153695324cdda5d1ceff.jpg
    141.6 KB · Views: 1,052
To avoid these ads, REGISTER NOW!

fnieto

Well-known member
Joined
Aug 27, 2013
Messages
1,401
Location
Tucson,Arizona
Re: Building the Ideal Mancave

Nice shop. Man caves are for *****....cats.
One can still drink beer and hang out in a shop:spit:
 

Dan in Pasadena

Well-known member
Joined
Feb 18, 2009
Messages
13,103
Location
Pasadena, CA
Re: Building the Ideal Mancave

"Man cave" is so trite that it now reminds me of the women that belong to some screwy club that requires them to wear red....or purple, I forget which.

It's like militant nonconformity in a group...which of course is not nonconformity at all!

Now that's we've all busted your balls....how can we help?! Lol.
 

Jmatlock88

Well-known member
Joined
Jul 28, 2012
Messages
164
Re: Building the Ideal Mancave

For instance, what's the best way to attach the bottom plate of the stud wall to the slab? Framing nailer, powder actuated gun or expansion fasteners such as anchor bolts?

The way I prefer is the powder actuated gun (Ramset), but you can use tapcons or anchor bolts as well. Do not use a framing nail gun.

so that I can heat and cool it with a mini-split unit which require very little juice and are very efficient for large open areas.

Mini split will work well, just buy one that is sized for the room (load).

bubbly's thread he recommended not fastening the wall to the steel purlins to allow for flex But, would the wall hold something like a Dust Gorilla which easily weighs around 300 pounds?

He is describing a top floating wall. Your wall will be anchored at the sole plate via the Ramset. Fasten a wood nailer to your perlins. Build your wall about 1" short of that height. The top plate of the wall will be "pinned" by pre-drilling holes in the top plate and adding large nails to attach it to the nailer. This allows the roof to flex without loading up the wall.
 

JC23

Well-known member
Joined
Dec 31, 2009
Messages
11,718
Location
Northcoast
Re: Building the Ideal Mancave

Anchor bolts installed when you pour are yer best bet.

You getting the picture bout the Mancave name? Haha
 

Hornman

Well-known member
Joined
May 9, 2013
Messages
517
Location
Southwest DFW
Re: Building the Ideal Mancave

Pay no attention to those knuckledraggers. It's your place, you can call it anything you want.
 

Gerald O

Well-known member
Joined
Mar 5, 2013
Messages
1,884
Location
NC
Re: Building the Ideal Mancave

You all do know that the word 'mancave' was invented by women to mock those 'icky' workshops we men prefer to spend time in.
 

Outlander

Well-known member
Joined
Jul 30, 2010
Messages
5,154
Location
Quebec, Canada
Re: Building the Ideal Mancave

Well after the zombie apocalypse and we are sent back to the stone age the women will all be interested in coming to our caves.

Pot stand is interesting.
 
OP
P

Paladin306

Well-known member
Joined
Jun 25, 2014
Messages
136
Location
Oklahoma City, OK
Re: Building the Ideal SHOP

The way I prefer is the powder actuated gun (Ramset), but you can use tapcons or anchor bolts as well. Do not use a framing nail gun.

Thanks!

Mini split will work well, just buy one that is sized for the room (load).

Yes sir, that's the main reason I'm thinking about partitioning off the Shop from the parking area for my truck and equipment.

He is describing a top floating wall. Your wall will be anchored at the sole plate via the Ramset. Fasten a wood nailer to your perlins. Build your wall about 1" short of that height. The top plate of the wall will be "pinned" by pre-drilling holes in the top plate and adding large nails to attach it to the nailer. This allows the roof to flex without loading up the wall.

Pardon my amateur questions but should I attach the wood studs to the vertical bridging or girts as well? In other words, if I partition it off there will be a free standing wall, which I believe your answer pertains to but, I would also like to "skin" the current walls to be able to hang various items on such as the dust collector.

Thanks in advance.
 

Cyberbear

Well-known member
Joined
Nov 23, 2013
Messages
1,524
Location
California
Re: Building the Ideal Mancave

Just use some common sense for supporting the top of your wall and shoot the bottom in with powder actuated pins if it's an interior stud wall with standard construction. Interior walls do not normally require a PT mudsill. Shear panel the wall for easy mounting of stuff and that wall should handle plenty of weight. If the wall is tall and long, consider 2 x 6 studs and dbl. top plate. It's always better to over build than not.
 

LS6 Tommy

Well-known member
Joined
Dec 27, 2013
Messages
26,162
Location
Northern NJ
Re: Building the Ideal Mancave

Sorry, I can't contribute anything useful to your construction question, but I'm gonna throw my $.02 in anyway...
AFAIC, a "Mancave" is a lame attempt at throwing someone's husband a bone by setting up a semi-masculine space, usually designed by the same type of yuppies that say a room is "whimsical"...

Tommy
 
Last edited:
OP
P

Paladin306

Well-known member
Joined
Jun 25, 2014
Messages
136
Location
Oklahoma City, OK
Re: Building the Ideal Mancave

Just use some common sense for supporting the top of your wall and shoot the bottom in with powder actuated pins if it's an interior stud wall with standard construction. Interior walls do not normally require a PT mudsill. Shear panel the wall for easy mounting of stuff and that wall should handle plenty of weight. If the wall is tall and long, consider 2 x 6 studs and dbl. top plate. It's always better to over build than not.

Thanks Cyberbear! :beer:

Our house sold in only 4 days and we close on both our current house and the newer house and SHOP in only 27 more days!:bounce:

Sorry, I can't contribute anything useful to your construction question, but I'm gonna throw my $.02 in anyway...
AFAIC, a "Mancave" is a lame attempt at throwing someone's husband a bone by setting up a semi-masculine space, usually designed by the same type of yuppies that say a room is "whimsical"...

LOL, You're a little late to the man cave bashing as I've already been converted to a Shop fan. But, just to be sure, there is no "throwing a bone to me on this by setting up a semi-masculine space" as the Shop is larger than the house! And, that space is reserved for such things as housing the John Deere tractor, Ferris zero-turn mower and massive amounts of woodworking.

(I did get a laugh out of the wording you used though.):bounce:

Mark
 

BikerDad

Well-known member
Joined
Apr 24, 2014
Messages
975
Location
Utah
Re: Building the Ideal Mancave

In the 60's wasn't it called a DEN ???

yup, it was. Only catch is, since the 60's the Man of the House has been chased out of the den and into either the basement or the garage, i.e. "prime" real estate. The den has been converted into a Yoga Studio or her home office.
 

ARCTIC_RAGTOP

Well-known member
Joined
Apr 26, 2013
Messages
175
Location
Yellowknife, NWT
Re: Building the Ideal Mancave

yup, it was. Only catch is, since the 60's the Man of the House has been chased out of the den and into either the basement or the garage, i.e. "prime" real estate. The den has been converted into a Yoga Studio or her home office.

Hahahah. Holy **** this thread is hilarious
 
OP
P

Paladin306

Well-known member
Joined
Jun 25, 2014
Messages
136
Location
Oklahoma City, OK
Re: Building the Ideal Shop

The ultimate SHOP has endured a couple of setbacks to include the normal rigor of moving and unpacking as well as a back surgery which has put me in neck brace for six weeks, (only 4 weeks left) to go. :bounce:

But, now that we actually own the place here's a few pics.

This is a 40' x 60' shop with an inner "office" in the back that's about 16' x
16'. There is a large loft on the right hand side which provides a large amount of extra storage. We obviously still have a lot of unpacking etc. to do. And, we're keeping the prior owners RV trailer until their home is built. So, things are going slowly but, going none the less.

One of the first things I'd like to do, after I get clearance from the doc and get things cleared away a little is install wood walls with tongue and groove pine or cedar planks on top of the existing steel walls and insulation. I'm not totally convinced that I will do this all the way to the roof as the tall side is about 19' high. But, on the other hand, if I'm going to do it might as well do it right.

I still have a couple of novice questions though. I understand the part about using the Ramset on the sole plate (versus a framing gun) but, having never used one I'm taking it that it would adhere the sole plate to the hardened concrete?

Secondly, what's the best way to attach the 2 x 6 studs to the girts?

Thanks in advance. I've already researched these questions through several other threads but I still don't "get it" totally.

Mark
 

Attachments

  • IMG_0887.jpg
    IMG_0887.jpg
    129.6 KB · Views: 676
  • IMG_0886.jpg
    IMG_0886.jpg
    141.2 KB · Views: 952
  • IMG_0888.jpg
    IMG_0888.jpg
    143.1 KB · Views: 729
To avoid these ads, REGISTER NOW!
OP
P

Paladin306

Well-known member
Joined
Jun 25, 2014
Messages
136
Location
Oklahoma City, OK
Re: Building the Ideal Mancave

Well it's taken longer than I expected but finishing the interior of my shop has finally started in earnest. First order of business was to get some receptacle drops wired in from the ceiling so that my woodworking machines will have juice. The electrician also did the wiring for the two 2 1/2 ton mini-split systems which will provide heating and cooling for those days of extreme temperatures. Then mini-splits were installed.

Next, I pulled down the old pegboard and have begun installing tongue and groove pine on the walls. Started with a couple of inside walls that cordon off a small office area but, eventually will do the ones the ones that really matter.

Mark
 

Attachments

  • IMG_1092.jpg
    IMG_1092.jpg
    141.1 KB · Views: 491
  • IMG_1093.jpg
    IMG_1093.jpg
    135.9 KB · Views: 436
  • IMG_1099.jpg
    IMG_1099.jpg
    138.1 KB · Views: 540

kingstrider

Well-known member
Joined
Dec 14, 2014
Messages
114
Location
Lowcountry
Re: Building the Ideal Mancave

Wow that's a sweet setup with loads of room. I'm hoping to get back into woodworking and building guitars when I retire.
 

Nighttrain

Well-known member
Joined
Aug 6, 2009
Messages
2,682
Location
Dripping Springs, Tx
Re: Building the Ideal Mancave

I have the same size shop and went through some of the same concerns you have. I used self taping screws on the the 2x4 which I attached to the purlins. Then sheet rocked to those. Also used Ramset nails for my office. Take a look at my build thread. It covers a lot
 

LS6 Tommy

Well-known member
Joined
Dec 27, 2013
Messages
26,162
Location
Northern NJ
Re: Building the Ideal Mancave

Thanks Cyberbear! :beer:

Our house sold in only 4 days and we close on both our current house and the newer house and SHOP in only 27 more days!:bounce:


LOL, You're a little late to the man cave bashing as I've already been converted to a Shop fan. But, just to be sure, there is no "throwing a bone to me on this by setting up a semi-masculine space" as the Shop is larger than the house! And, that space is reserved for such things as housing the John Deere tractor, Ferris zero-turn mower and massive amounts of woodworking.

(I did get a laugh out of the wording you used though.):bounce:

Mark


I should have been a little clearer. I was more objecting to the term "mancave" than any particular end user's idea of what the space should be. It's your space. Do what you want with it. It's fine with me. I'm just fed up with "garage" catalogs that are full of production line designer trinkets that were obviously conceptualized by someone who has never even held a screwdriver. Things that have "mancave" stamped on it or cheesy furniture featuring fake car parts or $300.00 aluminum sheet metal paper towel holders just don't figure into any space I would have, whether it's for work or relaxation...:lol_hitti

Tommy
 
Last edited:

coljar

Well-known member
Joined
Sep 26, 2010
Messages
6,243
Location
Belpre, Ohio
Re: Building the Ideal Mancave

I should have been a little clearer. I was more objecting to the term "mancave" than any particular end user's idea of what the space should be. It's your space. Do what you want with it. It's fine with me. I'm just fed up with "garage" catalogs that are full of production line designer trinkets that were obviously conceptualized by someone who has never even held a screwdriver. Things that have "mancave" stamped on it or cheesy furniture featuring fake car parts or $300.00 aluminum sheet metal paper towel holders just don't figure into any space I would have, whether it's for work or relaxation...:lol_hitti

Tommy

You pretty well summed it up. I told my wife, no more mancave! Sounds like a gay bar. The best thing I could come up with to call that part of the shop when it's done is "the lounge".
 

mark11

Well-known member
Joined
Jul 8, 2013
Messages
135
Re: Building the Ideal Mancave

Very nice work, I love the stretchers on the table. I see some Woodpecker, now you need some Festool green.
 
OP
P

Paladin306

Well-known member
Joined
Jun 25, 2014
Messages
136
Location
Oklahoma City, OK
Re: Building the Ideal Mancave

Thanks for the comments, guys. It's certainly going to be a long term project but I'll get there eventually.

I have the same size shop and went through some of the same concerns you have. I used self taping screws on the the 2x4 which I attached to the purlins. Then sheet rocked to those. Also used Ramset nails for my office. Take a look at my build thread. It covers a lot

Nighttrain,

Thanks for the info! I have been viewing your thread with great interest. (I know I've seen it before but, I'm not sure I made it all the way through it.) However, I am now committed to travel the entire thread as it has provided several thought provoking ideas.

One question I have is why did you use tar paper on the back of your wood frames. Extra insulation value? Condensation protection?

I think I had some other questions but, before I go there I want to go back through, make some notes and get to the end. Thanks in advance.

Here's a few more pics:

First interior wall is finished, with the exception of the very top board which I intentionally left off until I get the wall it connects to done just to make sure they both come out more or less even. To do this wall I took down the supporting post on the left of the stairway and then removed all of the many screws that supported the stairway.

Once it was totally free I was then able to pull it away from the wall just a couple of inches. (The heat/air guys had built a little slack in the lines just for that purpose.) They also mounted the mini-splits on 3/4" plywood so that the southern pine would slide under the front covers of the mini-splits and every thing come out nice and tight. Which as I think you'll see in the pics did just that very well.

And, while I am a hobbyist woodworker, I'm a total rookie at all of this construction stuff. So, for any other rookies out there I'll just note that this tongue and groove pine went together very well for the most part. (This will be "old hat" for most of what I consider to be experts on this board.) I've had a few boards which ended up a little warped and I just dedicated them to the pile for the shorter pieces so that the warp would be insignificant. I've used a rubber mallet to knock the sections together and then a 16 gauge Max nailer to place the nails on the inside of the top of the boards with the groove. So, once the next board is placed on top of that one it totally covers up the nail for a very nice nail free look.

Next pic just shows the mini-splits.

And, the final pic shows the other exterior wall of the "office" about half finished. I picked these two walls to finish first primarily because I plan on being able to use much their wall space to hang a variety of items on which, in turn will get them off the floor and out of my way for the rest of the build. (As I think stated upthread we're still keeping a large motor home for our sellers who were extremely nice in allowing us to move much of our items in prior to closing.) So, it's still a little crowded but, that will all change once their new home and shop is built.
 
OP
P

Paladin306

Well-known member
Joined
Jun 25, 2014
Messages
136
Location
Oklahoma City, OK
Re: Building the Ideal Mancave

Well, so much for the pics posting as I thought they would:
 

Attachments

  • IMG_1110.jpg
    IMG_1110.jpg
    140 KB · Views: 288
  • IMG_0454.jpg
    IMG_0454.jpg
    133.8 KB · Views: 290
  • IMG_1116.jpg
    IMG_1116.jpg
    141 KB · Views: 283
OP
P

Paladin306

Well-known member
Joined
Jun 25, 2014
Messages
136
Location
Oklahoma City, OK
Re: Building the Ideal Mancave

just fed up with "garage" catalogs that are full of production line designer trinkets that were obviously conceptualized by someone who has never even held a screwdriver. Things that have "mancave" stamped on it or cheesy furniture featuring fake car parts or $300.00 aluminum sheet metal paper towel holders just don't figure into any space I would have, whether it's for work or relaxation...:lol_hitti

Tommy[/QUOTE]

Howdy Tommy,

I totally understand, and agree with your point so don't worry about it. And, when my wife asked me "what I'm going to do today?" I certainly don't say I'm going to the mancave, but rather "I'm going to the shop."

Very nice work, I love the stretchers on the table. I see some Woodpecker, now you need some Festool green.

Thanks Mark! That's a Hayrake Arts and Crafts dining table from www.finewoodworking.com. The plan #is SU 25 but, if you're a member of the fine woodworking.com website (for which there is a yearly charge), there is a video series which will give you everything you need. As I'm a "power tool guy" it was definitely a good project to expand my hand tool skills!

Mark
 
OP
P

Paladin306

Well-known member
Joined
Jun 25, 2014
Messages
136
Location
Oklahoma City, OK
Re: Building the Ideal Mancave

On the right half of this pic you can see the corner of a large loft which runs along much of the south wall of the shop, (approximately 30' long x 10' deep. Certainly provides a lot of storage space.

As I plan on making the wood frame walls, my question is, would you make the effort at unloading, unbolting, etc. and pulling this out so that the wood frames and pine could slide in behind it in similar fashion to the way I did the stairway? Or, just build the bottom half below the loft and the top half above it?

The walls on that side are 12' 3" high so I'm assuming they would have to be built in a top and bottom sections anyway maybe 8' for the bottom half and then the remaining distance for the top.

Mark
 
OP
P

Paladin306

Well-known member
Joined
Jun 25, 2014
Messages
136
Location
Oklahoma City, OK
Re: Building the Ideal Mancave

I'm getting ready to start putting up the 2x4 frames. Anyone have a suggestion on scaffolding or some kind of personnel lift?

My south wall is a little over 12'. So, if would be easy enough to reach with about a 6' scaffold which would come at a pretty reasonable price. But, the height of my north wall is almost 16'. And the tallest peak, which I would want to be able to get to at some point is a little over 18'. So, I would need something that has a platform height of at least 12'.

In addition, I'm assuming I would make the bottom sections about 8' tall. Is this reasonable? So, I'll need something big enough to get the top halves up their.
Any other tips would be appreciated as well.

Thanks in advance.

Mark
 

shortykorte

Well-known member
Joined
Sep 1, 2014
Messages
8,034
Location
Tallahassee, Fl
Re: Building the Ideal Mancave

On the right half of this pic you can see the corner of a large loft which runs along much of the south wall of the shop, (approximately 30' long x 10' deep. Certainly provides a lot of storage space.

As I plan on making the wood frame walls, my question is, would you make the effort at unloading, unbolting, etc. and pulling this out so that the wood frames and pine could slide in behind it in similar fashion to the way I did the stairway? Or, just build the bottom half below the loft and the top half above it?

The walls on that side are 12' 3" high so I'm assuming they would have to be built in a top and bottom sections anyway maybe 8' for the bottom half and then the remaining distance for the top.

Mark
Is the wood frame wall going floor to ceiling, enclosing the loft area or for framing out the exterior wall? If you are talking about a free standing wall, the full length stud would be the way to go (especially by code). Can you post a picture where the wall is going?
 

shortykorte

Well-known member
Joined
Sep 1, 2014
Messages
8,034
Location
Tallahassee, Fl
Re: Building the Ideal Mancave

I'm getting ready to start putting up the 2x4 frames. Anyone have a suggestion on scaffolding or some kind of personnel lift?

My south wall is a little over 12'. So, if would be easy enough to reach with about a 6' scaffold which would come at a pretty reasonable price. But, the height of my north wall is almost 16'. And the tallest peak, which I would want to be able to get to at some point is a little over 18'. So, I would need something that has a platform height of at least 12'.

In addition, I'm assuming I would make the bottom sections about 8' tall. Is this reasonable? So, I'll need something big enough to get the top halves up their.
Any other tips would be appreciated as well.

Thanks in advance.

Mark
First question. If you are going with a two piece wall, how are you going to tie the two together. Since the wall isn't load bearing it shouldn't be a big problem. What type of interior wall covering will you use? The weight and placement could cause the wall to buckle inward at the 8ft height unless it is tied to the purlins, braced between the two or bolted.
Have you thought about metal studs? This could make the job easier, and the walls straighter and all continuous. If metal is more, it makes up in ease of install. Probably not the best solution if you continue with the wood siding.

For scaffolding, my neighbor had two standard sections. I rented wheels, a short section and walk boards from the scaffold company. The rental was cheaper than I expected. A good tip, check to see if there is a daily, weekly, month rate, longer term could save in the long run. I also rented a Genie material lift to get my joist and decking up for the loft areas. $75 for the weekend and well worth it. I also rental a electric man lift to install the 7 exterior panels. I fabbed a wood clamp to hold the panel (20' long), hooked clamp to rail, up I went.
 

Nighttrain

Well-known member
Joined
Aug 6, 2009
Messages
2,682
Location
Dripping Springs, Tx
Re: Building the Ideal Mancave

Mark. Just following up on your build. I used the tar paper as a cheap insurance for a little weather protection, even though it's all inside the walls I figured it wouldn't hurt. For scaffolding I found a two section high unit 12' total with top rails and outrigger wheels on CL for $200. It was well worth it especially when I did my lighting. Tractor Supply has this same set up but you should check CL. Use it for a year then sell it for same price. I still have mine out in the barn. I use it for shelving now.
 
OP
P

Paladin306

Well-known member
Joined
Jun 25, 2014
Messages
136
Location
Oklahoma City, OK
Re: Building the Ideal Mancave

Is the wood frame wall going floor to ceiling, enclosing the loft area or for framing out the exterior wall? If you are talking about a free standing wall, the full length stud would be the way to go (especially by code). Can you post a picture where the wall is going?

Howdy Shortykorte,

Unless plans change, (and currently, I don't know why they would) I plan on the framing being from the floor to ceiling on the interior side of all four of the exterior walls. Basically everywhere you currently see the while insulation in these pics:

This is a small portion of the 60' long north wall:

View media item 47430
This is currently the best pic I have of the east wall (in the back) as well as a little of the south wall.

View media item 47401
So, the "wall" will be going behind the loft area which I can hopefully pull out about a foot or so, to allow me to slide a wall frame behind it. At least that's the plan. I have no clue if I can pull the loft out enough or not. So, no, I won't be enclosing the loft area at this point.

Currently, my progress has been delayed due to some health concerns and I hope to be back at it in a couple of weeks.

So, I've been working on some projects that are a little less intense. The business that originally installed the overhead doors told me that reverse angle weatherstripping had to be installed at the time of the original installation. However, I later found out that's not true. So, I installed it on all three of the overhead doors as well as a different strip of weatherstripping along the top of the door to cure several drafty spots.

I just loosened the screws holding the door frame one by one and slid the weatherstripping behind the frame and then tightened up that bolt before I loosened the next bolt. Here's a pic:

View media item 48272
I've also been working on this workbench which will also serve as an outfeed table for the table saw and a storage center for various tools.

Prior to our move I had the bench built up to this point: Drawers are installed and just need the drawer fronts.

View media item 48275
These drawers are really large! I'm not a "neat nut" but, I am trying to get things to a point where I can find a tool when I want to use it. And, if it has a home it won't end up being piled on top of the table saw!!!

View media item 48274
5 Drawers done with 2 to go! I used Sapele, (a cousin to mahogany) for the fronts because I liked the contrast.

View media item 48277
Mark
 

bgarrett

Well-known member
Joined
Feb 11, 2006
Messages
4,393
Re: Building the Ideal Mancave

You all do know that the word 'mancave' was invented by women to mock those 'icky' workshops we men prefer to spend time in.


First time I heard 'mancave' was from a cute real estate woman. I hated it instantly
 

mygarageone

Well-known member
Joined
Oct 16, 2013
Messages
2,691
Location
Munising , Mich
Re: Building the Ideal Mancave

Mark. Just following up on your build. I used the tar paper as a cheap insurance for a little weather protection, even though it's all inside the walls I figured it wouldn't hurt. For scaffolding I found a two section high unit 12' total with top rails and outrigger wheels on CL for $200. It was well worth it especially when I did my lighting. Tractor Supply has this same set up but you should check CL. Use it for a year then sell it for same price. I still have mine out in the barn. I use it for shelving now.

Tar paper ? I have been told not to use that inside a conditioned space due to the Oder it will give off when it's warmed up , even inside a wall ?
You haven't experienced that yet ?
 
To avoid these ads, REGISTER NOW!
Top Bottom