To avoid these ads, REGISTER NOW!

My 1954 BelAir project.

DEEDDUDE

Well-known member
Joined
Jan 9, 2012
Messages
161
Location
Beach City, Texas
As promised I stated in my thread about my building I would show you guys some of my projects that I would do when the shop was completed. Well the shop isn't total complete, but is functional as is.

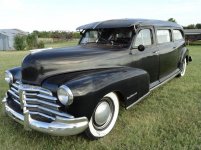
I bought this 54 a while back, before the shop, and started working on her on my only day off usually every other Sunday. The first photo is what she looked like before I started all the work. What started out as doing a rear end swap and a 5 speed morphed into this project.

I cut and pasted all the updates and photos from another site I so if it doesn’t make a lot of sense this is the reason. I have learned a great deal from this site and I wanted to share that with this post. One thing I learned was how to ****-weld sheet metal properly from MP&C, I believe that’s the correct posters name, with professional results. Thanks. The photos don’t show the detail, but many people have seen the car and cannot believe the panels are ****-welded.

I will split the thread up into multiple post.


I have a 1954 Chevy Bel Air that will get a 2001 Trans Am LS1 and 4L60E. The engine and trans combo have less than 39K. I’m building my own harness with the help from many of the member’s threads concerning stand alone harnesses that frequent the conversion and hybrid section of this forum."

I'm also installing a mustang II front suspension and ford 9" with bags. The project will take some time because of my work schedule. I'll update with pictures as I can.
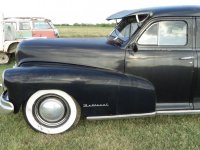
Picture of the car.

100_0180.jpg
 
To avoid these ads, REGISTER NOW!
OP
D

DEEDDUDE

Well-known member
Joined
Jan 9, 2012
Messages
161
Location
Beach City, Texas
These came today along with the wire factory harness, pedals and cruise control box.

photo_zpsc9c1012a.jpg


Behind the crate is the rear end that will soon go in also.

photo-12_zps40299c96.jpg


Small update. I got to put a few hours into the project today. I reorganized the wiring from the motor and just about completed the fuse box. I reclaimed all of the wire used in the fuse box from the original wiring harness, trying to keep with the GM color codes. I only have the interior wire harness and not the one under the hood so some of the wires don't match.

Fuse box pics. I'm not real happy with the fuse holders and relay holders, I may replace these at a later date; but I'm just going to get the car running first. (which means I'll never redo the fuse box):D

photo.jpg


photo2.jpg


After I took the pictures the term organized chaos came to mind. Maybe that's the name for this build.
 
OP
D

DEEDDUDE

Well-known member
Joined
Jan 9, 2012
Messages
161
Location
Beach City, Texas
Small update. I tried updating this thread yesterday, but I kept closing the thread when toggling between LS1 and the photo host. Anyway. I finally got a Saturday off. (shhhh… no one knows) After working on three other cars and cleaning out my storage unit in another town I was able to get to work on the ’54. I started with a running driving car and ended up with this.

019_zps9c30aeee.jpg


I got a lot of work completed for just a few hours of work and working by myself.


It took a couple hours to get the body and frame apart, but even longer to get the chassis from underneath the body. The notch kept hanging up on the floor boards. I did this without my engine hoist. If I was smart I would have went and got the hoist, but I would rather spend all day fighting and cussing.

021_zps97201525.jpg


I mocked the narrowed ford 9” rearend up with the disc brakes. It clears by about 1/2" on each side. The rearend is just about complete. Weld brake hose tabs and paint.

020_zps0e282a31.jpg


The swap may take even more time after getting the body in the air I could actually see the cars floorboards had even more rot than excepted, all of the floor supports are gone. There are several different ways I can attack this and all the parts are available, but expensive.

This weekend I’ll try to get the engine pulled and the rear trailing arms installed. The plan is a 2-link with panhard bar. The front will be a custom mustang II.

018_zps8ae93aa2.jpg


Thanks for viewing.
 
OP
D

DEEDDUDE

Well-known member
Joined
Jan 9, 2012
Messages
161
Location
Beach City, Texas
Update: Over the last two weeks I've only had the opportunity to work on the car for two of those days. Here's the progress. Excuse the mess I took these as soon as I finished cycling the bags up and down. Finished the rear air bag install, I still need to install the pan hard bar. I have been thinking about a watts link, still undecided.

010_zps6910c11b.jpg


I'm making my own lower cross member and upper mounts, I don't like the way kits on the market mount the uppers. Racing slicks make the perfect table, I hate working on the floor.

011_zps2a5f0db0.jpg


012_zpsd44391e7.jpg

Update as promised, just late. I got a little time after work today and I snapped these, this is the work I did last Sunday.
Front layed out.

001-2_zps6f942a9f.jpg


Better view
002-1_zpsd356651f.jpg


Front and rear layed out. The rear frame will get sectioned so the car will lay rockers; if my math is correct.

004-1_zps49c4e4e2.jpg


I built these brackets with a chop saw and a grinder.

005-1_zps7b7f6fc4.jpg


008_zps2b5805e2.jpg


Front at approximate ride height. The sway bar is from a G-body GM, used for mock up purposes; I'll probably use a 1-1/4".

012_zps4ebc3c70.jpg


Update. I got a little closer to getting the engine and trans ready for the chassis. Needed to finish the welding on the rear suspension. I ended up building a 3-link. I had to salvage the work I already did for the 2-link. I think it turned out ok. All the brackets I built using a chop saw and grinder.

Rearend 3-link upper.


Upper rear shock mount.


Everything tied together.


Another shot from the front.


Front sway bar mount.


Motor mount.


That's it for now.
 
OP
D

DEEDDUDE

Well-known member
Joined
Jan 9, 2012
Messages
161
Location
Beach City, Texas
Painted the chassis and started re-assembly. Got the engine and trans installed along with the front suspension. Hopefully have a roller next weekend.


I tried updating last week, but had issues with my work computer. Anyway. I got a lot of work done the last couple weekends. I've got a roller now and have the body back on. I'll have to pull it back off for the floor board and wheel well replacement.

This is as low as I could get it before the wheel well modification. I had to cut them twice and I think I'll need a little more when the trailer fenders get here.


Here she is laying rockers. There's a lip under the rockers where all the sheet metal meets, I don't think I'll remove it.


Engine installed. I had to cut the trans tunnel quite a bit to get the 4L60E in there.


My nicely painted fuel tank is now a catch all and has a few bruises.


Cut wheel wells.

 
OP
D

DEEDDUDE

Well-known member
Joined
Jan 9, 2012
Messages
161
Location
Beach City, Texas
I built a VATs disable unit and got the engine running pretty easily, after a few tries. I had the ignition and ground just wrapped around the other just to get it running. First the ground came off and I fixed it then the ign fell off. I kept getting the ole' run for a few second syndrome. This is my first fuel injected car to work on, but I've read so much I figured that would be were to start my trouble shooting. After I connected them permanently the car fired right up.

I installed the fuse panel in the glove box by building a metal pan, but later removed it for a couple reasons. First the relays were crooked and secondly, I followed someone wiring diagram for the fans and it wasn't allowing the fans to come on; it would latch the relay on (or what sounding like on). I fixed it easily also. A lot of the wiring is just temporally installed at this point to see if the engine ran.


The radiator is installed.


I modified the existing shift leaver system to work with the new trans. Also in the pictures is the steering shafts. I got the column mounted too.


Another mount was modified for the shift selector on the trans.


Both the f-body accelerator pedal and a new cable were installed. The OBD II port is placed so I can use the port for the scanner until I get the gauges working.


I drilled and tapped the oil pressure what ever you call it above the filter to accept the factor gauge oil pressure tube, works great. No pictures.

I tried to extend the water temp sensor, but messed it up twice, I'll try one more time before I send the gauges in for a remodel. I've read if you freeze the bulb you can do the repair yourself. I guess I didn't freeze it enough. I also drilled and tapped the right cylinder head to accept the mechanical gauge bulb. Thanks to the site for the knowledge to do it. I used the grease and blow air through the pump method.


All of the above went easily, now the part that have given me the most trouble is the thunderbird rack. It will work with the LS1 power steering pump, but you must have the proper connectors. I though I would just buy the hoses for the rack, take them down to the parts store and have the old pressure hose and the new hose connected. Well I did and it didn't work. After a lot of cursing and research I found that the rack has metric fittings and the hoses are sae. How that works I don't know. All of the parts store web sites show the sae hoses and metric racks. So I cursed even more. I found the hoses and fitting from a source that I should have went to in the first place, but I like to do every thing twice.

I still need a few parts to have the car driving and stopping, but that's on hold until I can get a few pennies saved.

Small update. I've been slowly making progress. I didn't like the radiator top mount so I removed it, still trying to deside how I want to do it. I made these front wheelwells yesterday. As you can see I cleaned up the wiring. I left the power and ground hooked up just to start the engine from time to time.

I used the existing wheel well and cut them to use the trailer fenders, I'll come back later and close them off leaving clearance for the upper a-arms.


I don't like the air filter placement so I'll buy another 90 elbow and move it closer to the inner fender wells.
 
OP
D

DEEDDUDE

Well-known member
Joined
Jan 9, 2012
Messages
161
Location
Beach City, Texas
I mocked up the exhaust. F-body manifolds to an off road pipe set-up from dyno max, I believe, to a 3-1/2" dyno max bullet. It's not welded in yet, I have to geta driveshaft and make sure I have plent clearance. It doesn't sound bad, but when I get a few pennys saved up I'll do a cam swap.

Small update. I've been working out of town so the updates may not come as quickly as they have. Finally got the brakes finished and bleed. I first painted everything and while that was drying I started on the pedal assembly. I used the f-body brake and bracket. I lengthened the pedal thinking the little 8" booster wouldn't work very well, well I was wrong. After reinstalling everything and bleeding and bleeding the brakes I had no pedal. I spent the better part of a day a couple weeks ago messing with this thing. Got brake fluid everywhere messing up my freshly painted parts. After some research I not only lengthened the pedal again, but also so the pivot to the rod. I now have a 4:1 ratio and it seem to be ok. I need to bleed the brakes again once I get some help.


Instead of spending $300+ for a driveshaft I found an aluminum one on e-bay from a crown vic. I was thinking it was too short so I installed a long yoke, well again I was wrong; reinstalled the short yoke and bolted her up. I used a conversion joint on the front so I could use the GM slip yoke to the transmission.


The weather here is crappy and I wanted to do a test drive, but instead I tested the brakes and the Ford true track, or what ever Ford calls it; I've forgotten the name. Here's some proof that it works. The LS-1 lit the tires up so easily I had to open the shop up to air out.


The picture doesn't reflect the amount of smoke those little tires produced. Can't wait for a test drive.

Sorry guy it's been so long since I've updated, I've been real busy working on the car and forgetting to take pictures. I finished the exhaust and I did this while the floor was in the car. I removed the floor today. I took 2-45 degree bends, found the centers and cut them to make an offset to clear the driveshaft.


Before adding the straight run of pipe after the "y" I noticed this, from a well "marketed" exhaust company, and cut it all out; this is supposed to be a 3" outlet, it's actually 2-3/4" and this made it less than 2". hmm. no pic of the finished product.


The exhaust was heading right to the rear cross member so I modified it with some 5" tubing I had laying around.


I started the body work a week or so ago. The right side didn't have an previous repairs so it went ok.


The left side had these issues.


The bondo went as high as you see the paint buffed off.


Also modified one of the rear wheel tubs to put some fat tires in the back to hopefully plant the power the LS-1 makes.


I've gotten only a few days work into it and this is what's completed, I still need to continue to grind the welds flush. I'm learning to use body hammers and dollies. I've never done any body work before except on my stock cars and that was using rivets and duct tape.

This is the rot I cut out and that's the reason for all of the mounts.


Enjoy the pictures. Still plenty to do, wish me luck.
 
OP
D

DEEDDUDE

Well-known member
Joined
Jan 9, 2012
Messages
161
Location
Beach City, Texas
Small update. Not getting a lot of work done and what little I do is under the floor boards. A couple photos of the interior, I still need to finish welding a few spots and repair others. The next day I have off I'll start working the rear quarters again and hopefully get the tubs installed.


A few more pics. I'm getting a little bit done each weekend. Finally got the tubs in and started on the trunk. I have more completed than the pics show. One more weekend and I believe I'll be finished in the trunk and start back underneath the car. My goal is to be back running, not finished, by the end of April.
I built a frame with 1" x 1" under the center of the trunk sheet metal and made it removeable so I can get to the battery. The fuel tank just fit in the area thanks to my BFH. I'll get pics of that later. Also built a frame to support the sides with 1/2" x 1/2". Pics to follow as well.


Short video of the second drive around the hood. My wife shot this without my knowledge or I would have done a burnout.
54 2 - YouTube
 
OP
D

DEEDDUDE

Well-known member
Joined
Jan 9, 2012
Messages
161
Location
Beach City, Texas
Sorry guys it's been awhile since updating, I've been busy with odds and ends on the car, but mostly driving. Here are a few photos. I used a f-body shifter and modified it with a soild linkage and extended lever. I wanted to use a stock shifter to utilize the reverse lock out, parking lights and the signal to the pcm for park.


I still need to make a center console.

Here are a couple of the air ride system.


I repaired the fender, the piece on top was the rot I cut out.


And a couple in da weeds. Laying frame and rockers.


Enjoy


This should get everyone caught up to date. Thanks for viewing.
 
OP
D

DEEDDUDE

Well-known member
Joined
Jan 9, 2012
Messages
161
Location
Beach City, Texas
Nice build. Was wondering if you were going to leave it rusty?

Thanks for the compliment.

I will try to match the faded paint on the new panels, but leave the patina and seal it with clear. My opinion these cars look good with the aged look.

Thanks again
 
Last edited:

shawnspeed

Well-known member
Joined
Sep 11, 2009
Messages
326
Looks like someone has built a few roundy round cars...good work, and I am sure it is a blast to drive...
 
OP
D

DEEDDUDE

Well-known member
Joined
Jan 9, 2012
Messages
161
Location
Beach City, Texas
Looks like someone has built a few roundy round cars...good work, and I am sure it is a blast to drive...

I have and repaired many more. HaHa.

The red and blue cars I built from the ground up. The black one I rebuilt after wading it up in turn three after blowing out the right front tire at the track in the photo.


Thanks for the complements.
 
To avoid these ads, REGISTER NOW!
OP
D

DEEDDUDE

Well-known member
Joined
Jan 9, 2012
Messages
161
Location
Beach City, Texas
Very nice work . I love the look of those cars. How long would you say it has taken to get it to this point?

jhn9840
John

John, Thanks for asking, I meant to put that in the original post. I worked on the car one day every two weeks for about six months then about one day a week for about 8 months, so about 6 to 8 weeks back to back; 50 to 60 working days. Some weeks I didn't work on it during the 8 month period. If I would have had a good donor car without the body and floor board rot I believe I could get done in about 3 weeks or less. Thanks for the compliment.


Thank You.
 
Last edited:

Kevin54

MEMBER EMERITUS
Joined
Jan 12, 2005
Messages
29,341
Location
Urbana, Ohio
I like the way the car lays out. Most that drop has so much camber they look bad to me, but when yours is up or down, the tires still look like they are still in the same vertical position. Very nice.

You may not know, but there is a vacant 2 acre lot across from me for sale. You could get out of all of that Texas heat and move on up to Ohio and get 4 seasons in a weeks time. You help me out, and I have some machines to help you out....Deal?

J/K......fantastic, and in my opinion. a quick job with what all you have done. Are you sure you want "patina"? It sure would look sweet finished up with a nice gloss paintjob on it. Maybe a Candy Crimson, or a sweet Candy Green?
 

TF50

Member
Joined
Mar 27, 2012
Messages
10
How do you adjust caster and camber with the way you have your upper A-arms mounted? Usually the crossbolt is perpendicular of the way you have it and the bolts mount in slots for adjustment.
 
OP
D

DEEDDUDE

Well-known member
Joined
Jan 9, 2012
Messages
161
Location
Beach City, Texas
I like the way the car lays out. Most that drop has so much camber they look bad to me, but when yours is up or down, the tires still look like they are still in the same vertical position. Very nice.

You may not know, but there is a vacant 2 acre lot across from me for sale. You could get out of all of that Texas heat and move on up to Ohio and get 4 seasons in a weeks time. You help me out, and I have some machines to help you out....Deal?

J/K......fantastic, and in my opinion. a quick job with what all you have done. Are you sure you want "patina"? It sure would look sweet finished up with a nice gloss paintjob on it. Maybe a Candy Crimson, or a sweet Candy Green?

Thanks Kevin, I designed the front suspension pickup points after a lot of research. I have a program where I put info in and it gives me a set of numbers where I can then determine where to move the points for proper placement. Basically move it around in the computer until you get the info you need to place them correctly. Now this is for stock cars, but it works very well with any car; in my opinion. The BelAir is no road racer, but she handles very well. Those cars/truck you're referring to have poorly designed systems, too much camber gain; but you rarely see them driving that way.

I have a cousin in Ohio. Her and her husband own a hot rod resale shop in Painesville. From my understanding he is well known in those parts for his creative style in cars, their Camaro was the "centerfold" in one of Summit's catalogs last year; I forget the month. I think together he and I could build some really nice rides.

Oh. I don't mind the heat, cold not so much.

If it was any other car I would agree with those colors.

Thanks for the comments.
 
OP
D

DEEDDUDE

Well-known member
Joined
Jan 9, 2012
Messages
161
Location
Beach City, Texas
How do you adjust caster and camber with the way you have your upper A-arms mounted? Usually the crossbolt is perpendicular of the way you have it and the bolts mount in slots for adjustment.

TF50, Good question, you adjust the caster and camber just like any other car with shims. Or what I did is make spacers the lengths I needed for proper alignment. This didn't take too much time because I placed the uppers where they needed to be when setting the suspension up before welding
 

KCarGuy

Well-known member
Joined
Feb 5, 2009
Messages
2,075
Location
50 miles outside Chicago, illinois
Very Impressive Work.
I am also Loving your Vision and How your putting is all together.
I am Torn between the Car being all Painted and Beautiful or Leaving it Original, with old Interior (Mexican Blanket Material for seats)
No Matter what...Its Going to be a Slick Ride!
 

BUGTHUG

Well-known member
Joined
Nov 12, 2010
Messages
2,960
Location
Kansas
really dig the chevy, the way you did the fab work makes it look easy. I know a lot of hours are invested in the ole 54. I have your next project now that you have some space freed up.:lol: How about some work on the 54's daddy? Have any ideas??
 

Attachments

  • 021.jpg
    021.jpg
    146.9 KB · Views: 77
  • 017.jpg
    017.jpg
    147.8 KB · Views: 63
  • 016.jpg
    016.jpg
    145.6 KB · Views: 61

Stooge

Well-known member
Joined
Mar 24, 2013
Messages
3,533
Location
South Shore, MA
Outstanding work happening in here! ive been on the hunt for a 49-54 chevy for a few years now, and thank you for saving another from becoming scrap!

thanks for sharing and keep the pictures coming!
 
To avoid these ads, REGISTER NOW!
Top Bottom