
These photos were all lost due to the photo bucket fiasco. I've just re -edited my first 3 posts here so I could host all 13 photos here (due to the 7 photo per post limit I went back to my 1st 3 posts since hey all had more photos as well) I hope it's not too confusing to follow now.
Wire Whippings seem to be slowly disappearing but I bet many of you have some tools either you or some old timer has put a whipping on. If so please post some photos on this thread, it's a dying art. Wire whippings are used for many things. I learned to do them for spicing cables to keep the strands from spaying out. I used to put whippings on my splitting axe handles right from new as well as using them on slicks and wood chisels.
When working with wire, wire rope or cable there are names for each end. The running end is the end that keeps going from where you are working with it and the dead end is the short end you are starting with.
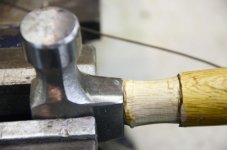
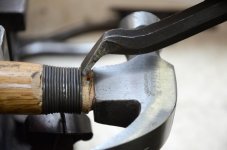
To make a really nice job you can cut down a 1/16” trough in the handle where your whipping will go. This is not necessary but it has a nicer finish. I repaired a cracked hammer handle from work here for this demo. This chinese handle was pretty well rotten right through so I did kind of a hack job on it but had it been a respected tool I would have made a more precise trough.

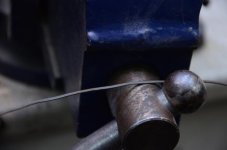
You will get a much neater winding if yoiu take all the little bends and kinks out of your wire before you start. You’ll need 5 or 6’ of tie wire. Grab each end with a pair of pliers or wrap each end around a screwdriver shank or bolt, anything and bend the middle of the wire over something round and solidly situated. I used my vice screw. With lots of pressure slide the wire over the round steel implement, back and forth until all the fine bends and kinks are gone and it has just a smooth curve to it.

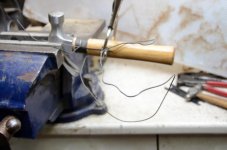
There are a few different patterns you can make with the windings but this is my favorite as it is neat and simple and is unlikely to come apart from abrasion. Start with a right angle bend 6” from one end of your wire and hold it so the the bend is at the end of the trough you made or if you are not using a trough it will be where the end of your whipping will be. The dead end of the wire is running along the middle of the handle on the wide side of the handle. Now wrap the running end right around in a complete wrap over top of your 90’ bend and keep going until you have got to the middle of your trough.

Now lift the dead end up and lay one more wrap under it.

That was the easy side, now we do the tricky part, I hope I can explain without getting tongue tied.
Take the running end and lay it across the whipping in the opposite direction to the dead end and also over top of the last winding you did. The last winding you did will always be under both the running end and the dead end.
You will be working with the center of the wire now in a big loop so you can pass this big loop over and over the handle with each wind.

I clamped the running end to the handle to free my hands up to get a photo but anytime something like this helps you manage by all means do what is necessary. Remember how nice and smooth the wire was when you passed it over the round object? It will be getting some new kinks again but we’ll get to them.

Use a smooth plier handle or what have you to smooth them as best you can. They should be at the end of the wire and will likely be cut off eventually.

Wire Whippings seem to be slowly disappearing but I bet many of you have some tools either you or some old timer has put a whipping on. If so please post some photos on this thread, it's a dying art. Wire whippings are used for many things. I learned to do them for spicing cables to keep the strands from spaying out. I used to put whippings on my splitting axe handles right from new as well as using them on slicks and wood chisels.
When working with wire, wire rope or cable there are names for each end. The running end is the end that keeps going from where you are working with it and the dead end is the short end you are starting with.
To make a really nice job you can cut down a 1/16” trough in the handle where your whipping will go. This is not necessary but it has a nicer finish. I repaired a cracked hammer handle from work here for this demo. This chinese handle was pretty well rotten right through so I did kind of a hack job on it but had it been a respected tool I would have made a more precise trough.
You will get a much neater winding if yoiu take all the little bends and kinks out of your wire before you start. You’ll need 5 or 6’ of tie wire. Grab each end with a pair of pliers or wrap each end around a screwdriver shank or bolt, anything and bend the middle of the wire over something round and solidly situated. I used my vice screw. With lots of pressure slide the wire over the round steel implement, back and forth until all the fine bends and kinks are gone and it has just a smooth curve to it.
There are a few different patterns you can make with the windings but this is my favorite as it is neat and simple and is unlikely to come apart from abrasion. Start with a right angle bend 6” from one end of your wire and hold it so the the bend is at the end of the trough you made or if you are not using a trough it will be where the end of your whipping will be. The dead end of the wire is running along the middle of the handle on the wide side of the handle. Now wrap the running end right around in a complete wrap over top of your 90’ bend and keep going until you have got to the middle of your trough.
Now lift the dead end up and lay one more wrap under it.
That was the easy side, now we do the tricky part, I hope I can explain without getting tongue tied.
Take the running end and lay it across the whipping in the opposite direction to the dead end and also over top of the last winding you did. The last winding you did will always be under both the running end and the dead end.
You will be working with the center of the wire now in a big loop so you can pass this big loop over and over the handle with each wind.
I clamped the running end to the handle to free my hands up to get a photo but anytime something like this helps you manage by all means do what is necessary. Remember how nice and smooth the wire was when you passed it over the round object? It will be getting some new kinks again but we’ll get to them.
Use a smooth plier handle or what have you to smooth them as best you can. They should be at the end of the wire and will likely be cut off eventually.
Attachments


Last edited:


") ............Good one KamiCrit!
............Good one KamiCrit! 


 40' below and dry then apply the wire hot so it shrinks when it cools.


 copy.jpeg")
 copy.jpeg")