To avoid these ads, REGISTER NOW!

Single-player double garage

tiggi

Well-known member
Joined
Sep 12, 2014
Messages
253
Location
USA
Greetings all,

I've enjoyed reading this forum for some time now and in part is responsible for where I am headed as far as the hobbies and maybe even work. In comparison to some of you out there what I do in my garage seams so insignificant but I enjoy it and it makes me want to do more and better.
For little background, I moved in my current home little bit over 2 years ago. I did lot of work on customizing the house and backyard to fit our needs. I took out half of the wooden deck and built a patio with wood burning pizza oven and built in bbq. Almost like an outdoor kitchen. Also built a shed which was a key to freeing up some space in the garage.

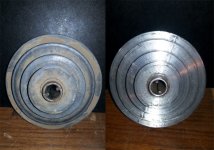
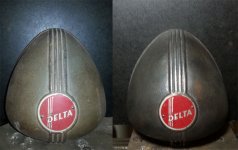
So for the past 6 month I've been accumulating tools and building work area. Most of my previous projects have been with wood, stone, concrete, but I discovered that I like working with metal which I did not have any serious experience with. So after getting few key tools I am already working on few projects and have lot more planned.
Don't want to make this too long and too boring so I leave you with few pic since I know how much you guys like pics.

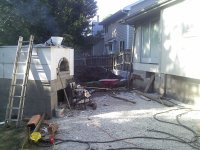
Here is the patio build in progress
attachment.php

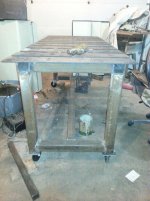
This one is with finished oven and the floor. I also built the table.
attachment.php

Here is the shed just before the final paint.
attachment.php

I don't have any pics of pizza, they usually don't last long, but here are some breads I made.
attachment.php
 

Attachments

  • PHOTO_20130803_180839.jpg
    PHOTO_20130803_180839.jpg
    131.7 KB · Views: 939
  • 20140730_070608.jpg
    20140730_070608.jpg
    76.3 KB · Views: 936
  • 20140907_155557.jpg
    20140907_155557.jpg
    112.5 KB · Views: 937
  • PHOTO_20130922_101017.jpg
    PHOTO_20130922_101017.jpg
    94.7 KB · Views: 934
To avoid these ads, REGISTER NOW!
OP
T

tiggi

Well-known member
Joined
Sep 12, 2014
Messages
253
Location
USA
Tonight I spend some time restoring the Delta drill press I got over the weekend. Started working on the motor first, this thing is all kinds of dirty. Traced all the wires to their end points. I will be more than happy when I am done with rewiring it, as long as I do it right. After that I cleaned up few part that I was able to turn in my lathe.

All the wires run in between the windings
attachment.php


Here are some before and after pictures.
Quill
attachment.php


Spindle
attachment.php


Feed Handle
attachment.php
 

Attachments

  • 20150127_193259.jpg
    20150127_193259.jpg
    96.1 KB · Views: 856
  • 20150127_192003.jpg
    20150127_192003.jpg
    74.6 KB · Views: 862
  • 20150127_190041.jpg
    20150127_190041.jpg
    59.9 KB · Views: 859
  • 20150127_185604.jpg
    20150127_185604.jpg
    115.4 KB · Views: 863
  • 20150126_202613_resized.jpg
    20150126_202613_resized.jpg
    122.4 KB · Views: 19
  • 20150126_182747_resized.jpg
    20150126_182747_resized.jpg
    93.3 KB · Views: 19
  • 20150125_130100_resized.jpg
    20150125_130100_resized.jpg
    71.8 KB · Views: 27
OP
T

tiggi

Well-known member
Joined
Sep 12, 2014
Messages
253
Location
USA
Pinion Shaft
attachment.php


Pulley
attachment.php
 

Attachments

  • 20150127_194543.jpg
    20150127_194543.jpg
    48.5 KB · Views: 852
  • 20150127_204610.jpg
    20150127_204610.jpg
    90.5 KB · Views: 855
OP
T

tiggi

Well-known member
Joined
Sep 12, 2014
Messages
253
Location
USA
Did some more cleaning on the drill press, should have it primed and painted by the end of this week.

Drilled and tapped all the holes on the table for the tops to mount. Next to do is to countersink all the wholes so the screws will be flush with the top. As soon as I do this table will be usable, but there is plenty more to do. I tried 3/4" single cutting edge countersink bit which didn't work. I tried it in the drill press, regular drill, slow speeds, fast speeds, with and without oils. I was not able to get a single hole countersunk. I don't know if its a bit or am I doing something wrong. It was quite disappointing. I'll try getting a different bit.

attachment.php

attachment.php

attachment.php

attachment.php
 

Attachments

  • 20150202_192615.jpg
    20150202_192615.jpg
    124.2 KB · Views: 776
  • 20150201_212741ba.jpg
    20150201_212741ba.jpg
    76.9 KB · Views: 778
  • 20150202_192335.jpg
    20150202_192335.jpg
    93.3 KB · Views: 777
  • 20150202_192238.jpg
    20150202_192238.jpg
    92 KB · Views: 777

OzarkMan

Well-known member
Joined
Dec 3, 2014
Messages
556
Location
Ozark Missouri
Looks nice!
I am a connoisseur of Pizza. Love the bread you pictured. What did you end up doing for stairs from the house to the patio?
 
OP
T

tiggi

Well-known member
Joined
Sep 12, 2014
Messages
253
Location
USA
Don't get me started on pizza and bread lol. I didnt do anything to the stairs yet. Those doors lead into the dinning room and we have another one from the family room. I am still debating what to do. I might even just put a window instead of the door. We never used those anyway.
 
OP
T

tiggi

Well-known member
Joined
Sep 12, 2014
Messages
253
Location
USA
I've been busy restoring a drill press and swing saw. Both of them are almost done, just need to mount motors and switches. I'll be posting pictures when it's all done.

Yesterday I brought home nice filing cabinet so today I decided to put some casters on it and put it into use.

Cabinet had adjustable feet so I reused the hole for the casters. The hole was about 1/4 and the casters are 3/8. So i had to enlarge it and thread it again. For the life of me I couldn't find 5/16 drill bit so I went with the closest size. I had an extra 0.04" to work with but it turned out fine.
attachment.php

First caster in, 3 more to go.
attachment.php


attachment.php

All done, now I got to tip it over, this thing is not light at all.
attachment.php

I am really liking this cabinet. Plenty of room and pull out drawers makes it easy to get to the stuff especially if it's in the back. I ended up looking through the garage to find stuff I can put into it lol. I placed that grinder in there just for fun and then :headscrat
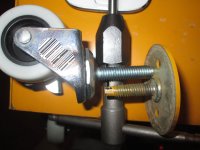
, hey I can actually use it there. Just pill out the drawer when I need it. So I am going to run a power cord into the cabinet for the grinder and also for the battery chargers.
I need to get some more of these cabinets for sure.
attachment.php


Another thing on my list for next week is removing mill scale of the fabrication table. I already tried wire wheel and cup but that thing is tough. Need a different plan, maybe muriatic acid.
 

Attachments

  • IMG_0427.jpg
    IMG_0427.jpg
    99.3 KB · Views: 637
  • IMG_0426.jpg
    IMG_0426.jpg
    79.8 KB · Views: 637
  • IMG_0425.jpg
    IMG_0425.jpg
    78.5 KB · Views: 640
  • IMG_0424.jpg
    IMG_0424.jpg
    51.6 KB · Views: 637
  • IMG_0423.jpg
    IMG_0423.jpg
    47.6 KB · Views: 638
To avoid these ads, REGISTER NOW!
OP
T

tiggi

Well-known member
Joined
Sep 12, 2014
Messages
253
Location
USA
Took the drawers out of the file cabinets and hung the shells on the support beam. It fits perfectly and it gives me some extra storage for the stuff I don't use often.
attachment.php


attachment.php

Now I need to figure out what to do with the drawers. I have some big shelves made out of 2x4s and plywood, I might built drawers into it.
attachment.php
 

Attachments

  • IMG_0473.jpg
    IMG_0473.jpg
    68.5 KB · Views: 496
  • IMG_0474.jpg
    IMG_0474.jpg
    84.9 KB · Views: 493
  • IMG_0475.jpg
    IMG_0475.jpg
    105.4 KB · Views: 493
OP
T

tiggi

Well-known member
Joined
Sep 12, 2014
Messages
253
Location
USA
I got some casters at HF for the welding table. The idea is attached them to some square tubing and slide them into the legs. One reason is so I can make the height adjustable in the future if I need to. I would just drills some holes and use a pin to set the height. Also I want to add some leveling legs and I have not decided where I want to place those. So if I ever need to remove them I lift the table and slide them out.

attachment.php


Biggest pain was lifting the table initially so I can slide a lever under it. After that I used car jack to lift the table.
attachment.php

One side in and then I realized that the casters don't have breaks. I guess I was more concerned about the price and the max load that I didn't pay attention to what I was getting.
attachment.php

All four in so I took the table for a spin around the garage.
attachment.php
 

Attachments

  • 20150225_211157.jpg
    20150225_211157.jpg
    73.8 KB · Views: 487
  • 20150225_211703.jpg
    20150225_211703.jpg
    113.5 KB · Views: 486
  • 20150225_212053.jpg
    20150225_212053.jpg
    106.2 KB · Views: 486
  • 20150225_213659.jpg
    20150225_213659.jpg
    104.5 KB · Views: 488

kriv4o

Member
Joined
Apr 9, 2010
Messages
8
^ 100% agreed. I am in the design process of the same concept for my back yard. Would you share some info/links on the pizza oven design?
 

Terranova

Well-known member
Joined
May 12, 2008
Messages
854
Location
Grove City, OH
Man that yellow cabinet makes me nervous. It looks top heavy as hell to be on casters. One small crack in the floor while rolling and all your tools come tumbling down. That's how it'd happen for me! Lol. At least put the tools on the bottom and the paint on top.

Nice use of the shelves over the garage door.
 
OP
T

tiggi

Well-known member
Joined
Sep 12, 2014
Messages
253
Location
USA
^ 100% agreed. I am in the design process of the same concept for my back yard. Would you share some info/links on the pizza oven design?

Thanks, the only resource you need for pizza oven is the Forno Bravo Forum. You'll find lots of different designs and ideas. I made my own design and process based on the information there. I went with casting refractory cement to cast my oven in pieces where most do it with refractory fire bricks. I would be more then happy to share my process if you're interested.


Man that yellow cabinet makes me nervous. It looks top heavy as hell to be on casters. One small crack in the floor while rolling and all your tools come tumbling down. That's how it'd happen for me! Lol. At least put the tools on the bottom and the paint on top.

Nice use of the shelves over the garage door.

Thanks for the advice. I was just throwing stuff in there just to see how it looks and holds. I do have lot heavier items on the bottom now.

Those shelves are actually in the middle of the garage, there is support beam running down the center. But I am looking for some more of those file cabinets so I can put them above the garage door.
 
To avoid these ads, REGISTER NOW!
Top Bottom