To avoid these ads, REGISTER NOW!

First "Machine": Free Horizontal Mill

classicJackets

Well-known member
Joined
Sep 26, 2014
Messages
448
Location
SE Michigan
Hey guys,
I posted up a "help identify" over in the fabrication thread before going to get this today, but I finally got it loaded up and almost set in a new place.
Got it for free on Craigslist.

Anyway, I've never owned any sort of machinery before so this is a major first for me. I'll start with pictures.

20150217_162654_zpsyaozbdoj.jpg

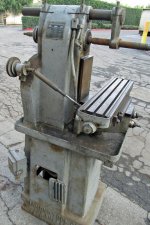
(friend for size reference in the back, machine's about 5' tall)

20150217_180305_zpstqkapjht.jpg

20150217_180313_zps1jx1u0ps.jpg

20150217_180328_zpsxtoruseg.jpg

20150217_180345_zpsgvoib4sp.jpg


There was a Vice that I was able to get for free as well:
20150217_180831_zpsk3x7reqb.jpg

20150217_180839_zpslltr6cll.jpg


Loading this damn thing took us about 2 hours to move it 150 feet. Gotta weigh 600 pounds. Had to scoot over some mud and up a hill and onto some grass before loading it into the bed of a pickup truck. The engine hoist poured out fluid as soon as we finished and loaded up, so I'm not sure how we'll get it out of the truck bet yet. Took 4 of us and a driver to get it loaded, precariously :shocking:

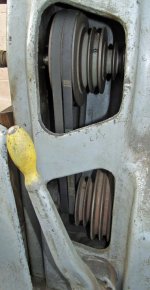
So... I'll probably hop on over to Practical Machinist before long to figure out what I've got and what I'm missing. It may take me a little while but I would like to see this as a running mill again. Both a good thing and a bad thing: The guy who was there before (and took the vertical metal bandsaw :tantrum2::tantrum2:, also for free) partially disassembled the mill to where it is now. I have absolutely no idea what I'm doing or how to make this goal happen other than lots of research and advice from people who have done similar. I may be in over my head, but I'm excited to learn as much as possible and hopefully save an old machine (for FREE!) If anybody knows what possible date range this could be from, I would love to know.

As I said, expect slow progress. Have to work around school...
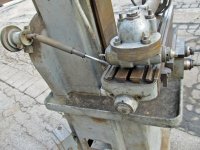
And, as came up in the original "identify" thread, if you or your workplace have extra cutters for this piece, feel free to have me pay to ship them here :)

Doug
 
Last edited:
To avoid these ads, REGISTER NOW!
OP
C

classicJackets

Well-known member
Joined
Sep 26, 2014
Messages
448
Location
SE Michigan
Can't beat the price on those two! What shape is the compound table in? I've never used a mill or anything but from what I've seen they can be very useful with the right setup.

As for being in over your head, that's what they call learnin'

The table has been upside down and pretty well takes 2 people to flip upright (heavy!) But other than old, the machine seems to be in pretty good shape, I think.
 

longlivepunk

Well-known member
Joined
Feb 22, 2013
Messages
377
Location
Edmonton, AB, Canada
I'll see if I can rescure some of those old slitting saws and involute cutters and such. Not sure the shipping would be worth it, though. What size is the arbor?
 
OP
C

classicJackets

Well-known member
Joined
Sep 26, 2014
Messages
448
Location
SE Michigan
^That's fair. Just realized you're a looong way up there, haha. Not even sure. I'll try to get out and measure tonight but I don't have much better than a tape measure or maybe calipers here.
 

A_Pmech

Well-known member
Joined
May 8, 2007
Messages
8,002
Location
IL
That should be a good first project for you! I hope you got all the parts! Make sure to update the thread as you fix it!
:)
 
OP
C

classicJackets

Well-known member
Joined
Sep 26, 2014
Messages
448
Location
SE Michigan
^ Thanks!
I'm antsy tonight and went out and moved the table out of the truck. Had to see what shape it was in. It also looks great (to my untrained eye)! Needs some cleaning. Apparently the guy was a hoarder, and both of the items I managed to get "seemed" almost unused, just very dirty. I guess we'll see.
20150218_002943_zps1cjwcfam.jpg

Doug
 

LXCam

ALLIANCE MEMBER
Joined
Apr 23, 2013
Messages
19,075
Location
AZ
Holy **** have you got a project now. Congrats on the new toy, but you're gonna learn that free is gonna cost you dearly :p
 

Fretters

Well-known member
Joined
Jan 25, 2014
Messages
4,217
Location
South Yorkshire, England
You got that for the best price possible. :D Nice find. That will be a very good, and probably lengthy, learning project, but one which is well worth putting some time and effort into. Just remember to not put anything abrasive to use on cleaning the machined surfaces. Elbow grease and subtlety alone.
 

larry_g

Well-known member
Joined
Apr 28, 2007
Messages
16,864
Location
oregon
Good score. I'm going to give a bit of advise here. First is to take NO abrasives to the ways to clean them up. The ways if the machine are where the precision is so if you grind or damage them then your precision goes down the drain. Second is to treat the leadscrews and arbor with kid hands, ****** them and your out big money. Third is I would suggest that you remove the arbor soon to prevent damage to it. It is probably stuck and if so I 'll give you a method to remove it without beating things to death.

Seeing that table setting like it is in the picture above I know it is on the ways and not doing them any good. Though this is a heavy bit of iron it can be easily damaged.

Good luck on your adventure. My latest adventure in a machine is here, http://www.garagejournal.com/forum/showthread.php?t=273996 . Not exactly the same machine but the concepts are.

lg
no neat sig line
 

nine4gmc

Well-known member
Joined
Mar 24, 2012
Messages
14,357
Location
Dallas
Can't beat free but dang that's going to be a learning experience that will cost you in the end!
 
OP
C

classicJackets

Well-known member
Joined
Sep 26, 2014
Messages
448
Location
SE Michigan
Yep, nine I'm sure I'll have to put a little money into it. As long as everything necessary to make it work is there, then that's okay. However, some research shows that Diamond is on the "much less common" scale of older machines, so if almost any parts are missing i'll pretty much end up parting this to make/use as some cool pieces, I guess. My fear is that the guy who broke it apart took some of the pieces with him to who knows where.
 

zkling

Well-known member
Joined
Jan 23, 2007
Messages
16,939
Can't beat free but dang that's going to be a learning experience that will cost you in the end!

:+1: Some of my most expensive projects have started out with a free item.

I'm now older and slightly wiser.

classicJackets, I'd start by laying everything out to see what all you are really missing or is damaged vs what you need to get the machine running. The fact that someone else removed the knee is a little worry some. Hopefully the gibb (if equipped) is still there.

My fear is that the guy who broke it apart took some of the pieces with him to who knows where.

Very valid concern. It's one thing to reproduce a worn part, but producing a missing part, that is uncommon in the first place; well that takes some thought and experimentation.
 
OP
C

classicJackets

Well-known member
Joined
Sep 26, 2014
Messages
448
Location
SE Michigan
^That thought and experimentation is slightly unlikely to happen. I dug around on practical machinist and found that I have the Diamond Tools Co. M-26 model.

Attached are some pictures of a complete example. Just makes me realize how much I'm missing, and wonder how complete the machine was before the other person took some.
Doug
 

Attachments

  • Mill1.jpg
    Mill1.jpg
    83.8 KB · Views: 119
  • Mill2.jpg
    Mill2.jpg
    122.1 KB · Views: 118
  • Mill6.jpg
    Mill6.jpg
    80.2 KB · Views: 91
  • Mill4.jpg
    Mill4.jpg
    111.5 KB · Views: 90
  • Mill5.jpg
    Mill5.jpg
    94.1 KB · Views: 81

Guster

Well-known member
Joined
Mar 11, 2012
Messages
1,543
Location
Auckland, New Zealand
^That thought and experimentation is slightly unlikely to happen. I dug around on practical machinist and found that I have the Diamond Tools Co. M-26 model.

Attached are some pictures of a complete example. Just makes me realize how much I'm missing, and wonder how complete the machine was before the other person took some.
Doug

Great. Important part achieved. Identity, reference photos and other people to talk to about it.

This bits I don't see :
* Vertical head - makes the machine much more versatile though often just an optional extra on most of these.
* End plate on the table that holds the end of the table feed screw - maybe just elsewhere and just not in the pictures.
* Knee handles or handwheels - maybe just elsewhere and just not in the pictures.
* Table feed - nice but not the end of the world - most guys replace them with small geared motors anyway.
* Belt tensioner levers - those will be necessary but easily made
* The variable drive speed adjusting handwheel on the base - again easily sourced as it looks like the the rest of the mechanism is still there.

Otherwise the real important stuff seem to be there... and nothing missing that cannot be made or bought. Even the vertical head can be made if needed.
 
To avoid these ads, REGISTER NOW!

nine4gmc

Well-known member
Joined
Mar 24, 2012
Messages
14,357
Location
Dallas
Longlivepunk, You are looking at the one he posted as an example of what his should look like, not what his actually looks like which is pictured in the first post.
 

Fretters

Well-known member
Joined
Jan 25, 2014
Messages
4,217
Location
South Yorkshire, England
Great. Important part achieved. Identity, reference photos and other people to talk to about it.

This bits I don't see :

[...snipped...]

Otherwise the real important stuff seem to be there... and nothing missing that cannot be made or bought. Even the vertical head can be made if needed.

If that's all that's astray, doesn't sound like a big problem. I've literally bought complete units which were less complete. :D That sounds like it's just in good project territory, with a few bits of creativity required.
 
OP
C

classicJackets

Well-known member
Joined
Sep 26, 2014
Messages
448
Location
SE Michigan
I'll have to look back at this again later as I've had a drink.or two tonight, but I may have sourced a vertical head in Arkansas. As you mentioned, a lot of the othwr stuff should be easily replicable or something I can live without. The link from pictures I found included the username of the buyer, so I could ask for any important/ necessary measurements. I'm still banking on the guy who was.giving away these pieces putting me in touch with the person who should.have whatever's missing.
Thanks for your input!
Doug
 
OP
C

classicJackets

Well-known member
Joined
Sep 26, 2014
Messages
448
Location
SE Michigan
Alright, I'm going to bring this back as I start making decisions about what to do next.

-How do I clean the ways? I know it was said to use a non abrasive and if I recall I read somewhere on here that 0000 Steel Wool is non abrasive?
-I plan on wiring the motor to a switch and 240V power. Does anybody have recommendations for a good, reasonably priced switch for that?
-What the heck is this, and could it originally have been part of this machine?


And the backside of the shaft:


Here's a few shots of the motor.
FacePlate


Wiring:


This setup makes me think it's not an original motor:


Anyway, I'll post up more pictures soon of the other pieces that I do have before I ask (again) what is critical that seems to be missing. Once I can determine if the motor is working or not I'll make a decision on where to go from there. It would cost me $250 plus freight from Arkansas to get a vertical head, which I'm fine with IF the majority of mechanicals are there.
Doug
 

justanengineer

Well-known member
Joined
Apr 5, 2011
Messages
7,722
Location
Motor City
I typically clean ways starting with kitchen paper towels + WD40, then if I'm having issues beyond that I step up to Brakleen, then green scotchbrite. When you get to scotchbrite you need to make sure after to wipe everything VERY carefully afterward with paper towels and WD bc scotchbrite has been known to leave grit behind. If there is a lot of caked on grease/**** and the machine is more reminiscent of an antique tractor, I'll also very lightly use a scraper before anything else.

I cant tell from squinting at tiny pics, but I suspect the lil motor is a coolant pump, never encountered one of that make of mill in person so cannot say if its original. As for the spindle drive, mills arent too picky regarding motors and it sounds like youre a hobbyist w/his first so I'd try to save whatever motors are there, clean it up, and start making chips.

Best of luck.
 
OP
C

classicJackets

Well-known member
Joined
Sep 26, 2014
Messages
448
Location
SE Michigan
Justanengineer, I'll take some more shots tomorrow when It's light out and I can capture the whole thing, but that would make sense.. Thanks for the help with the ways! They seem to be in good shape and aren't cruddy or anything, I just don't want to mess them up in an attempt to make them better.
Doug
 

Outlawmws

Well-known member
Joined
Aug 9, 2011
Messages
39,092
Location
The Badlands
Keep the green scotchbright OFF the ways! :wtf:

Use any solvent you want/or are comfortable with then ID what you still need to deal with, and if it is rust, gunk or physical damage. Rust pits, if not deep you can work with. Dings and gouges are a separate issue; take good pics and get advise from people that know how to restore ways property. This could by simple stoning of the high spots or more elaborate efforts. DON'T BE IN A RUSH! Get advise first. but sift it...
 

DocsMachine

Well-known member
Joined
Sep 16, 2006
Messages
1,844
[cracks knuckles]

How do I clean the ways? I know it was said to use a non abrasive and if I recall I read somewhere on here that 0000 Steel Wool is non abrasive?

-Steel wool is simply a very mild abrasive.

Now, for cleaning, there's nothing at all wrong with Scotchbrite and WD-40, but only on the nonprecision surfaces. Like the side faces of the table, crank handles, dials, etc. What I do is snip some Scotchbrite, usually the green stuff, into small, maybe 2" squares. Hose an area with WD, scrub, wipe, move on.

For worn precision surfaces (as in, the table ways, saddle ways, etc.) the Scotchbrite doesn't remove or damage much. There's no reason not to to use it, if the surfaces are already scarred.

Do NOT use power tools. No wire wheels, no Roloc pads, no nothing. On the non-machined surfaces though, have at it- I used a pneumatic needle scaler to clean all the old paint off my big 16" lathe, but only on the unmachined parts of the casting.

On any precision surface that's still in good condition, you need to be more careful- here, I prefer some Naval Jelly and 0000 steel wool. Wear gloves, of course, and work small areas at a time. Lay out the jelly, let it work, scrub, lay out a bit more, scrub, etc. Then rinse thoroughly and immediately oil the new surface.

What the heck is this, and could it originally have been part of this machine?

-That's a coolant pump, and yes, it could indeed have been factory. Doesn't mean it was, but it could have been. Pop it out and clean it up. Or maybe see if it runs before wasting time on it. :D

And the backside of the shaft:

-That's a centripetal pump.

This setup makes me think it's not an original motor:

-I'm not familiar with that brand of machine, but that's a fairly common Reeves type drive, a variable speed assembly. The two spacers might simply have been to adapt a different length belt. The machine almost certainly originally had a 3-phase motor, and somebody at some point swapped in the single-phase. They may have needed to alter the spacing slightly as part of the conversion.

Doc.
 
OP
C

classicJackets

Well-known member
Joined
Sep 26, 2014
Messages
448
Location
SE Michigan
Docs, Thanks for your reply! That's awesome info, all around.
I got excited/antsy so I went out and snapped some pictures of the ways (that's what these are, right?? :D)
Circle and detail are around the only "damage I could find, profiled in next pic


Here's the ones on the machine..


All the other pieces I have to go with..


I like this sticker..


Backside of the mill..


Thanks all for the continual info.
 

justanengineer

Well-known member
Joined
Apr 5, 2011
Messages
7,722
Location
Motor City
Keep the green scotchbright OFF the ways! :wtf:

Use any solvent you want/or are comfortable with then ID what you still need to deal with, and if it is rust, gunk or physical damage. Rust pits, if not deep you can work with. Dings and gouges are a separate issue; take good pics and get advise from people that know how to restore ways property. This could by simple stoning of the high spots or more elaborate efforts. DON'T BE IN A RUSH! Get advise first. but sift it...

Lol as usual, you said it.

I's a-shorely d'ohn no wat I's a talkin bout bc I's a cudn't ta dun dis!

666c5ac87383dee3d4fc288405f49657.jpg

51f2f0867d881e2ee4400112fdb5b8e0.jpg


Sent from my iPhone using Tapatalk
 
Last edited:

DocsMachine

Well-known member
Joined
Sep 16, 2006
Messages
1,844
Docs, Thanks for your reply! That's awesome info, all around.

-Thanks. I have some experience rebuilding machines, and I sure don't mind helping others save old iron. :D

I got excited/antsy so I went out and snapped some pictures of the ways (that's what these are, right?? :D)

-Yep. Machine "ways" are the surfaces that slide against one another. The carriage of the lathe slides on the "ways" on the bed of the lathe. The table of a mill slides on the "ways" on the saddle of the mill. The mill "knee" raises and lowers on ways, the compound of the lathe moves on ways, and so on.

Circle and detail are around the only "damage I could find, profiled in next pic

-It's hard to tell from your photo, but that may not be "damage". It could be simply a void in the casting, revealed when the dovetail ways were originally machined.

Now, it's also hard to tell, but it looks like you may still have quite a bit of "flaking" on those ways- that's the 'frosted' pattern left when the parts were first scraped (fitted) together. In that case, you're going to want to be careful on those surfaces- go with the Naval Jelly and fine steel wool, and work small areas at a time.

The jelly removes the rust chemically, the steel wool just helps scrub the stubborn stuff.

If that is a spot of damage, you'll want to very gently "stone" around it- use a small piece of oil stone, like you'd use for sharpening knives. The finer the grit the better. Just apply some WD-40, and gently scrub the stone over the nick or dent. You'll be able to feel the stone 'grab' the raised areas, if any, and cut them down to the the same level as the rest of the surrounding precision surface.

Don't try to polish the whole area, just stone 'til you can't feel any 'edge' to the nick.

Doc.
 

A_Pmech

Well-known member
Joined
May 8, 2007
Messages
8,002
Location
IL
Regarding Scotch Brite, I challenge anyone to remove one square inch of cast iron a ten-thousandth deep with a maroon hand pad.

It takes an obscene amount of effort. So much so, that the effort alone is a suitable safeguard against damaging the geometry of most way surfaces.
 
OP
C

classicJackets

Well-known member
Joined
Sep 26, 2014
Messages
448
Location
SE Michigan
I'm going to bump this back up in hopes to be held accountable for some progress in the next 3 months :). Pretty much haven't touched it since I posted this, but I'm now getting started. Plan to get the motor tested (somehow) and hopefully figure out some wiring for it in the next few weeks and then I will delve into some more. Began taking the way/table assembly apart last night. Really wishing I had a good workbench here, but i'll get there eventually..
 

pendragon1998

Well-known member
Joined
Mar 24, 2012
Messages
3,733
Location
NE Georgia
Looking forward to your restoration thread, but I have to say, if you don't have a work bench, you should get one put together before you worry about restoring a mill. There's nothing worse than working on the floor.
 
OP
C

classicJackets

Well-known member
Joined
Sep 26, 2014
Messages
448
Location
SE Michigan
I have a "workbench", but i share a house with 30 other guys (yay college) and tend to be cautious leaving too much on it at a time. Learned that one the hard way. Also have a mobile cart that I'm using as a workbench for an engine build/rebuild learning experience ha. It's also a little ways away from the mill itself, which sits under a tarp out of the way.
 
To avoid these ads, REGISTER NOW!
Top Bottom