To avoid these ads, REGISTER NOW!

Craftsman 506.51890 woodworking vise restoration (rebranded Columbian 10R-2A)

pendragon1998

Well-known member
Joined
Mar 24, 2012
Messages
3,733
Location
NE Georgia
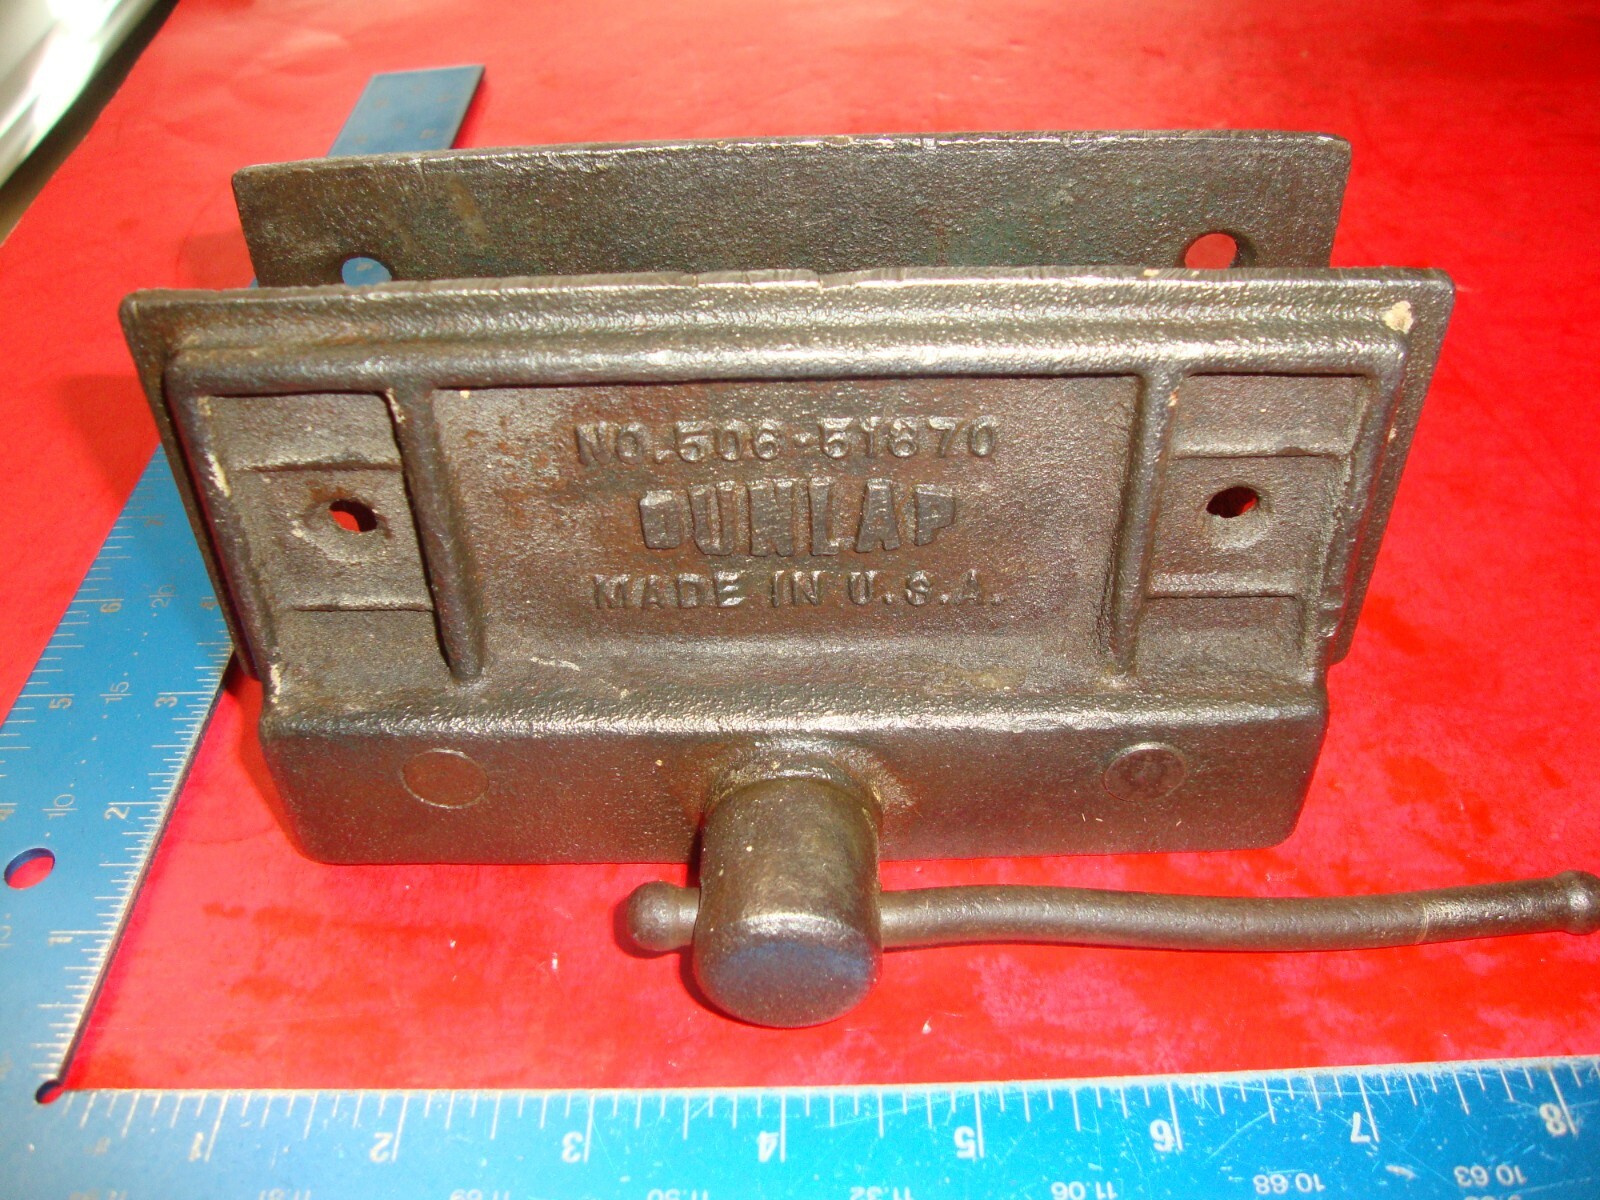
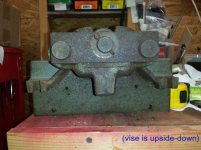
I just got a 34 lb piece of old American iron in the mail today: a Craftsman 506.51890 woodworking vise. These vises were made by Columbian for Craftsman, as indicated by the 506 prefix code. The earliest catalog entry I've seen which appears to be the 51890 vise model was from the (1960 catalog scanned by Outlawmws). I cropped a portion of that catalog scan below (item 6, the 4x10" option).

attachment.php


Sears changed the model number around 1973, I believe. If I'm correct about those dates, that makes the vise 42 to 55 years old. $21.95 in 1960 had the same buying power as $175.31 in 2015.

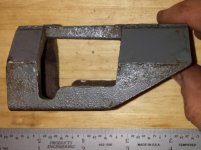
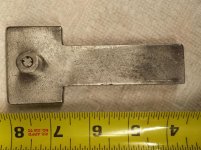
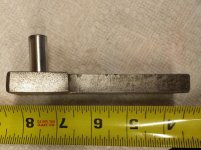
The jaws are 10" x 4", and it opens a good 11"-12", depending on the pads I'll put on. The original dog appears to be missing, but it came with a hefty steel replacement (probably homemade) that will more than suffice. I had the dog in the electrolysis bath already. The original oak (I think) handle was also present, but I took it off before taking photos. It's got a lovely honey color to it after all these years.

These can still be had for a very reasonable cost, particularly because some folks overlook Craftsman in favor of other classic vise brands. I paid $104, including $22 shipping, which was roughly what I paid new for my Chinese (albeit, excellent) Craftsman Professional bench vise a few years ago.

I'm going to restore this old girl and put her to work. I'll be taking my time, as I have several irons in the fire right now, but I'll post photos as I get to it. First will come some electrolysis bath time to get the rust and paint off.

attachment.php


attachment.php


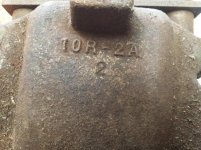
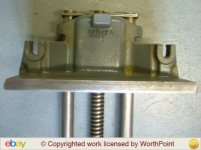
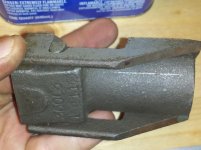
The Columbian vises were the 10R-2A model, and my Craftsman has the same code cast into the rear jaw assembly.

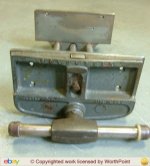
Here's a Columbian from ebay (poor pics):

attachment.php


attachment.php


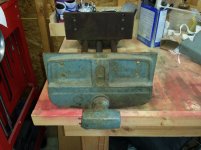
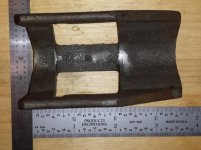
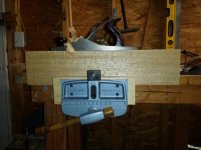
...and here's my Craftsman:

attachment.php


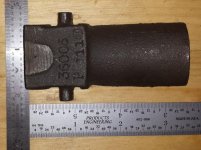
My greatest concern is the bronze half nut that controls the quick release function. They are designed to wear out before they damage the acme threads. I believe it should be replaceable if needs be, according to this thread, but it may be fine. I haven't taken it apart to see yet.

attachment.php
 

Attachments

  • 20150303_110330.jpg
    20150303_110330.jpg
    69.1 KB · Views: 1,222
  • 20150303_110355.jpg
    20150303_110355.jpg
    63.4 KB · Views: 1,160
  • 20150303_110510.jpg
    20150303_110510.jpg
    86.8 KB · Views: 1,148
  • 20150303_110611.jpg
    20150303_110611.jpg
    61.4 KB · Views: 1,144
  • Columbian1.jpg
    Columbian1.jpg
    78.2 KB · Views: 1,164
  • Columbian2.jpg
    Columbian2.jpg
    63.7 KB · Views: 1,151
Last edited:
To avoid these ads, REGISTER NOW!
OP
P

pendragon1998

Well-known member
Joined
Mar 24, 2012
Messages
3,733
Location
NE Georgia
I have to remove the cotter pin and drag bar, pull off the rear jaws including nut carrier.
 
Last edited:

sselander

Well-known member
Joined
Nov 20, 2008
Messages
2,041
Location
CT
Nice vise

I have to restore my woodworking vises, (some Wilton's and Morgan's)
(got these a few years back when I saw a CL listing for vices)


A few of the Wilton's
 
Last edited:
OP
P

pendragon1998

Well-known member
Joined
Mar 24, 2012
Messages
3,733
Location
NE Georgia
How does the half-nut cover come apart on your vise? I can't see any visible fasteners in your photo. Is that a bolt or machine screw going in on the left side? Columbian obviously made some changes to these vises and their components as time went by.


Copilot, I took apart the rear jaw assembly last night, so I can answer your question.

To remove the nut carrier and main nut, you first remove the cotter pin from the drag bar. That allows the drag bar to be pulled off. Next, you rotate the nut carrier so that the rear jaw assembly slides freely, and simply pull the entire rear jaw off the main screw and guide rods, along with the nut carrier. That frees the nut carrier to be lifted up and out, then which separates into two parts with a little twisting (no fasteners hold it together).

Here are some photos:

Cotter pin in drag plate. I had to cut the pin off with mini-bolt cutters and knock out the pin with a pin punch. I'll replace it.

attachment.php


Here is the nut carrier in place. It rotates freely with the screw, and when in the release position, it drops open with gravity. When in the tightening position, it falls onto the threads and engages them.
attachment.php


Main nut, threaded portion. I'm not sure what the 2 female threads on one end are all about. They're pretty shallow. It almost makes me think 2 male threads popped off. Anyone know?

attachment.php


attachment.php


Nut carrier, unthreaded. This half is what the main nut hinges into.
attachment.php


attachment.php


attachment.php
 

Attachments

  • 20150304_185127.jpg
    20150304_185127.jpg
    73.8 KB · Views: 1,037
  • 20150304_185056.jpg
    20150304_185056.jpg
    59.4 KB · Views: 1,029
  • 20150304_185037.jpg
    20150304_185037.jpg
    71.7 KB · Views: 1,034
  • 20150304_184911.jpg
    20150304_184911.jpg
    74.6 KB · Views: 1,042
  • 20150304_184841.jpg
    20150304_184841.jpg
    76.1 KB · Views: 1,042
  • 20150304_172854.jpg
    20150304_172854.jpg
    67.1 KB · Views: 1,045
  • 20150304_173250.jpg
    20150304_173250.jpg
    67.4 KB · Views: 1,041
Last edited:
OP
P

pendragon1998

Well-known member
Joined
Mar 24, 2012
Messages
3,733
Location
NE Georgia
Few more pics...

Here's the nut carrier and main nut assembled.

attachment.php


Here's the drag bar. I ran it through the electrolysis bath and then I got impatient and wire brushed it. I hit it with some primer after I took this photo and I'll paint it when that's cured. We have a winter ice storm today (it was 81 degrees yesterday!) and I'll have to wait until it warms up more.
attachment.php


This is not the original dog, I believe. This one came with the vise when I bought it, and appeared to be a shop-made replacement. It's very sturdy and will do just fine. It was rusted into place, so I removed it with a few mallet taps and wire brushed it.

attachment.php


attachment.php


I didn't like the bare steel look, so I blued it with some cold blue solution I had been holding onto. Then I waxed it with Johnson's paste wax. I think it looks better. I wanted it dark and with some 'patina'.

attachment.php
 

Attachments

  • 20150304_185152.jpg
    20150304_185152.jpg
    56.4 KB · Views: 1,018
  • 20150304_170001.jpg
    20150304_170001.jpg
    74.4 KB · Views: 1,014
  • 20150304_170011.jpg
    20150304_170011.jpg
    65.2 KB · Views: 1,014
  • 20150304_224855.jpg
    20150304_224855.jpg
    137.9 KB · Views: 1,018
  • 20150304_224104.jpg
    20150304_224104.jpg
    58 KB · Views: 1,018
Last edited:
OP
P

pendragon1998

Well-known member
Joined
Mar 24, 2012
Messages
3,733
Location
NE Georgia
Parts list from Sears Parts Direct - obviously everything is out of stock, never to be replaced, but I'm including this for posterity and to keep the terminology straight.

attachment.php
 

Attachments

  • parts-list.jpg
    parts-list.jpg
    125.2 KB · Views: 990
OP
P

pendragon1998

Well-known member
Joined
Mar 24, 2012
Messages
3,733
Location
NE Georgia
I've got the rear jaw stripped and primed. I wish there was a better way to avoid flash rust after these cast iron parts are cleaned up. I use a rusty metal primer, but I never feel sanguine about it.

I can't decide on a paint color. I don't want to go with a red or black.

I'd kind of like to try the old standby Rust-Oleum 7219830 Hammered Metal Finish Spray, Verde Green.

This color:
autopts said:


On the other hand, I still have a couple cans of this X-O Rust bronze and Rustoleum Professional Dark Brown that I used on my Craftsman block grinder from a few years earlier than the vise was made. Hmm...

attachment.php


I want a subdued color, nothing hot rod-y, but something that looks close to the 1950s or early 1960s.


Anyway, afterwards, I used nasty paint stripper to try and get the paint removed (partially) on the front jaws assembly. It worked somewhat, but I hate that wretched snot-looking goo. I ended up having to repurpose a tote that would fit the entire thing for a new e-bath, because the guide rods aren't coming out. I got it going tonight, but the reaction seems slow, perhaps because the bath is so big. I'm curious what it will look like in the morning.

Can't seem to get pics uploaded at the moment - might try later if anyone's following this.
 
Last edited:
OP
P

pendragon1998

Well-known member
Joined
Mar 24, 2012
Messages
3,733
Location
NE Georgia
Before and after time! I primed the vise a week or two ago, and today I painted it with Rust-oleum Hammered Light Blue from a spray can. (I did not use Verde Green, which was one of my original ideas, because it's semi-discontinued and was much too spendy for me). I hit it with two light coats followed by two heavy coats about 5 minutes apart. The blue is really subtle - my camera kept making it look gray and the picture below is about as close as I could photograph it. I got a pretty decent hammered look to the paint on the front jaws. The rear jaw assembly didn't look quite as hammered - I think it was because I painted the front stock in the cooler garage (so I could lean it off the bench) and the rear stock was hanging in the sun while I sprayed.

I'll post some more pics after everything is cured and assembled. I have yet to decide what I'm going to do with the wooden handle. I might give it a very light sanding and soak it in some danish oil. It has a lot of age on it, which I want to retain.


I am pretty pleased with how it came out.

BEFORE:
attachment.php


AFTER:
attachment.php
 

Attachments

  • 20150401_125937.jpg
    20150401_125937.jpg
    68.9 KB · Views: 982
Last edited:
OP
P

pendragon1998

Well-known member
Joined
Mar 24, 2012
Messages
3,733
Location
NE Georgia
A few final photos of the vise mounted on my bench. I just used some 3/4 plywood I had laying around for the jaws. I'll see how that works out. I'm not crazy about the plywood, but it's there to be beat up on.

One odd thing about it is the quick release is acting up. It unlocks just fine, but when you turn clockwise to tighten, the nut has a tendency to slip over the main screw and not rotate to engage them. What I mean is that the nut remains in the unengaged position and won't rotate into the engaged position. When you manually rotate it, it tightens up just like it's supposed to. Turns with one finger, actually. Very smooth.

I think my problem is it's actually too clean. I wire brushed the main screw and waxed it, and I think that reduced the friction to the point that it won't flip the nut assembly over when it's supposed to. I may have to squirt some sticky grease up in the nut to see if that helps, but it's kind of funny, when you think back to how rusty it was.

attachment.php


attachment.php
 

Attachments

  • 20150407_193814.jpg
    20150407_193814.jpg
    57.3 KB · Views: 708
  • 20150407_193922.jpg
    20150407_193922.jpg
    63.6 KB · Views: 711

Rickenbackerman

Well-known member
Joined
Oct 19, 2009
Messages
388
Location
MD
Rather than start a new thread, I thought I'd bump pendragon's. I just picked one of these up last night. Going to start cleaning it up before I mount it, but I have a couple of questions... What is the point of the "dog"? I always thought that thing on the front was the quick release, but now I see that it's not, and I have NO idea what it's supposed to do. Also, why does the nut design of this one seem to be totally different?


To avoid these ads, REGISTER NOW!
OP
P

pendragon1998

Well-known member
Joined
Mar 24, 2012
Messages
3,733
Location
NE Georgia
The dog is meant to work in conjunction with another dog on the workbench, so you can pinch a board between two points. Sort of like this:

FH09JUN_BESBEN_13.JPG


The nut design was changed at least once on these vises. I think yours may have an internal spring in it that helps to engage the screw in the nut when it's rotated? If so, that is a slight improvement over mine, which depends only on gravity, so it can be a tad bit reluctant to flip and engage if it's too clean.

I really like my vise, hope you do too. It's a great piece of old USA iron.
 
Last edited:

zkling

Well-known member
Joined
Jan 23, 2007
Messages
16,939
It's a vise dog designed to clamp longer items in conjunction with a bench dog than the vise would open and or allows a solid backing (the work bench) for thinner items. On a traditional wood working bench there are series holes in the top and sides that allow for placement of bench dogs, stakes and other clamps.

As an engineer, I thought you would have had the gumption to do a little thinking on that. ;)
 

Rickenbackerman

Well-known member
Joined
Oct 19, 2009
Messages
388
Location
MD
LOL, thanks guys. Yeah, a little googling around helped me figure out what the dog was for. Honestly I'm not much of a woodworker...

I think the nut on this one is totally dependent on gravity, too. There is a piece of spring steel, but it's part of the stationary nut rather than the part of the nut that flips. There could be pieces missing, though, for all I know.
 

bagged89s10

Well-known member
Joined
Mar 13, 2005
Messages
4,607
Location
CT
A few final photos of the vise mounted on my bench. I just used some 3/4 plywood I had laying around for the jaws. I'll see how that works out. I'm not crazy about the plywood, but it's there to be beat up on.


One odd thing about it is the quick release is acting up. It unlocks just fine, but when you turn clockwise to tighten, the nut has a tendency to slip over the main screw and not rotate to engage them. What I mean is that the nut remains in the unengaged position and won't rotate into the engaged position. When you manually rotate it, it tightens up just like it's supposed to. Turns with one finger, actually. Very smooth.


I think my problem is it's actually too clean. I wire brushed the main screw and waxed it, and I think that reduced the friction to the point that it won't flip the nut assembly over when it's supposed to. I may have to squirt some sticky grease up in the nut to see if that helps, but it's kind of funny, when you think back to how rusty it was.


attachment.php


attachment.php


Nice restore! :thumbup: I have a smaller columbian I have to do a restore one. I hope it comes out as good as yours. ImageUploadedByTapatalk1438041984.074839.jpg
 
OP
P

pendragon1998

Well-known member
Joined
Mar 24, 2012
Messages
3,733
Location
NE Georgia
My dog had been replaced with a removable shop-made one, so I cannot help much, but my guess is yours would be threaded. Let us know!
 

Rickenbackerman

Well-known member
Joined
Oct 19, 2009
Messages
388
Location
MD
Nice, Frank! The original paint on mine is pretty nice so I just cleaned it up with some simple green and mounted it. It works great! And the quick release is really cool!
 

nine4gmc

Well-known member
Joined
Mar 24, 2012
Messages
14,357
Location
Dallas
That came out great Pendragon! I have one like it getting ready to do the same thing with basically.
 
OP
P

pendragon1998

Well-known member
Joined
Mar 24, 2012
Messages
3,733
Location
NE Georgia
Thanks - I am sure you'll love yours too!

attachment.php
 

Attachments

  • 14493444307420.jpg
    14493444307420.jpg
    139.7 KB · Views: 4,028
Last edited:

FrankLee

Well-known member
Joined
Sep 13, 2010
Messages
3,554
Location
seMI, 48317
I finally finished my Columbian Craftsman woodworker's vise. A huge thanks to an online antique machine forum member who media-blasted it for me. The color was supposed to be Hammered Gray, but it looks more like silver.

I have a scanned publication for a Craftsman 391.5195 if someone needs it. This appears to be the same as the Columbian vise possibly manufactured by Adjustable Clamp Co.


Last edited:
OP
P

pendragon1998

Well-known member
Joined
Mar 24, 2012
Messages
3,733
Location
NE Georgia
The 391 prefix vises were made in Japan as copies of the Columbian models, I believe?

Nice job on yours. If you end up replacing the jaws again, I suggest making them level with your benchtop. It is useful for a variety of tasks.
 

MPOWERD

Well-known member
Joined
Jun 7, 2011
Messages
578
I don't know much about the history or Columbian Vises but isn't 506 series Craftsman always Columbian? Did they buy out Dunlap or vis-a-versa? Because I keep seeing Craftsman Vises like this 506-51870 with the Dunlap name on it...

s-l1600.jpg
 

txlonghorn1989

Well-known member
Joined
Feb 27, 2017
Messages
2,786
I don't know much about the history or Columbian Vises but isn't 506 series Craftsman always Columbian? Did they buy out Dunlap or vis-a-versa? Because I keep seeing Craftsman Vises like this 506-51870 with the Dunlap name on it...

s-l1600.jpg

Dunlap was just a lower tier brand offered by Sears.
 

RTM

Well-known member
Joined
May 13, 2019
Messages
13,082
Location
SF Bay Area
I don't know much about the history or Columbian Vises but isn't 506 series Craftsman always Columbian? Did they buy out Dunlap or vis-a-versa? Because I keep seeing Craftsman Vises like this 506-51870 with the Dunlap name on it...

Could be Columbian made for Sears as a Dunlap (2nd brand).

107 when made for Craftsman was supposedly Millers Falls, but could be labeled Dunlap for electric drills and hand planes.

All per the OEM list at Vintagemachinery.org
 

MPOWERD

Well-known member
Joined
Jun 7, 2011
Messages
578
Dunlap was just a lower tier brand offered by Sears.

Yes I have a few Dunlap items in my tool collection and I should of posted Craftsman instead of Sears... As I always thought that Columbian only built Craftsman vises since it was the top Sears line...
 

MPOWERD

Well-known member
Joined
Jun 7, 2011
Messages
578
Could be Columbian made for Sears as a Dunlap (2nd brand).

107 when made for Craftsman was supposedly Millers Falls, but could be labeled Dunlap for electric drills and hand planes.

All per the OEM list at Vintagemachinery.org

Learn something new every day...
 
To avoid these ads, REGISTER NOW!
Top Bottom