To avoid these ads, REGISTER NOW!

Modest 2 Car Garage in Brisbane

AndrewP

Well-known member
Joined
Jul 17, 2014
Messages
117
Location
Qld, AU
Probably like many others, I came across Garage Journal while looking for garage ideas; and was impressed not only with the many great ideas, but also with the level of detail and enthusiasm people had for their garages.

For my modest 2 car garage, I'm thinking I might need to start back at the beginning, as this has been, and still is, an ongoing project.

When we moved into the house in 2006, it was raised on stilts, with a garage door and a concrete slab for one car underneath. The rest of the space under the house was void. You have potential to build in underneath, we were told.

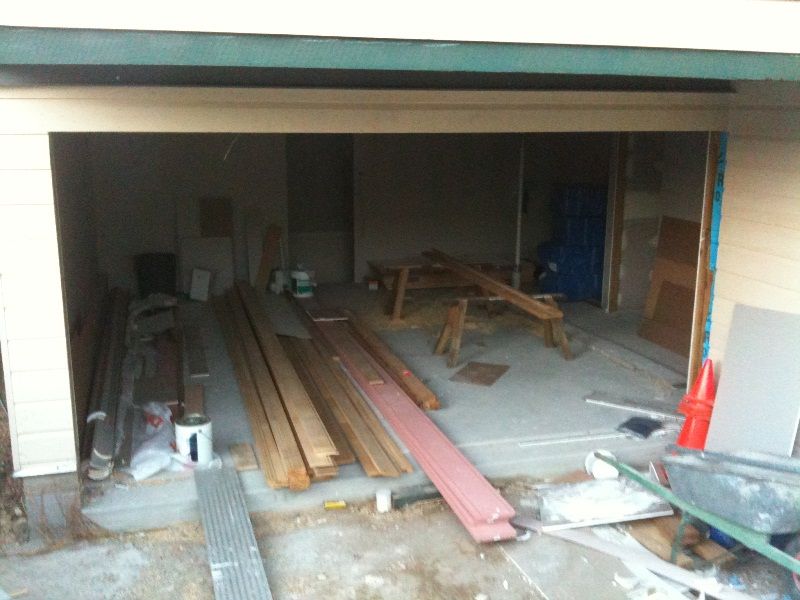
This is how the then-garage area looked:

02Garage_Before.jpg


In 2008 we had plans drawn up to build-in underneath, which would be for both extra living areas, and an enclosed garage:

03Plans_2_Zoom.jpg


Work then commenced in 2009, after we contracted a builder to undertake the work.

Here the new lower foundation had been installed, and some blocks had been delivered:

04Work_started.jpg


The block work starting to be laid in the lower section:

05Lower_Blockwork.jpg


And how the site looked at that time:

06In_Progress.jpg


Earth was being moved to establish the lower level:

07Progress.jpg


Further foundations being set in place:

08Progress_2.jpg


And then the lower level slab was poured:

9A.Lower_Level_Slab.jpg


Looking back from the new slab to the front garage section:

10Lower_Section_Slab.jpg


11Edge_of_Garage.jpg


...tbc
 
Last edited:
To avoid these ads, REGISTER NOW!
OP
A

AndrewP

Well-known member
Joined
Jul 17, 2014
Messages
117
Location
Qld, AU
Thanks 1/2 Cup. :beer:

I'll add add some further images.

Formwork and preparation in place for the upper slab, being predominantly for the garage itself:

12Garage_Slab_Prep.jpg


The upper/garage slab after having been poured:

13Garage_Slab.jpg


View from inside the new upper/garage slab, while work was taking place on the internal wall framing:

14Inside_new_Slab.jpg


At this point I made a quick decision with what was deemed to be a storage area on the plans. I asked the builder to change this corner area from having external to internal access. Turned out to be a good move, as this subsequently became the small workshop space.

e46cbbbc-d1b0-4f53-a18e-a1b2039414db.jpg


More internal framing work completed inside the garage area:

15Internal_Wall_Frame.jpg


16Framing_RHS.jpg


Now the structure is starting to resemble a garage:

17Plasterboard_Up.jpg


Particularly with the new garage door in place:

18New_Door.jpg


...tbc
 
OP
A

AndrewP

Well-known member
Joined
Jul 17, 2014
Messages
117
Location
Qld, AU
Nice, real nice in fact.

Regards

Thanks again.:beer:

While the building was taking place under the house, garage-type items had to be stored elsewhere for the duration of the build.

I'd stacked a few things up on the back deck during this time:

19Storage_Back_Deck.jpg


Once the internal building work was complete, the new bridging section of the driveway was poured:

20Driveway_Joined.jpg


And we finally had a proper garage to park the cars. This is from inside the garage, looking out towards the driveway:

21From_Inside.jpg


And at this stage it was a relief to be able to park under cover again, and a relief to finally have the building work completed (which to be honest was quite a stressful period).

We were also able to tidy up around the house, and move things back downstairs.

Most of the store room space was taken up by the lawnmower and a few other bits and pieces. And that's how things stayed for a couple of years.
 
OP
A

AndrewP

Well-known member
Joined
Jul 17, 2014
Messages
117
Location
Qld, AU
In around 2011, I wanted some workspace, but hadn't then come across this website.

I made up a workbench based on how i thought it should look, as opposed to researching any designs or techniques.

25Workbench.jpg


It at least gave me a flat surface to work on, which was more than what I had available during the last 6 or so years.

I also put up a large pegboard in front of it, thinking it was quite purposeful.

23Put_Up_Pegboard.jpg


To make room for this workspace, I was able to move the mower (along with the whippersnipper and a few other things) into their new home, being the space under the internal stairs.

And from that point, up until around mid-2013, that's how everything remained; with me being happy that things were now mostly clean and organised.

I guess too, in hindsight, I was just appreciative of the fact I no longer had a dirt floor and one-car concrete slab as my 'garage area'.

The garage in use, circa 2013:

26Cars_In_Garage.jpg
 
OP
A

AndrewP

Well-known member
Joined
Jul 17, 2014
Messages
117
Location
Qld, AU
What happened next was I came across Garage Journal, saw plenty of great ideas (thanks all here :thumbup:), and started to realise where I could do things better.

The first few things I did were in the workshop area.

I framed and painted the pegboard, and installed a shelf underneath it:

27Framed_Painted_Pegboard.jpg


Next I strengthened the work bench with some upright fence posts, which made the whole thing much sturdier.

I had oodles of green interior paint leftover from painting an upstairs bedroom, so painted the underneath parts of the bench as well:

29Much_Stronger.jpg


30_Painted_Bench.jpg


Once all tidied up, the workshop area started to look a little nicer:

32Tidier_2.jpg


I'd also got hold of a tool chest, which fitted right in under the work bench:

31Tidied_Up.jpg


Next I added a budget drill press, and installed a crude door to hide the items being stored within the bench:

35Night_Shot.jpg
 
OP
A

AndrewP

Well-known member
Joined
Jul 17, 2014
Messages
117
Location
Qld, AU
Continuing on, the next project was mounting an air hose reel to the roof:

36Mounted_Hose_Reel.jpg


And ran the air hose line along the joists to the corner where the hot water cylinder resides:

37Air_Line.jpg


The next project was an idea I saw on this site, where somebody painted their exposed roof black.

I started with the workshop area first, to see how it looked:

41Started_Roof_Black.jpg


Not too bad I thought, so I continued with painting the main garage area:

42See_How_It_Looks.jpg


A few before and after shots:

Exposed pipe work before:

43Pipes_Hose_1Before.jpg


And after:

44Pipes_Hose_2After.jpg


Main roof area before:

45Roof_1Before.jpg


And after:

46Roof_2After.jpg


Another before:

47Roof_1Before.jpg


And after:

48Roof_2After.jpg


Looking back before:

49Roof_1Before.jpg


And after:

50Roof_2After.jpg


Exposed pipe work before & during:

51Bike_Pipes_1Before.jpg


And after:

52Bike_Pipes_2After.jpg
 

4xdog

Well-known member
Joined
Aug 18, 2012
Messages
5,595
Location
Santa Fe, NM
The black ceiling and white walls look good. It would be great to see a wide angle shot when you have a chance. Thanks for letting us see the project.
 
OP
A

AndrewP

Well-known member
Joined
Jul 17, 2014
Messages
117
Location
Qld, AU
Well thought out and well executed. It looks like the changes you made to the front of your house tie in nicely and add "curb appeal."

Thanks Bib Overalls - we wanted the downstairs section to look the same as the existing upstairs section, even though there would be a 13 year age difference between them.

We kept the footprint the same too, which left some odd spaces in the garage, but it gave the outside a flush appearance.
 
OP
A

AndrewP

Well-known member
Joined
Jul 17, 2014
Messages
117
Location
Qld, AU
The black ceiling and white walls look good. It would be great to see a wide angle shot when you have a chance. Thanks for letting us see the project.

Thank you 4xdog.

I did borrow the idea from someone here, but can't remember the poster or the thread.

Walls are actually a light green colour, but do tend to look a little white in the pictures.

I should have mentioned initially I'm not the best photographer, and that some of the earlier shots were taken on an iPhone 3, so they're not as clear as later ones.
I've got some more to come, which may hopefully link it all together better.
 

HSpencer

ALLIANCE MEMBER
Joined
Nov 28, 2010
Messages
2,854
Location
South Central US
Just simply fantastic from start to finish. I like all aspects of the garage and workspace.
I could not help seeing the fishing rods and reels stored in the ceiling! They are out of the way, yet calling you to go and use them.
A perfectly superior job on your garage and shop sir!

Best Regards
Herb Spencer
 
To avoid these ads, REGISTER NOW!
OP
A

AndrewP

Well-known member
Joined
Jul 17, 2014
Messages
117
Location
Qld, AU
that turned out really well, but how do you access the upstairs? thru the laundry room?

jim

Thanks Jim.

The internal stairwell runs beside the laundry (it's an 'L' shape), but not into the garage area. Rather, it connects the two living areas together.
You can sort of see this on the plans, 2nd picture down in my 1st post.

But it does intrude into the garage as a 45 degree bulkhead, and the underneath part is where I am able to store some bulky equipment.

Here is the under stairs area, used for storing gardening equipment:

Under_Stairs_1.jpg


And further into the 'L shape', I'm able to store spare tiles, paint, and other bits and bobs:

Under_Stairs_2.jpg
 
OP
A

AndrewP

Well-known member
Joined
Jul 17, 2014
Messages
117
Location
Qld, AU
Just simply fantastic from start to finish. I like all aspects of the garage and workspace.
I could not help seeing the fishing rods and reels stored in the ceiling! They are out of the way, yet calling you to go and use them.
A perfectly superior job on your garage and shop sir!

Best Regards
Herb Spencer

Thank you for your comments, Herb.

It's more of a situation of making the most out of a small space, and trying to gain some efficiencies where possible. Needless to say, this website has been very helpful.

Our whole block is only 405 m2 (484 square yards), and I suppose we are trying to achieve most of the things which would otherwise come with a larger space.
 
OP
A

AndrewP

Well-known member
Joined
Jul 17, 2014
Messages
117
Location
Qld, AU
Catching up along the timeline now to last year, and I had a set of wheels and tyres which needed to be moved up off the ground.

I decided to build a platform above the hot water cylinder area.
Was able to access 6 stud points, and used 6 heavy-duty angle brackets for the support:

54Tyre_Shelf.jpg


And used a piece of pine as a tyre stopper:

55Tyre_Shelf_2.jpg


After completion, and in use:

58Tyres_Up.jpg


And this left the floor area much tidier - the wheels were previously stacked where the red trolley is here:

59Clean_Floor.jpg
 
OP
A

AndrewP

Well-known member
Joined
Jul 17, 2014
Messages
117
Location
Qld, AU
And another idea I found on Garage Journal was for clamp storage, which I duly borrowed:

60Clamp_Shelf.jpg


I found clamps are surprisingly difficult to hang up, when there is not much room to do so.
 
OP
A

AndrewP

Well-known member
Joined
Jul 17, 2014
Messages
117
Location
Qld, AU
This next update covers most of the last things done to date.

I put up a shelf along under the door guide, to put the radio and a few other items.

Although it cannot been seen, the top of the shelf is varnished; while the side and underneath are the same light green as the wall colour.

57Radio_Shelf.jpg


Then I purchased a few cupboards from Aldi when they were on sale, after realising I wasn't really capable of making anything like them on my own.
They were probably the cheapest cupboards available anywhere, but fine for me and what I need them for.

They were supposed to hang from two hooks at the back IIRC, but as that looked a bit flimsy, I screwed them into the wall studs.

After I had put 2 cupboards up:

622_Cupboards_Up.jpg


And then 5 of them:

635_Cupboards_Up.jpg


And then 7 of them:

647_Cupboards_Up.jpg


Next I painted them, using the same slightly darker shade of green used in the workshop area (which I had plenty of).

LHS:

65Cupboards_Painted.jpg


and RHS:

66Cupboards_Painted_2.jpg
 
Last edited:
OP
A

AndrewP

Well-known member
Joined
Jul 17, 2014
Messages
117
Location
Qld, AU
The cupboard handles were silver, but I spray painted them black, to better tie in with the existing 'theme'.

Here are the LHS cupboards with their handles installed:

Black_Handles_1.jpg


And the RHS units:

Black_Handles_2.jpg


And this is how the LHS units currently sit along with the 'radio shelf':

Shelf_Cupboards.jpg


The next thing I need to think about is the floor, and now summer is over, I will hopefully have some time to look at doing household projects again.

The floor is also a prerequisite for other garage project ideas, so it's kind of holding me up from starting them.

See how things go from here.
 
OP
A

AndrewP

Well-known member
Joined
Jul 17, 2014
Messages
117
Location
Qld, AU
Top job on the cupboards Andrew.:thumbup:

Thanks 1/2 Cup :beer:

Truth be told, I've picked up quite a few items from Aldi for the garage.
Most of them being really quite good, especially considering their price.

The red ramps on the wall (last picture) would be my latest purchase - intended for caravans; but are 2 tonne rated each, and a perfect fit for lowered cars.
 

1/2 Cup

Member Emeritus
Joined
Apr 28, 2012
Messages
19,283
Location
Shepparton. Victoria. Australia
Thanks 1/2 Cup :beer:

Truth be told, I've picked up quite a few items from Aldi for the garage.
Most of them being really quite good, especially considering their price.

The red ramps on the wall (last picture) would be my latest purchase - intended for caravans; but are 2 tonne rated each, and a perfect fit for lowered cars.

Nothing wrong with buying stuff at Aldi, truth be know they all come from the same place in any case, the cupboards do look great.:thumbup:

My Dad brought a welder there and for what he was using it for was ideal.

Regards
 
OP
A

AndrewP

Well-known member
Joined
Jul 17, 2014
Messages
117
Location
Qld, AU
Nothing wrong with buying stuff at Aldi, truth be know they all come from the same place in any case, the cupboards do look great.:thumbup:

My Dad brought a welder there and for what he was using it for was ideal.

Regards

I seriously considered picking up one of their welders, I think when it was being reduced even further.

But finding further storage space for it, plus needing to do a welding course, kind of got in the way of that idea. For the time being anyway ;)
 
OP
A

AndrewP

Well-known member
Joined
Jul 17, 2014
Messages
117
Location
Qld, AU
Looks great Andrew.
You must like your Fords?
Also agree with 1/2 Cup and yourself as I also get stuff from Aldi.

Thanks Aaron. :beer:

Yes I am indeed a Ford fan.

On the subject of Aldi purchases, I probably should have said 'a lot' instead of 'quite a few'. But they seem to be suitable for home-type jobs, and that's all I'm ever really doing, or hope to do.
 

BBChevro

Well-known member
Joined
Jan 24, 2014
Messages
2,235
Location
Brisbane, Qld., Australia
Nice work Andrew, and good to see that the "build in underneath" project appears to have been done properly.

I know that it wouldn't have been inexpensive, but it should have added value to the property in a HUGE way (and of course, made it much more liveable for now).


You've made good use of the available space and the Aldi cupboards look good too.

And finally, welcome from another Queenslander (I'm actually in Redland City - but I figured that only locals would know where that was - so I listed my location as "Brisbane").
 
Last edited:
OP
A

AndrewP

Well-known member
Joined
Jul 17, 2014
Messages
117
Location
Qld, AU
Nice work Andrew, and good to see that the "build in underneath" project appears to have been done properly.

Thanks Mark :beer:
We tried to make the renovation as seamless as possible, so that it looked like it was all put together at the same time. Kept the ceiling height, doors & fittings all the same.

I know that it wouldn't have been inexpensive, but it should have added value to the property in a HUGE way (and of course, made it much more liveable for now).

You're right, in that it was similar to building a small house.
But timely too - it was completed just after we had started a family.

You've made good use of the available space and the Aldi cupboards look good too.

That's been the challenge - using space as efficiently as possible. Will hopefully be able to nut out a few more ideas as I go along.

And finally, welcome from another Queenslander (I'm actually in Redland City - but I figured that only locals would know where that was - so I listed my location as "Brisbane").

Thanks Again.

Interestingly there is a Brisbane in California, and a Queensland in Canada too.
But maybe only one Redland City? :)
 
OP
A

AndrewP

Well-known member
Joined
Jul 17, 2014
Messages
117
Location
Qld, AU
Yeah most of my wood working power tools are also from Aldi. All work fine. About time they ran another DIY special I reckon!

There seems to be a pattern to the specials - some things appear around the same time every year, others possibly more frequently.
 
To avoid these ads, REGISTER NOW!
Top Bottom