To avoid these ads, REGISTER NOW!

My 30x48 Shop Build

rand5204

Active member
Joined
Feb 3, 2014
Messages
35
I have been a member of this forum for some time and have really enjoyed reading about others' projects. It has been, and continues to be, a great learning experience.

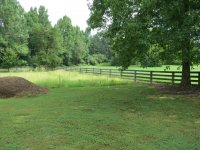
After many years if dreaming about it and planning, I am finally able to start my own shop project. As a result of a recent move from Kansas to just north of Atlanta I now have the space to build. When we moved here we decided that we wanted a minimum of 2 acres out in the country. What we finally found was 4.5 acres of beautiful N Georgia land. The property is roughly pie shaped with the big end facing the street. The house sits over 240 feet back from the street and all of that space is lawn (lots of mowing = large yard tractor). From the house back, it's all heavy woods.

With all that space, building design and decisions should have been easy but it hasn't been. Everything from the house back is not only heavily wooded but the property slopes pretty steadily down to a creek that drops about anther 6 feet or so. Because of that I have no choice but to build in the "front yard"

I looked at every possible location and every possible site but every one of them presents issues. My first choice was in a corner of the front yard near the road but when we went in there with a bobcat to move some dirt around we would up burying it in the soft ground even though it was a tracked machine.

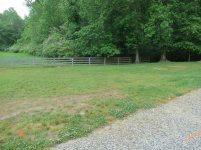
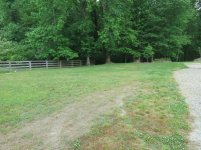
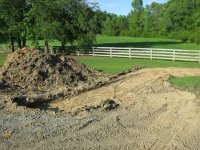
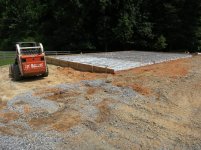
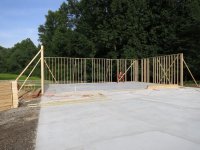
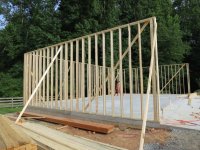
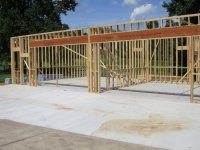
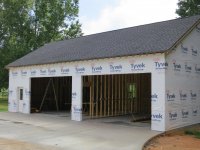
After that experience I was really left with no choice but to build up closer to the house. The pictures below (assuming I can post them correctly) will show the locations and the challenges. Basically I will be building off to the left side of my current garage. The property slopes in two different directions here and I will wind up with about 3' walls to level the site.

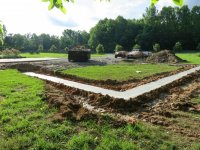
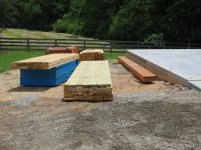
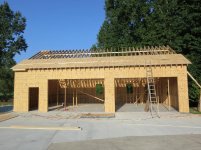
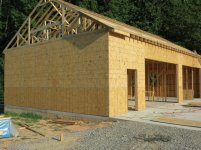
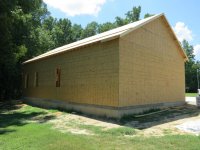
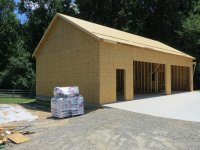
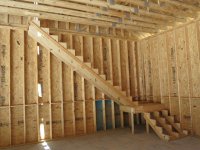
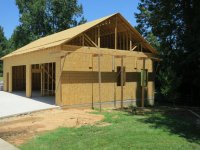
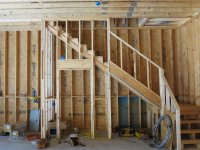
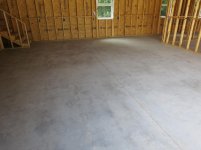
As the title suggests the building will be 30' x 48' with 12' side walls. Because of the location, it will need to match the house so it will have brown vinyl siding and a composition roof. It will load along the side through two 18'x9' doors. It will essentially be divided into two sections, one of about 18x21 with a small office and work area behind it with the balance set up as an actual shop space. I will try and post a building layout tomorrow from a different computer.

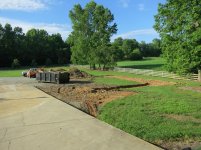
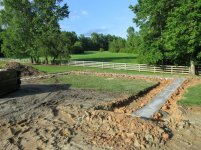
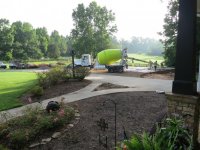
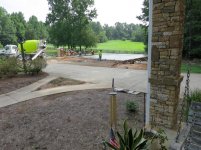
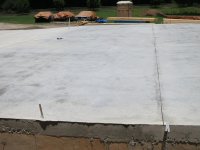
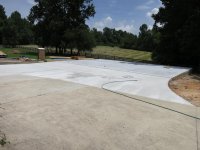
You may be able to just see in the pictures where the stakes have been set. Unfortunately because if the slope I will need to dig up the entire concrete turnaround you can see in some of the photos and replace it.

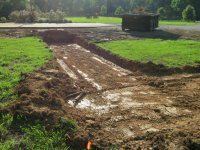
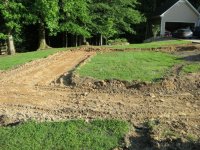
Right now the excavator will here by Friday to tear out the concrete and level the site. The concrete crew is supposed to be here the following Tuesday to dig footings. Those will be inspected by an engineer the following day and, if approved we can pour the footings by a week from Wednesday.
 

Attachments

  • 051r.jpg
    051r.jpg
    108 KB · Views: 280
  • 046.jpg
    046.jpg
    147.2 KB · Views: 198
  • 049r.jpg
    049r.jpg
    102.8 KB · Views: 176
  • 050r.jpg
    050r.jpg
    106 KB · Views: 178
To avoid these ads, REGISTER NOW!

marsch

Member
Joined
Feb 18, 2015
Messages
22
Location
Gallatin, TN
Subscribing to this thread. I am to juggling the idea around of the same sized shop. Just having trouble picturing it. Good luck with the build!
 
OP
R

rand5204

Active member
Joined
Feb 3, 2014
Messages
35
Marsch,

Thanks. I will post the floor plan as soon as I can figure out how. I'm not the most coputer literate guy in the world

Cougar,

That's one of the things thsta keeping me up nights. I guess I'll find out pretty soon. The excavator is supposed to be here tomorrow to level the site and the footings will go in next week.
 
OP
R

rand5204

Active member
Joined
Feb 3, 2014
Messages
35
I am not particularly good with any of the widely known drafting tools so I did a simple layout in Excel. This is an experiment to see if I can attache that file.
 

Attachments

  • Garage GJ.pdf
    126.2 KB · Views: 214
OP
R

rand5204

Active member
Joined
Feb 3, 2014
Messages
35
The drawwing is there as an attachment rather than pasted into the body of the text but let me try to explain it anyway.

The building is 30x48 with 12' sidewalls. It will be stick built. It is divided into two primary areas. The first is a pretty straightforward two car garage. My house only has a two car garage attached so I needed this space to get my collector cars out of the house garage so I can park my daily drivers inside the house garage.

Behind this space will be room for an office and a work area where I will have a workbench and space for a sand blast cabinet, parts washer, etc. The large shop space will be about 30' deep and 28' wide. There will be room for a 2 post lift on one side and open areas for the rest. The roof trusses will be "attic" style so I will have a stairway on the far left to give me access. Under the stars I will have storage space and my compressor area. Along the rest of that wall will be storage racks for all those parts that magically multiply when you start disassembling cars.

The roof pitch is currently panned at 6/12 although I may go a little steeper to give me more headroon in the attic. Exterior walls will be vinyl to match the house along with a composition shingle roof.

Inside, the small garage space will be fully sheetrocked and painted. The large space will have a white steel ceiling with sheetrock walls. I am considering doing the top 8' or so in sheetrock and the botton part in OSB to better stand up to the dings that will inevitably happen in a shop but I haven't finallized that decision yet. Walls will likely be a very light grey.
 
OP
R

rand5204

Active member
Joined
Feb 3, 2014
Messages
35
I see that the drawing didn't post. If someone can walk me through the process of adding an excel drawing to this thread i'd really appreciate it. If all else fails, I will simply take a picture of it this weekend and post that.
 
OP
R

rand5204

Active member
Joined
Feb 3, 2014
Messages
35
Cougar,

I really can't lengthen the building. I had to cut it from the original 32 x 50 size to reduce the cost. I did revise the drawing to shift 1 foot from the shop to the garage. The cars in the small garage will not be moved in and out very often. By backing the left one in a driving the right one in and keeping both close to the walls, they can share the space in the middle for opening doors. It will be tight but it should work.
 
OP
R

rand5204

Active member
Joined
Feb 3, 2014
Messages
35
Finally! After what seems like weeks the weather cleared enough and things dried out enough overnight to get the excavator in here this morning. The dug out the existing concrete turnaround and leveled the lawn for the footings, The concrete crew is supposed to come in by Friday and dig the footings and set up the rebar.

The picture looking back toward the driveway gives you an idea of how high the garage walls will be - about three feet.

After inspection, I should be able to have the footings poured by about next Tuesday. If the rain will hold off, I may be able to get the walls poured by Friday. After they cure we can backfill and pour the floor. Maybe sometime in the next two weeks or so the framing crew will be able to get started.
 

Attachments

  • 010 (1024x768).jpg
    010 (1024x768).jpg
    153.7 KB · Views: 138
  • 008 (1024x768).jpg
    008 (1024x768).jpg
    152.7 KB · Views: 137
  • 007 (1024x768).jpg
    007 (1024x768).jpg
    151.9 KB · Views: 140
  • 006 (1024x768).jpg
    006 (1024x768).jpg
    154.9 KB · Views: 141
  • 005 (1024x768).jpg
    005 (1024x768).jpg
    152.4 KB · Views: 144
  • 001.jpg
    001.jpg
    147.4 KB · Views: 155
OP
R

rand5204

Active member
Joined
Feb 3, 2014
Messages
35
Rain has really slowed things down here. It rained again Wednesday night so when I left for work on Friday I was not expecting any action on the building at all. I was surprised when I got a call saying that the concrete crew was going to come and dig and place rebar for the footings despite the water standing in their way.

I was really surprised when I got home to see that they had succeeded in getting an engineer to sign off on the rebar and had already poured the footings! Pretty cool to finally see some progress.

They are supposed to come in now early next week (more rain in forecast, of course) and pour the walls. Those will need to cure for a week before I can have the excavator come back in back fill inside the walls so we can get the floor poured.

I am really excited - I've waited a long time! Now it looks small though.
 

Attachments

  • 002 (2).jpg
    002 (2).jpg
    148.5 KB · Views: 129
  • 003 (2).jpg
    003 (2).jpg
    147.9 KB · Views: 123
  • 004.jpg
    004.jpg
    148.4 KB · Views: 133
  • 005 (2).jpg
    005 (2).jpg
    150.1 KB · Views: 132
OP
R

rand5204

Active member
Joined
Feb 3, 2014
Messages
35
After long delays caused by weather and broken contractor promises (imagine that) there has finally been some activity on my build. The concrete walls were poured. These are about two feet tall and will be backfilled as soon as they cure sufficiently
 

Attachments

  • 30A.jpg
    30A.jpg
    149.1 KB · Views: 151
  • 30.jpg
    30.jpg
    146.3 KB · Views: 137
  • 29.jpg
    29.jpg
    145.5 KB · Views: 153
  • 28.jpg
    28.jpg
    149.3 KB · Views: 169
OP
R

rand5204

Active member
Joined
Feb 3, 2014
Messages
35
After curing for a week, it was time to back fill. The grass was scraped away and 16 truckloads of good, red Georgia dirt were compacted into the space. It was so well done that there was virtually no ponding on top after a coupe of good rains.

Now just waiting for the concrete crew.
 

Attachments

  • 31.jpg
    31.jpg
    147.7 KB · Views: 134
  • 32.jpg
    32.jpg
    148.7 KB · Views: 130
  • 35.jpg
    35.jpg
    149.6 KB · Views: 138
  • 36A.jpg
    36A.jpg
    147.2 KB · Views: 149
OP
R

rand5204

Active member
Joined
Feb 3, 2014
Messages
35
1/2 Cup,

Thanks. I've waited a long time to do this and the delays have been killing me. It's good to be moving forward again
 

600SL

Well-known member
Joined
Apr 26, 2012
Messages
1,794
Location
Connecticut
Nice size garage. You will love it.

One comment on the lift location. You might want to consider moving the lift as far back to the door as possible because any space behind the cars in not usable. If you move the cars back you will have room in front of the cars for a tires changer and wheel balancer or anything else.
 
OP
R

rand5204

Active member
Joined
Feb 3, 2014
Messages
35
600SL,

Thanks for the comments. You may very well be right. I "pencilled out" that lift in every possible location I could think of, even looking at a seperate gable side entrance for it. In the end, I put it whare it is because of the way I though I would use it. I have several Olds 442's I will be restoring in the building. My idea was that once I seperate the body from the frame on them. I would have space between the lift and the garage door to work on either piece while still having easy access to the door to get them in and out to the media blaster, body shop, etc. I hope it will work for me but I guess only time will tell.

By the end pf the day today it will be too late to make any changes as the concrete crew is there right now. It's great to finally be seeing some progress! Now I'm nervous about how it will all come together.
 
OP
R

rand5204

Active member
Joined
Feb 3, 2014
Messages
35
Yesterday the convrete crew spent pretty much the whole day getting everything ready for the slab pour. First, they dug trenches for the grade beams and then laid gravel on top of everything. They also dug piers for my lift. They're a little deeper than I wanted but it should be ok. Next they laid down the vapor barrier and started laying out the rebar grid as well as cages in all the trenches.You can see in a couple of pictures where the grid appears incomplete. They ran out os rebar and will finish that tomorrow before they pour.

It was a sweltering hot and humid day and I felt kind of bad for the guys out doing the job. I guess when you do this kind of work all day every day you become a little acclimated to it.

When I get home tonight, I should have a full slab, approach apron and partial driveway poured and ready for the next step - after it cures, of course.
 

Attachments

  • 43.jpg
    43.jpg
    147.6 KB · Views: 134
  • 42.jpg
    42.jpg
    149.2 KB · Views: 121
  • 41.jpg
    41.jpg
    147.9 KB · Views: 117
  • 40.jpg
    40.jpg
    148.3 KB · Views: 114
To avoid these ads, REGISTER NOW!

YukonXL04

Well-known member
Joined
Feb 2, 2015
Messages
261
Location
Arlington, TX
Cougar,

I really can't lengthen the building. I had to cut it from the original 32 x 50 size to reduce the cost. I did revise the drawing to shift 1 foot from the shop to the garage. The cars in the small garage will not be moved in and out very often. By backing the left one in a driving the right one in and keeping both close to the walls, they can share the space in the middle for opening doors. It will be tight but it should work.

You should be fine on space to park 2 cars in there. My last attached garage was about that size and I had a Yukon XL and a Acura TL in there with tools all over the place. Still had room to get in and out of both vehicles on the drivers side of the yukon and both sides of the TL.

Great build btw. I wish I had room to build that big and wish I could afford it
 
OP
R

rand5204

Active member
Joined
Feb 3, 2014
Messages
35
Yukon,

Thanks for the comments. I have two fairly good size cars I will be parking in there but since they are only occasional drivers it's not like I need to move them all the time. It should work fie for my purposes.

I have plenty of room(4+ acres) but not enough money or it would have been 40x60!
 
OP
R

rand5204

Active member
Joined
Feb 3, 2014
Messages
35
Today was concrete day finally!!

The crew was here pretty early. They finished up the rebar and prepping the driveway. The first concrete truck showed up at about 9 AM. At one point, we had one unloading and two in the street waiting their turn.

The garage slab came out nearly perfect. There is one spot where it is 7/16ths low but the rest is nearly perfectly flat and very smooth. The approach apron also came out well. The only issue was the very last pour on the driveway extension. The truck was late and the poured area had started to harden. This left a pretty visible spot but the rest of the work is so good that I'm not going to obsess about it.

The crew foreman told me I could start framing tomorrow but my framing crew can't get here until Thursday. That should actually work out pretty well. At this point, other than the delays, I'm very happy with the way it's working out.
 

Attachments

  • 47.jpg
    47.jpg
    148.2 KB · Views: 190
  • 48.jpg
    48.jpg
    147.6 KB · Views: 185
  • 50.jpg
    50.jpg
    145.4 KB · Views: 211
  • 51.jpg
    51.jpg
    148.5 KB · Views: 178
OP
R

rand5204

Active member
Joined
Feb 3, 2014
Messages
35
Yaidunno,

Thanks for the comments. We just moved here a little over a year ago and looked long and hard for the right place. I knew it was "ours" as soon as I walked in the door.

Correction from yesterday - the slab is low in one sopt by 3/16" not 7/16"
 
OP
R

rand5204

Active member
Joined
Feb 3, 2014
Messages
35
Today the crew came back and stripped the concrete forms. They also saw cut the garage slab and the driveway. I was a little surprised that the driveway was done without expansion joints but I guess the saw cuts are a standard practice here. I'm skeptical but we'll see how it goes.

The building material and trusses were both delivered today. It doesn't look like enough lumber to build the garage but I guess it's pretty deceiving. The trusses are awesome. They weigh 250 lbs apiece and the framer says he will lift them with a 3 man crew. He says he has never used a crane in all his years of experience and insists he won't have to here either. Should be interesting to watch. I just don't want anyone hurt

Framing is scheduled to begin tomorrow, weather permitting. I am really looking forward to it.
 

Attachments

  • 67.jpg
    67.jpg
    145.1 KB · Views: 111
  • 59.jpg
    59.jpg
    148.6 KB · Views: 119
  • 55A.jpg
    55A.jpg
    145.9 KB · Views: 134
  • 55.jpg
    55.jpg
    139.9 KB · Views: 122
  • 53.jpg
    53.jpg
    143.9 KB · Views: 124
OP
R

rand5204

Active member
Joined
Feb 3, 2014
Messages
35
Finally framing!!

The framing crew got kind of a late start today so they didn't get as far as I had hoped. It is currently a two man crew but they kept at it pretty steady. The work so far looks top notch.
 

Attachments

  • 68.jpg
    68.jpg
    146.1 KB · Views: 108
  • 69.jpg
    69.jpg
    151.1 KB · Views: 100
  • 70.jpg
    70.jpg
    150.3 KB · Views: 106
OP
R

rand5204

Active member
Joined
Feb 3, 2014
Messages
35
On Friday the framing crew was a little a larger ans got an earlier start so they accomplished quite a bit. The exterior walls are basically complete with the exception of some of the window framing. The interior walls are pretty much done as well.

It turns out the detached garages are r-treated the same way as residences here when it comes to the building codes. The inspector would n't allow me to build the stairs as steep as I wanted so they wouldn't fit where I planned them. I have had to move them to the back of the building, basically on the same wall but coming up from the opposite direction. It's kind of irritating as it will affect the way I can use the space in that part of the building. I guess I'll just have to make it work as I know you're never going to win a debate with a county building inspector.

My big problem now is that my framing contractor goes on vacation next week so the work will come to a halt. He could have started on the trusses but we have had some pretty strong storms lately and he didn't want to leave them exposed while he was gone. I'm pretty dissapointed but I do agree with the decision.

Overall, I'm pretty pleased with the work that's been done so far. My only issue is the delays. I have so many projects backed up because of this one that I/m not sure how I will get back on schedule.
 

Attachments

  • 76.jpg
    76.jpg
    141.8 KB · Views: 98
  • 82.jpg
    82.jpg
    147.7 KB · Views: 121
  • 80.jpg
    80.jpg
    145 KB · Views: 128
  • 78.jpg
    78.jpg
    147.7 KB · Views: 109
OP
R

rand5204

Active member
Joined
Feb 3, 2014
Messages
35
Been a little while since I posted. Framing contractor now back from vacation and getting some work done. Attached are some shots from mid week. Framing done and trusses went up on Thursday. Unfortunately, they did them at a time that I could not be home so I have no photos of the process.

The crew finally decided that they were not going to be able to lift 250lb trusses, 32 ft. in length, over 12ft in the air. I told the contractor that I didn't want anyone hurt on the job so I really wanted him to use a crane. As an inducement, I offered to split the cost with him since it wasn't in our original agreement. The 65 ft. crane arrived at 9 AM and by noon had lifted all 36 trusses into place. I was really impressed! It was $250 well spent as far as I am concerned.
 

Attachments

  • 85.jpg
    85.jpg
    150.6 KB · Views: 110
  • 86.jpg
    86.jpg
    147.6 KB · Views: 129
  • 87.jpg
    87.jpg
    149.6 KB · Views: 108
OP
R

rand5204

Active member
Joined
Feb 3, 2014
Messages
35
By Friday night they had finished decking the roof and were working on building the gable end eaves.

In the first picture you can get an idea of what the attic storage space will look like. It will be about 10ft. wide and a little over 7 ft. tall in the center area. Not enough for any kind of additional shop space but more than adequate for storage. I'm glad I changed the truss pitch from 6/12 to 7/12 as I can at least stand up in the space now.

In the third picture you can see where I moved the stairway from the left front corner to the left rear. This was a result of the building inspector insisting that my stairs had to match the residential requirements even though this is a garage. As a result, I had to extend the rise/run on the stairs which then took up to more space so there wasn't room for tem in front. This is actually a bit of problem as I had this space configured to where I could get three cars inside - I won't be able to do that now.

The fourth picture shows a workspace where I will have a bench and probably a sandblast cabinet and parts washer. In the distance you can see my small office. I bought a bunch of barn wood yesterday and am planning what I hope will be very cool bookcase along 1 wall and trim throughout the space.

In the fifth picture you can see the north side of the building. At the front corner is the roofing material delivery that came on Saturday much to my surprise. I was told they wouldn't be here until Monday afternoon.

If you look closely at the last picture you will probably notice that the window heights are different. This does look a little odd from the outside but I had good reasons for doing it. After reading many other build threads on this forum, I wanted to make certain that the windows in the shop space (first two in the picture) were high enough to clear workbenches and other taller gear. They are 42" above the floor. The last window, as well as the other one in the office are lower at 36" above the floor. Although I don't expect to spend a whole lot of time in my office, I have a beautiful wooded view out both windows and I wanted to be certain that the view was not blocked.
 

Attachments

  • 96.jpg
    96.jpg
    147.4 KB · Views: 120
  • 95.jpg
    95.jpg
    147.9 KB · Views: 133
  • 94.jpg
    94.jpg
    144.4 KB · Views: 146
  • 93.jpg
    93.jpg
    145.5 KB · Views: 142
  • 92.jpg
    92.jpg
    141 KB · Views: 129
  • 91.jpg
    91.jpg
    147.8 KB · Views: 126
OP
R

rand5204

Active member
Joined
Feb 3, 2014
Messages
35
Haven't posted for a few days but progress has been made.

The building is now wrapped and the roof is on. The windows and the front door have also been installed. The vinyl siding to match the house will begin yet this week.

Inside the electrical rough in has started. It's amazing how much wiring goes into one of these buildings. I am approaching a half mile and we're not done yet! I am really happy with the electricians work. He is big into details and everything has to be right before he moves on.

The HVAC rough has started also although there is not a lot to it. After much debate (and research on this forum) I have settled on mini splits from Mitsubishi. I will have a 24,000 btu unit in the big shop area and and a 12,000 btu unit in the small garage area.

The stairway has probably been the single biggest frustration of the project. The building inspector required me to match the residential standard so it couldn't be as steep as I wanted. That forced me to move it to the back of the building where it really eats into the space I wanted for my cars. On top of that, they wouldn't allow me to just put in a hatch as I wanted. I had to fully enclose the stairway and set a door at the top. Not only does it restrict my access to the upper level, it probably cost me an additional $1,000 just to make the inspector happy.The closet that you see under the stairs will house my compressor and additional storage. I will probably vent and sound insulate this area to help keep the heat and the noise down.

I am really happy that I increased the roof pitch to increase the space upstairs. It is about 10 ft wide and 7 ft tall in the center. I also decided to run it the entire length of the building rather than just part way. It should really help with the clutter.
 

Attachments

  • 111.jpg
    111.jpg
    144.6 KB · Views: 134
  • 108.jpg
    108.jpg
    145.6 KB · Views: 128
  • 106.jpg
    106.jpg
    145.2 KB · Views: 112
  • 103.jpg
    103.jpg
    145.9 KB · Views: 86
  • 102.jpg
    102.jpg
    145.2 KB · Views: 95
  • 101.jpg
    101.jpg
    145 KB · Views: 107
OP
R

rand5204

Active member
Joined
Feb 3, 2014
Messages
35
A couple more pictures of my project.

The pile of lumber n the floor is old white oak barn wood. I plan on using it to build a bookcase and trim out my office.

The second shot is the view out of my garage door. The farm wagon is something my wife has always wanted. Since I'm getting a garage why not keep her happy too. We don't know the history of the wagon. It says John Deere - Moline, IL on it in several places. We believe it was built somewhere between 1890 and 1910 but just don't know for sure. It has quite wide wheels which we have been told indicates it was likely built as a freight wagon. It has a full 4 team hitch and was most likely pulled by mules.

The last picture shows why my office windows are lower than the others. This is the view out of one of the office windows. I wanted to be sure that I could enjoy the view while seated at a desk.
 

Attachments

  • 116.jpg
    116.jpg
    147.2 KB · Views: 92
  • 115.jpg
    115.jpg
    139.5 KB · Views: 101
  • 113.jpg
    113.jpg
    145.7 KB · Views: 101

woscholar

Well-known member
Joined
Apr 26, 2015
Messages
51
Location
Gladewater, TX
Very cool. It's awesome to have the land to build out, isn't it. We live in the country as well and would struggle if we had to do the neighborhood thing again. It's nice to spread out.
 

yaidunno

Well-known member
Joined
Feb 10, 2011
Messages
1,336
Location
WI
Great looking progress! While the stairs/closet do eat up space, they sure will look nice once finished.
 
OP
R

rand5204

Active member
Joined
Feb 3, 2014
Messages
35
wosholar,

We have lived in neighborhood type subdivisions most of our married lives. We should have done this much sooner. It's a bit of a drive to work - about 40 miles each way, but I can feel the pressure come off as I get closer to home. It is s great way to live.

yaidunno,

Thanks. I hope they will look good when finished. The closet will hold my compressor and have room for a few shelves. I should be ready for rough electrical and HVAC inspections yet this week. With any luck it will be insulated before the weekend.
 

BellyUpFish

Well-known member
Joined
Jun 24, 2012
Messages
2,942
Location
Alabama
You mentioned at hatch rather than stairs - were you going to do a dumb waiter type setup?

I'm planning my build and just got an estimate I'm happy with, but I'm not sure if I need everything in the estimate.
 
OP
R

rand5204

Active member
Joined
Feb 3, 2014
Messages
35
I did think about a dumb waiter style lift. I also put some thought into doing just a hinged stairway like a lot of attics have. I could never really figure out a practical way of doing the dumb waiter and I realized that that hinged stairs would be so restrictive that it would pretty much defeat the purpose of having the attic storage space.

My building is pretty much over budget. The biggest single surprise was the concrete but everything seemed higher. It's the small things that I really did not plan well for. Paint for example, I've been buying during sales (Labor Day was very timely for that) but I'm somewhere around 40 gallons right now so it's way more than I expected. Materials for trim out (baseboard, window casings, stair tread etc.) have all taken a toll
 
OP
R

rand5204

Active member
Joined
Feb 3, 2014
Messages
35
I haven't posted in quite a while but work has continued. I wanted to do something very simple on the floor both from a labor and appearance standpoint. After looking at pretty much everything out there I decided to use the Legacy densifier HD40. It looked like it would give the clean, kind of "wet" seeking without a lot of steps.

I made absolutely certain that the floor was as clean as I could get it. Starting with a leaf blower and working my way down through various sorts of dry type cleaning implements. I then lightly washed the entire floor with a wet mop. I was amazed even after all of this at how much grit you could still find on the floor. After another scrubbing and a final sweep, I was convinced that it was as clean as it was going to get.

I followed the label instructions exactly and put down three coats. The first was somewhat heavy and the second two rather lighter. 5 gallons covered my 1500 square foot space almost exactly with only a little left over. Rather than just dump it, I did spray it on the ramp in front of the building. The product within 1 to 2 hours between each coat so I was able to keep the process moving pretty quickly.

After letting the floor thoroughly fry overnight I was planning on burnishing it with a high speed polisher as the directions indicate. Here is where I ran into my only problem with the entire project and it had nothing to do with the HD40 itself. I live in a pretty rural area north of Atlanta and the only large, high speed floor polisher was a 40 mile trip each way. I decided to rent the floor machine for the weekend so I would have plenty of time to get the job done. Sunday morning I got the machine all set up, plugged it in and pulled the trigger on the handle. At that point I got a really nasty jolt from the machine that left my hand and arm tingling for awhile. Needless to say, I pulled the plug on the machine and my burnishing day was over. After two round trips of 80 miles each I took the machine back. After a few pointed remarks about their safety record I got a full refund and was on my way home again.

After talking with Scott at Legacy I find that for top results the floor really does need the burnishing steps. I haven't figured out exactly how I am going to do it yet but I will get it done.

In the before and after pictures you can really see the results I was after in the reflection on the floor after the HD40 went down. I'm sure that it will be even better when I can find a floor machine that won't shock me!
 

Attachments

  • 001.jpg
    001.jpg
    139.2 KB · Views: 59
  • 002.jpg
    002.jpg
    141.2 KB · Views: 59
  • 004.jpg
    004.jpg
    142.9 KB · Views: 59
  • 005.jpg
    005.jpg
    144.4 KB · Views: 60
To avoid these ads, REGISTER NOW!
Top Bottom