To avoid these ads, REGISTER NOW!

Victorian (1880s) Townhouse - from Carriage house to Track Day Heaven

HiWind

Well-known member
Joined
Mar 23, 2013
Messages
188
Location
South Africa
Hey Folks!

been lurking and sniping for a couple years after following the Jack's stupendous efforts in the 12 gauge garage thread, which I found via RennList. Lots more of that level of execution to see here which has kept me busy and scheming.

Nothing like a well executed plan to get you thinking, eh!?

So I've been living here in this 120 year old double storey vic for 20 years and finally got tired of wishing I had a great space to work on my young classics - a 964 and a GTV Alfa - and in part thanks to all your threads and ideas, I'm finally beginning. I thought I'd document the process here partially for me as a journal and for whatever help it may be to others in similar (creaky old) houses. Of course I'm also keen to get some specific input as issues arise so feel free to air your thoughts!

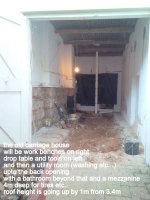
For the most part I'm just remodeling the old carriage house - literally not wide enough for a car if you want to get out of it once you're parked - and putting up a double garage on the front driveway upto the road. The whole erf is 450 sqm as we're in 'downtown' on the side of a 1000m high mountain - pretty but between mountain and sea there's precious little space.

The basic idea:
1. sketch the concept
2. get approval from very sticky Heritage & Residents association
3. draw formal concepts
4. repeat step 2
5. draw architectural plans and submit to Town Council
6. adjust per 'instruction'
7. put out tenders for various bits of the job and find a builder - I'll be project managing
8. break ground and start getting the old stuff out the way ... without damaging foundations etc...

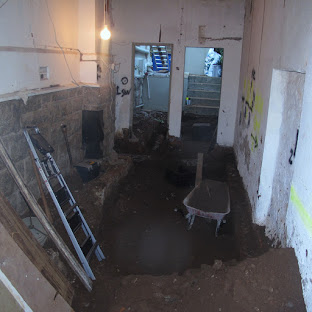
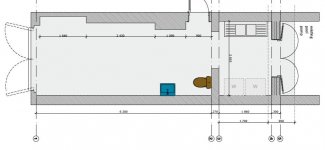
So I'm now at step 8 and over the next couple days I'll post the pics and sketches and plan that go me to this point.

Here are my first pic of today's breaking ground and the basic idea.
 

Attachments

  • 4-IMG_20150521_152604.jpg
    4-IMG_20150521_152604.jpg
    134.5 KB · Views: 1,212
  • 1-IMG_20150521_152637.jpg
    1-IMG_20150521_152637.jpg
    70 KB · Views: 1,056
  • 2-IMG_20150521_152613.jpg
    2-IMG_20150521_152613.jpg
    78.9 KB · Views: 1,028
  • 3-IMG_20150521_152622.jpg
    3-IMG_20150521_152622.jpg
    66.9 KB · Views: 987
To avoid these ads, REGISTER NOW!
OP
H

HiWind

Well-known member
Joined
Mar 23, 2013
Messages
188
Location
South Africa
here are the 3d sketches of the overall idea

required due the heritage grading of the area; the existing carriage house is behind the new pitched roof garage and will house a utility room/flat-let with mezzanine floor and a 5sqm space for my workbenches and tools.

the pitched roof is to allow for the 2 post car lift (bought off a mercedes garage that was moving) and will allow for 3 cars to be stored in the new garage (if necessary and I'm feeling brave)
 

Attachments

  • K114 Kreeve Option 1 Views from Garden.jpg
    K114 Kreeve Option 1 Views from Garden.jpg
    144.7 KB · Views: 1,047
  • K114 Kreeve Option 1 Views looking up and down street.jpg
    K114 Kreeve Option 1 Views looking up and down street.jpg
    139.9 KB · Views: 1,094
Last edited:

theoldwizard1

Well-known member
Joined
Feb 22, 2011
Messages
43,076
Location
SE MI
Big drop on the floor ! I assume you already checked the depth of the foundation and there won't be any issues ?
 
OP
H

HiWind

Well-known member
Joined
Mar 23, 2013
Messages
188
Location
South Africa
good question Wizard - one I'm pondering with the engineer in the morning ...
the roof is going up 60cm and floor is dropping 40cm to give me the extra 1m (didnt explain that before!)

That's what you can see in the first pic & 3rd pic ie the first 20cm down.

The interesting thing about these old places in the colonies is that there wasn't really much concrete available - it was super expensive then and only used in the stone foundations and a little below - the walls are all clay (unbaked) brick with clay cement between them!
The plaster was strong and thick and helped retain the walls but there is very little concrete in them.

I'm looking for the main sewage line below the carriage house floor .. it shd be about 1.2m down and made of porcelain - while we're in there I'm replacing that with duro-pipe (plastic) and the cast iron (likely all very rusty by now) can be replaced too. That's why there is a 1m wide section where I've taken the screed and underlying brick out completely so I can have a wide enough space to locate the pipe. Not sure what we do then but likely will replace the 3cm screed and 15cm brick with 25cm of concrete as a 'retainer' of sorts.

Sound reasonable? Will get pro input tomorrow am.
 
OP
H

HiWind

Well-known member
Joined
Mar 23, 2013
Messages
188
Location
South Africa
good news is I found 4 of these on an auction yesterday
will think about color as I can get them re-powder coated cheaply
but these definitely pop as is!

1.8m high by 90c wide and 50cm deep - so 4 of them are 3.6m wide
and will make a great wall filler in the flat garage ie in front of the car on that side.

The SUV is 4.4m and the garage is 6.6m deep so enough space to park and open the cupboard doors or walk in front of the car ... a bit tight but workable.

635012743525091724635012743525091724.jpg
 
Last edited:
OP
H

HiWind

Well-known member
Joined
Mar 23, 2013
Messages
188
Location
South Africa
Post 2 above shows the outside view of the garage that will take the place of the current driveway and vines above it.

Behind the new garage space will be a workshop onto utility room onto small mezzanine (double bed size +50%) and bathroom (wetroom shower and toilet with basin across) in what is now the carriage house.

Here are the design notes and a sketch of that area (although bathroom and Utility room have switched spaces - need to draw that up later and include all the points made below.

Oh! Pointers on electrics (ie plug points) most appreciated :bowdown:
__________________________________________________________

Existing Carriage House Renovation

Bedroom & Bathroom section
1. mezzanine - ibeams and wood floor at 2.5m (? high enough) above the bathroom (bathroom has 2.3m internal height); runs from back garden side wall for about 4m to over above the cellar door (label cellar door); hot water from main bed (1st floor) bathroom down the outside wall (chased); 2 round windows in mez bedroom onto the back garden
>>> electrics: 2 plug points (one on each of the long walls in mez room); light switch on left as you enter the basin area (lights above toilet and basin) and switch above in mez on opposite (to basin) wall i.e. the nib wall which has the light switch for the cellar (shd lights be motion activated??)

2. channel type drain cut into the floor on the outside of back garden entrance doors to carriage house; need that as garden is higher and stair run down to the double door entrance

3. shower & toilet in a full tiled (1.2m on wall) wet room; positioned on the house side of carriage house; with sliding doors; drain in floor; shelf cut into wall in shower (40cm high; 15cm deep); vent in back garden facing wall for shower (small sliding window)

4. small corner basin on the left of back garden entrance as you enter carriage house (CH) ie opposite toilet in the side corner; small basin ie 35-40cm with cabinet below

5. ceiling in CH to insulate & hide light wires; lights to be LED above long counter and equal distance on other side too; maybe 6 downlighters instead on one transformer

6. floor of CH to drop 40cm from current height; also floor next to pool pump/back garden stairs to fall by 50cm to match; will help re all the sewage and stormwater pipes that need to be positioned for new bathroom and utility room.

7. replace existing sewage pipe (120 yr old porcelain and cast iron) with new poly pipe from back garden to main driveway (new garage) manhole cover/drain; there is already a sewage point on garden side of pool pump house; CH side of pool pump house is storm water drain

8. thin internal wall with no door (for now) between bathroom and util room; just keep nibs (reduce north side nib to match south side nib)

Utility room - must look clean and slick and neat; easy to work in and do all the laundry etc...

6. above #6 also applies

7. first thing on entering this room from new bathroom is on the left and is a space big enough for a fridge freezer combo. For now it will just be a stand alone, tall freezer and a broom/utility cupboard (remove cupboard later if need to put in a fridge)
>>> electrics: 2 plug points

8. then the counter begins - working heigh ie 90 cm surface height; 62cm deep; simple rounded from edge mild steel and clear coated with 10cm rear splash guard/trim; steel great for ironing on (have rubber matt with fireblanket trimmed with cotton - easy to roll away when not ironing)

9. underneath counter:
i) is the washing machine (cold water inlet & exhaust to sewer)
ii) dryer (rear wall vent for hot air)
note: washer is closer to garden/freezer; wide headheight cabinet (not deep - 30cm) above it for iron & all washing powders etc...
>>> electrics 4 plug points

10. 2m wide couch on house side wall next to fireplace

11. double hand-washing sink (big) next along the regular width (602mm) counter - note need to calc precisely where this will be re water in (hot & cold) and exhaust to sewer (make sure good trap re smell!); single tap with swivel spout and 2 taps ie not balanced water; sinks could be porcelain i.e. classic butler sinks

Workshop (adjacent to new garage; inline with 2 post Mercedes garage lift; no real separation from utility room though as floor is the same and counter continues - ok? maybe a curtain can be drawn later on Util room side)

12. fireplace next to chimney (on road side of chimney ie opposite side from cellar door).
Small belgian porcelain & cast-iron unit with exposed flue running up beside existing chimney (crazy risk? shd be ok as main garage is shut off and yellow cabinets are fireproof)
>>> 2 plug points half way between chimney and drop-table knook (quite high ie above the stone foundation/facing which goes to 1.2m

13. on opposite side of CH counter continues along the wall from util sink all the way to new garage side ... counter stops 30-60cm before .. rounded out? not sure how to end it; under this counter will be air compressor (100L) and also another small basin for hand washing in the end corner of the counter
>> electrics - 4 plug points

14. in 1640mm knook (on house side of CH wall) will be a drop-table and tool cabinet; drop table is 1.5m wide and 900 deep and folds up at 900cm height; above it on the wall is a shallow cabinet also 1.5m wide and 1m high with 2 doors and all spanner etc... on a pin board
>> 2 plug points (fancy plug with 3 prong and 2 prong); power bar in cabinet with chargers

15. 3 pane folding stacking doors (gunmetal gray alu with glass) stack towards the North side of garage onto CH opening ie towards town side of garage opening; ±2.4m high, 2.6m wide

16. small step/ramp down to new garage level (10cm lower at lip of door)
_____________________________________________________________
 

Attachments

  • garage existing - internal v2.jpg
    garage existing - internal v2.jpg
    44.7 KB · Views: 334
Last edited:
OP
H

HiWind

Well-known member
Joined
Mar 23, 2013
Messages
188
Location
South Africa
today's progress ... found the pipe!

This portion is a mix of old baked clay and cast-iron.
Also found a couple healthy vine leader roots but none attacking the pipe. The vine is 8m away and there's a solid driveway between the planter and this floor which was also 15cm deep brick and screed.

Amazing the 120 yr old cast iron in reasonably damp (we live on the side of a mountain so high water table and lots of streams 15-30m down) soil is not rusted. Hellava thick though!

Will drop the pipe another 10 cm, replacing with modern poly pipe, with various junctions for the fixings listed above and then seal it in with cement. Ground never freezes here. Foundations are reasonably small but thanks to the solidness of the ground the Engineer said its fine for the size of house and perfectly common. We will dig out 1.2m spans along the house wall and fill them with high strength concrete, linking them sideways with re-bar. Will take a while - ie 1.2m a week with 2.4m between each section - but will focus on the front garage while doing that and get the first fixes in place for all the plumbing and electrics.

Relieved the Eng was happy! I won't sleep soundly till there's more foundation despite the fact that there hasn't been for the last century!
 

Attachments

  • 1-found the cast iron pipe.jpg
    1-found the cast iron pipe.jpg
    62.9 KB · Views: 400
Last edited:
OP
H

HiWind

Well-known member
Joined
Mar 23, 2013
Messages
188
Location
South Africa
popped round to a friend's garage - he's a classic tool nut and an industrial designer
got some good ideas and spotted a few things which may need to be 'stored' (at my place) as soon
as his bike rebuild starts taking shape ;)
 
Last edited:

theoldwizard1

Well-known member
Joined
Feb 22, 2011
Messages
43,076
Location
SE MI
Big drop on the floor ! I assume you already checked the depth of the foundation and there won't be any issues ?

good question Wizard - one I'm pondering with the engineer in the morning ...
the roof is going up 60cm and floor is dropping 40cm to give me the extra 1m.

Some houses around here, had basements dug after the house was built. I don't know if this was "engineered", but the "classic" solution was to step in about 1m and dig down. Obviously, this would not work for sandy/loose soil. A new foundation and reinforced concrete wall was poured. Admittedly they were going down about 1.5-2.0 meter.
 
OP
H

HiWind

Well-known member
Joined
Mar 23, 2013
Messages
188
Location
South Africa
Yes T.O.W.1 ... that is spot on what the Eng suggested - thanks again for chiming in!

So he said dig down the 80cm we need to lower the floor level (and reach the old cast iron pipe) and provide a floor at 60cm below current but do that in 1.2m slots along the house wall.

Then dig a 25cm gap directly below the wall and fill with high grade cement with reinforcing bars
laid parrallel to the wall and 'try' and have some of these rebars extend out each side
so they can be included/lockedin to the slot on either side of that slot.

That will help prevent the typical hairline cracks etc.. (something we already live with quite happily as we solve those every 6 years when we paint the inside and outside of the house).

The soil is clay heavy and not loose or sandy, which helps alot.

The only issue is the 5 days between each slot ie waiting time.
(not max hardening time but with high grade cement it shd be hard enough to do the next slot)
So it seems we'll need 5 slots so 5 weeks but I can do other work during that time (I hope)

Any additional ideas or suggestions?
 
Last edited:
OP
H

HiWind

Well-known member
Joined
Mar 23, 2013
Messages
188
Location
South Africa
yes I was surprised by that but the Eng says if the gap below is 1.2m the wall wont collapse downwards thanks to the interlaced bricks and size of the stones etc... obviously not something you'd leave open for long, just remove the slots of ground and insert the concrete and rebar immediately.

The reason the concrete mix is spec'd to '30' is that even after just 12 hrs dry it'll be close to '20' ie the actual required strength for the weight of that wall.
 
OP
H

HiWind

Well-known member
Joined
Mar 23, 2013
Messages
188
Location
South Africa
Didn't want to get OT too soon ;) .. but sure!

Mine is one of the 208 homologation road cars for the GTV race car with dell'orto carbs, race headers and cams, lower front valance, moulded bonnet with intake, wider BBS rims
and 3.0L engine which was used to upgrade the 2.5L into the race car.

Most of them were red, a few grey and white ... not my car (mine has 57k kms) but article here about the same car

141027060522251582.jpg


DSC_0626.jpg
 
Last edited:

v12man

Active member
Joined
Dec 8, 2007
Messages
40
Location
Johannesburg, South Africa
Matt

Couple of things that might be worth considering:

1 - 380v 3 phase power - if you have it available, then consider at least 1 plug point - useful for older machinery.
2 - 220v welder plug points - at least 1
3 - Air distribution around the garage - assuming you will place a compressor somewhere
4 - Generator - while you are in there somewhere... :)
5 - if your lift has a center raised piece between the verticals - consider dropping that into the floor
6 - Lighting - going to need lots - especially low level lighting that is not blocked when a car is on the lift, and above workbench lighting
7 - Access for a low car off the pavement
8 - Consider putting an eye bolt in the floor so you can use a winch to pull a car in if the motor is dead or you have clutch issues.
9 - Consider a dead flat area for cornerweight scales - under the lift
10 - Flooring - what's your plan for floor covering? if it's epoxy - them make sure you have a waterproofing layer under the concrete.
11 - Heating - nothing worse than working in a cold garage alone at night.
12 - Comms to house - maybe an intercom or some such?

That's my list for the moment - you know my number
 

Alfanuts

Well-known member
Joined
Oct 9, 2012
Messages
531
Location
Port Elizabeth, South Africa
Hi there

I see you are also appreciate fine cars. The GTV 3L is an especially nice one and thanks for keeping it in the country. Of the 214 (that's the figure I have been told) it is believed that 14 were works cars (later destroyed) and the the other 200 were cars sold to the public. These figures are highly debatable though. Alfa Romeo South Africa's records were kept in an exercise school book in pencil is one of the rumors.

They say there are around 70 odd 3.0L GTV's remaining in South Africa and around 150 are in Europe and Australia?? You know you have a great classic when it is replicated / forged / copied?

Why I actually posted is that I have a hoist in my garage as well. It is the two post variety with screw threads for lifting. I store my Giulia race car on it permanently. Cable or Hydraulic you need to make sure the safety interlocks work properly and it should be safe to store a car on it.

You need at least 3.2m head room for the hoist. I had them build the wall 3m high at the low end of my garage and it has a tin roof with a 15 degree slope. The roof beams are about 50mm above the cars roof on the hoist, at full lift.

The advice to install 380v 3 phase is worth considering. I put a 3 kW 240V single phase motor on my hoist and it will not lift my double cab, 1740 kgs, but would lift my 146 at 1560 kgs with effort.

My hoist came from a Toyota dealer and it would lift anything they threw at it when it was three phase. If your hoist is hydraulic it should be okay on single phase. If your hoist is a screw thread type seriously consider the extra cost of installing 3 phase. I would have installed 3 phase if the cable they had to install from the transformer was not going to cost R150k.
 
OP
H

HiWind

Well-known member
Joined
Mar 23, 2013
Messages
188
Location
South Africa
thanks Guy - my answers below with >>>

Matt

Couple of things that might be worth considering:

1 - 380v 3 phase power - if you have it available, then consider at least 1 plug point - useful for older machinery.

>> thanks Guy .. expensive to have 3 phase put in at the house as its all single phase around here and the lift is hydraulic so single will work for the Porsche, Alfa, Lancia Beta etc...

2 - 220v welder plug points - at least 1

>> good point

3 - Air distribution around the garage - assuming you will place a compressor somewhere

>> I will although not sold on airtools for my needs yet - still considering it but will pipe air to the lift area for tires, blowing out grit etc..

4 - Generator - while you are in there somewhere... :)

>> yes with the load shedding of late its sadly worth consdiering but going to go with an inverter, battery, panel idea first as the gennies are loud/smelly and the plot is small as we're right in town

5 - if your lift has a center raised piece between the verticals - consider dropping that into the floor

>> 100% right - already spec'd and drawn - essential as the 964 runs so low and getting it on planks then shifting planks to swing in the arms (2 post merc workshop lift) is a hassle, so we're dropping them in 50-80mm (can't remember the number, but enough for them to get in place easily)

6 - Lighting - going to need lots - especially low level lighting that is not blocked when a car is on the lift, and above workbench lighting

>> still an area on the site I need to explore but thinking of running 2 strip of warm led with diffuser allong the walls (at 1m and 2m heights) and then something from above (also led but hi-quality (90%+)

7 - Access for a low car off the pavement

>> had the driveway surveyed and have all the measurements so that wont be a problem - requires a type of butterfly surface (down to flat on one side and up to flat on the other) off the sidewalk as road is quite steep

8 - Consider putting an eye bolt in the floor so you can use a winch to pull a car in if the motor is dead or you have clutch issues.

>> nice one!

9 - Consider a dead flat area for cornerweight scales - under the lift

>> aiming for the whole garage to be dead-flat so yes

10 - Flooring - what's your plan for floor covering? if it's epoxy - them make sure you have a waterproofing layer under the concrete.

>> will keep in mind - still not sure between tiles (easy to replace cracked ones) vs polished concrete (good look but can stain) vs expoxy (expensive but pretty and easy to clean as long as it doesn't lift i.e. need well laid, dry floor) but leaning towards epoxy for a pro finish

11 - Heating - nothing worse than working in a cold garage alone at night.

>> aiming for a air tight area so a gas heater will do the job but maybe worth mounting a couple on the walls? I might put a Morso or similar fireplace in the adjoining space but wary generally re fire

12 - Comms to house - maybe an intercom or some such?

>> great idea thanks!!
 
OP
H

HiWind

Well-known member
Joined
Mar 23, 2013
Messages
188
Location
South Africa
Hi there

I see you are also appreciate fine cars. The GTV 3L is an especially nice one and thanks for keeping it in the country. Of the 214 (that's the figure I have been told) it is believed that 14 were works cars (later destroyed) and the the other 200 were cars sold to the public. These figures are highly debatable though. Alfa Romeo South Africa's records were kept in an exercise school book in pencil is one of the rumors.

They say there are around 70 odd 3.0L GTV's remaining in South Africa and around 150 are in Europe and Australia?? You know you have a great classic when it is replicated / forged / copied?

Why I actually posted is that I have a hoist in my garage as well. It is the two post variety with screw threads for lifting. I store my Giulia race car on it permanently. Cable or Hydraulic you need to make sure the safety interlocks work properly and it should be safe to store a car on it.

You need at least 3.2m head room for the hoist. I had them build the wall 3m high at the low end of my garage and it has a tin roof with a 15 degree slope. The roof beams are about 50mm above the cars roof on the hoist, at full lift.

The advice to install 380v 3 phase is worth considering. I put a 3 kW 240V single phase motor on my hoist and it will not lift my double cab, 1740 kgs, but would lift my 146 at 1560 kgs with effort.

My hoist came from a Toyota dealer and it would lift anything they threw at it when it was three phase. If your hoist is hydraulic it should be okay on single phase. If your hoist is a screw thread type seriously consider the extra cost of installing 3 phase. I would have installed 3 phase if the cable they had to install from the transformer was not going to cost R150k.

cheers Nuts - are you in GP or down by the coast too? And thanks for that advice - we went with 3.4m height so close to your calc. As you say $15k for the 3 phase is silly if I can put a different engine on the jack for $250. But mine is Hydraulic so that helps too.

You're right the 3L is a rare Alfa ... and luckily I have access to the works driver from the period and the Mechanic who built them all! Here are Arnold Chatz (Driver) and Sampie Bosman (Factory Mechanic and Builder) of the 208 (per Sampie) cars with my 3.0 last week. Sampie kindly came though to review the car and point out some of the special mods the factory race team made for the car to get it to the dominant position it held in GT racing back in the day. Each batch of 10-20 cars (of the total 208) were slightly different as new parts came available from the factory and AutoDelta found improvements etc... My car has the last gen wider rims and a few other touches.

Arnold drove for Alfa for so many races and for so long that he was awarded the most winning Alfa driver in history award by the Factory a few years back! He's also now in the Hall of Fame. Sampie says it was a pleasure to keep his car running as he was so gentle on them ;)

med_gallery_141_18_174023.jpg

here are the above mentioned Driver (Lhs) & Builder (Rhs) just last week with my car in the shop where the paint is being corrected and new windscreen going in etc..
 

Attachments

  • 1-sampie and arnie with GTV.jpg
    1-sampie and arnie with GTV.jpg
    53.8 KB · Views: 176
Last edited:

v12man

Active member
Joined
Dec 8, 2007
Messages
40
Location
Johannesburg, South Africa
3 - Air distribution around the garage - assuming you will place a compressor somewhere

>> I will although not sold on airtools for my needs yet - still considering it but will pipe air to the lift area for tires, blowing out grit etc..

The only air tool you really need is an air impact for removing wheels - but as they say - while you are in there.... nothing worse than tripping over air hoses because you don't have a distribution point somewhere handy....

The other benefit you have with a couple of distribution points is you have have 2 or more hoses ready - so one for air duster and one for air impact - nothing worse than having to move tools between a single line all the time.

When you do the floor - just make it a light colour - all the better to find that dropped washer (aluminium hides nicely on cement gray) and helps with light distribution. I am not sure I would go with an expensive epoxy finish - there are local 2 part alternatives from Prominent paints that are pretty cost effective and good enough.

The other thing I have in my own garage is a mirror - for checking facial damage/dirt before scaring the family when about to return to the house...

What I don't have - but often wish I did have - is some plumbing and an industrial basin in the garage - its a pain to clean up a bit mid job, and SWMBO does not like greasy hand cleaning in the house... fortunately I do have outside basins on the other side of the house - with hot water - just a bit fresh late at night mid winter...
 
To avoid these ads, REGISTER NOW!
OP
H

HiWind

Well-known member
Joined
Mar 23, 2013
Messages
188
Location
South Africa
thanks Guy .. 100% agree re cleanup (and mirror ;) ) which is in the plan
and great point re 2 connectors .. think I found a rotary type compressor that doesnt need a tank
in an old building that's for sale .. might be able to pick it up - very quiet too
 

Alfanuts

Well-known member
Joined
Oct 9, 2012
Messages
531
Location
Port Elizabeth, South Africa
HiWind

I am From further along the coast in Port Elizabeth. Not a Vaalie :D

Well there you go, 208 were made. Coming from Sampie then you know that is true as he is the veritable horses mouth, the man who made it all happen.

One of my favourite stories of the 3.0L GTV build is that we are the only country to have had fuel injected big six saloons. Apparently there was a shortage of carburetors at some stage (or something like that, best ask Sampie he will know) and they robbed the big six saloons of their carburetors and fitted the fuel injected system from the 2.5 GTV's they converted. The carburetors were easier to tune and modify for more power apparently.

Yes Arnold deserves his spot in the hall of Alfa fame. His name pops up in lots of places in the racing history of South Africa. I also found that a gentle hand was needed to race an Alfa successfully.

Back to your Garage, any progress? More pics? The compressor did not happen without pictures, you should know that. :)
 
OP
H

HiWind

Well-known member
Joined
Mar 23, 2013
Messages
188
Location
South Africa
lol thanks Nuts .. yes its great having the guy at hand and the stories never end
(altho some get repeated :beer:) ... ps - which alfa forum dyu recommend?)

Yes some progress on the rear part of the build ie the refurb of the existing carriage house - hitting it running after a month away for business&family (sunny places)

1. lots of earth moved - 12 cubes and likely 3 to go tomorrow

2. got the spray cans out and did some graffitti ie where the plugs, water fitting etc... need to go - plumber arrives tomorrow (yellow is water, black electric)

3. found the old clay storm water and sewage pipes - storm above the sewage, so that will be replaced with plastic 110mm and the sewage will get a coat of something to help preserve ie (ideas?)

4. props arrive tomorrow so we can break down the old door ways and put the new single skin wall for the bathroom on top of the new damp proofed and insulated floor. (see new improved plans below)

5. found a way to bump the roof up towards the rear 50-60cm so the rear half of the space's Mezzanine will be 2.2m instead of 1.7m - mez shown on the left side of the plans and will be great for all my rims and tires (but queen sized bed drawn for scale)

6. planning the floor now:
- 10cm of corse sea sand
- 15cm of polystyrene
- damp proof course (is 375 microns enough?)
- scattered bricks to hold up the steel mesh
- steel mesh
- 20-30cm of fresh concrete (eng's spec)
- 3 strip (60cm wide) of under-tile heating elements (in bathroom and along counters ie middle strip of room)
- screed & epoxy

here's some pics and the plans (modified with mezzanine) attached

6 of these gone over the last few days
Fv8ZrbdyjCz9VwrPFT_S9-3nAkqeVAsn1yy3F6xvbT8=s338-p-no


back courtyard behind carriage house - need to find a way to get those stairs down another 80cm! (walled box next to stairs is the pool pump); sewage pipe just visible
c0CNXYln02LHy8vjEjb1ENQvfTHRpVfGg0_CZD85Aec=s338-p-no


will replace roof with IBR once floor is in .. mezzanine starts where the light is; might use metal perlons inside the mezzanine to preserve internal space .. but also can just pop the roof up 50cm which makes it comfy in there
7Rtm3KUqktQD58DFy_KEUads1Jjx54vLMn9DOZwjdA8=w389-h312-p-no


once I prop the long wall to the right tomorrow the doorways (short wall) can be removed (note the single skin of bricks removed on the right - was the only way I could open the car door enough to get out! :dunno:)
Pbr5akklAMGiWwWyGFIB0n8b83FtqoJrefYNtWkZGTg=s312-p-no


The old cellar door will now need to be lengthend as it will be 1.9m again thanks to the lower floor
JjIHUizfXg0kKGLfRnMgSc29eSAxlRtWT2Dyy84Yke8=s338-p-no


All feedback and advice welcome! TIA :thumbup:
 

Attachments

  • old garage refit v2 - jun15.pdf
    103.3 KB · Views: 15
Last edited:
OP
H

HiWind

Well-known member
Joined
Mar 23, 2013
Messages
188
Location
South Africa
thanks Jim - yes by being GJ poster's we tend to be (overly?) ambitious!
and good point re the pic ... seems google drove past in summer (vine in full bloom) so here you go.

old%2Bvic%2B-%2B42.jpg
 
OP
H

HiWind

Well-known member
Joined
Mar 23, 2013
Messages
188
Location
South Africa
Lol, had a fire in 2008 in the roof .... came back a little improved ;)

... now I'm getting into it!

unnamed.jpg
 
OP
H

HiWind

Well-known member
Joined
Mar 23, 2013
Messages
188
Location
South Africa
so this is good news ... there is actually a concrete foundation on top of the soil & loose rocks/stones...
seems that's how they made them 120 yrs ago .. cement was very expensive back then I believe
and used sparingly ie in foundation only and not in between bricks in the walls (these are just clay unbaked bricks and clay between them)

here is the 50mm foundation and rocks, soil below
OqRHbayezMl24yCfaBP3AEcjg2rCpPgAdlMQqPPeZbQ=w722-h619-no


in order to unpin the wall better (and allow for dropping the floor level) I did this over the last 2 days:
1. choose a 1.2m wide section and remove the soil/rock below it - 90cm high and 60cm under the wall (about the width of the walls above the section)
PVuZaGMs0paB8cNaVS_CJsZ1QdlMY3SleNVUJD4WUwI=w353-h264-p-no


2. then take the 10mm rebar and make the cage into which the cement (1/2/4 cement/sand/stone) mix is poured (got to play with a real cement mixer today!)
keJHNhk0V1Quo3kEDCqeJtBdInZevf6Eko2ivBrpwa0=w353-h264-p-no


the bars are bent up so that when I do the section to the right and left of this one, I can chip the bars out on the side, bend the bar flat again and join those into the adjoining section .. neat technique

Tomorrow the base upto the tops of the white foam "wrappers" will be dry and using high strength coursing bricks the bricklayer will build the rest of the footing upto the bottom of the existing concrete layer shown above.
Then the bent parts can be repositioned and a week or so later repeat on either side.

There has been some settling over the last many years and per the engineer this approach is the best way to deal with it (and allow for dropping the floor 40cm) ... there are 4-5 of these type match-stick wide cracks in various places along the wall ... but none of them more than 12cm in length ... we propped the walls in a few place just to help secure the area while we were digging.

pDsZK3SvQtjfAlCsd9TAvy_a_A977kbmlVPtN2oTxxE=w826-h619-no
 
Last edited:

iceman510

Well-known member
Joined
Mar 18, 2014
Messages
147
Location
Michigan
Interesting project. Looking forward to the end results.

A "Victorian" house in SA looks a little different than a typical one here in the US.
 
OP
H

HiWind

Well-known member
Joined
Mar 23, 2013
Messages
188
Location
South Africa
thanks Ice ... I am too!

Re the difference ... Our warm weather means our trees aren't as sturdy as yours (for the most part, ours grow faster and aren't as dense/strong) and the english colonists brought their stone and brick approach rather than the wooden house approach so that's also prevalent here vs the wooden approach on your side of the pond

... guess economics of the materials played a big role. The house is also on the side of Table Mountain ... lots of granite and rocks around.

beautiful-view-of-table-mountain-in-cape-town-South-Africa-from-signal-hill-1600x1067.jpg


some good detail here ... https://en.wikipedia.org/wiki/Victorian_house
 
Last edited:
OP
H

HiWind

Well-known member
Joined
Mar 23, 2013
Messages
188
Location
South Africa
I should add that although there is no real problem with cracking etc... the new concrete underpin will help with the hairline cracks that appear over years (been in this house 24 years now) beneath the plaster and paint inside .. it'll be nice to be rid of those for once and for all :thumbup: .. and its a good excuse for all the work which will end up giving me a great storage and workshop space ;)
 
OP
H

HiWind

Well-known member
Joined
Mar 23, 2013
Messages
188
Location
South Africa
thanks Alv ... where about are you?

Xtremek ... this is phase one while I wait for plan approval for the real deal is double garage in front of this one. This should take another 3 weeks (2 down already - I was away for June) with 3 of us working - ie me and bricklayer & a carpenter... but I'm not holding my breath, just easing through it as it goes.
 

Alvetro

Active member
Joined
Oct 23, 2013
Messages
34
I'm out in plumstead. Hope to start my own garage reform soon so I can get to my 2 air cooled projects. A 71 ghia and a 67 splittie. Cheers
 
OP
H

HiWind

Well-known member
Joined
Mar 23, 2013
Messages
188
Location
South Africa
nice - I like your taste ... just prodding around a 74 beetle for sale but doesn't have enough going for it to take on .. a splittie deserves a pic tho ;)

So a tough day and when you're doing things under the surface it can feel like nothing's really been achieved as the room is no more organised if not more messy when I got done ... but knowing that the 3 storey house's 120mm thick concrete foundation is no longer suspended in mid-air is a good feeling!

It took all day to plaster the new walls - bit cold and not enough sun to make it easy drying tho - and then to take the concrete slab footing we poured 2 days ago and add the bricks (14 MPA, NFX) between the foot and the old existing foundation.

The english bond was the chosen approach per the Eng with brickforce (metal wires in a ladder format laid between courses to help strengthen and tie this foot with the two coming on either side ... sorta like brick rebar).

The last course is obviously key as it must be solid up against the top concrete layer ... so I built up the last 2 courses at the back first, packed above them solid with the bricking cement (packing it in with a wooden prod) and then wedged in some 5mm slate tiles into the gap so the 'corking' was solid. That caused some of the cement to bulge out but meant the last layer was knocked in tight, so I was happy and called it a day. Here some pics to explain the process.

the slab laid and 2 days dry (20 deg c)
CYB23yLMP1EAaJflZnEL6paGBM89zsUWQtWHiBxHc0Y=w338-h252-p-no


the first course showing the english bond and the brickforce
1dIUIk9l5isHZe0iWzOxipTDtYFUIZBJ1_N0URUN_mk=w338-h252-p-no


getting there ... quarters left extending on sides to tie into subsequent columns
6pTNjhyKqYxAfOfscyCH6hREzDqx_07wsH6oL7hF8jI=w338-h252-p-no


damp proof course in with enough over the join into the sub floor slab plastic later ... brickforce also extended for later and corking in right to the top (wish I could have used some kind of expanding concrete filler but this wedged/knocked-in corking layer worked well enough I think.

Next week should be a bit less 'hidden' .. but 2 or 3 more of these to do too. But its the weekend now!
mE9fJ-kcyBV_Ri-lnAXBU_EYnfHDNnaV1do8BNtW7b8=w414-h311-p-no


Any ideas or tips I could use? Feel free to post them as I have to do this a few more times! TIA
 
Last edited:
OP
H

HiWind

Well-known member
Joined
Mar 23, 2013
Messages
188
Location
South Africa
began the 2nd underpin today - 3 hrs to remove sub foundation stone and soil
then 2 hrs to mix and pour footing ... will leave overnight and begin bricking upto foundation and corking it as above in the late morning .. at this rate I hope to do 2 more complete underpins this week.

That means 2 more u/p's next week, a french drain, stormwater drain and floor could go in next week!? Would be nice.. feels like the end can begin once there a floor and not mud and ramps of random wood etc... Lets hope Hephaestus/Vulcan is smiling down on me :thumbup:

The next u/p's will be more interesting as it will allow me to complete the bent rebar approach by tying the first foot into the third & forth. Todays underpin is all by itself as it separated from the rest by the cellar door way (the foundation underpinned there with a double lintel above the low doorway).

Also had a plasterer begin to cover up the new brickwork (raising the roof 300mm required 2 new courses of block on top of the old walls) as well as lots of old plaster removed and even some of the less intact brickwork on various walls. I want the new roof joists to go into and above fresh brick as I may introduce a rain collection tank on that roof later - 6-8k litres (not sure what or how yet, just a thought - but would want it to be a 2m by 5m by .8m type tank - nice if its high as it means watering the garden below won't require a pump etc...).

The new wall blocks went in with hoop-iron to the perpendicular wall and brickforce between courses. Its a 250mm 2 skin wall of a 90 & 140mm block. I also added some brick to restrict access from the front balcony to the rear of the house via the carriage house roof.

Anyways here some pics to cover the above comments ... as we all know this thread is meaningless w... :)

IMG_20150714_152219.jpg

^ front balcony new brick work plastered and various patching

IMG_20150714_151445.jpg

^ view from the back towards the road ... carriage is well below the back garden level

IMG_20150714_145453.jpg

^ footing 2 - 35cm deep by 65 cm wide 14 mpa bricks to come ontop to the foundation

IMG_20150709_110252.jpg


^ that's the roof that brought this whole thing into being ie 60 yrs old and beaten per the first post (fire repairs)
 
Last edited:
OP
H

HiWind

Well-known member
Joined
Mar 23, 2013
Messages
188
Location
South Africa
some good progress today .. but Friday will be very wet .. like 5mm ... might be better to spend some time prepping for the Saturday Track day ;)

At this rate we're getting 1 Underpin completed a day ... only 2 left to go
Learning alot thanks to a few friends near by .. love the way the adjoining underpins interlink on 3 levels ... rebar, brickforce and interlinked brickwork

L-pjPpDGtmsFZK8qExVbhCX1epBhWORklhIo97r0Y70=w940-h705-no


wTelfTIxBiti_TMoU7FDnRKlUvtLbiJ14zOpDcWyrgU=w940-h705-no


uOR7UmfkVaAWg3wXgRdL6fVon5CNOqDSD6dtjDRGJa4=w940-h705-no


864cFuB5vphpcfHfGgBVUtI3jaXL9lYCCSsgB-Aa35g=w940-h705-no


tItBE894g38Ad7dea4OnR2BQ5wYOZqUBL4sJRq6DDxQ=w940-h705-no
 
To avoid these ads, REGISTER NOW!
Top Bottom