To avoid these ads, REGISTER NOW!

All steel heavy duty loft addition

offroadrunner1

Active member
Joined
May 25, 2015
Messages
44
Location
Gilbert Arizona
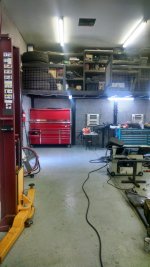
October of 2013 the wife and I bought a home with a 40 x 60 detached RV garage. The house was a major gut job remodel but to me, it was all about the garage. Over the last year and a half while working on the house I also began lurking here at GJ. All our possessions were stacked in the garage as I dreamt of the day I could take my garage back .


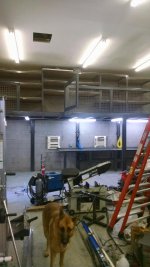
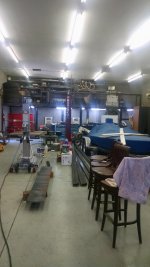
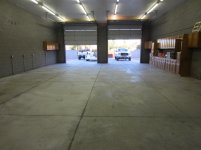
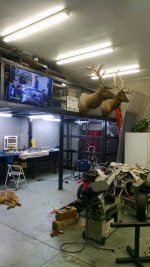
You can see in the picture the mess I am dealing with. Someday soon it will be squared away.


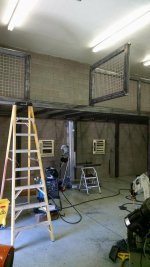
Posts on GJ pointed me toward a loft as my solution. This loft would need to be heavy duty as I will store a few engines , transmission etc for car projects in my future.

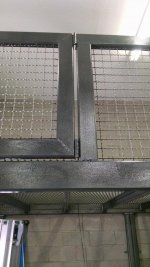
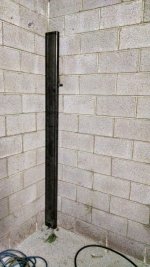
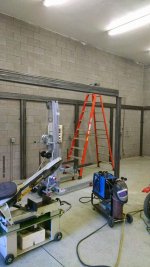
May 12 I began the build. First post cut and installed. The height will be 7' 6" from concrete floor to the loft.


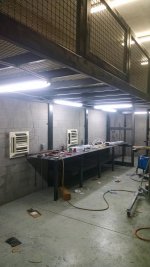
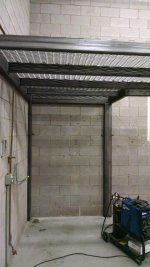
All upright supports installed. They are lagged to the floor as well as having 11 inch long 5/8ths bolts and locknuts through the block wall. The upright supports and main floor frame are 2x6 rectangular tubing x 1/4 inch .

The genie lift made quick work of getting these heavy steel beams in position.


Thanks for the wonderful site. There is an unreal amount of information and ideas to be had here at Garage Journal.

More to come.
 

Attachments

  • GARAGE 10.jpg
    GARAGE 10.jpg
    151.1 KB · Views: 831
  • GARAGE 11.jpg
    GARAGE 11.jpg
    151.6 KB · Views: 808
  • GARAGE 01.jpg
    GARAGE 01.jpg
    148.3 KB · Views: 761
  • GARAGE 02.jpg
    GARAGE 02.jpg
    148.9 KB · Views: 816
  • GARAGE 03.jpg
    GARAGE 03.jpg
    148.3 KB · Views: 867
To avoid these ads, REGISTER NOW!

drivesitfar

Well-known member
Joined
Oct 23, 2013
Messages
35,997
Location
Pacific Northwest
ORR: i want to thank you for joining our group and for showing this awesome steel loft build. i have a few questions and answer them as you have time or if you wish to.

1) How are you attaching the steel to the concrete block? i see you said you bolted to the floor and then lagged 11 inch bolts into the walls. any chance you can show close up pictures and are the walls solid concrete?

2) i'm just learning to weld and looking for a good welding set up. i'm thinking of getting a Miller set up like yours and does it have a wire feeder? what is the # of that unit and are you happy with it? it looks like maybe a 180 or is it a 211 or ??

3) i'm also thinking of getting a couple big tanks of Acy/Oxy so i'll be able to cut thick steel and use it to weld also and wondering if that is your back up or do you have something different.

nice looking work and if you can tell us how much time it takes to do certain jobs that would help all of us try to figure out if we can do one of these projects in a reasonable amount of time or if we should hire it out or buy ready made racks.

thanks a ton and i'm sure i'll have more questions as you post more if you don't mind sharing your wisdom.
 

bggrnchvy

Well-known member
Joined
Nov 14, 2011
Messages
579
Location
Pleasant Hill, CA
Did you score an awesome deal on the 2x6 .250?

It just seems like a perfect application for W or S section beams, or even channel which is usually more cost effective per foot for a given MOI.

I'm jealous of the space though, and I'm very interested in the details of your construction of it.

After finishing my own, a mezzanine is next on the list for some off floor storage.
 
OP
O

offroadrunner1

Active member
Joined
May 25, 2015
Messages
44
Location
Gilbert Arizona
The welder I am using is the Millermatic 175. It is a wire feed and is about maxed out on the 1/4 inch stuff.

I also have a Miller Dynasty 200 as a back up TIG welder but that will not be used on this project.

The main reason on my choice of steel, it was left over from a previous project at work . I had to buy one 20 foot length of 2x6 and three 20 foot lengths of 2x4 to complete this project. Overkill for sure.
 
OP
O

offroadrunner1

Active member
Joined
May 25, 2015
Messages
44
Location
Gilbert Arizona
To give a bit of a timeline as to how long a job like this would take, I began the job on May 12th. No work was done the weekend of May 16th. I have been working on it a few hours a day after work and I will admit to three 14 hour days over the memorial day weekend.

I will try to get all caught up with current progress by end of today.


The next project was making a cut out for the stairs. The landing on top is still 5 feet deep but the 3 foot cut in left a smaller footprint of stairs on usable shop space.


The next step was in installing the 2x4 floor joists on 2 foot centers. The 2 foot centers allowed no cutting of the expanded metal floor. The genie lift again made easy work of lifting all this into place. Other than a couple buddies helping one day over the holiday weekend I was able to do all this by myself.

Basic loft frame and floor were finished on May 20th
 

Attachments

  • GARAGE 6.jpg
    GARAGE 6.jpg
    147.6 KB · Views: 722
  • GARAGE 4.jpg
    GARAGE 4.jpg
    149 KB · Views: 709
  • GARAGE 7.jpg
    GARAGE 7.jpg
    148.6 KB · Views: 722
OP
O

offroadrunner1

Active member
Joined
May 25, 2015
Messages
44
Location
Gilbert Arizona
Next step was the stairs.


The railing was next. There still needs to be made a 5 foot wide swing open gate for access with the forklift and heavy parts. I can't for the life of me remember what it's called but I added decorative steel mesh between the railings as well.


This will bring us current. There will be a caged in room on the end by the stairs. I hope to get the door finished today.

Still a lot to do. Work bench, Cabinets, Air lines, paint etc.

More to come.
 

Attachments

  • GARAGE 08.jpg
    GARAGE 08.jpg
    146 KB · Views: 620
  • GARAGE 2.jpg
    GARAGE 2.jpg
    147.7 KB · Views: 611
  • GARAGE 8.jpg
    GARAGE 8.jpg
    156.5 KB · Views: 652

drivesitfar

Well-known member
Joined
Oct 23, 2013
Messages
35,997
Location
Pacific Northwest
ORR: awesome looking loft. i'm planning on welding up 1/4 inch and maybe thicker steel so would you think a Miller 211 would be enough? i don't have 3 phase (yet), but when i do i hear one of these that i own might work ok.

keep the pictures and details on your loft build coming as you want and have time to because it's a great design.

if you don't know the answers to my welding questions that's ok and i'll just watch your build.
 

Attachments

  • WP_20150331_001.jpg
    WP_20150331_001.jpg
    152 KB · Views: 214
  • WP_20150331_002.jpg
    WP_20150331_002.jpg
    147.6 KB · Views: 192
OP
O

offroadrunner1

Active member
Joined
May 25, 2015
Messages
44
Location
Gilbert Arizona
Drives asked how I secured the loft to the block wall. On the outside wall I used 2 " x 12 " straps to spread the load over a bigger area. I still need to paint these. The inside is simply a nylock nut on the 5/8 bolt through the upright post.
 

Attachments

  • GARAGE 12.jpg
    GARAGE 12.jpg
    153.1 KB · Views: 475
  • GARAGE 14.jpg
    GARAGE 14.jpg
    148.6 KB · Views: 517
OP
O

offroadrunner1

Active member
Joined
May 25, 2015
Messages
44
Location
Gilbert Arizona
This weekend I managed to finish the hinged gate for forklift access .

I also made a start on the work bench. The work bench will be 16 feet long.
 

Attachments

  • GARAGE 15.jpg
    GARAGE 15.jpg
    148.7 KB · Views: 459
  • GARAGE 16.jpg
    GARAGE 16.jpg
    151.7 KB · Views: 495

drivesitfar

Well-known member
Joined
Oct 23, 2013
Messages
35,997
Location
Pacific Northwest
ORR: that makes perfect sense to me know. great idea and I wish you lived closer to help me learn to weld up some of my steel i have ready for some projects.

if you were to buy another welder would you still buy a Miller and which one? i'm looking and saving funds for a new 211 because i tend to want to weld 1/4 inch and thicker stuff. here's a few pieces of 4 inch plate i saved from the scrap bin that i'm probably going to make a vise stand out of and i have some 1/2 inch thick steel pipe. or do i need to have it commercially welded by a guy that has 3 phase power? as you can see from a couple pictures that i do like steel and not just the small stuff.

i'll ask on a welding thread if you don't know the answers, but i always like asking a guy i see doing a project I'd like to build someday to see what he thinks.

very cool loft and totally jealous as said before. cheers and keep up with the pictures and details. thanks
 

Attachments

  • WP_20150225_001.jpg
    WP_20150225_001.jpg
    151.2 KB · Views: 261
  • WP_20140919_003.jpg
    WP_20140919_003.jpg
    104.4 KB · Views: 262
OP
O

offroadrunner1

Active member
Joined
May 25, 2015
Messages
44
Location
Gilbert Arizona
Drives, I'm not familiar with the 211. I would think with the 1/2" stuff you are wanting to weld 3 phase would be desired.

I can tell you that I am a fan of the Miller welders. We have a few welders here at work that have run flawlessly since 1978. Welders that run the 1000 pound drums of wire and run all day long.
 

drivesitfar

Well-known member
Joined
Oct 23, 2013
Messages
35,997
Location
Pacific Northwest
ORR: here's a thread i'm reading about the Miller 211 in case you ever want to change. at my age i'd like to get the right tool i can grow into and not have to say i wish i would have bought this or that. in any case thanks for the confirmation that Miller makes great welders and i have a lot to learn.

http://www.garagejournal.com/forum/showthread.php?t=292416&highlight=miller+211

if you want to take pictures of the actual welding which might need another person that would be awesome, but just showing your finished product works if you don't have that option.

best of luck and i'm guessing pretty heavy stuff is going up top or did you just want to make something nice so you could walk up there?

D
 

LutzTD

Well-known member
Joined
Dec 31, 2011
Messages
3,673
Location
Lutz, Florida
mad fab skills it all looks great. My only comment is that the block walls have zero strength in the direction of your fasteners unless you have the bolts through rebarred cores. Since you have basically built the structure with stand alone strength it likely wont matter, but if you get a really heavy moving load on the top that will tend to rack the structure then they will come into play. A simple traingulation of a few of the sections would add increadible extra strength for little effort.
 
OP
O

offroadrunner1

Active member
Joined
May 25, 2015
Messages
44
Location
Gilbert Arizona
Lutz thanks for the kind words and feedback. The block walls of this garage do have rebar and poured concrete.

I'm glad this garage came with the house. I would hate the cost to build this garage new today. The entire floor is a 6 inch pour. There are electric outlets every 6 feet around the entire garage. There are 220 volt outlets on each wall.


The previous owner did heavy truck repairs in this garage and over built everything.
 

drivesitfar

Well-known member
Joined
Oct 23, 2013
Messages
35,997
Location
Pacific Northwest
ORR: i was hoping the walls were full of concrete and rebar and from the looks of your garage from the outside i know any of us would love to own it even if all the electrical outlets weren't installed.

did he leave you any tools or a huge vise? i wrote up a $30,000 grand 1880's into a full price all cash deal for a nice house a few years ago and the seller said ok.

cheers
 

LutzTD

Well-known member
Joined
Dec 31, 2011
Messages
3,673
Location
Lutz, Florida
Lutz thanks for the kind words and feedback. The block walls of this garage do have rebar and poured concrete.

I'm glad this garage came with the house. I would hate the cost to build this garage new today. The entire floor is a 6 inch pour. There are electric outlets every 6 feet around the entire garage. There are 220 volt outlets on each wall.


The previous owner did heavy truck repairs in this garage and over built everything.

thats awesome that you have that detail of the building. most garages are built as cheap as possible and the contractors are not always the "most well trained" lets say. I will be watching to see the projects once you get the house filled and the clutter gone :)
 
OP
O

offroadrunner1

Active member
Joined
May 25, 2015
Messages
44
Location
Gilbert Arizona
There has been a delay on getting work done that I will explain shortly. First I will get you caught up on what I have managed to finish.

Paint has begun. I am using brushed on Rustoleum in hammered black . This will require a second coat as it is a bit blotchy.


I installed 5 lights under the loft. They are 4 foot T8. Of course info from garage journal led me to which lights to use.
 

Attachments

  • GARAGE 17.jpg
    GARAGE 17.jpg
    149.3 KB · Views: 392
  • GARAGE 20.jpg
    GARAGE 20.jpg
    148.2 KB · Views: 509
To avoid these ads, REGISTER NOW!

drivesitfar

Well-known member
Joined
Oct 23, 2013
Messages
35,997
Location
Pacific Northwest
ORR: hoping you delay wasn't a health related issue. i like the paint and the workbench looks great. remember tool, garage, car pictures are our **** so feel free to post as many pictures as you like and if 7 isn't enough take up another post or two for that week's or day's work.

looks great so far
 
OP
O

offroadrunner1

Active member
Joined
May 25, 2015
Messages
44
Location
Gilbert Arizona
I have also managed to run 60 feet of 1/2 inch copper air line to supply air to all required areas in garage.


I scored a craigslist deal on shelving for up on the loft. I still intend to make a few sections of H/D shelving for heavier storage but the craigslist shelves will handle a lot of my clutter.
 

Attachments

  • garage 24.jpg
    garage 24.jpg
    146.9 KB · Views: 480
OP
O

offroadrunner1

Active member
Joined
May 25, 2015
Messages
44
Location
Gilbert Arizona
Here is the delay. I broke at least 3 of my safety rules and ended up with 34 stitches in my forearm. I was using a 7 1/2 grinder with one hand while holding an phone cord and airline out of the way with the other. I'm sure you can all guess the outcome.

I will heal up just fine but was mad that I put myself in that position by trying to shortcut the job.
 

Attachments

  • GARAGE 25.jpg
    GARAGE 25.jpg
    143 KB · Views: 400

drivesitfar

Well-known member
Joined
Oct 23, 2013
Messages
35,997
Location
Pacific Northwest
ORR: Jesus that looks like it hurt. i accidently cut my 15 year old (now he's 39) with a chain saw when i had him trying to push a small tree from falling the wrong way. it came straight down missed our feet and the fence but nicked his arm. he still gets called chainsaw and i think he had 42 stiches.

how many stiches did it take? also taking a picture of your arm in that condition deserves a MAN'S MAN type ovation.

hope you are ok and on the mend now.

i started a Grinder 101 safety video if you care to see what others have done and not even really Darwin award winner type stuff for the most part. here's the link if you want to post a short story with that and other pictures of maybe your grinder and the blade used so others are reminded that a power tool isn't a toy.

http://www.garagejournal.com/forum/showthread.php?p=4912183#post4912183

the shelving looks great up on the loft BTW.
 
OP
O

offroadrunner1

Active member
Joined
May 25, 2015
Messages
44
Location
Gilbert Arizona
Thank you all for following along and especially for all the kind words.

I'm afraid all the interesting posts are done but I will continue to add pictures as the clean up happens. There are still a couple small surprises to come.
 

drivesitfar

Well-known member
Joined
Oct 23, 2013
Messages
35,997
Location
Pacific Northwest
ORR: how's the arm? hopefully healing ok.

anytime you want to add more pictures of the loft filling up with some of your supplies and stuff please do.

awesome building and even better loft design and install. :thumbup:
 

ADSR

Well-known member
Joined
Jan 12, 2013
Messages
10,713
Wow! I'm glad you're ok. Grinders can really rip you open.

Heal fast my friend!
 
OP
O

offroadrunner1

Active member
Joined
May 25, 2015
Messages
44
Location
Gilbert Arizona
Thanks guys. I'm healing up just fine but it did slow my progress a bit.

Funny how one job leads to another. After getting a small portion of clutter moved upstairs it was apparent that the existing cabinets were ugly. I decided a two tone of red and black would spruce them up. This has turned into a very tedious task but seemed the right job while letting my arm heal.

I also managed to get my first two pieces of wall art hung.
 

Attachments

  • GARAGE 27.jpg
    GARAGE 27.jpg
    148.2 KB · Views: 601
  • GARAGE 28.jpg
    GARAGE 28.jpg
    146.3 KB · Views: 583
  • GARAGE 29.jpg
    GARAGE 29.jpg
    148.1 KB · Views: 590
  • GARAGE 30.jpg
    GARAGE 30.jpg
    146.3 KB · Views: 503
OP
O

offroadrunner1

Active member
Joined
May 25, 2015
Messages
44
Location
Gilbert Arizona
This boat was imprisoned all last summer in the messy garage. Seems like good timing as it will be 111 degrees this week.
 

Attachments

  • Shower repair and ******** 015.jpg
    Shower repair and ******** 015.jpg
    137.4 KB · Views: 286
  • Shower repair and ********.jpg
    Shower repair and ********.jpg
    149.5 KB · Views: 269
  • Shower repair and ******** 019.jpg
    Shower repair and ******** 019.jpg
    140 KB · Views: 258

drivesitfar

Well-known member
Joined
Oct 23, 2013
Messages
35,997
Location
Pacific Northwest
ORR: looks like you've been moving a ton of stuff with the hurt arm. how are you doing? the shop looks great. how fast does that boat go and if it's 111 to 120 degrees outside how warm is the water in the lakes?

cool 57 and any ideas for any graphics on the sides or do you need to get the insides and engine restored before you think about that?

i'd probably use the top half of your shop or garage for storage either with racking or some sort of loft, but maybe you fixed all your storage needs with the great loft you just built.

cheers
 
OP
O

offroadrunner1

Active member
Joined
May 25, 2015
Messages
44
Location
Gilbert Arizona
Drives, My arm is all healed up. I took the stitches out on Tuesday. The only lasting effect will be an nice scar.

The boat tops out around 90. You won't see many of them with an automatic transmission though.

The 57 will get a complete hot rodded rebuild. I'm not set on the final paint as I keep going back and forth on a few ideas.

I was going through some pictures and I will post them of how this garage looked the day we bought it in October of 2013. As mentioned the previous owner did heavy truck repair and the oil stains on the concrete were extensive. The first order of business was to clean the floor and epoxy coat it. I knew if we moved all our stuff in before the epoxy coat that it would never happen.

Next order was to install a Mohawk lift.

Lastly will be a picture of where we are as of last night. I have run power below the loft and mounted the garage TV in it's home.
 

Attachments

  • AFRICA 2014   BOAT HOME REMODEL 259.jpg
    AFRICA 2014 BOAT HOME REMODEL 259.jpg
    133.9 KB · Views: 427
  • AFRICA 2014   BOAT HOME REMODEL 286.jpg
    AFRICA 2014 BOAT HOME REMODEL 286.jpg
    136.8 KB · Views: 432
  • GARAGE 31.jpg
    GARAGE 31.jpg
    149.6 KB · Views: 482

drivesitfar

Well-known member
Joined
Oct 23, 2013
Messages
35,997
Location
Pacific Northwest
ORR: your garage is what i'd order if somebody asked me only i'd probably have some 12 foot racks up so i could store more stuff and still pull my car or truck under them on the side without the lift.

good to hear your arm is doing ok and still amazed you took a picture of it when you were bleeding and probably in pain.

90 MPH on the water sounds like fun and a bit scary. I've been over 150 MPH on a highway in the desert near Vegas years ago in my old 70 Mach 1 that had a 428 in it, but 90 on the water sounds like 220 on the freeway. ever flipped or had an accident in the boat.

sounds like you are planning a fun trip so stay safe and looking forward to more garage posts when you return. did you get the international phone rate so you can read and post on GJ while you are resting or waiting for a meal?

cheers
 

ASHMAN_AZ

Well-known member
Joined
Jun 17, 2015
Messages
182
Location
Vail, AZ
Is the ceiling 15ft? looks like 14 ft doors. I think I want to build 16ft ceilings so I can build a mezzanine. The loft fab is badass that took alot of weld time.

How is the block and stucco construction in the AZ heat?
 
OP
O

offroadrunner1

Active member
Joined
May 25, 2015
Messages
44
Location
Gilbert Arizona
Thanks again for the kind words.

They are 15 foot walls. From floor to bottom of loft is 7'6". From the loft to ceiling is 6'9" . The only problem I have had is you have to be careful swinging stuff around while on the loft. I popped a fluorescent while loading a shovel on the shelving.

It's Phoenix during the summer. It's hot. The garage has solid block walls and two swamp coolers. When I came home yesterday it was 92 degrees inside. The swamp coolers ran for 4 hours and the shop only cooled to 90. If you catch it in the morning it stays fairly pleasant . When I go out in the morning while the inside temp is 80 degrees and get the coolers running it will stay 82 degrees all day. Mind you it has been in the low 110's this week.

Will try to check in but for now I'm off to Europe .
 
To avoid these ads, REGISTER NOW!
Top Bottom