

Dick in Wisconsin
Well-known member
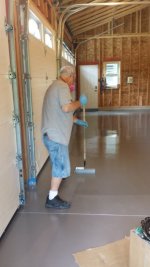
All five coats.
Here is my experience and some of the things I've learned about applying RB and what I'd do different next time.
Overall, I'm happy with the results at this point. It hasn't sat long enough for me to start moving race cars and equipment in, so the longer term jury is out. I don't consider the final product to be "professional looking". That would be a disingenuous insult to the professional painters and floor coaters who do this for a living. But for a guy who had safely stayed away from painting his entire life (this is by FAR the largest painting project I've EVER tackled), I think it looks nice for a novice's race shop. If this were the floor in the $10 million climate controlled, bullet proof hangar I will need to build if I end up buying a new $65 million Gulfstream jet early next year ... it wouldn't be acceptable.
Floor was poured in August of 2014. The expansion joints were saw cut (which divided the 1000sf into 12 "sections") and a sealer was put on the concrete. At Justin Krauss's (GarageFlooring, LLC) recommendation I ground the sealer off using a floor polisher from Home Depot along with a Diamabrush disc also from Home Depot. Not all HD's rent this kind of equipment, call ahead. The Diamabrush is the nastiest piece of equipment I've EVER seen. Very interesting design. Expensive to rent. Diamabrush must be used with water; end result is a slurry that you need to vacuum up with a shop vac.
This was my floor prep sequence:
1. Sweep the floor clean.
2. Using Metal Blaster bought from Justin I scrubbed and scrubbed and scrubbed three or four little areas that already had engine oil, gear lube, and ATF on them. They lightened up in color, but I could still see the stains when I had them as clean as I could get them. Diamabrushing lightened them a little more.
3. Diamabrush the entire floor using water liberally. Don't allow the Diamabrush to rotate on dry concrete. Vacuum up slurry with ashop vac. I did the 12 sections one at a time.
4. Let the floor dry. Sweep it with a very fine push broom. Cement dust is very fine, will go right through a coarse broom and stay on the floor.
5. Diamabrush entire floor again using water liberally. I felt I needed to Diamabrush floor a second time to get the areas it looked like I had missed getting the sealer off.
6. Let floor dry. Sweep it with a very fine push broom.
7. Using a floor mop, wet mop the floor. I changed the water after every section.
8. Wet mop the floor second time, changing water after every section. Water still had cement dust in it, but it was clearer.
9. Still had a little cement dust on it when I rubbed my finger across the concrete. Wet mopped it a third time. Water was very clear, but still was cloudy.
10. Now concrete had no discernible cement dust on when I ran my finger across it.
11. Pull a curved utility knife/putting knife/scraper through saw cuts to dislodge anything in them. Put filter back on the shop vac, went over sections slowly to get any bugs, dirt, etc. off the concrete. Make special effort to thoroughly vacuum the saw cut grooves.
12. Mask. Use only really wide 3M masking tape. More expensive than other stuff, but I find it works. Masked access door thresholds, three floor drains, overhead doors (see below), two PVC cleanouts for sewer, and PVC access for the RV sewer dump. I didn't mask three inch high concrete that wall plates sit on. Its a race shop, not a hanger for a private, intercontinental jet.
13. Break out the Rust Bullet.
14. Used a 12" roller with 3/8" nap (I purposely did not use a microfiber roller). I had picked up four orange plastic roller plans from HD not knowing if I would be able to reuse them, along with two rollers, one long handle, and a box of nitrile gloves. I had bought a respirator from Justin when I bought the RB from him. Do not try to apply Rust Bullet without a respirator!! I left the garage windows open; the neighbors and my wife could smell it a long ways off. With the respirator on, I couldn't smell it.
15. Anything that RB comes in contact with, RB will stay on it. Make sure you mask off all door handles and backs of doors you will touch. Remove your shoes immediately after walking away from project. I left the five gallon buckets of RB in the cardboard boxes they came in; cut top 12" or so off the boxes. Set the boxes on a wooden utility dolly and had big sheet of card board under that. Used a small plastic bucket to get RB from 5 gallon pail to roller pan, don't even try to pour it directly from bucket! I used small, low cardboard boxes and trays that I masking taped the corners of to set the small pouring bucket in as it oozed RB.
16. First coat. Went to a corner, got roller wet and started apply RB. I discovered art and science of back rolling to get product distributed evenly. As Justin had said, first coat will take lots of RB. I figure 1000sf of recently Diamabrushed concrete took 3 gallons of RB. Used same roller for the entire coat. Took about three hours from start to backing out the access door.
17. Second coat. Waited about 21 hours and repeated the process. I could walk on floor without any problem, nothing sticky after 21 hours. I shop vacced entire floor section by section before starting to get little pieces of dirt, bugs, & stuff that came from who knows where. I notice little nubs & pimples of RB from time to time, so I knocked those off with a wide putty knife & vacced them up too. Kept doors closed as much as possible & windows have screens, but there was still stuff on floor. Used a new roller tray. Used a new roller, used it the entire coat. Took two gallons, tiny amount of RB left in bottom of bucket. Took almost three hours from start to backing out access door.
18. Third coat. Waited 21 hours. Knocked nubs and pimples off. Shop vacced and repeated process with a new roller and roller tray. Coats three, four, and five used a touch under the five gallons in the second bucket; all three coats took about two hours.
19. Fourth coat. Waited 24 hours. Now I noticed old roller trays sitting & RB looked awfully hard. I flexed trays & RB broke away from the plastic in huge sheets. In about 5 min I had a 98% clean, free of RB, ready to re-use roller tray.
As I got to end of session, I noticed that RB in tray was starting to firm up & wasn't as liquid as first coat out of bucket or even beginning of session. I attribute this to two things. (1) once you open bucket & every time you take the cover off bucket to put more RB in roller pan, air with moisture gets to the RB & moisture is what cures RB. Second, on this coating I didn't completely use the last of the RB in roller pan before refilling, so there was RB in roller pan towards the end that had spent about 2 hrs in there curing. If I do this again I will change roller half way through a coating when I do coats three & after (two rollers/coat) & use all the RB in roller tray before filling it.
19. Coat five. I emailed Justin & told him RB was firming up at end of 4th coating. He told me to "thin" it with solvent he had provided; no more than 6oz per gallon. I figured I had about 1.5 gallons so I used 8oz of solvent. This worked must better, didn't thicken at end of coating. I do have a number of spots on floor that got "thick" & didn't get properly back rolled out. I attribute that to having partially cured RB in roller pan & also in nap of roller (hence changing rollers half way through next time!). It seems like coats 3, 4, and 5 used about same amount of RB (5 gal/3).
20. Second color. I wanted to put four colored squares under tires of the race cars so I can center them north to south & east to west in garage easily. So after waiting about 24 hrs I masked off eight squares & painted them with Safety Red RB. I'll probably put on 4 or 5 coats of red RB, with no less than 6 hours betw coats ... no more than 18 to 21 hours.
That is my RB story.
Next post will cover "what I learned"!
I'm posting a few pictures and will post some more with the red squares tomorrow. Expecting questions, criticisms, and suggestions.


 THIS ^^^^^^