To avoid these ads, REGISTER NOW!

The Winter of 14/15 - The Iron

kbs2244

Well-known member
Joined
Nov 11, 2006
Messages
14,065
The winter of 14/15

Last winter I built my work place.

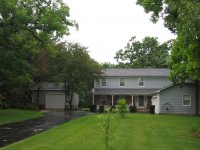
In the before PIC you can see the old pool deck peeking out between the bushes.
The big bush in front of the pool was transplanted toward the street to help hide the shop.

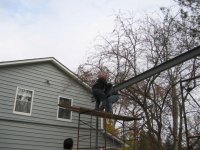
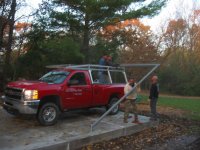
There were three large pine trees that had to be taken out and a large branch off the crab apple tree.

This is not meant to be a day to day, in and out, parking garage so the somewhat awkward driveway angle was OK.

I matched the house street set back and saved, even transplanted, as much of the bushes on the street side as I could to “soften” the look. Simple, low, landscaping around the base of the foundation. The building is has only been there 6 months but it looks like it has been there for years.

What I was trying to accomplish was:

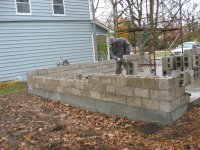
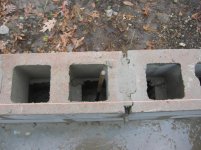
3 rows of cement block under regular 8 foot stick built walls for 10 foot walls.

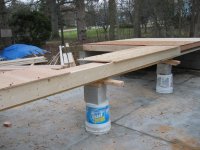
Ridge beam roof construction for a vaulted interior. Even with a shallow 4/12 roof pitch I have a 14 foot interior space.

Two (expensive to buy and have expertly installed) skylights on the back side of the roof. They provide all kinds of always on lighting and avoid the need to turn on the lights for a 10 minute search. After 3 months I still haven’t installed overhead lighting. There is just no need.

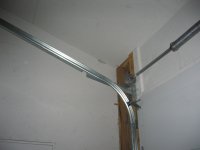
Garage door tracks that follow the roof slope so I don’t waste that vaulted interior.

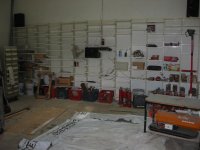
White peg board all around just above the block. Nothing is more flexible for hanging stuff on the walls.

Even though I hate the look, OSB instead of the too expensive plywood above the peg board, including the ceiling. It is sturdy enough that I can screw into it for hanging storage hooks. Drywall may look a little better but it just isn’t strong enough. And this is a working shop room, not a living room.

Paint the entire interior white. I hate working in the dark.

2x12 rafters. Not for strength, but for air circulation room between the insulation and the roof sheathing.

Exterior styling to match the house. No neighbor complaints. I even got a “It looks nice” from the dog walking group. The shop sits where an above ground pool and deck used to be and the PO had some bushes to hide the pool from the street.

I matched the house street set back and saved, even transplanted, as much of the bushes on the street side as I could to “soften” the look. Simple, low, landscaping around the base of the foundation. The building is has only been there 6 months but it looks like it has been there for years.

There was comprising with the wife on some things. It is smaller than I wanted, but larger would have made it too close to the house for passage to the back yard. In the end it is better than the nothing I had before.

Now I am emptying the attached garage ASAP so SWMBO has a place to unload groceries and park, etc.
 

Attachments

  • before 4.jpg
    before 4.jpg
    150.5 KB · Views: 69
  • shop with house 2.jpg
    shop with house 2.jpg
    145.4 KB · Views: 74
  • bench 2.jpg
    bench 2.jpg
    140.1 KB · Views: 67
To avoid these ads, REGISTER NOW!
OP
K

kbs2244

Well-known member
Joined
Nov 11, 2006
Messages
14,065
The winter of 14/15 - The slab

October of 2014

Floating Slab 20x24 6 inches thick Integral Rim Foundation
$2,300.00 in concrete

$2,500.00 in labor. 5 guys total. One owner/supervisor, one complete newbe, 2 who had done it before, and one very experienced.

After spreading and compacting the stone fill it sat for over a week due to scattered rain. When they could they came and set the forms around the outside and then set the rebar up on the little supports. The rain slowed things down but I was happy to see everything get soaked and settled.

When they came to do the pour they used a concrete pump. The pump stayed in the street and the trucks dumped into it. The trucks never came into my driveway. A little over 100 feet of 3 inch hose brought the concrete to the pour site. It reminded me of toothpaste coming out of the tube. It sure beat having the trucks beat up the driveway or having a gang of guys with wheelbarrows.

They had enough extra for a nice apron where the door would be and for a step at the end of the porch.
 

Attachments

  • IMG_5700.jpg
    IMG_5700.jpg
    65.2 KB · Views: 63
  • IMG_5710.jpg
    IMG_5710.jpg
    54.9 KB · Views: 48
  • IMG_5716.jpg
    IMG_5716.jpg
    148.6 KB · Views: 49

NUTTSGT

Super Moderator
Staff member
Joined
Sep 14, 2009
Messages
50,856
Location
Northern Central Ohio
Re: The winter of 14/15 - The slab

I merged both of your threads, if you need something deleted/title changed let me know.
 
OP
K

kbs2244

Well-known member
Joined
Nov 11, 2006
Messages
14,065
November 2014

Since I was using a roof with a ridge beam for a vaulted interior the next step, after the slab, was putting up the ridge “I” beam with it’s supports. This turned into a comedy of errors. Both on my part and the iron guys.

I had ordered a 20 foot x 8 inch beam with 3 inch x 14 foot pipe supports at the ends. That is what they brought. So far so good. They had everything up on a pick up truck rack. The only equipment was a couple of step ladders. There were 2 iron guys, my son, and a day labor he brought with. This guy was good as a gofer but nothing heavy.

They bolted the legs to the end of the beam and slid everything around until the feet of the legs were in place. Then the idea was to tip the beam up to vertical. It didn’t work. The angle was too flat and everything would just skid along the floor instead of tipping.

I have some scaffolding so plan B was to erect it under the beam and lift the beam as you go. Good idea, but I had only enough scaffolding for one end. So a few panic phone calls latter they are off the borrow some scaffolding from a local mason.

In the end it worked. But not without a lot of grunting, squat lifts, and using lever action shipping straps as lifting winches.

The feet were set on their marks, holes drilled into the floor and everything bolted into place.

We were having an amazingly warm November. Some of the guys were in T-shirts.

Another of my sons is a mason. He was going to do the 3 courses of block going under the stick built walls. He came over to see what he was going to be doing and noticed a problem right away.

Just like I had ordered, the ridge beam legs were on the edge of the slab. The problem was that he then could not put the legs in the cells of the block.

So a call to the iron guy. “We need to move the legs 4 inches each.”

We still had my scaffolding erected so we could support the beam while they unbolted it from the leg and slid the leg over. First one end and then the other. But instead of drilling more holes they just plumbed the legs and welded them to the beam.

$1500 for the first time (Including the iron) and $500 to fix it. More than I wanted, but it was a learning experience.
 

Attachments

  • IMG_5731.jpg
    IMG_5731.jpg
    151.2 KB · Views: 54
  • IMG_5729.jpg
    IMG_5729.jpg
    159.1 KB · Views: 48
  • IMG_5726.jpg
    IMG_5726.jpg
    146.2 KB · Views: 51
  • IMG_5720.jpg
    IMG_5720.jpg
    142.2 KB · Views: 52
  • IMG_5718.jpg
    IMG_5718.jpg
    148.2 KB · Views: 49
OP
K

kbs2244

Well-known member
Joined
Nov 11, 2006
Messages
14,065
The Winter of 14/15 - Carpentry Work

Carpentry Work
March 2015

Weather is warming up and rain hasn’t started. The carpenter is eager to get started. So here we go.

Stick built walls. 2x4 studs on a 2x6 plate on 8 inch wide block. ½ plywood sheathing at the corners and ½ OSB in the field.

I went with 2x12 rafters. Not so much for strength as for plenty of room between the ceiling insulation and the bottom side of the roof sheathing. I wanted lots of air flow from the soffit to the ridge vent.

The carpenter was a $20.00 per hour guy. A mostly by himself worker. But my son (the same one who negotiated the iron work) got off work around noon and would sometimes bring his day labor guy to help out when it came time to lift walls and such. The carpenter was good. Experienced, worked steady. . The day labor guy was $20.00 a day and sometimes worth it. I was happy with the deal

When came time to shingle I wanted to put in two 24x36 inch sky light on the rear side of the roof.
The carpenter had never done skylights before, so he brought in a roofer buddy. Same pay. The guy was good, and found there were missing pieces in one of the skylight boxes. While the roofer was working on the one skylight I ran and replaced the bad box with a factory sealed one.

As soon as the roof sheathing was on you could see the difference the skylights made inside. The garage has plenty of bright light inside.

The outside was Tyvek and cement board siding. I had never worked with cement siding before, so this was a leap of faith for me. The house was clear, rough sawn cedar siding. But that was way out of line cost wise. Even number two cedar was too much. The cement board was textured to have a cedar “look”. It is OK. I did go with rough sawn cedar for the corners. If there were any style questions the mantra was “Match the house.”

We did get a March snow, but the outside was done by then and they could work inside. I like peg board, so after the insulation there is 4 feet of “Garage Paneling” (pre painted white, ¼ inch peg board) then 3/8 OSB above that. I don’t like the look of OSB, and the painting didn’t change my mind. But I wanted something I could hang things from and plywood was just too much money.
In the end I am a “form follows function,” and “go before show” guy.

I also like light. My first career was in white walled, white ceiling and white floor computer rooms with way too many florescent lights. I got used to it and cannot stand working in the dark. So, 2 coats of cheap white interior was sprayed over everything.

Again, I am happy with the result. Even without electricity there is plenty of light through the skylights to make the white walled room workable until the sun goes down.
 

Attachments

  • IMG_5755.jpg
    IMG_5755.jpg
    149.4 KB · Views: 49
  • IMG_5752.jpg
    IMG_5752.jpg
    101.7 KB · Views: 45
  • IMG_5749.jpg
    IMG_5749.jpg
    138.8 KB · Views: 58
  • IMG_5747.jpg
    IMG_5747.jpg
    150.8 KB · Views: 44
  • IMG_5744.jpg
    IMG_5744.jpg
    151 KB · Views: 43
  • IMG_5741.jpg
    IMG_5741.jpg
    143.9 KB · Views: 43
OP
K

kbs2244

Well-known member
Joined
Nov 11, 2006
Messages
14,065
The Winter of 14/15 - Block Work

Block Work

November/December 2014

The weather changed. Hovering around freezing. Sometimes rain, sometimes wet snow, sometimes dry.

One son is a mason and his regular job for the last 4 years has had him on a 20 story building in downtown Chicago. That was shut down for the winter. So, when it was somewhat dry and he had the time he came over and went to work on the block walls. He need anti-freeze in the mortar but not very much.

I knew he didn’t have a mortar mixer and wondered where he was going to get one. He surprised me by just using a very large Milwaukee drill and a mixer blade in a 5 gallon bucket. Just like the drywall guys use to mix their mud.

The block are "split face," 8 inchs wide and HEAVY. He showed me mirror image faces where after they cast them in pairs they use a wedge to split in two for the rough face. That way no 2 are alike.

At the end of the day he would use any left over mortar to fill in the open cells. But to keep the beam legs plumb he had me use the “High Expansion” Great Stuff in their cells. I had my doubts but he said it was OK to use even in Cook County, witch follows the Chicago building code. It did stiffen them up after an overnight cure. We made sure every third block had motar filled cells and inserted "J" bolte to hold down the sill plate.

He worked by himself, keeping a steady pace to stay warm. It took a few weeks to finish the block work, but I was in no hurry since the carpentry work would have to wait until we were into the dry season.
 

Attachments

  • IMG_5733.jpg
    IMG_5733.jpg
    153.9 KB · Views: 47
  • IMG_5736.jpg
    IMG_5736.jpg
    152 KB · Views: 44
  • IMG_5738.jpg
    IMG_5738.jpg
    139.4 KB · Views: 48
  • IMG_5740.jpg
    IMG_5740.jpg
    143.9 KB · Views: 43
To avoid these ads, REGISTER NOW!
OP
K

kbs2244

Well-known member
Joined
Nov 11, 2006
Messages
14,065
The Winter of 14/15 - Garage door

April 2015
Garage Door

There is a lot of discussion about garage doors around here.
For me it turned out to be a non-issue.

With the block base adding 2 feet, I have 10 foot walls. I wanted a 8 foot high door “just in case.” I had the carpenter put the door header up against the top plate of the wall and build down to door height from there in case I ever want to go even higher.

I settled on a 10 foot width. Again a comprise. I would have liked 12 feet but since I was at 20 feet wide (due to 24 being too close to the house to drive into the back yard if ever needed) 12 feet just took up too much wall space.

I also wanted the door to follow the slant of the vaulted ceiling. If you go through the trouble to get that open space why lose it unnecessarily.

When I was researching doors I found that the Coplay site showed tracks that followed the slant of the ceiling. It was a diagram in the “commercial” section, but it showed that they understood the concept. Menards sells Coplay and had the same diagram in their door display. When I was ordering the door the only thing extra in the ordering information form the guy had to fill out was wall height (floor to top of wall) and roof pitch (4-12) I went with the middle of the line insulated steel. It was right around the $1000.00 I expected.

Of course it was a special order from the factory. When it came in I wasn’t home but my son went and picked it up. The carpenter was on site getting the scaffolding ready for the outside siding so they went to work on the door. My son had never installed a door and the carpenter had never done one with slanted tracks, but when I got home the door was installed and working fine. About 4 hours or less.

“We just followed the instructions.” What a concept!

I haven't installed an opener yet. I have noticed that if I do not lift the door fully open it wants to slowly come down. I am guessing this is because the weight is not completely horizontal. Not a big problem. If I want to work with the door open I want it fully open.
 

Attachments

  • IMG_5758.jpg
    IMG_5758.jpg
    123 KB · Views: 37
  • IMG_5757.jpg
    IMG_5757.jpg
    127.8 KB · Views: 33
  • IMG_5756.jpg
    IMG_5756.jpg
    132.5 KB · Views: 31
OP
K

kbs2244

Well-known member
Joined
Nov 11, 2006
Messages
14,065
The Winter of 14/15 - The Electric Install

May 2015
Electric Install

My electric is kind of light by some standards. I am 71 years old and do not do much fabrication anymore. Most of my work is repair and maintainice. So I do not have any need for heavy electric demand tools. No welder, a small compressor, etc. I do like lots of light but fluorescents do not draw that much.

The house and shed are 15 feet apart. So box to box is less that 50 feet. I went with three 12 with ground UFB direct buried. I later found I had some red, black and white number 10 that I could have used. I would have need to buy a ground and the plastic conduit but that would not have deal breaker. In retrospect I wish I had gone that way. But that is water over the dam.

My county wants 2 ground rods 8 feet apart pounded down 19 feet. Menards sell the rods and the bare number 10 wire and clamps so that was the way I went. I had to put a separate hole in the wall for the ground wire because they want to see the wire clamped to the rods before you bury them/ (They now want the ground rod ends buried after inspection. Too many people had been breaking them off when they were exposed.)

The concrete guy had buried a 1 ¼ “J” in the slab and I put 4 foot extension on that when the block was going up so that is where the box ended up.

I drilled a hole just above the house sill plate, installed some plastic conduit with a plastic “J” at the bottom and threaded the ground wire. I was told I didn’t need the “J”. That the straight plastic going underground was enough. But the “J” was 62 cents. I thought I could afford it. And it kept the ditch digger honest on digging deep enough.

At he house end I threaded the wire along the sill plate to above the CB box and through the hole that had been for the pool circuit. (The shed sits where the pool used to be.) I was told I didn’t need conduit in the house and the inspector never looked or even asked.

I wanted to get the final inspection over with ASAP so all I installed in the shed was one GFI outlet and a single 100 watt bulb. One 4x4 box for the GFI outlet and switch and a 6 foot piece of ½ inch EMT up to the bulb and I was legal. I plan to ring the walls with convenience outlets and put in a door opener outlet but that may wait until summer is over. Right now extension cords are working fine.
 

Attachments

  • IMG_5761.jpg
    IMG_5761.jpg
    147.9 KB · Views: 28
  • IMG_5759.jpg
    IMG_5759.jpg
    150 KB · Views: 28
  • IMG_5766.jpg
    IMG_5766.jpg
    144.6 KB · Views: 26
OP
K

kbs2244

Well-known member
Joined
Nov 11, 2006
Messages
14,065
The WInter of 14/15 - Shelves

There are shelves across the 20 foot back wall.
They were an impulse buy at a Target store closing sale.
They were the shelves in the Pharmacy Department.
I ended up with 48 lineal feet, eight feet high. With shelves spaced vertically 3 inches apart.
I got twice what I have is shown here for $100.00
Just for starters I have the shelves vertically apx. eight inches apart.
They are 17 inches wide by 8 inches deep.
I started out with 10 shelves per section, but am moving them around all the time.

The shelves tip up and into slots on the vertical posts. They lock in place when tipped back down.
I have since noticed that this type of shelf seems to be the “go to” for stores and even my local library.
They will have shelves of different widths but all the verticals, and the mounting procedure, are the same. I have seen the same shelves in stores supporting a lot more than what I plan to lift. So I am not worried about weight

The wife had a garage sale after I installed this wall and I sold another 20 feet for $100.00
So my bottom line cost is zero and I still have another 8 lineal feet uninstalled with another 200 uninstalled shelves.

This is not what I envisioned for shelves.
I was planning on building my own.
But when the opportunity came up I jumped.
It does cover up a full 20 feet of peg board wall but, because of it‘s flexibility, it could be called “peg board shelves.”

I am still moving into this building and every time I bring something in I end up adjusting a shelf position to fit.
I really like them.
 

Attachments

  • IMG_5770.jpg
    IMG_5770.jpg
    92 KB · Views: 24
  • IMG_5771.jpg
    IMG_5771.jpg
    82.2 KB · Views: 22
  • IMG_5772.jpg
    IMG_5772.jpg
    136.4 KB · Views: 52
OP
K

kbs2244

Well-known member
Joined
Nov 11, 2006
Messages
14,065
Re: The winter of 14/15 - The slab

Thanks.
You know how to organize them better than me
 
To avoid these ads, REGISTER NOW!
Top Bottom