To avoid these ads, REGISTER NOW!

I think I got taken on this Kellogg American 331TV compressor :(

Burgerkong

Well-known member
Joined
Apr 17, 2010
Messages
2,501
Location
Markham, Ontario, Canada
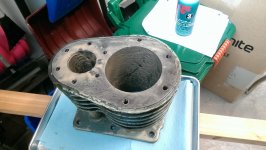
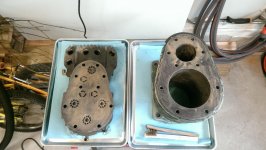
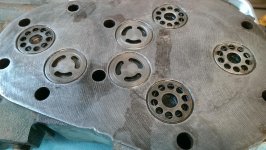
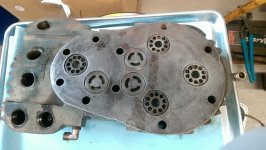
50's Era Kellogg American 331TV Rebuild

After I ran this question by the experts here:

http://www.garagejournal.com/forum/showthread.php?t=300902

I committed to it today. I ended up getting them to deliver it for me for a grand sum of $45 tax in. Oh well, they (equipment rental company) had a F350 with a liftgate which made it easier. Backed the truck all the way into the garage, I wrestled it with one of their guys and positioned it onto the liftgate and down we go! Didn't even have to use the pallet jack (good thing too as it was just bolted to two 2x4 which laid flat on the ground, getting the forks underneath would be difficult). Pushed it off of the tailgate - thank God for the wood sliders.

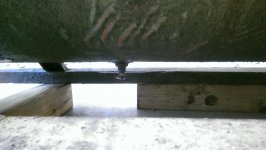
After going all primeval and rolling some conduit underneath the 2x4's, I managed to position it with some thick walled pipe as a lever. Worked great, one man could definitely do this without an engine hoist. Rolled my jack underneath to raise it for some 4x4 shoring, only to find out my jack is a couple inches too tall for the bottom of the tank. Fear not! Wedged a length of 4x4 under one end of the tank and jacked that up instead (lever again!) until I stuffed my shoring underneath where it'll live for the time being.

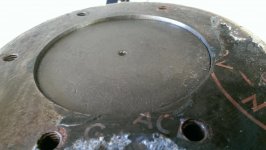
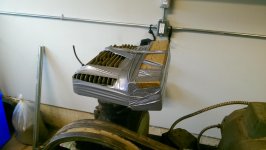
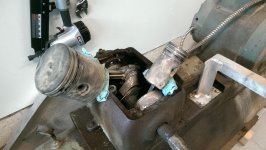
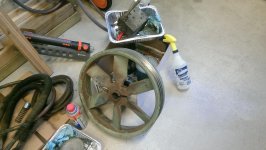
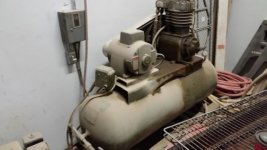
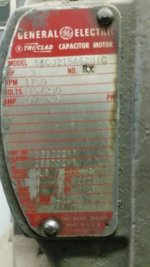
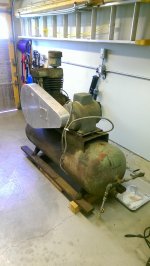
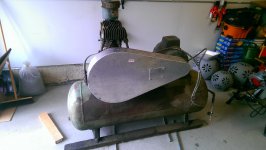
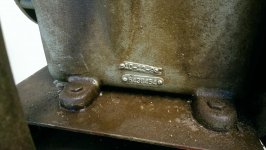
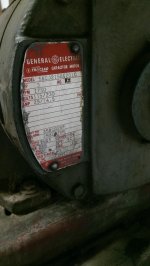
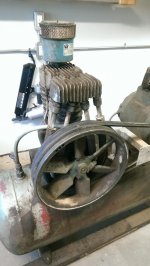
Turns out this is a Kellogg American 331TV - kams you're right on the money, virtual cookie for you! HUGE beast, the damn 3HP motor is as big as the pump itself! Sometime in the past, the guard must have broken or fallen off, so an aluminum (?) replacement was welded together and bolted to the mounting flange on the tank.

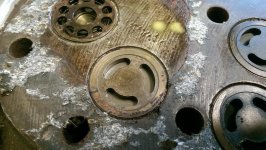
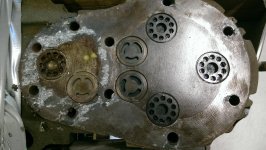
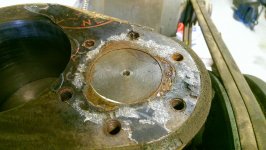
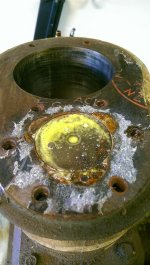
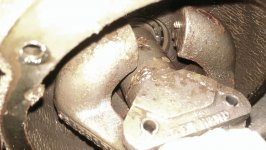
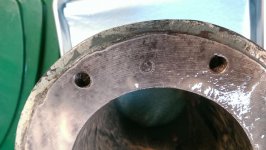
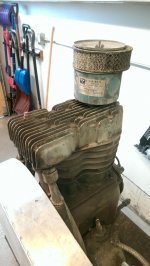
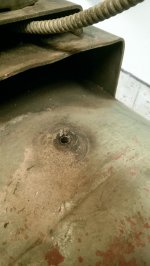
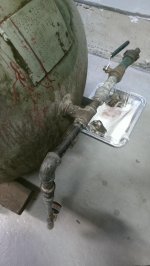
It also seems like there was a gasket failure at some point, oil s EVERYWHERE on the crankcase, tank flange, flywheel and the tank itself - or some genius might've spilled oil everywhere during an oil change. Speaking of oil change, I suspect there hasn't been one in a while, and I also suspect the tank has water inside of it. I cannot undo the pilot valve at the bottom of the tank, nor can I get either of the tank drains on either end to unscrew. Some heat and penetrating oil plus an impact may be in order.

Compressor runs SMOOOOOOOTH, no questionable noise, plus no discernible play in the flywheel which leads me to suspect the bearings are still good - both in the motor and the pump.

Oh, I didn't mention the price.

Free.

Yep. Only charge was delivery since I don't have a truck currently, but if I had picked it up, would've just been gas money. I guess it kinda killed the deal. :sad:

JK. Just kidding.

:willy_nil
 

Attachments

  • comp.jpg
    comp.jpg
    140.5 KB · Views: 872
Last edited:
To avoid these ads, REGISTER NOW!
OP
B

Burgerkong

Well-known member
Joined
Apr 17, 2010
Messages
2,501
Location
Markham, Ontario, Canada
More....
 

Attachments

  • IMAG2383.jpg
    IMAG2383.jpg
    149.2 KB · Views: 306
  • IMAG2382.jpg
    IMAG2382.jpg
    143.3 KB · Views: 268
  • IMAG2380.jpg
    IMAG2380.jpg
    142.2 KB · Views: 276
  • IMAG2378.jpg
    IMAG2378.jpg
    139 KB · Views: 244
  • IMAG2374.jpg
    IMAG2374.jpg
    144.7 KB · Views: 276
  • IMAG2370.jpg
    IMAG2370.jpg
    143.6 KB · Views: 307
  • IMAG2369.jpg
    IMAG2369.jpg
    139.7 KB · Views: 300
OP
B

Burgerkong

Well-known member
Joined
Apr 17, 2010
Messages
2,501
Location
Markham, Ontario, Canada
And more....
 

Attachments

  • IMAG2401.jpg
    IMAG2401.jpg
    146.8 KB · Views: 177
  • IMAG2399.jpg
    IMAG2399.jpg
    136.4 KB · Views: 188
  • IMAG2397.jpg
    IMAG2397.jpg
    149.5 KB · Views: 173
  • IMAG2396.jpg
    IMAG2396.jpg
    148.7 KB · Views: 159
  • IMAG2395.jpg
    IMAG2395.jpg
    148.1 KB · Views: 166
  • IMAG2393.jpg
    IMAG2393.jpg
    143.7 KB · Views: 163
  • IMAG2392.jpg
    IMAG2392.jpg
    145.9 KB · Views: 179
OP
B

Burgerkong

Well-known member
Joined
Apr 17, 2010
Messages
2,501
Location
Markham, Ontario, Canada
Couple things I found, how come only two belts remain? There are provisions for three belts on both the motor pulley and flywheel, yet only two was installed.

Also, the pressure switch snapped off, due to overzealous handling. Guess I will have to ez-out the remaining thread in the tank, if I can't use a pick to back it out.
 

Attachments

  • IMAG2403.jpg
    IMAG2403.jpg
    141.2 KB · Views: 146
  • IMAG2410.jpg
    IMAG2410.jpg
    144.8 KB · Views: 219
  • IMAG2413.jpg
    IMAG2413.jpg
    150.3 KB · Views: 202
  • IMAG2414.jpg
    IMAG2414.jpg
    151 KB · Views: 223
OP
B

Burgerkong

Well-known member
Joined
Apr 17, 2010
Messages
2,501
Location
Markham, Ontario, Canada
That's weird, all the documentation on 331 pumps recommend 5HP - the GE that's currently on there is 3HP and it works fine. Will have to hook it up and try after I get a new pressure switch.
 

highcarbon

Member
Joined
Mar 6, 2013
Messages
15
Location
Huntsville Alabama
be careful with that 50 year old tank. for sure get the fittings off and get the water and crud out of it. replace with standard schedule 40 pipe fittings and a valve. make sure you have a relief valve on the tank.and a reliable guage. belt guard needs to be able for air to pass through it to get to the cooler coils.I worked on Kelloggs for a long time. the air filter can be replacedd with a modern Solberg housing and filter from graingers. might need a pressure washing to find the oil leaks. drain the oil and replace with nondetergent 30 weight . good luck and be careful.
 
OP
B

Burgerkong

Well-known member
Joined
Apr 17, 2010
Messages
2,501
Location
Markham, Ontario, Canada
be careful with that 50 year old tank. for sure get the fittings off and get the water and crud out of it. replace with standard schedule 40 pipe fittings and a valve. make sure you have a relief valve on the tank.and a reliable guage. belt guard needs to be able for air to pass through it to get to the cooler coils.I worked on Kelloggs for a long time. the air filter can be replacedd with a modern Solberg housing and filter from graingers. might need a pressure washing to find the oil leaks. drain the oil and replace with nondetergent 30 weight . good luck and be careful.

Yeah, that's why I took off the guard. May end up cutting a nice round hole in the guard and patching with some mesh/expanded metal.

I will get one of the drains open, the plumbing on the tank is a bit wonky. I may retorque the head bolts, but I have yet to come across a service manual with the torque specs and all. Emailed Kellogg and waiting to see what they say. Will have tank hydrotested if keeping though. Almost 60 years old!
 

CNGsaves

Well-known member
Joined
Sep 26, 2012
Messages
13,233
Location
KS and OK
That IS a beast !!! Even the 3 HP motor is MASSIVE !! ;)

+1 to give it some TLC and clean her up. Sad to say needs to go back outside so you can spray with degreaser and then power wash !! :D

My guess is really only "needs" the 2 belts for 3 HP Motor and had the 3 belts when it was powered by full 5 HP motor back in the day.

Even with repairs it needs . . . getting it FREE is worthy of YOU **** !! :thumbup:
 

finn

Well-known member
Joined
Mar 27, 2005
Messages
16,203
Location
The UP, God's country
The old Champion I picked up used the same pump for 3, 5, and 7.5 hp motors, with different drive ratios and resulting pump speeds for the different motor outputs.

Unfortunately mine is set up with the 3 hp motor and pulley arrangement.

I think this was (and still is) a common marketing arrangement for the higher end compressors.
 
OP
B

Burgerkong

Well-known member
Joined
Apr 17, 2010
Messages
2,501
Location
Markham, Ontario, Canada
Kellogg got back to me with a manual, it is attached.
 

Attachments

  • Model# 331 tv040220052_Page_4.jpg
    Model# 331 tv040220052_Page_4.jpg
    151.3 KB · Views: 215
  • Model# 331 tv040220052_Page_3.jpg
    Model# 331 tv040220052_Page_3.jpg
    147.2 KB · Views: 242
  • Model# 331 tv040220052_Page_2.jpg
    Model# 331 tv040220052_Page_2.jpg
    146.7 KB · Views: 253
  • Model# 331 tv040220052_Page_1.jpg
    Model# 331 tv040220052_Page_1.jpg
    152.9 KB · Views: 249
OP
B

Burgerkong

Well-known member
Joined
Apr 17, 2010
Messages
2,501
Location
Markham, Ontario, Canada
Hypothetical question, I'm tempted to scrap the tank because I don't have space for a horizontal 80 gal receiver. So I am transferring the pump and motor to my smaller stubby 30 gal vertical tank - only caveat is that it is rated for a max WP of 165PSI. Obviously I will need a new pressure switch, I'm eyeing one that cuts out at 155PSI and turns on at 125PSI - or should I look for a new receiver?
 

CNGsaves

Well-known member
Joined
Sep 26, 2012
Messages
13,233
Location
KS and OK
Put the big 80 gal horizontal tank outside and plumb black pipe steel back inside the garage to airline system. Get your 20 or 30 gal vertical tank inside and T the airline system together with ball valve to separate the 2 tanks.

Going too small on your tank will not let your compressor get up to temperature when operating. Besides I like the sound of 100 to 110 gal capacity !! ;)
 

CNGsaves

Well-known member
Joined
Sep 26, 2012
Messages
13,233
Location
KS and OK
Alright then . . . . big tank goes in attic . . . or on high shelf up near ceiling !! ;)

Actually would work out well for draining the big tank.
 
OP
B

Burgerkong

Well-known member
Joined
Apr 17, 2010
Messages
2,501
Location
Markham, Ontario, Canada
Oh and BTW, here's how it sounds:

<iframe width="420" height="315" src="https://www.youtube.com/embed/5X2raEVwhOo" frameborder="0" allowfullscreen></iframe>

I can't get the head off, I will try a larger hammer tomorrow. Probably pulling the pullet to gain more access for the hammer - should I hit perpendicular to the head or from below where the manifold is?
 
Last edited:
OP
B

Burgerkong

Well-known member
Joined
Apr 17, 2010
Messages
2,501
Location
Markham, Ontario, Canada
The head met it's maker today, a 12 pound sledge! In the end, I actually used a brick chisel to wedge it apart, worked a lot better. So, as long as you're careful and tap it lightly, a chisel works loads better than a sledge as I was WAILING away with it and it still didn't budge.

Good news! It is INSANELY clean inside the cylinder and the head - some carbon deposits on the valves, and some yellowish liquid (water mixed with oil perhaps?) on top of the high pressure piston, but everything wiped off with a rag. No rust!, Cylinder walls look pretty decent, very light scoring. Don't think I will end up taking the valves apart, just a dunk in solvent.

Also tipped the compressor over and drained the oil - it was blacker than black! Wayyyy overdue for an oil change, luckily no metal shavings, just a bit of fine dark powder. Pulling the unloader and pulley next, then we'll see how the crankshaft looks.

Any tips on how to remove stuck on gaskets? I tried scraping it off, but the surfaces scratched easily.

Here's another video without the head:

<iframe width="420" height="315" src="https://www.youtube.com/embed/zklwGfdxiG0" frameborder="0" allowfullscreen></iframe>
 

Attachments

  • IMAG2539.jpg
    IMAG2539.jpg
    157.9 KB · Views: 156
  • IMAG2537.jpg
    IMAG2537.jpg
    153.2 KB · Views: 160
  • IMAG2514.jpg
    IMAG2514.jpg
    142 KB · Views: 153
  • IMAG2520.jpg
    IMAG2520.jpg
    141.1 KB · Views: 153
  • IMAG2519.jpg
    IMAG2519.jpg
    150.8 KB · Views: 152
  • IMAG2515.jpg
    IMAG2515.jpg
    149.7 KB · Views: 172
  • IMAG2511.jpg
    IMAG2511.jpg
    136.3 KB · Views: 149
OP
B

Burgerkong

Well-known member
Joined
Apr 17, 2010
Messages
2,501
Location
Markham, Ontario, Canada
Time to get the unloader off, but ran into a snag. Looking at other centrifugal unloaders, the weights screw into the crankshaft - am I right in assuming this is the case here? Presumably a left handed thread as well so it doesn't come undone.
 

Attachments

  • IMAG2554.jpg
    IMAG2554.jpg
    145.6 KB · Views: 156
  • IMAG2551.jpg
    IMAG2551.jpg
    146.1 KB · Views: 157
  • IMAG2556.jpg
    IMAG2556.jpg
    147.8 KB · Views: 177
To avoid these ads, REGISTER NOW!

engineer031

Well-known member
Joined
Jun 26, 2015
Messages
131
Location
Ontario Canada
to remove the gasket I use a scraper or a die grinder with pads a gasket scraper should not hurt it I am assuming it is cast iron
 

MacMcMacmac

Well-known member
Joined
Oct 21, 2014
Messages
1,583
Location
canada
That gasket looks chock full of asbestos-ey goodness. I would not grind or sand it. I'd tap it off with a ball peen hammer, and scrape the residual off with a razor scraper.
 
OP
B

Burgerkong

Well-known member
Joined
Apr 17, 2010
Messages
2,501
Location
Markham, Ontario, Canada
Well, after some tense work, the gasket surfaces are clean and free of asbestos, washed down with solvents. Sprayed some LPS 3 on the bare machined surfaces as I'm not ready to reassemble yet so it'll hopefully keep the surfaces rust free until then. Should I stone the surfaces as well? I used a drywall knife and scraped it down while wetting the surfaces with some varsol.

Cleaning the old grease/oil took forever, I hate cleaning. The valves are fairly clean now on the other hand.

I'm scanning the gaskets since I'm cheap.
 

Attachments

  • IMAG2563.jpg
    IMAG2563.jpg
    145.5 KB · Views: 141
  • IMAG2560.jpg
    IMAG2560.jpg
    145.3 KB · Views: 147
  • IMAG2565.jpg
    IMAG2565.jpg
    145.5 KB · Views: 148
  • IMAG2562.jpg
    IMAG2562.jpg
    153.8 KB · Views: 149
  • IMAG2561.jpg
    IMAG2561.jpg
    151 KB · Views: 154
  • IMAG2559.jpg
    IMAG2559.jpg
    149.2 KB · Views: 147
  • IMAG2558.jpg
    IMAG2558.jpg
    146.1 KB · Views: 166

twooldfarmers

Member
Joined
Jul 9, 2015
Messages
12
Location
SK
did you ever come across the proper specs for the torque on the 3/8 head bolts

I have been looking and looking
 
OP
B

Burgerkong

Well-known member
Joined
Apr 17, 2010
Messages
2,501
Location
Markham, Ontario, Canada
OK, now that you explained it I can see what you're talking about. I've never seen that before.

I actually think those 'covers' are in place to fling oil towards the cylinders and pistons, a way of diverting some of the oil drawn up by the oil slinger ring so it doesn't all go to the journals and end bearings.

Funnily enough, the counterweights are welded in however LOL. Fairly certain it was done by the factory as well.
 

Attachments

  • IMAG2671.jpg
    IMAG2671.jpg
    146.4 KB · Views: 179
  • IMAG2659.jpg
    IMAG2659.jpg
    140.2 KB · Views: 189
  • IMAG2669.jpg
    IMAG2669.jpg
    144.1 KB · Views: 185
  • IMAG2665.jpg
    IMAG2665.jpg
    137.5 KB · Views: 189
OP
B

Burgerkong

Well-known member
Joined
Apr 17, 2010
Messages
2,501
Location
Markham, Ontario, Canada
I actually have a plan for the valves, which includes not taking them out in the first place. :lol_hitti

If need be, I have a couple impact sockets I'll sacrifice and grind the proper profile into them.
 

MacMcMacmac

Well-known member
Joined
Oct 21, 2014
Messages
1,583
Location
canada
Post 12 ;), 28 foot pounds.

Make sure you don't overdo it. Kelloggs are notorious for stripping out threads. Maybe the later Chinese made ones were the culprits, I dunno, but I was guaranteed to need a couple of helicoils during reassembly. 462 intercoolers were the worst. The most critical ones are the two near the top of the gap in the crankcase at the back. If you eff them up you are in a world of hurt.
 

MacMcMacmac

Well-known member
Joined
Oct 21, 2014
Messages
1,583
Location
canada
I actually think those 'covers' are in place to fling oil towards the cylinders and pistons, a way of diverting some of the oil drawn up by the oil slinger ring so it doesn't all go to the journals and end bearings.

Funnily enough, the counterweights are welded in however LOL. Fairly certain it was done by the factory as well.

Kellogg would never win any awards for craftsmanship, but they held together well.
 

dispatchy

New member
Joined
Sep 10, 2015
Messages
2
Location
Houston Tx
gents, I have a Kellogg 331 pump that has a tag on it reading 331 and not 331 TV, is there a difference between a 331 TV and 331?
 
OP
B

Burgerkong

Well-known member
Joined
Apr 17, 2010
Messages
2,501
Location
Markham, Ontario, Canada
gents, I have a Kellogg 331 pump that has a tag on it reading 331 and not 331 TV, is there a difference between a 331 TV and 331?

Noooo idea. How does yours look?

Finally got around to cleaning out the crankcase, some nasty sludge on the bottom ugh. Either the oil seal failed or someone didn't torque the base bolts to spec, because the pump and the receiver had caked on grease/oil all over the front (and on the intercooler fins as well). Not fun to clean up, took a nice long soak in solvent then brushes and rags.

It's all nice and clean on the inside, wondering if I should paint it, but at the same time, on the surface it looks clean, but unless I bake it or steam bath it, the oil that seeped into the casting would stay trapped in the case. Lost cause?

The rest of the bolts are soaking in solvent now.
 

Attachments

  • IMAG2865.jpg
    IMAG2865.jpg
    143.2 KB · Views: 127
  • IMAG2755.jpg
    IMAG2755.jpg
    148.3 KB · Views: 125
  • IMAG2800.jpg
    IMAG2800.jpg
    144.4 KB · Views: 126
  • IMAG2859.jpg
    IMAG2859.jpg
    149.8 KB · Views: 127
  • IMAG2860.jpg
    IMAG2860.jpg
    149.4 KB · Views: 130
  • IMAG2861.jpg
    IMAG2861.jpg
    152.1 KB · Views: 122
  • IMAG2652.jpg
    IMAG2652.jpg
    136.7 KB · Views: 130
OP
B

Burgerkong

Well-known member
Joined
Apr 17, 2010
Messages
2,501
Location
Markham, Ontario, Canada
What's the consensus on full synthetic oils in older compressors? Will the gaskets hold up? And also the oil seal? Or is it safer to stick with dino?

On an unrelated note, I finally got the thick layer of grease and **** off of the pulley, it was FILTHY. Everytime I grabbed it oil would get everywhere.
 

Attachments

  • IMAG2864.jpg
    IMAG2864.jpg
    147.9 KB · Views: 107
  • IMAG3049.jpg
    IMAG3049.jpg
    147.5 KB · Views: 107
OP
B

Burgerkong

Well-known member
Joined
Apr 17, 2010
Messages
2,501
Location
Markham, Ontario, Canada
Just came across this piece of marketing from the CompAir age, turns out the cups on the crankshaft that were welded in are actually small oil reservoirs meant to force feed the oil into the drilled crankshaft!

It is super long, so there are going to be three (!) parts.

The Kellogg-American Air Compressor is the HEAVY DUTY, TIME PROVEN source of reliable compressed air power for the person whose livelihood depends on compressed air. The 101, 201, 211, 321, 352, 335, 340, 452 well known models of Kellogg compressors suggest a choice is size for compressed air power, but all with four basic ingredients: QUALITY - RELIABILITY- DEPENDABILITY- LOW COST (not necessary low price), and a source of compressed air that no matter how small or how big your need for compressed air, the Kellogg compressor is there to serve, and endure, to supply compressed air for your business day after day at the lowest possible cost, built not to be thrown away, but repairable as a reasonable cost after normal wear or breakdown occurs.


The discriminating user, who realizes that his compressed air system is really a "fourth utility" upon which his economic health is dependent, recognizes this as continues to purchase and use the Kellogg compressor in record numbers. Why does he do this?


-Reputation?

-Service and Parts Support?

-Local Support?

-Product Design and Efficiency?

But only if he understands the design feature and benefit as compared to the other chassis. This confidential booklet will take us BACK TO BASICS, to review the time proven design of the CompAir/Kellogg-American compressor as compared to competition and remind us why the user is better off in investing in a Kellogg than many lower price competitors.

Background


Kellogg Compressors have been a source of reliable compressed air power since 1906. Over the years the basic design parameter has remained the same, a reliable, heavy duty unit to serve the user whose livelihood depends on compressed air.


The company, Kellogg American, which built and offered the Kellogg Compressor to the industry in 1971, became part of CompAir. LTD, a multinational organization dedicated to the Compressed Air business with high quality, efficient manufacturing facilities all over the world.


Continued invest into the Kellogg America Group has culminated in the opening of a new modern plant in Kingston, New Hampshire which is dedicated to the continued manufacturing and supply of the Kellogg Compressor line of Heavy Duty Reciprocating compressors along with Compressed Air Dryers and Rotary Screw compressors. This operation, now known as CompAir Kellogg, is the most modern production facility in the United States for reciprocating air compressors. COMMITMENT by CompAir to supply quality products and full support to the user. Drawing the complete CompAir Engineering and manufacturing assets, the Kellogg line of compressors, although using the time proven basic design of yesterday, has been improves even further by incorporating modern materials and manufacturing producers.


The Kellogg Compressor today is truly a QUALITY UNIT, precision built with the finest materials and workmanship, Swedish STEEL valves with rigid engineering specifications covering materials, heat treatment and surface finish. Drop forged crankshafts, high tension Steel rods, close gained cast iron cylinders, heads and crankcase, high quality ground finish where required for reduced friction afford maximum life and more usable compressed air for the power dollar.


THE KELLOGG COMPRESSOR- from 1 HP to 10 HP. Built like the Big Ones! Small Air Compressors Built to Run.


Let’s take a close look at some of the benefits in the Kellogg Compressor that makes it the "Best Buy" the compressed air user can select.


1. Lubrication System - This is probably the single biggest exclusive design feature in any air compressor that separates the Kellogg Compressor from the rest of the units available.


Lubrication is the most critical to any air compressor and particularly when the unit is less likely to receive constant attention. This has always been the dilemma of the compressor design engineer: "Splash Lubrication" with random lubrication and extreme sensitivity to oil level or use and "oil pump" which, although not as sensitive to oil level, is extremely sensitive itself, when it fails it generally causes complete destruction of the unit.


The patented "Ring Flo" oil lubrication system offers positive force feed oil flow with only the moving part - the ring - no oil pump or gear.


The oil pick-up ring, revolving on the crankshaft picks up oil and continually fills the cups welded on the crankshaft. The cups hold the reservoir of oil charge which then is forced though the drilled crankshaft by centrifugal forces to force feed oil through the crankshaft to the rod and other critical lower end areas. Carefully designed "directional spraying" of oil is used to lubricate critical upper end areas.


This system is relatively insensitive to oil level and provides consistent lubrication at all operating oil levels in the crankcase and is capable of keeping the cups full for almost the entire amount of oil capacity.


Let's look at how some other manufactures handle the lubrication of their units. Compare this to the typical rod and dipper stick which randomly splashes oil through the unit hoping for adequate lubrication where required. As the oil level drops from full, the "dipper stick" is able to sling less and less oil in an ever descending amount. Even if the lowered oil level is corrected before destruction, life shortening damage will have been done by less than optimum lubrication. Random splash lubrication is also obviously very sensitive to oil viscosity, compressor speed and requires critical leveling of the unit.

QUINCY - QR25


Quincy uses a full flow vane type oil pump for lubrication with a by-pass valve to protect from over pressuring. Failure of the pump, by-pass valve or oil pick-up filter screen will cause lack of lubrication and potential destruction of the unit.


INGERSOLL RAND, CHAMPION, SHULTZ - and others use a splash type lubrication system with a dipper stick on the connecting rod.

CHAMPION ROD

INGERSOLL RAND ROD

INGERSOLL RAND

2. LOWER END DESIGN


The Kellogg Compressor has a rugged lower end built to give years and years of trouble free service with only reasonably required maintenance. It is a true industrial design with highest quality steel forgings and close grained castings used throughout. All group finishes are implemented and designed to give lowest possible friction losses and longest possible life.

Crankcase


Crankcase - Made of close grained high quality cast iron - totally enclosed design - dust proof and vented.

Free Image Hosting

Crankshaft


Drop forged high tensile alloy steel crankshaft with "micro-finish" ground surfaces balanced with integrated counter weights. Drilled to supply force feed oil to the main bearings are over-sized, tapered roller bearings, mounted on each end of the crankshaft to handle both radial and thrust loads. Can be easily adjusted from the outside if required.

It is IMPORTANT to note here the mounting of the crankshaft - solidly supported on both ends with main bearings mounted firmly in the crankcase, to support the working end of the rods. There are some competitors. (INGERSOLL RAND, OHIOLIAB) that still use the "over-hung" type of crankshaft, which although is less costly, is a significant compromise in design which certainly reduces inherent strength and life. You can see here in the photo of an INGERSOLL RAND Type 30 crankshaft that the "cantilevered" design - or "overhung" mounting only supports the crankshaft at the one end - while the rod loads have to be handled by the "unsupported" main journal. This cannot possibly without increased wear and shorter life - particularly at the higher pressures.

Kellogg Rods

The Kellogg rod is manufactured from steel forging and is of the industrial two piece design. Precision manufactured with high strength steel giving unmatched strength for heavy duty service.


Ingersoll Rand T-30 Crankshaft

Connecting Rod Bearing Inserts are steel backed Babbitt lined, to protect the crankshaft journal. These are of the industrial type and replaceable.

Some lower price competitors use "non-removable" Babbitt lined rods which means the whole rod must be replaced in the field - and some use the one piece aluminum rod - such as INGERSOLL RAND as shown here. It is quite obvious that this one as the two piece precision rod design and the critical tolerances between the rod and journal are not adjustable - therefore when the unit is assembled - critical clearances are dependent on the manufacturing tolerances. Any wear of the rod means complete replacement of the whole rod - meaning more cost in normal overhaul.

SHULZ COMPRESSOR


(an imported unit from Brazil - often marketed under many different brand names) utilizes roller bearing for rod bearing and although unconventional in use do work. Hardened Roller Bearings in this application are much more sensitive to premature failure from impact loads than the time proven steel backed Babbitt inserts.

With this type of bearing arrangement a lost rod bearing means the complete bearing, rod, and crankshaft will have to be scrapped with a rod bearing failure.

The SCHULZ connecting rod only has one oil drain rather than the two required for premium operation.
 
OP
B

Burgerkong

Well-known member
Joined
Apr 17, 2010
Messages
2,501
Location
Markham, Ontario, Canada
Part 2....

3. OTHER MATERIALS


Some other manufactures (such as the QUINCY "Lynite" Rod as shown here) have switched to lighter weight materials for their connecting rods. This is a compromise the Kellogg Compressor has not made! The rod parts of the working pieces of the unit - FORGED STEEL - cost more - but are the "best buy"


Champion Rod

Note the CHAMPION rods shown here in their top line model are of aluminum construction (obviously does not have the strength is steel for heavy duty use) without bearing inserts - meaning that when normal wear occurs the whole rod must be replaced.

4. UPPER AND DESIGN - CYLINDERS AND HEADS:


The Kellogg Compressor utilizes large close grained cast iron cylinders and heads which are honed to the correct finish for minimum friction, wear, and oil control. Cooling is accomplished by extra deep - directional cooling fins to proceeded increase cooling capacity plus greater strength. TWO STAGE units utilize the rugged "EN-BLOC" design which offers greater strength and resistance to war-page due to heat and mechanical stresses.

Over the years of service the "EN-BLOC" cylinders or two cylinders in one block per bank have proven to be the most rugged and long lived for heavy duty industrial usage.

The INGERSOLL RAND cylinder shown here is typical of the lighter weight single cylinders used on the lighter, higher speed units sold today on the industrial market which are really lighter duty units than the Kellogg unit.

CHAMPION utilizes different cylinder/head which, it is well to note, offer inherent disadvantages to the user. Over the years, CHAMPION has offered an Aluminum one piece cylinder with built in head claiming better heat dissipation than conventional cast iron cylinders. As in the case of all quality equipment, good engineering provides correct cooling regardless of the material.

Today, CHAMPION now offers their cylinders in either aluminum or cast iron. The point to consider here is not the cylinder design. NOTE: The cylinder and head are only one piece construction. The negative implications of this are obvious. Non-lube CHAMPIONS use cast iron cylinders with aluminum heads where cylinder quality is most important.

1. Any wear or damage to the head or cylinder will require complete replacement of both.

2. Normal routine valve and head cleaning of accumulated carbon requires the complete removal of the cylinders. This is time consuming and expensive and therefore is not generally done by the user. This means the user just routinely cleans the valves and not the rest of the head area which is only "partly effective" and certainly will not allow optimum life between overhauls.

Exclusive KELLOGG


Valve/Head Arrangement


Note: The time proven head and valve arrangement of the Kellogg compressor with the Swedish steel concentric ring valves. This has some very significant advantages to the user. All Kellogg valves use high quality COPPER gaskets which withstand the higher temperatures better and make it easier to remove the valves for normal maintenance.

1. Routine valve maintenance requires the simple removal of the valve but where more extensive maintenance is required the head can be easily removed.

2. KELLOGG valves are cleanable and the seat can be cleaned and reused. The actual valve itself can be changed rather than the whole assembly at a lower cost. Compare to designs where the complete valve assembly must be replaced.

3. Compare the pictures of the Champion and QUINCY, head/valve arrangement shown here, to the KELLOGG head/valve and you will see that the Kellogg design gets significantly more cooling fins and a better flow of cooling air over and around the heads - the hottest part of the compression area. What can be more important to the life of an air cooled compressor than adequate air-cooling? Again, the KELLOGG unit offers no compromises.

The KELLOGG Compressors use Industrial Quality Steel Valves with cushioned action. The valves and removable valve seats are hardened to give quiet efficient service, computer designed to fit the exact operating condition of valve lift, valve compact, valve gear in its Industrial CompAir Kellogg Compressor.

The SHULZ Compressor Unit Utilizes a one piece valve - combination inlet/discharge valve of the concentric ring design with intake on the outside perimeter and discharge in the center. The valve is the same size as the cylinder. They do not use cushion washers like the KELLOGG units. This heats the inlet air which dramatically reduces efficiency and raises all critical operating temperatures. These centers discharge DOES NOT ALLOW FREE AIR UNLOADING - which means the unit is not available with constant speed control.

Kellogg Valves

Quincy Valves

As you can see, the QUINCY unit has more valve parts than the cushioned Swedish steel KELLOGG valves. This makes them more sensitive and expensive to work on.

Ingersoll Rand Valves

INGERSOLL RAND uses "finger type" valves which are pinned on one end and must flex with each revolution. These valves have a very limited life and often the valve and valve plate must be replaced at a great deal of expense. In the larger units (above 7-1/4 - 10 HP) uses concentric ring valves from 15 HP to 25 HP.

Pistons


The KELLOGG Compressor uses industrial quality precision ground cast iron and aluminum pistons carefully selected for optimum running balance and long life under most rugged conditions.

Let's take a look at some competitive piston arrangements:


1. QUINCY: Utilizes "light weight automotive type low and high pressure piston" which they claim requires less energy to move because they are lighter. For the user who depends on compressed air for his livelihood - he needs "industrial" design -not "automotive". A compressor running 6000 hours a year is equivalent to a car engine going 240,000 miles a year at 40 mpg. The duty air compressor is a "severe" compared to 'automotive".

CHAMPION


Also utilizes an aluminum low pressure piston and cast iron high pressure piston but you will also notice that they utilize a "domed" shaped piston as opposed. Although the dome shape does allow increased manufacturing tolerances for the "single piece" head and "cylinder arrangement" it has causes a significant loss in performance. The "dome" or re-expansion area between the head and piston than the flat piston design. This means that much less air gets out than came in causing lower air gets out than came in causing lower efficiency - and extra heat built up in the cylinder and heads as more "re-compression" occurs. This head combined with the small discharge air passages caused by the valve arrangement and conical head design create more rapid carbon build up that cannot be cleaned properly without pulling the complete one piece cylinder head.

Inter-coolers


Often overlooked by the two stage compressor user today is the inter-cooler - using "patented" steel fine on copper tubes which are made within our factory - the air tubes which cool the air as it passes from the first stage to the second. Proper inter-cooling is most important to the efficiency of any two stage units, and without it the user pays a significantly higher power bill to run his compressor for the same amount of air. REMEMBER at .06 a KW/H the user pays about $400 per year per HP on a 3 shift operation - weather he gets the air or not.

The user that has 5 HP unit develop 20 C.F.M. displacement and an actual 16 C.F.M. at 100 P.S.I.G instead of 20 C.F.M. delivered at 100 P.S.I.G and possible is really losing $200 a year in power cost to do the same job - not counting the "overworking" of an already over applied compressor.

Champion Inter-cooler

One of the places the lower cost unit can save many dollars and five up efficiency or C.F.M./HP that may go unnoticed is in the inter-cooler. The inter-cooler performance affects the actual unit performance by a very hard and fast PHYSICAL LAW. Specific i.e. Perfect Inter-cooling is when the inlet temperature of the last stage. Therefore a 30°F difference in the inter-cooler performance equals a 3% loss in air.

Quincy Inter-cooler

You can see from this that compressor performance is delivering usable compressed air (which is what the user needs to accomplish his work!) and is very directly affected by the inter-cooler. Since these are air cooled units, a physical look at competitive inter-coolers compared to a comparable KELLOGG inter-cooler will tell a lot.

The KELLOGG INTER-COOLER - Note the large fully finned tubes for maximum flow and minimum pressure drop rod friction. The fins increase the effective cooling surface significantly and on a per horsepower basis you will find the KELLOGG tow stage units have the most inter-cooling area.

You can see from these photos the competitive inter-coolers do not rank on a par with the KELLOGG. It is obvious that the KELLOGG inter-cooler is more efficient and therefore the whole unit is more efficient than the competition.

Large diameter inter-cooler/after-cooler tubing provides greater efficiency - The lined tubing used as inter-cooler between stages of two-stage models provides two important advantages. Using larger than normal diameter tubing the air flow is increased and pressure drop reduced. The thin circular metal fins are scalloped in order to provide the greatest possible surface for heat dissipation.
 
To avoid these ads, REGISTER NOW!
Top Bottom