To avoid these ads, REGISTER NOW!

New Shed Construction - Progress Thread (16x12)

Azarius

Well-known member
Joined
Aug 19, 2015
Messages
51
Location
NW Ontario
Hey folks!

Finally getting around to replacing my old, worn down shed in my back yard with something a bit more functional.

Old shed is 14x12, I'm going to replace it with a 16x12, or perhaps 16x14... Haven't really decided yet until I measure out the space once the old shed is completely gone... Although 16x12 would make more economical use of materials I believe...

Shed housed an old pigeon coop in half of it... Shingles were bad, parts of floor had started to dry rot... Door wasn't very secure, windows weren't secure. Electrical to the shed comprised of an extension cord buried under ground, which plugged into a CGFI on the deck... Just a whole bunch of things.

Hoping to work within a $3k budget. Yes, I will have to get a building permit. Old shed was right on the property line, and I will have to build 1-2" out (depending on which way the roof slants)...

Next week I'm hoping to have those big 12x12's pulled out, and get a load of crushed gravel dumped into the hole that's there and then tamp it down so I've got a good base to work with.

Comments and suggestions welcome, as this is my first build of this size.

FYI - tear down was over 3 days, 99% by myself (~30 hours of work), and 8 dump runs with truck and trailer.

http://imgur.com/a/hfp4h
 
To avoid these ads, REGISTER NOW!

CJ7VFR

Well-known member
Joined
Jan 13, 2015
Messages
2,941
Location
Central New Jersey
Electrical to the shed comprised of an extension cord buried under ground, which plugged into a CGFI on the deck...

Comments and suggestions welcome, as this is my first build of this size.

http://imgur.com/a/hfp4h
Don't use the extension cord trick again...

Use proper electrical installation methods incase your town decides to come out and inspect the electrical you want to add.

Just out of curiosity, how long was the extension cord buried in the ground that provided the power the shed?

Although not to code and dangerous, people did this all the time and some have lasted DECADES before the extension cord started to corrode and give out.

Good luck with your build, and post pictures of your progress!!!

Jim
 
OP
A

Azarius

Well-known member
Joined
Aug 19, 2015
Messages
51
Location
NW Ontario
Hey Jim!

It was a 50'... Buring about 1' underground... It's been there for about 15 years (give or take)... It would flip the CGFI once in awhile on the deck. One of my buddies is a ticketed electrician so we're going to do that over beers before final inspection to make sure it's up to code.
 

CJ7VFR

Well-known member
Joined
Jan 13, 2015
Messages
2,941
Location
Central New Jersey
Excellent! It really is amazing how long those old extension cords last!

Are you allowed to run more than one electrical line out to your shed per your permit? In my town, here in New Jersey, we are only allowed to run one line to any out building, like a shed.

I did not do a MWBC (Multi Wire Branch Circuit) at the time I built my shed because money was tight, and I could only afford the 12/2 UF-B wire for a single circuit.

But if I could have, I would have done the MWBC so I could have had the lights on one phase and the outlets on the other so the lights don't flicker when I power up a tool.

My shed is really only used for garden stuff and the only electrical things are a few lights I use when its dark, and one Battery Tender to keep my lawn tractor battery charged up. So I don't really have a problem.

Jim
 
OP
A

Azarius

Well-known member
Joined
Aug 19, 2015
Messages
51
Location
NW Ontario
No such restriction that I can see... Only thing covered as far as electrical goes to "Residential Accessory buildings" is clearance from overheard wires... Its definately something I'm going to ask my buddy about.

Funny thing, on the old extension cord trick, I could run the lights and the mitre saw without issue ~lol~
 

CJ7VFR

Well-known member
Joined
Jan 13, 2015
Messages
2,941
Location
Central New Jersey
What style of shed are you planning on building?

One of the things I had incorporated into my shed was 6 inch higher walls so that the doors were a full 75 inch opening so I would not hit my head on them. This also provided me with more storage space in the upper part of the shed.

Jim
 
OP
A

Azarius

Well-known member
Joined
Aug 19, 2015
Messages
51
Location
NW Ontario
16x12 with 8 foot walls, with a full 82x36' entry door... No fancy gable roof or anything, just a common 4/12 pitch. The door will be a steel door, with reinforced jambs... The windows will have decorative security bars... Unfortunately due to where my house is situated, we often get transients walking through our neighbourhood to get where they need to go, and things will go missing if not tied down and locked up tight...
 
OP
A

Azarius

Well-known member
Joined
Aug 19, 2015
Messages
51
Location
NW Ontario
Whew...

So an update...

I've pulled down the old shed, and removed the debris that was "fill". Blocks and chunks of granite and concrete. The 16' 12x12x12's, plus a tree trunk, and four tree trunks used as posts.... Plus the stump of a tree I had to remove.

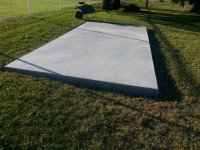
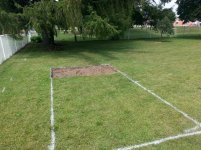
Anyways, it's all gone now... Cleaned up the hole, framed an 18x14' space with 4x4's, and had 6 cubic yards of gravel shipped in...

Spread it out, rented a compacter...

Used only concrete blocks I found in the other shed for my new shed...

Laid them out, levelled them out as best I could... Picked up the lumber for the shed foundation. Decided to use 2x8's for a mudsill between the concrete blocks and the frame...

Framed the outside and measured for squareness. It looked fine, but was out by 7"s... lol... a sledgehammer and gentle tamping and 15 minutes later we were square up.

Started putting the joists in.

ERROR #1: For some reason I grabbed construction screws instead of the coated screws for PT wood (ACQ). Had to take 130 screws out and replace them. /sigh #brainfart

ERROR #2: I marked the joist locations properly... But when attaching the joists I screwed them to the wrong side of the line, even though I had it marked... So my centers were all screwed up. 30 minute fix.

Plywood is now glued and screwed... there is very little overlap on the far edge. It's still square!

Not exactly level, may have to jack up the far end just a bit, but will see...

*WHEW*

Now to get ready to start on the walls! My buddy convinced me that I've already done the hardest part.

http://i.imgur.com/VGhIq6F.jpg

The rest of the images are found at the top of the page...
 
OP
A

Azarius

Well-known member
Joined
Aug 19, 2015
Messages
51
Location
NW Ontario
I'm getting the trusses prefab... 7 trusses plus gable ends and ladders, delivered will set me back about $450 Canadian...

Hopefully if the weather holds out, walls will go up this Thursday and Friday... Trusses delivered the following week with a truss/roof/shingling party being held over 3 days the following week (weather permitting of course)
 

TonkaJoe

Well-known member
Joined
Dec 19, 2014
Messages
410
Location
Southern ON, Canada
Just built one myself! You'll enjoy it for sure [emoji106] Still have to landscape the front yet but it finally gave me the room back in my shop!. uploadfromtaptalk1442199217124.jpguploadfromtaptalk1442199249307.jpguploadfromtaptalk1442199283694.jpguploadfromtaptalk1442200391461.jpguploadfromtaptalk1442200428576.jpguploadfromtaptalk1442200445344.jpguploadfromtaptalk1442200445344.jpguploadfromtaptalk1442201095623.jpg

Sent from my SGH-I747M using Tapatalk
 
OP
A

Azarius

Well-known member
Joined
Aug 19, 2015
Messages
51
Location
NW Ontario
Shed Walls are up!

Well, mostly...

Goof 4351: I goofed with the height of the front window... Made it to high. Will lower it to 48" (from the floor) Monday... 2nd window already at 48".

Goof 4352: Walls are now 8'3, due to the fact I used the true 2x4x8's instead of the 2x4x7'9 boards, or cut the 2x4x8's a bit shorter (to adjust for the 3" of the top and bottom plates...

I had contemplated cutting them all down and reattaching, but I decided to keep it. It'll cause me a small amount of grief when I go to side it, but I'll just get a sheet of OSB cut into 3" strips to fill in the gaps created...

Oh the things we learn as we go along!

Trusses are ordered, will be delivered next Wednesday. Weather permitting, hope to have them and the roof and walls up by next Saturday...

It's finally starting to look like something!


Add: Nice lookin shed Tonkajoe! You have power to that bad boy?
 
Last edited:

bczygan

Well-known member
Joined
Nov 4, 2009
Messages
22,002
Location
DETROIT! Arsenal of Scrappers
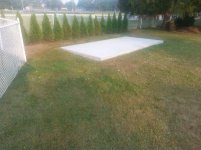
While looking at your floor in the photo below, it struck me how much yard space gets used up by setbacks for a shed like this. And this is even when an accessory building is allowed to be closer to the lot lines.

Sometimes (And this is worth checking), zoning allows a shed to be built right on the property line if it is fireproof construction. This is if there are no utility easements there, of course. It does mean you can't put big overhangs on, and maintenance requires going in the neighbors yard, but that is allowable. I've thought of a small city lot, where the entire back yard was enclosed by a brick faced masonry wall 8' high. At certain places the wall would go higher and a shed roof on the inside would cover a long narrow shed, maybe 4' deep by 20' long, for storage. A deeper shed would be a shop. I've seen some places where a thick masonry wall actually was hollow inside and had a door and yard storage inside.

This zero setback allowance is true here in Detroit, and a house a couple doors from me has a block walled garage right on the property line, using the usual 3' setback. This is also a way to get a virtual fence that is taller than the height allowed.

It's also useful to check the allowable fence height. Most people here install 5' high privacy fences, but ordinances allow 8'. Worth checking if you want more privacy.

Nice fence, BTW. I like solid ones, where people can't peek through.

Bill

VGhIq6F.jpg
 
Last edited:
OP
A

Azarius

Well-known member
Joined
Aug 19, 2015
Messages
51
Location
NW Ontario
Fences can be on the property line... Also limited to 6'. Thanks for the compliment, it was my first wood fence and a lot of work!

Residential Accessory building overhangs have to be 16" away minimum from property line...


I'm hearing differing opinions on thickness for the roof sheathing... Anyone have opinions?


[Add: that imbedded picture throws the whole website off for me, lol]
 
Last edited:
OP
A

Azarius

Well-known member
Joined
Aug 19, 2015
Messages
51
Location
NW Ontario
A buddy at work mentioned that my shed doesn't have any horizontal 2x4's between the studs for support... In all my books I don't see a single plan that shows this being done. Is that old school? Not required for a shed this size?
 

Dreaming

Active member
Joined
Dec 15, 2013
Messages
31
I am not sure blocking is required as the sheathing will add considerable strength, but I have typically blocked between studs on the sheds I have helped build. I see it as a way of keeping the 2x4's from twisting.
 
OP
A

Azarius

Well-known member
Joined
Aug 19, 2015
Messages
51
Location
NW Ontario
I was wondering about that... Will consider it. Not like it's difficult or expensive to do... Will seek some more input.


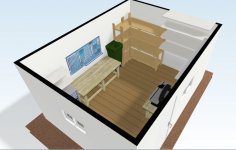
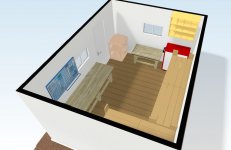
That being said, thought I'd move on to something a little fun for a bit... Organize/design the inside! :D

I've attached a quick mock-up... Wondering if folks have any input.

Of course I need a big work bench... and shelving, some of which is 3' high to allow me to put my generator, lawnmower etc underneath...

Suggestions? I'm also going to peruse the gallerys looking for suggestions!
 

Attachments

  • iNZn8Rz.jpg
    iNZn8Rz.jpg
    62.7 KB · Views: 98
  • nQbmqI1.jpg
    nQbmqI1.jpg
    54.4 KB · Views: 87
Last edited:
To avoid these ads, REGISTER NOW!
OP
A

Azarius

Well-known member
Joined
Aug 19, 2015
Messages
51
Location
NW Ontario
Monday: Reframed the one window that was too high, and framed the second window. Managed to put up 1/2 of the double top sill before I had to catch some Z's for night shift...

Trusses on Wednesday! Weather forecast is now only 40% chance of rain, clear Thursday, Friday and Saturday. If that stays true, I should have trusses, walls and roof up?

Talked to two local contractors who said 7/16's OSB is fine for both roof and walls for my shed. Although I will use 7/16's on the walls, I may use 5/8s on the roof, considering its 24" O.C.
 
Last edited:

920kip

Well-known member
Joined
Aug 11, 2011
Messages
168
Location
Titletown USA
Definitely not 7/16 osb for the roof. 1/2 is minimum. Your lumber dealer will know what is best in the Great White North. And get some tar paper up right away, ask me how I know. Ridge vent or gable vents?
 
OP
A

Azarius

Well-known member
Joined
Aug 19, 2015
Messages
51
Location
NW Ontario
Definately going with 5/8s.

How do you know? lol Must be a learning point in this story... You have a suggestion for location of vent?


So for my top plate, I've butted two 2x4x8's together on the long span... When I scribed the 24" OC's on it, I noticed that one truss will land directly on that joint... Any potential issues with this that would have me take them all out and replace with one solid piece?

http://i.imgur.com/MbNZ0mv.jpg


Add: Today I put the top plate on, as well as finished framing the 2nd window and cut back the tree from the shed... And dropped another hundred at HD on fasteners (hurricane ties, more 3" construction screws, 8d nails... the usual)
 
Last edited:

Capegls

Well-known member
Joined
Feb 13, 2013
Messages
49
Location
Connecticut
Goof 4352: Walls are now 8'3, due to the fact I used the true 2x4x8's instead of the 2x4x7'9 boards, or cut the 2x4x8's a bit shorter (to adjust for the 3" of the top and bottom plates...

I had contemplated cutting them all down and reattaching, but I decided to keep it. It'll cause me a small amount of grief when I go to side it, but I'll just get a sheet of OSB cut into 3" strips to fill in the gaps created

Question regarding this, wouldn't you add the sill, and double top plates, essentially making the wall studs 7'3"? This would give you 8' from the top of the top plate to the bottom of the sill.
 
OP
A

Azarius

Well-known member
Joined
Aug 19, 2015
Messages
51
Location
NW Ontario
Yup. Instead I have 8'4.5" walls! More storage space. Had to cut some more sheathing to fit but wasn't difficult.
 

Attachments

  • image.jpg
    image.jpg
    20.8 KB · Views: 128
OP
A

Azarius

Well-known member
Joined
Aug 19, 2015
Messages
51
Location
NW Ontario
WHEW!

What a three day run...

Wednesday - I had the trusses delivered. The ladder looked about 2' too large, but I called the company and they explained that the ladder actually screws into the first regular truss, not the gable end... Then it extends over the edge of the garage and rests on top of the gable end... This gives it a lot more strength. Made sense.

Once I had that figured out, my buddy and I got moving and installed the trusses, gable ends and one ladder (ran out of time)... No real issues other than a bit of warping on a couple of the boards. Used some screws and some clamps and solved that issue. I had the 24" OC already marked on the top plates, so that sped things up.

Thursday - rained all day. Quiet day on the shed front...

Friday - It was still bit damp out so I spent the day sheathing the walls... Had some fit issues due to the 4x8's not lining up properly on the 16 OC's, so spent some extra cuts.

I also saw how far the first ladder stuck out from the shed, I decided to cut the remaining ladder by 50%, to absolutely ensure that I wasn't over his property line. He wasn't worried about it, but if I sell the house I don't want there to be any issues. Wasn't hard.

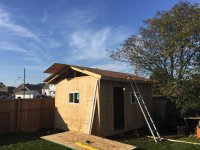
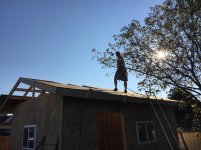
Saturday - One of my buddies came over and we sheathed the roof! WOO! It went pretty smoothly... Left a small gap at the peak to install the cover...

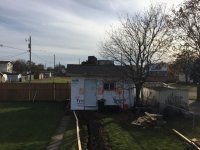
Sunday - I trimmed the ends off the roof sheathing, and added some more nails. Cut the sheathing for the gable ends and installed them... Also installed the hurricane ties to the trusses, and ended the day by inspecting all the nails in the wall sheathing to make sure they #1 - hit their mark on the inside, and #2, weren't sticking out any on the exterior. I then used some good ole Tyvek and wrapped the house.

Finished Sunday off by buying a really big tarp and tarping the roof... Good thing... It poured last night.

It actually feels like a "thing" now... You walk in, and with the walls and roof it actually feels like a tangible building. It's solid. There is a tremendous amount of space, especially with the 8'4.5" walls *lol*

Now for shingles...

ADD: I have complete and utter respect for those in the carpentry business... A huge difference from say, me, and a real carpenter is the attention to detail they probably give the planning phase... Adjusting building dimensions so that they minimize cuts, reduce wastage and ensure it goes up quickly... Simple things are painfully obvious to them, where to beginners it's all part of the process.

Yes, I could have had it built faster and better by using someone... But I'm thoroughly enjoying the process and learning a tonne in the meantime. That's worth it.

edit: Also - the windows are not installed, just held by a couple of screws to check for fit and keep rain out

FULL ALBUM
 

Attachments

  • IMG_0461.jpg
    IMG_0461.jpg
    147.1 KB · Views: 88
  • IMG_0460.jpg
    IMG_0460.jpg
    146.3 KB · Views: 76
Last edited:
OP
A

Azarius

Well-known member
Joined
Aug 19, 2015
Messages
51
Location
NW Ontario
Yup... My old shed was single door, 32". Fit everything I needed, so I just upgraded to a 34" door.... Which I actually installed today.

God I hate installing doors.
 
OP
A

Azarius

Well-known member
Joined
Aug 19, 2015
Messages
51
Location
NW Ontario
Shingles installed! Roof vent installed! Windows fully installed (weather sealing/drip edge etc)!

Shingles, plus roofing felt ran me $250. Had three buddies come over and we shingled it on a beautiful afternoon. Learned a lot about the process... No longer daunting. Those engineered shingles are awesome, with their tabs and such. Easy peasy!

We are now ready for winter! :D

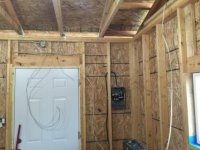
Other than the fact I still have an 50', 18" trench to dig so that I can run electrical out to the shed... Will get that done in the next few weeks. Once I'm done that, I can do all the work on the inside of the shed...

Need to by a subpanel, 10'3, and some breakers. That'll probably run me another $300
 

Attachments

  • IMG_0521.jpg
    IMG_0521.jpg
    85.5 KB · Views: 62
OP
A

Azarius

Well-known member
Joined
Aug 19, 2015
Messages
51
Location
NW Ontario
Trench dug for the wire!

Not a long dig (less than 50'), but the worst was the 8' under my deck... Had to basically use a hand trowel. 18" isn't deep until you're digging it, basically with a spoon lol

Hope to get it buried tomorrow!
 

Attachments

  • IMG_0555.jpg
    IMG_0555.jpg
    120.5 KB · Views: 51
OP
A

Azarius

Well-known member
Joined
Aug 19, 2015
Messages
51
Location
NW Ontario
Wire buried and hooked up!

Lights installed!

Outlets installed!

It was a great couple of days. :)
 

Attachments

  • image.jpg
    image.jpg
    19.9 KB · Views: 68
OP
A

Azarius

Well-known member
Joined
Aug 19, 2015
Messages
51
Location
NW Ontario
I'm going to install two exterior lights - one, a regular light above the door, and a second double motion light for security on another exterior wall.

Once that's done, I'm going to put thin OSB boards on the soffit as a temp measure until next spring when I do the siding... Then time to work on insulation and walls/ceiling :)
 
OP
A

Azarius

Well-known member
Joined
Aug 19, 2015
Messages
51
Location
NW Ontario
One exterior security light installed! LED floodlights... Freakin' things light up the backyard nicely...

Also bought some sheating, cut it into 16" and 12" strips and used them as temporary soffits to plug the gap until next year when I can get the soffit, fascia and siding done. An hour of my time and less than $30 and I was done.

Also finished weather proofing the door (added tuck-tape, drip edge etc).

Started adding a bit of Roxul insulation to the walls... Still unsure if this is the way to go. Can do the walls for $~$350...
 
To avoid these ads, REGISTER NOW!
Top Bottom