To avoid these ads, REGISTER NOW!

Critique my Hot Dawg Install/questions

Mr. Roboto

Well-known member
Joined
Dec 11, 2012
Messages
2,159
Location
New Hampshire
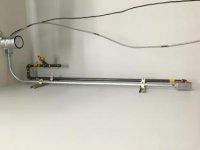
Got my Hot Dawg installed and vented over the weekend. I have not run it yet, because the gas company needs to come and hook up a propane tank. I also need the inspector to come and sign off on the permits I've pulled for this.

Unit Hanging

2vdhg2d.jpg


Interior Venting (I have not fastened the fire break into place yet)

All pipe is Simpson DuraVent B Vent double wall pipe.

16h5i0g.jpg


Roof Venting:

208wmko.jpg


According to the DuraVent instructions, they require no sealant at the seams....should I add some just to be safe?

My big question is on the electrical wiring. The instruction manual for the heater was very detailed in all aspects of the installation, aside from this. Can I just wire a standard 110 plug to the leads in the unit and run an outlet above the heater and plug it in? Or does the unit need to be direct wired with BX or similar wire?

Thanks!
 
To avoid these ads, REGISTER NOW!

wes73

Well-known member
Joined
Nov 18, 2013
Messages
218
Location
South Central PA
Looks like a nice clean install. What size is that and how big of an area are you heating? Are you installing a remote thermostat for it as well?

As for the electrical connection, wire a dedicated circuit and connect it from the outlet box via an appliance whip so that it is hard wired. I would also installed an emergency shut off (20 amp toggle) switch just below it with a red face plate that says Gas Appliance Emergency Shut Off. I am in the process of installing one as well and this is what I did.
 
OP
M

Mr. Roboto

Well-known member
Joined
Dec 11, 2012
Messages
2,159
Location
New Hampshire
Looks like a nice clean install. What size is that and how big of an area are you heating? Are you installing a remote thermostat for it as well?

As for the electrical connection, wire a dedicated circuit and connect it from the outlet box via an appliance whip so that it is hard wired. I would also installed an emergency shut off (20 amp toggle) switch just below it with a red face plate that says Gas Appliance Emergency Shut Off. I am in the process of installing one as well and this is what I did.

It's a 60K BTU heater, and the garage is 26 x 34.

Great idea. I was leaning towards the plug route for simplicity sake, but the more I read, I think these things really have to be hard wired. I'll run Romex from my panel across the ceiling to a box where I'll have the appliance whip exit. I can also run a piece of conduit down along next to the gas line on the quick strut I have mounted to the wall to another box with the shutoff switch.

I like it, thanks for the input!
 

Rod N

Well-known member
Joined
Jul 21, 2011
Messages
835
Location
Keswick, Ontario
I ran BX to a wall switch so I can turn it off for the summer or maintenance.

Nice install. Seems a bit close to the ceiling.
 

Attachments

  • heater.jpg
    heater.jpg
    12.1 KB · Views: 262
OP
M

Mr. Roboto

Well-known member
Joined
Dec 11, 2012
Messages
2,159
Location
New Hampshire
I ran BX to a wall switch so I can turn it off for the summer or maintenance.

Nice install. Seems a bit close to the ceiling.

The manual said there is only 1" clearance required from the top of the unit. The brackets have the 1" built in to them, so you could technically flush mount it. If I ever find it being an issue with the heat staying too high up, I can add in another 1' section of B vent and extend the rods. Time shall tell. My ceiling is only a little over 10' anyways so hopefully it's OK.
 

wes73

Well-known member
Joined
Nov 18, 2013
Messages
218
Location
South Central PA
What is the distance from the heater to your lights? I'm gonna have almost the same setup in regards to tight to the ceiling in a corner facing a row of lights. Do you have any concern about that much heat close to them?
 
OP
M

Mr. Roboto

Well-known member
Joined
Dec 11, 2012
Messages
2,159
Location
New Hampshire
Not sure how close exactly. I can measure this evening.

I'm not too concerned though, I'm hoping the adjustable fins will be do a good job diverting the flow, but we shall see.
 

SteveeP

Well-known member
Joined
Apr 26, 2013
Messages
74
Location
Pepperell, MA
I essentially flush mounted my hot dawg (L brackets against the ceiling, 10.5ft) and have not had any issues with it.. and it was inspected.
 

deckmonkey

Active member
Joined
Oct 18, 2015
Messages
29
Location
Thunder Bay
Everything looks great, the only thing I don't see is a drip pocket for the gas line. I didn't think you could run romex exposed or only a short run. Maybe someone can tell you the code on that.

The brackets for reznor heaters are only one inch from the ceiling as well.
 
OP
M

Mr. Roboto

Well-known member
Joined
Dec 11, 2012
Messages
2,159
Location
New Hampshire
I essentially flush mounted my hot dawg (L brackets against the ceiling, 10.5ft) and have not had any issues with it.. and it was inspected.

Awesome, thanks for the info!

Everything looks great, the only thing I don't see is a drip pocket for the gas line. I didn't think you could run romex exposed or only a short run. Maybe someone can tell you the code on that.

The brackets for reznor heaters are only one inch from the ceiling as well.

There is a drip leg on the line, you can see it in the picture below.

Where do you see exposed romex wire?

I got the electrical and thermostat wire run for the heater last night. The armored cable on the left is the power and the black cable on the right is for the thermostat. I (obviously) haven't wired it into the heater yet. It got late...

t64g7l.jpg
 

CNGsaves

Well-known member
Joined
Sep 26, 2012
Messages
13,233
Location
KS and OK
Looks good EXCEPT the black pipe steel drip leg (ie for propane). That is incorrect. Needs changed so flow of LPG is forced to change directions and drip leg is BELOW that change. Thus, change T and force LPG to go UP out of T and over to heater with flex pipe.
 
Last edited:

Todd.Brock

Well-known member
Joined
Jul 15, 2008
Messages
4,248
Location
Cincinnati
Good looking install. Does a drip leg require the gas to change directions to be most effective? I always thought it had to have the gas coming in from the side of the Tee and then the drip leg on the bottom and gas exit on top? Only curious... Not saying it s wrong. That is a sharp looking install!


EDIT. IGNORE ME :)
Looks like someone else mentioned it while I was typing !
 

dfiler2

Well-known member
Joined
Dec 15, 2014
Messages
2,858
Location
NW Minnesota
Thanks for the feedback, will this work?

Pardon the crude drawing!

Without a direction of flow this might be confusing, my understanding is the valve needs to be before the drip leg to allow the gas to be shut off and the drip leg cleaned, is that not correct?
 
OP
M

Mr. Roboto

Well-known member
Joined
Dec 11, 2012
Messages
2,159
Location
New Hampshire
This shows the direction of flow: If I understand you correctly, the valve is before the drip leg.
 

Attachments

  • DRAWING.jpg
    DRAWING.jpg
    37.5 KB · Views: 41
To avoid these ads, REGISTER NOW!

dfiler2

Well-known member
Joined
Dec 15, 2014
Messages
2,858
Location
NW Minnesota
Yes, in order to clean the drip leg you need to shut off the gas first without affecting the whole system.

2009 IRC G2419.4 (408.4) Sediment trap. Where a sediment trap is not
incorporated as part of the appliance, a sediment trap shall be
installed downstream of the appliance shutoff valve as close to
the inlet of the appliance as practical. The sediment trap shall
be either a tee fitting having a capped ****** of any length
installed vertically in the bottom-most opening of the tee or
other device approved as an effective sediment trap. Illuminating
appliances, ranges, clothes dryers and outdoor grills need
not be so equipped.
 

danski0224

Well-known member
Joined
Jan 29, 2005
Messages
13,351
Location
Near Naperville, IL
Can you please elaborate?

The flashing you used is for a pipe or vent roof termination, most common use for residential work is to flash a plumbing vent stack. It has a rubber top to seal around the pipe.

B bent is supposed to have 1" clearance to combustibles, so it should not be touching rubber (or the roof deck, depending on how big of a hole you cut).

You used Simpson Dura Vent, so google the details from their site. The proper roof flashings will be shown, although they may not be readily available in the big box stores.

Another DIY install.... :shocking:
 
OP
M

Mr. Roboto

Well-known member
Joined
Dec 11, 2012
Messages
2,159
Location
New Hampshire
That flashing specifically stated that it could be used for b vent pipe. It's a "caulkless" flashing with rubber that's rated to withstand the heat generated by the b vent pipe, therefore the rubber is not considered a combustible. And yes, there is a 1+ inch clearance hole cut through the roof decking to give the pipe the proper clearance.
 
OP
M

Mr. Roboto

Well-known member
Joined
Dec 11, 2012
Messages
2,159
Location
New Hampshire
I cant argue with you, I do prefer the full metal flashing as well. This is my first time using this type. The supply house was out of stock on the metal ones, and I really needed to get the install done this weekend.

I went one step above what the manufacturer recommended and added a storm collar above it to the vent as well. Hopefully this will help with the longevity of the rubber in the elements
 
OP
M

Mr. Roboto

Well-known member
Joined
Dec 11, 2012
Messages
2,159
Location
New Hampshire
I have corrected my gas pipe based on the recommendations in this thread. Here it is in its current state:

Edit, I apologize, not sure why it's sideways! Rotate it 90 degrees to the right in your brain :)
 

Attachments

  • image.jpg
    image.jpg
    8.2 KB · Views: 190

Todd.Brock

Well-known member
Joined
Jul 15, 2008
Messages
4,248
Location
Cincinnati
Ok. So we are learning something together here. There has to be a shut off prior to the drip leg and after?? I could see the one before the drip leg, but I fail to see the purpose of two. I read the code book above and saw it says a cut off prior. When I plumbed my gas stove, I followed the direction of existing Water Heater and furnace, which I think Only had one shut of upstream of the drip.
 
OP
M

Mr. Roboto

Well-known member
Joined
Dec 11, 2012
Messages
2,159
Location
New Hampshire
I interpret the code as you are required to have one before the drip leg as you stated. The only reason I added the second shot off after the drip leg was for the purpose of the pressure test. I wanted to be able to pressure test the drip leg portion of the pipe as well, so by closing the valve at the end of the system and opening the one before the drip leg, I can pressure test the piping in its entirety. Basically, I think it's above and beyond.

We'll find out at 1pm today, the inspector is coming haha. Fingers crossed.
 

PittsS1

Well-known member
Joined
Sep 12, 2011
Messages
108
Location
Minnesota
Nice job. How does the cap on bottom of your B-Vent tee attach? I have the same setup, but can't decide how to attach the cap- it fits over the inner pipe, but is a real thin piece and doesn't lock in.

Was thinking I'd just use my high temp silicone, but then it'd be very hard to remove. What did you do?

Thanks
 
OP
M

Mr. Roboto

Well-known member
Joined
Dec 11, 2012
Messages
2,159
Location
New Hampshire
It actually comes like that. It's not a regular tee, it's a clean-out tee.

Take a look here:

http://www.homedepot.com/p/DuraVent...CwgvtsWwT9liCqKN2gUuEaAq-s8P8HAQ&gclsrc=aw.ds

It's essentially a regular tee that comes with the cap. You can purchase just the cap and add it to a regular tee as well, but your inspector may or may not sign off on it, since it then won't be an actual UL listed cleanout tee.

http://www.efireplacestore.com/cpf-...A1UqlfO2ZbbX38aAszO8P8HAQ&refnum=OCT-182-5167

I definitely would not just silicone a regular cap in place, it needs to be a serviceable connection.
 
OP
M

Mr. Roboto

Well-known member
Joined
Dec 11, 2012
Messages
2,159
Location
New Hampshire
Inspector just left. The pipe passed! It held 15psi overnight so I was fairly confident it would.

He did a quick preemptive look at the heater install as well...said it all looked great. He just needs to come back and see it running for the final approval and I'm home free :)

Thanks for all the help guys, much appreciated.
 
OP
M

Mr. Roboto

Well-known member
Joined
Dec 11, 2012
Messages
2,159
Location
New Hampshire
Thanks guys!

Sorry, I did not realize how small that picture was. Here is a better version, so anyone who may stumble upon this thread in the future can see how I did it.

301fudy.jpg
 
To avoid these ads, REGISTER NOW!
Top Bottom