To avoid these ads, REGISTER NOW!

Eastern PA shop addition

tweidman

Well-known member
Joined
Dec 1, 2009
Messages
502
Location
Ackermanville, Pa.
I have been mainly lurking here, enjoying everyone's builds and dreaming of the day when I can finally build or have a garage or shop that I could be proud of.
I have had functioning garages for many years, but never had the space or money to set it up the way I wanted it.

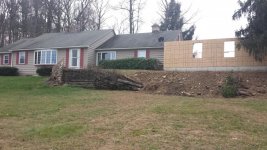
I think that day has finally come. I just moved to an awesome property that my grandfather bought back in the 50's, then he built an awesome custom home with the help of a friend. When I say he built it, i don't mean he had it built, he built almost the entire thing himself. He only contracted out three things, the tile work in the bathroom, the three fireplaces and the wall plaster.

My wife and I have been chipping away at some maintenance and updating issues with the house and property over the last few months.
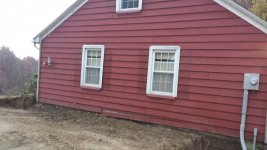
The existing house has an attached garage that is about 19x28, which is fine to park the car and the motorcycles, but doesn't leave me much room for working on stuff.
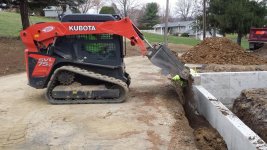
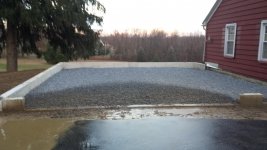
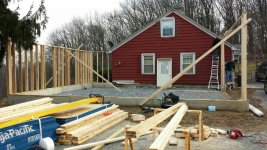
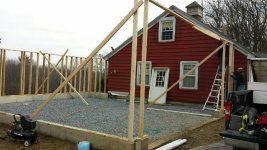
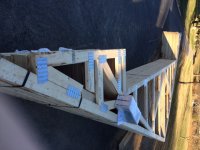
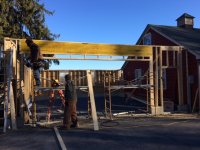
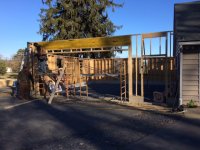
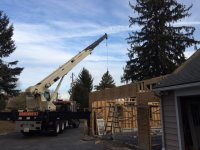
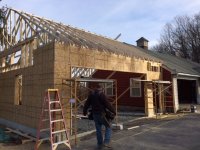
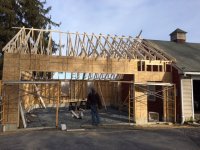
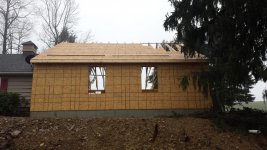
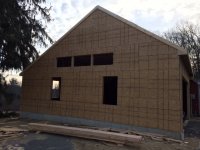
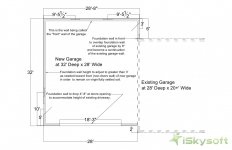
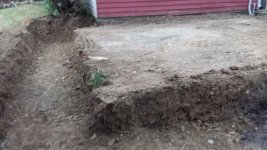
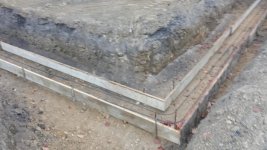
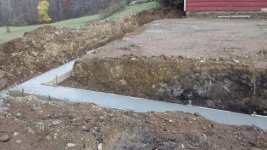
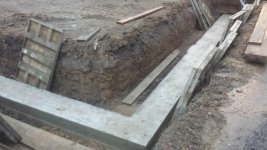
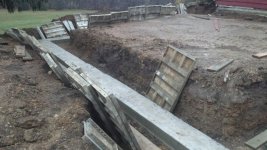
So.... I am building a 28 x 32 addition with a 12' ceiling. I only have my truck to park in there, which should leave me plenty of room for my tools, work benches and project space.

Here is a front and rear elevation sketch. I have changed the floor plan somewhat, the window on the side will move forward and the door at the front will move to the back, next to the garage door. There will also be a door connecting the two garages.
attachment.php

attachment.php
 

Attachments

  • Elevation - Rear (1).pdf
    57.2 KB · Views: 7,622
  • Foundation and Framing.pdf
    6 KB · Views: 60
  • Elevation - Rear (2).pdf
    73.6 KB · Views: 34
  • Foundation and Framing.pdf_page_1.jpg
    Foundation and Framing.pdf_page_1.jpg
    108.9 KB · Views: 6,264
Last edited:
To avoid these ads, REGISTER NOW!
OP
T

tweidman

Well-known member
Joined
Dec 1, 2009
Messages
502
Location
Ackermanville, Pa.
The first thing that had to be completed was to abandon the existing buried service line and upgrade the service to 200 amp. The existing line is somewhere in the vicinity of where we need to dig for the footers and the phone line is buried there too.
This meant digging up my driveway and trenching to the pole, what a mess that made. I was able to drop phone line and cable in the trench, so I won't have to worry about hitting any of that stuff.
 

Attachments

  • 20151015_073232.jpg
    20151015_073232.jpg
    153.3 KB · Views: 476
  • 20151015_073216.jpg
    20151015_073216.jpg
    153.7 KB · Views: 583
OP
T

tweidman

Well-known member
Joined
Dec 1, 2009
Messages
502
Location
Ackermanville, Pa.
The house was sided with steel siding back in the 80's and I never liked the look of the house with the steel on it. I knew that I needed to something with the exterior in order to have the addition match the rest of the house.
I knew there was 10" cedar siding hiding under the steel, I was just not sure of the condition. So I removed some of the steel siding in order to mount the new meter base. I was pleasantly surprised to see that the cedar was still in great shape. A little sanding and some fresh paint and it should be good.
 

Attachments

  • 20150922_190913.jpg
    20150922_190913.jpg
    141.3 KB · Views: 471
OP
T

tweidman

Well-known member
Joined
Dec 1, 2009
Messages
502
Location
Ackermanville, Pa.
I was able to strip the steel siding off of existing garage wall, where the addition will be attached. You can see the original color where the shutters used to be located.
In this pic you can also see my new service connection and meter base.
I now have a 42 space 200 amp box. That should give me all the room I will need and then some.
 

Attachments

  • 20151105_165158.jpg
    20151105_165158.jpg
    141.1 KB · Views: 396
OP
T

tweidman

Well-known member
Joined
Dec 1, 2009
Messages
502
Location
Ackermanville, Pa.
The excavator came and dug my footers yesterday. It's good to finally see some real progress. The site has been sitting with the asphalt removed and the excavators equipment parked there for the last couple of weeks. The concrete guys should be coming on Monday to form up the footers.
 

Attachments

  • 20151105_165144.jpg
    20151105_165144.jpg
    145.5 KB · Views: 308
  • 20151105_165149.jpg
    20151105_165149.jpg
    151.8 KB · Views: 265
  • 20151105_165227.jpg
    20151105_165227.jpg
    149.3 KB · Views: 269
OP
T

tweidman

Well-known member
Joined
Dec 1, 2009
Messages
502
Location
Ackermanville, Pa.
The excavator also moved my millstone that was sitting along the garage wall and placed it on the other side of the driveway where the ground was just re-graded for the service line.
 

Attachments

  • 20151105_165517.jpg
    20151105_165517.jpg
    150.5 KB · Views: 362

RSr

Well-known member
Joined
Jul 20, 2010
Messages
155
Location
Pittsburgh, PA
Looks like your off to a good start. Would it be possible to highlight some of the methods used to attach all the various components to the existing structure as you document this build?
 
OP
T

tweidman

Well-known member
Joined
Dec 1, 2009
Messages
502
Location
Ackermanville, Pa.
Looks like your off to a good start. Would it be possible to highlight some of the methods used to attach all the various components to the existing structure as you document this build?
Sure, my understanding is that they will tie it into the existing framing. Which means that if I want to salvage any of that cedar siding, then I need to remove it before the framers tear into it.
 
OP
T

tweidman

Well-known member
Joined
Dec 1, 2009
Messages
502
Location
Ackermanville, Pa.
The footers are formed up and waiting for inspection. They should get approved today. Not sure how soon they can pour.
 

Attachments

  • 20151110_071802.jpg
    20151110_071802.jpg
    146.3 KB · Views: 321
OP
T

tweidman

Well-known member
Joined
Dec 1, 2009
Messages
502
Location
Ackermanville, Pa.
The footers passed inspection and they were poured, next up, foundation walls.

We are making progress....
 

Attachments

  • 20151111_164928.jpg
    20151111_164928.jpg
    147.9 KB · Views: 368
  • 20151111_164938.jpg
    20151111_164938.jpg
    151.9 KB · Views: 273
OP
T

tweidman

Well-known member
Joined
Dec 1, 2009
Messages
502
Location
Ackermanville, Pa.
is that just an illusion that the footing doesn't go all the way to the wall in the first photo?

It is tied into the existing footing from the existing garage. It looks like my grandfather poured the footers without forms, or minimal forms, on the old garage, so it spills over about a foot past the existing block foundation wall.
I guess concrete was cheap back in the 50's and he mixed his own concrete on site back then.
 
OP
T

tweidman

Well-known member
Joined
Dec 1, 2009
Messages
502
Location
Ackermanville, Pa.
The concrete guys pulled the footer forms yesterday and left the wall forms in the trench. I'm guessing that they will put up the foundation wall forms today?
 

Attachments

  • 20151112_164755.jpg
    20151112_164755.jpg
    147.7 KB · Views: 287
  • 20151112_164758.jpg
    20151112_164758.jpg
    150.8 KB · Views: 266
OP
T

tweidman

Well-known member
Joined
Dec 1, 2009
Messages
502
Location
Ackermanville, Pa.
The foundation wall forms are up, rebar is installed, and we are waiting for inspection. They plan to pour today too. :thumbup:

28x32 is not looking as big on the ground as it did on paper....:headscrat
 

Attachments

  • IMG_0394.jpg
    IMG_0394.jpg
    149.3 KB · Views: 364
  • IMG_0396.jpg
    IMG_0396.jpg
    136.7 KB · Views: 289
OP
T

tweidman

Well-known member
Joined
Dec 1, 2009
Messages
502
Location
Ackermanville, Pa.
I guess we passed form and rebar inspection. They poured the foundation walls today.:)
 

Attachments

  • 20151116_141948.jpg
    20151116_141948.jpg
    155.6 KB · Views: 298
OP
T

tweidman

Well-known member
Joined
Dec 1, 2009
Messages
502
Location
Ackermanville, Pa.
They pulled the forms yesterday, I guess it will be a couple of days before they can start back filling.
I decided on a last minute change to eliminate the second man door that was originally proposed. After seeing how close they would have been to each other, I did not see the point in having two.
 

Attachments

  • 20151118_071656.jpg
    20151118_071656.jpg
    148.8 KB · Views: 347
  • 20151118_071720.jpg
    20151118_071720.jpg
    150.2 KB · Views: 323

Bib Overalls

Well-known member
Joined
Dec 4, 2006
Messages
3,318
Location
Jonesboro, Arkansas
Nice. For some reason buildings at the foundation stage look smaller than they really are. Once the structure is up and closed in you will be happy with what you are doing.
 
OP
T

tweidman

Well-known member
Joined
Dec 1, 2009
Messages
502
Location
Ackermanville, Pa.
Nice. For some reason buildings at the foundation stage look smaller than they really are. Once the structure is up and closed in you will be happy with what you are doing.

Yeah, I know the size will be okay. My last garage was 26x28 and had the back of a chimney projecting into the space. This garage is larger and I don't have to store as much stuff in there since I have another 2 car with an attic attached to it. I was just surprised at how small it looks at this stage.:dunno: 
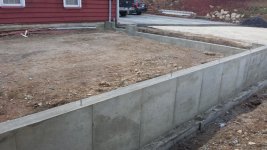
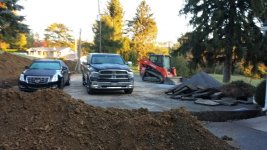
It's making me think I should have gone bigger, even though I don't really have much more room without squeezing my driveway and turnaround space down to nothing. :sad:
 

Styx

Well-known member
Joined
Jul 26, 2014
Messages
316
Location
Fraser Valley, BC. Canada
looking great that’s the same size I'm hoping to start building in the spring... Just have to wait for the city to approve my variance on size...
Keep the pictures coming...
 
OP
T

tweidman

Well-known member
Joined
Dec 1, 2009
Messages
502
Location
Ackermanville, Pa.
The excavator back filled and started to put down gravel on the floor on Saturday. They also ran drain pipes out to front so that I wont have to worry about a bunch of water/ice from the downspouts sitting on the drive out side the garage doors.
 

Attachments

  • backfill 1.jpg
    backfill 1.jpg
    148.5 KB · Views: 352
  • backfill 2.jpg
    backfill 2.jpg
    145.4 KB · Views: 345
Last edited:
To avoid these ads, REGISTER NOW!
OP
T

tweidman

Well-known member
Joined
Dec 1, 2009
Messages
502
Location
Ackermanville, Pa.
I was washing the mud off of my driveway.
Just waiting on the framers.... scheduled for next week.
 

Attachments

  • 20151203_162239.jpg
    20151203_162239.jpg
    146.4 KB · Views: 401
  • 20151203_162223.jpg
    20151203_162223.jpg
    145.6 KB · Views: 497
OP
T

tweidman

Well-known member
Joined
Dec 1, 2009
Messages
502
Location
Ackermanville, Pa.
framing started Friday
 

Attachments

  • 20151212_160339_resized.jpg
    20151212_160339_resized.jpg
    154.7 KB · Views: 375
  • 20151212_160313_resized.jpg
    20151212_160313_resized.jpg
    150.5 KB · Views: 395
  • 20151211_124542_resized.jpg
    20151211_124542_resized.jpg
    150.4 KB · Views: 374
  • 20151211_124528_resized.jpg
    20151211_124528_resized.jpg
    133.4 KB · Views: 348
OP
T

tweidman

Well-known member
Joined
Dec 1, 2009
Messages
502
Location
Ackermanville, Pa.
The framers finished up for now. I finally have a feel for what it will look like.
I was only able to get this pic of the front before dark. I think when it is done it will fit right in with the rest of the house. The garage addition projects forward exactly the same amount as the center portion of the house, 6 feet.

Now I am waiting on trusses.

Also, the framers could not get my engineered header up over the garage door opening.:dunno: I told them I would help, but they did not want any part of picking it up.
 

Attachments

  • 20151213_153445.jpg
    20151213_153445.jpg
    148 KB · Views: 536
Last edited:

RSr

Well-known member
Joined
Jul 20, 2010
Messages
155
Location
Pittsburgh, PA
Looks good, proportions seem in balance with the original structure. Strange they couldn't/wouldn't install the header, maybe they expect extra help when the roof trusses arrive.
 
OP
T

tweidman

Well-known member
Joined
Dec 1, 2009
Messages
502
Location
Ackermanville, Pa.
Looks good, proportions seem in balance with the original structure. Strange they couldn't/wouldn't install the header, maybe they expect extra help when the roof trusses arrive.

Thanks, my main goal was to make this look as integrated into the existing structure as possible.

I was almost able to get the header up there with my tractor, but the max lift on the loader was about 6" too short.

I think a different (larger) crew will be out to put up the trusses.
 
OP
T

tweidman

Well-known member
Joined
Dec 1, 2009
Messages
502
Location
Ackermanville, Pa.
I took a picture of the inside of the new shop just before I started trimming some branches on the pine tree next to the building.
The trusses where ordered last week, with the holiday, I'm not sure exactly how long they will take. My GC originally told me 2 to 3 weeks.
 

Attachments

  • 20151218_113013.jpg
    20151218_113013.jpg
    151.6 KB · Views: 311
OP
T

tweidman

Well-known member
Joined
Dec 1, 2009
Messages
502
Location
Ackermanville, Pa.
The trusses were dropped last week and the plan is for framing to start again tomorrow.
 

Attachments

  • IMG_0480.JPG
    IMG_0480.JPG
    123.7 KB · Views: 251
OP
T

tweidman

Well-known member
Joined
Dec 1, 2009
Messages
502
Location
Ackermanville, Pa.
A different framing crew was out yesterday to put up the garage door header and frame out for the three "transom" windows that are up in the tray area of the ceiling.
 

Attachments

  • IMG_0484.JPG
    IMG_0484.JPG
    128.9 KB · Views: 394
  • IMG_0486.JPG
    IMG_0486.JPG
    136.3 KB · Views: 348
  • IMG_0488.JPG
    IMG_0488.JPG
    109.8 KB · Views: 350
  • IMG_0489.JPG
    IMG_0489.JPG
    144.2 KB · Views: 343
OP
T

tweidman

Well-known member
Joined
Dec 1, 2009
Messages
502
Location
Ackermanville, Pa.
Today the crane showed up to install the trusses.
My GC called me yesterday with a issue. The framer spotted that the front and rear pitch of my existing roof are not the same, but the trusses he ordered are the same pitch front and back.
This creates a problem because the existing rear roof is not going to match up with the new roof. The fix will be to sister some 2x8's onto the trusses to make the pitch match enough so that the new roof will not dip below the old roof. :dunno:
 

Attachments

  • IMG_0494.JPG
    IMG_0494.JPG
    126.1 KB · Views: 296
OP
T

tweidman

Well-known member
Joined
Dec 1, 2009
Messages
502
Location
Ackermanville, Pa.
More progress
 

Attachments

  • IMG_0494.JPG
    IMG_0494.JPG
    126.1 KB · Views: 339
  • IMG_0495.JPG
    IMG_0495.JPG
    112.1 KB · Views: 346
  • IMG_0498.JPG
    IMG_0498.JPG
    139 KB · Views: 366
  • IMG_0499.JPG
    IMG_0499.JPG
    144.6 KB · Views: 367
  • IMG_0500.jpg
    IMG_0500.jpg
    56.1 KB · Views: 347
  • IMG_0501.JPG
    IMG_0501.JPG
    123.8 KB · Views: 373
OP
T

tweidman

Well-known member
Joined
Dec 1, 2009
Messages
502
Location
Ackermanville, Pa.
They finished the truss modifications on Friday. The front is really starting to look like a building, I will definitely need to do a bit more tree trimming.
I should have taken a longer shot from the front, I think this will really look like part of the original house design when this is done, which was one of my primary goals. I did not want this to look like an add on. :thumbup:
 

Attachments

  • 20160110_101510.jpg
    20160110_101510.jpg
    150.7 KB · Views: 301
  • 20160110_101422.jpg
    20160110_101422.jpg
    154.3 KB · Views: 338
  • 20160110_101406.jpg
    20160110_101406.jpg
    155.2 KB · Views: 332
Last edited:
OP
T

tweidman

Well-known member
Joined
Dec 1, 2009
Messages
502
Location
Ackermanville, Pa.
The framers finished up yesterday, the roofer may be there tomorrow.
The gable wall windows look a little weird because they are centered on the wall, but the peak of the roof is not centered. :wtf:
 

Attachments

  • IMG_0504.JPG
    IMG_0504.JPG
    107 KB · Views: 306
  • IMG_0506.JPG
    IMG_0506.JPG
    115.9 KB · Views: 289
  • IMG_0507.jpg
    IMG_0507.jpg
    52.9 KB · Views: 251
To avoid these ads, REGISTER NOW!
Top Bottom