To avoid these ads, REGISTER NOW!

Solution for mounting lights to ribbed exterior surface

dman535

Well-known member
Joined
Nov 10, 2008
Messages
46
Location
Nashville, TN
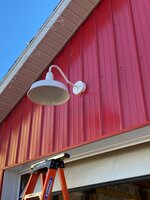
There have been a few posts floating around on how to mount lights to the exterior of a pole barn with ribbed sheet metal. The method I choose involved the least amount of sheet metal removal and its extremely sturdy.

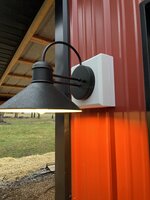
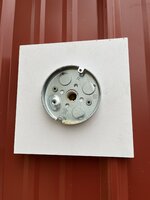
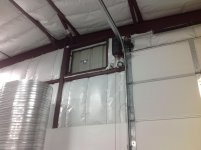
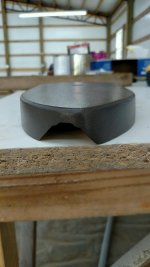
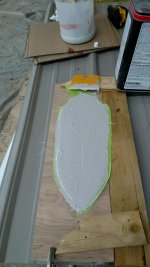
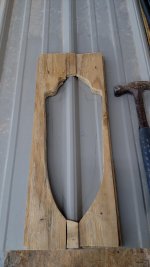
Exterior weatherproof box has a 1/2 galvanized pipe threaded through the center of it. Which in turn fits snugly through the 2x6 on the back side of the sheet metal. Two long wood screws with plastic bushings further help to secure it. Inside the metal circuit box there is nut that tightens the pipe up against the stud. Everything is caulked up and so far has been working great. For the areas without the rub, I just mounted the exterior box flush and used a shorted 1/2 pipe.

Hope this helps out.

Derek.-
 

Attachments

  • barn_light_1.jpg
    barn_light_1.jpg
    68.4 KB · Views: 1,485
  • barn_light_2.jpg
    barn_light_2.jpg
    55.7 KB · Views: 1,568
  • barn_light_3.jpg
    barn_light_3.jpg
    52.5 KB · Views: 1,408
To avoid these ads, REGISTER NOW!

Chaz

Well-known member
Joined
Apr 3, 2006
Messages
806
Location
Missoula, MT
Every wasp in my area would love making a nest there. It does look like a good solid mount though.
 
OP
D

dman535

Well-known member
Joined
Nov 10, 2008
Messages
46
Location
Nashville, TN
Everything is caulked up, so there shouldn't be any point of entry for a wasp on this light. Plenty of other places to make a nest in the barn.
 
OP
D

dman535

Well-known member
Joined
Nov 10, 2008
Messages
46
Location
Nashville, TN
The light was centered above and entry door, with an additional setup on the side of the building. I wanted them in the same location.
 

toyotadriver

Well-known member
Joined
Dec 30, 2010
Messages
1,586
You did a nice job.

I posted this recently. This was my method. It was decking material that had ribs that matched the metal.
 
Last edited:

zmaxmotorsports

Well-known member
Joined
Jan 11, 2013
Messages
11,948
Location
South of omaha
You did a nice job.

I posted this recently. This was my method. It was decking material that had ribs that matched the metal.

KIMG0152_zpsbkryqp46.jpg


KIMG0151_zpsk7gtenk7.jpg

Id mount them between the ribs like that.:thumbup:
 

Dick in Wisconsin

Well-known member
Joined
Mar 3, 2012
Messages
3,048
Location
Shawano, Wisconsin
Huh! You'd think that someone would make PVC mounting blocks that would be flat on one side (where you'd fasten the light to) and have the profile of the ribbed siding on the back ... making for easy installation.

Those of us who use that siding as ceiling material would buy them blocks by the box to mount our ceiling lights and various things like air hoses, power cords, etc.
 

fnieto

Well-known member
Joined
Aug 27, 2013
Messages
1,401
Location
Tucson,Arizona
custom made inner and outer frame for ductwork penetration. The inner profiled frame is welded to the red iron and has welded capture nuts. A very strong and watertight application as silicon was used during assembly.
 

Attachments

  • IMG_0440.jpg
    IMG_0440.jpg
    139 KB · Views: 737
  • IMG_0461.jpg
    IMG_0461.jpg
    140.6 KB · Views: 705
To avoid these ads, REGISTER NOW!

toyotadriver

Well-known member
Joined
Dec 30, 2010
Messages
1,586
Huh! You'd think that someone would make PVC mounting blocks that would be flat on one side (where you'd fasten the light to) and have the profile of the ribbed siding on the back ... making for easy installation.

Those of us who use that siding as ceiling material would buy them blocks by the box to mount our ceiling lights and various things like air hoses, power cords, etc.


I agree. I searched all over the internet but wasn't able to find anything. I came up with this while looking at a local hardware store.
 

Mr.atc

Member
Joined
Oct 31, 2016
Messages
13
Location
Nashville,TN
Okay, here's my solution. Since I'm in the body repair profession, My natural instinct is to use body filler.

I needed 4 bases and each light hit the metal in a slightly different place. Therefore, I needed 4 separate forms. I took 1/2" plywood and outlined my light base by about 1/2 inch. I cut 2 pieces to allow the upper piece to fit closer to the high rib in the metal. After cutting the upper and lower plywood, I used masking tape to bridge over where the pieces meet. I "joined" the left and right halves with some scrap across the top.

I "thinned" the body filler with fiberglass resin so it would pour. I added the hardener with a little less than normal to give me longer working times. As the filler was starting to get stiff, I took an exacto knife and cut it loose from the tape and the removed the form. After it was completely hard, I popped it off my scrap metal backer and finished the edges and face with a belt sander and filled any pinholes.

3 coats of paint to match the trim and they were ready to install. I used the mounting plate for the light and drilled a 1/4 " hole through the metal for the wires and (2) 3/16" holes for the screws. My screws go through the light mount, the bases I made, the building metal, and into the wood behind. I used "geo-seal" to caulk the 3/16" holes and the top half of the wire hole. My junction boxes are mounted directly behind the 1/4" hole mounted to a 2x10 ran vertically between the wall girts so the wires come in the back on the box.


This worked out perfect for me as I had very small penetrations in my building and less chance for water leaks. Each base was approximately 1" thick.

Note: all the pics are not of the the same form/base
 

Attachments

  • IMG_20170326_145308248.jpg
    IMG_20170326_145308248.jpg
    132.1 KB · Views: 914
  • IMG_20170326_140234661.jpg
    IMG_20170326_140234661.jpg
    152.4 KB · Views: 757
  • IMG_20170326_135035724.jpg
    IMG_20170326_135035724.jpg
    138.2 KB · Views: 842
  • IMG_20170325_144058516.jpg
    IMG_20170325_144058516.jpg
    140 KB · Views: 808
  • IMG_20170325_105421224.jpg
    IMG_20170325_105421224.jpg
    141.9 KB · Views: 829

ctgoodman

Well-known member
Joined
Mar 1, 2010
Messages
315
Location
Salisbury, NC
Okay, here's my solution. Since I'm in the body repair profession, My natural instinct is to use body filler.


I needed 4 bases and each light hit the metal in a slightly different place. Therefore, I needed 4 separate forms. I took 1/2" plywood and outlined my light base by about 1/2 inch. I cut 2 pieces to allow the upper piece to fit closer to the high rib in the metal. After cutting the upper and lower plywood, I used masking tape to bridge over where the pieces meet. I "joined" the left and right halves with some scrap across the top.


I "thinned" the body filler with fiberglass resin so it would pour. I added the hardener with a little less than normal to give me longer working times. As the filler was starting to get stiff, I took an exacto knife and cut it loose from the tape and the removed the form. After it was completely hard, I popped it off my scrap metal backer and finished the edges and face with a belt sander and filled any pinholes.


3 coats of paint to match the trim and they were ready to install. I used the mounting plate for the light and drilled a 1/4 " hole through the metal for the wires and (2) 3/16" holes for the screws. My screws go through the light mount, the bases I made, the building metal, and into the wood behind. I used "geo-seal" to caulk the 3/16" holes and the top half of the wire hole. My junction boxes are mounted directly behind the 1/4" hole mounted to a 2x10 ran vertically between the wall girts so the wires come in the back on the box.


This worked out perfect for me as I had very small penetrations in my building and less chance for water leaks. Each base was approximately 1" thick.


Note: all the pics are not of the the same form/base


Ooooh. Aaaahh. That is pretty slick there. Might have to steal that idea on my build.
 

tb140803

New member
Joined
Jan 17, 2023
Messages
1
Here is my solution. Started off with a square block and ran it over a series of different router bits to carve out the channel for the rib. Then connected the mounting plate to flush trim it. Then drilled out a channel and added a some plastic tubing to protect the wires in the mount from contacting the metal on the barn. After a bit of sanding and a lot of painting, I am happy with how it turned out. When the weather warms above 40 degrees I will caulk it.
 

Attachments

  • IMG_0872.jpg
    IMG_0872.jpg
    1.3 MB · Views: 337
  • IMG_0870.jpg
    IMG_0870.jpg
    499.9 KB · Views: 342
  • IMG_0858.jpg
    IMG_0858.jpg
    670.6 KB · Views: 305
  • IMG_0856.jpg
    IMG_0856.jpg
    573.7 KB · Views: 300

digividsmith

New member
Joined
Oct 16, 2023
Messages
2
Keep this thread going! I know it's old, but there are some great ideas popping up. Newer materials might make it easier too. I like the body filler idea best, however I went with tb140803's idea and used a piece of PVC to mold a flat surface. I used a urethane light mount over top of the 1" PVC block that I routed to fit over the rib and a bolt. Inside the light mount, I put a shallow electrical box. This inside of the mount is ugly, but once together, it looks great. I may disassemble and use some glue between the urethane and PVC at some point. Any caulking will need to wait for some warmer weather.
 

Attachments

  • IMG_1671.JPG
    IMG_1671.JPG
    334.4 KB · Views: 212
  • IMG_1668.JPG
    IMG_1668.JPG
    644.6 KB · Views: 195
  • IMG_1667.JPG
    IMG_1667.JPG
    838.3 KB · Views: 179
  • IMG_1666.JPG
    IMG_1666.JPG
    710.7 KB · Views: 180
  • IMG_1665.JPG
    IMG_1665.JPG
    689.6 KB · Views: 167
  • IMG_1664.JPG
    IMG_1664.JPG
    508.8 KB · Views: 188

nadogail

Well-known member
Joined
Jan 23, 2009
Messages
31,907
Location
Coronado, CA
Make a block of something that can be routed to the approximate contour of the under laying surface and add a compressible gasket.
 

digividsmith

New member
Joined
Oct 16, 2023
Messages
2
After posting this, I realized that I really didn’t need the light mount. The light would have attached to the 1” PVC just fine. At the time, I didn’t think the PVC was going to be thick enough to go up in one piece. If the construction ever falls apart, I may revert to it. I thought of 3D printing, but you would need a plastic that could withstand the sun.
 

WaterBoyA2

New member
Joined
Jul 22, 2023
Messages
1
Recently I made blocks using leftover Boral TruExterior trim. My Boral is 3/4" thick. No router, just a compound miterbox.

Turns out that a 45° end cut was a close match to the profile of the larger ribs on my Jensen Bridge Ultra2000 steel siding. I used a 45 on each side of any tall rib that was in my way of the block. The 3/4" thickness was very close to the height of the tall rib on the siding.

Then I cut a single block of Boral to span over the top of the spacer blocks. I glued & screwed the blocks then screwed into the siding and sheathing using 2-1/2" coated trim (small head) screws. The additional rib width between the spacer pieces is 1/2". That is the cover piece is 1/2" wider than the sum of two spacers on their widest dimension. The rib adds the 1/2" back so the top piece matches.

I caulked behind and around the top and sides, leaving the bottom open to drain.

I will paint to match the siding or the box & light.

I am mounting my round 4-1/4" electrical boxes to the face of the Boral contraption.

I did not bother with the profile of the shorter ribs. They were easy enough to span.
 

Attachments

  • 20240127_131908.jpg
    20240127_131908.jpg
    464.6 KB · Views: 164
  • 20240121_112902.jpg
    20240121_112902.jpg
    827.5 KB · Views: 141
  • 20240121_112934.jpg
    20240121_112934.jpg
    661.3 KB · Views: 150
  • 20240127_131218.jpg
    20240127_131218.jpg
    922 KB · Views: 201
To avoid these ads, REGISTER NOW!
Top Bottom