To avoid these ads, REGISTER NOW!

Raised tie ceiling joists in attached garage

Redwolf947

Well-known member
Joined
Feb 13, 2015
Messages
613
Location
South East WI
Hey all. I've gotten some great advice here before. I would like your thoughts and advice about my most recent project in my garage.

I have a thread about my garage project below. I started a thread a long time ago about my ceiling but the title no longer fits what I'm doing and thought a new thread with a more accurate title would get more answers/suggestions.

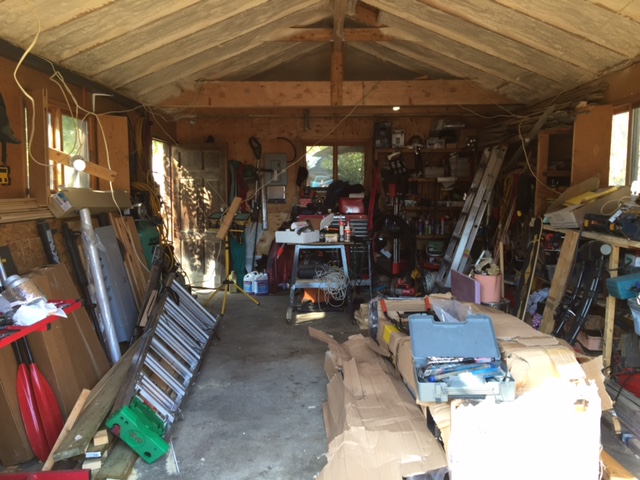
My ceiling height now is just shy of 9'. I'd like to install a mid lift or 4 post lift maybe a max-jax? in the future to do basic maintenance on my vehicles.

I'm looking to raise the bottom chord/rafter ties by 1'-8" that's just less than 1/3 the height of the roof peak. This would bring my working height to 10'-7 1/2"ish.

I'm thinking 2x6's or 2x8's at 18' long nailed to every rafter. That's 15 compared to the 5 now installed. I don't mind spending the extra on the 2x8's. I do plan on an insulated ceiling. I'd install all the new rafter ties then cut out the old ones. I plan on putting in 2x4 collar ties for added support at the top and running a 2x4 vertical from thoes to the new joists

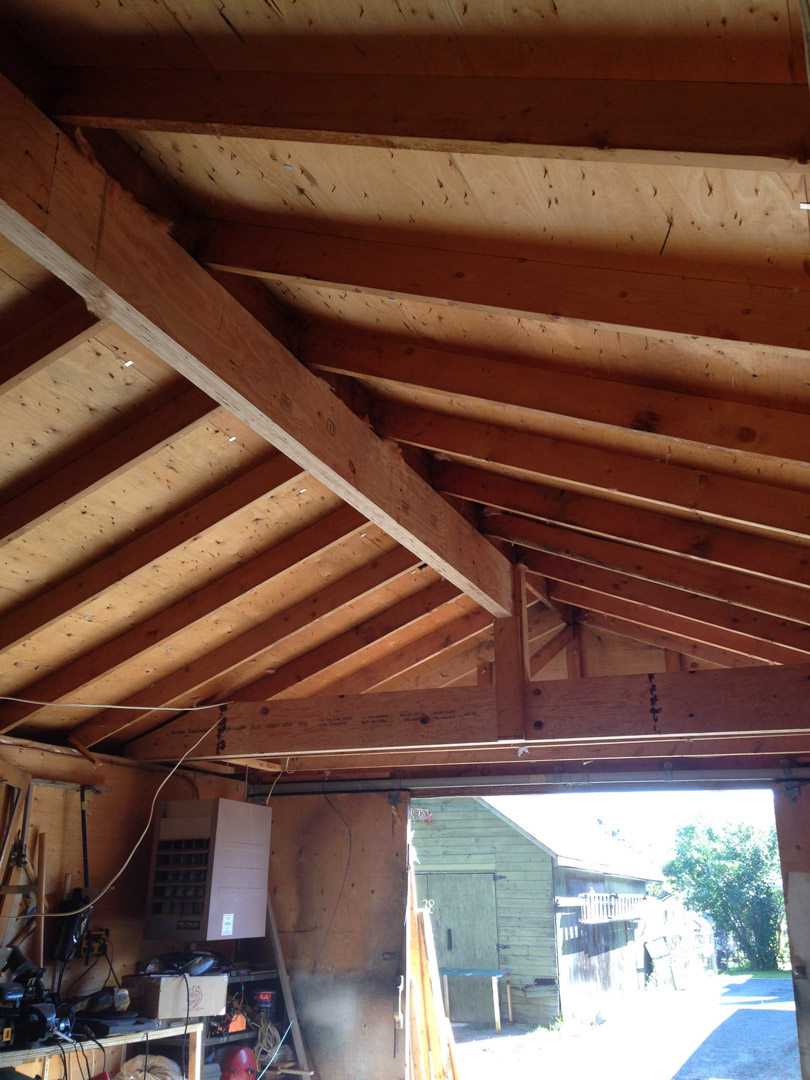
A little background. My garage was built in the 50's. It's 22'x22'. The roof pitch is 6/12 and the snow load is 30. It is located in South East WI. They used 2x4 rafter ties at close to 48" centers. Not only that but they are sistered 2x4's these ties are 20' with 2' added for a total length of 22'. I want to replace these. The outside of the stud walls are wood plank with a siding of not 100% sure might be Asbestos Siding then aluminum siding on not exactly 16" spaced studs. The roof is wood plank with architectural shingles the rafters are 2x6 at the same approx 16" spacing.

Would you go with the 2x6's or 2x8's? Anything I'm missing? I can take and attach photos.

Thanks for your info and time.
Red
 
Last edited:
To avoid these ads, REGISTER NOW!

K'ledgeBldr

Well-known member
Joined
Aug 22, 2011
Messages
1,925
Location
Johns Creek, GA
WI?

What's the snow load for the area? What's the roof pitch?

Collar ties have a lot more to do with the actual engineering than just ceiling hgt. My initial thought would be- probably not a big deal. But that would depend on your answers to the above questions. Especially considering "today's" standards to those of the 1950's.
 

Chris705

Well-known member
Joined
Nov 1, 2012
Messages
834
Location
The Finger Lakes of NY
It sounds to me like you want to insulate and then add a ceiling to protect that insulation? I'd be inclined to use 2x4's or 2x6's to keep weight down. As you seem to understand these rafter ties are to prevent outward wall thrust, and the current 4' spacing of 2x4's was adequate (though maybe were sistered to prevent sag?) to resist the thrust. Adding rafter ties to every bay spacing will surely be equal or better. Some things to consider. A vertical member can be used to help prevent sag. Strapping can be used above the ties to help keep the long spindlely members straight. The connections at the ends are the important detail. I'd recommend thru bolts or structural self drilling screws. If insulating the ceiling with batts or cellulose, remember to keep you air path clear from soffit to ridge. (Tough to do with only 6" rafters at the rafter tie). Good luck with your modifications. Would like to see progress photos ( before and after).
 
OP
R

Redwolf947

Well-known member
Joined
Feb 13, 2015
Messages
613
Location
South East WI
WI?

What's the snow load for the area? What's the roof pitch?

Collar ties have a lot more to do with the actual engineering than just ceiling hgt. My initial thought would be- probably not a big deal. But that would depend on your answers to the above questions. Especially considering "today's" standards to those of the 1950's.

K'ledgeBldr, I should have added that and its 22'x22' to the first post and will. According to: http://dsps.wi.gov/sb/docs/sb-CommercialBuildingsCodeEnrolledReplacV1C.pdf my snow load is 30 and my roof pitch is 6/12.

It sounds to me like you want to insulate and then add a ceiling to protect that insulation? I'd be inclined to use 2x4's or 2x6's to keep weight down. As you seem to understand these rafter ties are to prevent outward wall thrust, and the current 4' spacing of 2x4's was adequate (though maybe were sistered to prevent sag?) to resist the thrust. Adding rafter ties to every bay spacing will surely be equal or better. Some things to consider. A vertical member can be used to help prevent sag. Strapping can be used above the ties to help keep the long spindlely members straight. The connections at the ends are the important detail. I'd recommend thru bolts or structural self drilling screws. If insulating the ceiling with batts or cellulose, remember to keep you air path clear from soffit to ridge. (Tough to do with only 6" rafters at the rafter tie). Good luck with your modifications. Would like to see progress photos ( before and after).

Chris705, what I'd like to accomplish with this is to gain ceiling height and later insulate so I can heat or cool this garage in the future. The 2x4s used as rafter ties are too short that's why they are sistered to another 2x4 to make em long enough.

Not the best photo but.

View media item 52769
 

kbs2244

Well-known member
Joined
Nov 11, 2006
Messages
14,065
2x6 will be fine.
Collar ties are in tension so the extra of a 2x8 is not needed.
 

Chris705

Well-known member
Joined
Nov 1, 2012
Messages
834
Location
The Finger Lakes of NY
You will be able to find full length 2x4 & 2x6 at full service lumber yards. Pay attention to the end connections and add a mid support from tie up to a rafter to prevent sag with Weight of ceiling and insulation. You will be all set with what you describe. Yes collar ties are at the top, they prevent wind uplift at the top of roof.
 
OP
R

Redwolf947

Well-known member
Joined
Feb 13, 2015
Messages
613
Location
South East WI
You will be able to find full length 2x4 & 2x6 at full service lumber yards. Pay attention to the end connections and add a mid support from tie up to a rafter to prevent sag with Weight of ceiling and insulation. You will be all set with what you describe. Yes collar ties are at the top, they prevent wind uplift at the top of roof.

Chris705, I planned on putting in 2x4 collar ties for added support at the top and running a 2x4 vertical from thoes to the new joists. I should have added that to the firs post too.

Thank you, Chris it makes me think I'm not so crazy after all. Well maybe just a little.
 
OP
R

Redwolf947

Well-known member
Joined
Feb 13, 2015
Messages
613
Location
South East WI
The wood in the garage is really really dry. I have an air nailer that shoots full head nails and I also have a lot of framing nails for that gun from another project. should I use those or bolts or ? currently the ties there are nailed.
 

Chris705

Well-known member
Joined
Nov 1, 2012
Messages
834
Location
The Finger Lakes of NY
Look at the big box stores for structural screws. They self drill. They use a Torx head bit for your 1/4" impact driver. 2 or 3 of the 3/16" size should work well on each end. They should have a large flat head, the ones I use have an rss initial on the head. I wouldn't trust nails.
 
OP
R

Redwolf947

Well-known member
Joined
Feb 13, 2015
Messages
613
Location
South East WI
Look at the big box stores for structural screws. They self drill. They use a Torx head bit for your 1/4" impact driver. 2 or 3 of the 3/16" size should work well on each end. They should have a large flat head, the ones I use have an rss initial on the head. I wouldn't trust nails.

I have used those before. Thanks Chris705

Think these would work?

http://www.amazon.com/dp/B001SG1PL8/?tag=atomicindus08-20
 
Last edited:
OP
R

Redwolf947

Well-known member
Joined
Feb 13, 2015
Messages
613
Location
South East WI
Thanks Chris, I was always taught you don't want the screw poke out the back for strength. tho i ordered the 10's i think I'll cancel and go with the larger size.
 

K'ledgeBldr

Well-known member
Joined
Aug 22, 2011
Messages
1,925
Location
Johns Creek, GA
Considering the age and location I think it would be wise to consult with a PE- preferably in structural engineering.

Essentially you're removing the current "ceiling joist" and creating a "trey ceiling" to get the additional ceiling height. This "framing" is essentially a collar tie that you would use as ceiling. Hopefully there's already existing collar ties closer to the ridge beam.

Since the rafters are sitting directly on top of a stud you could probably use Simpson's H10-2 rafter tie on every other rafter. This will give a solid connect between rafter and wall. The raised ceiling joists (the material you're adding) need only be 2X6 at the most- I'd run one for every rafter- essentially creating a ceiling joist every 16". Nailing them will be more than adequate because you're dividing the load over more members than you currently have.

I believe that would be an adequate restructuring- but, I'm not a PE, don't live in WI, and there could be other factors that come into play besides pitch and snow load.

Good luck-
 
OP
R

Redwolf947

Well-known member
Joined
Feb 13, 2015
Messages
613
Location
South East WI
Considering the age and location I think it would be wise to consult with a PE- preferably in structural engineering.

Essentially you're removing the current "ceiling joist" and creating a "trey ceiling" to get the additional ceiling height. This "framing" is essentially a collar tie that you would use as ceiling. Hopefully there's already existing collar ties closer to the ridge beam.

Since the rafters are sitting directly on top of a stud you could probably use Simpson's H10-2 rafter tie on every other rafter. This will give a solid connect between rafter and wall. The raised ceiling joists (the material you're adding) need only be 2X6 at the most- I'd run one for every rafter- essentially creating a ceiling joist every 16". Nailing them will be more than adequate because you're dividing the load over more members than you currently have.

I believe that would be an adequate restructuring- but, I'm not a PE, don't live in WI, and there could be other factors that come into play besides pitch and snow load.

Good luck-

Thanks K'ledgeBldr. I found a picture (( this is not my garage )) of close to what I plan to do

View media item 59453
I do plan to put a rafter tie at every rafter and the hurricane straps at every other the extra 2x6 will be cut up and put on every other rafter like the blocking in the pic.
 
Last edited:

R6 Racer

Well-known member
Joined
Feb 21, 2010
Messages
1,632
Location
Northern Ontario Canada
That last pic makes the whole story make sense to me now.That pic looks like "the" solution to your questions.
On another note, screws vs nails. I have always been under the impression that one used screws to prevent pull out & nails to prevent shear. In your case (I think) I would want to use a combination of nails & screws in this project. Your basically in need of both types of fasteners as you will need to prevent both shear & pull out.
Lastly I would suggest useing plywood "plates" on both sides of all the joints. Much like you would see steel plates used in truss construction.
Just to be clear, I am not saying this is "the way" to go. I am not an engineer! I am just making observations & providing an opinion with regards to what I think might help you make your project a bit better.
(IMHO Overkill/overbuilt during structural construction is not only a good thing its wise!)

Best of luck with it!!

Steve
 
OP
R

Redwolf947

Well-known member
Joined
Feb 13, 2015
Messages
613
Location
South East WI
That last pic makes the whole story make sense to me now.That pic looks like "the" solution to your questions.
On another note, screws vs nails. I have always been under the impression that one used screws to prevent pull out & nails to prevent shear. In your case (I think) I would want to use a combination of nails & screws in this project. Your basically in need of both types of fasteners as you will need to prevent both shear & pull out.
Lastly I would suggest useing plywood "plates" on both sides of all the joints. Much like you would see steel plates used in truss construction.
Just to be clear, I am not saying this is "the way" to go. I am not an engineer! I am just making observations & providing an opinion with regards to what I think might help you make your project a bit better.
(IMHO Overkill/overbuilt during structural construction is not only a good thing its wise!)

Best of luck with it!!

Steve

R6 Racer, I'm glad this visual helped. I was having a hard time explaining it.

Its funny you bring up the nail/screw subject. I was planning to use my air nailer to "hold" the rafters in place with a few nails and then go back and run some screws as well.

Thanks Red
 
OP
R

Redwolf947

Well-known member
Joined
Feb 13, 2015
Messages
613
Location
South East WI
I want to thank you all for your thoughts on this.

The lumber should be here Monday afternoon. I have the screws, nails and all the tools I should need. Hardest part will be making a jig to cut the angel on the ties.

It's supposed to be friggin cold here again :mad: so I may not get on this right away. I'll try to take a few pictures when I do. I'll post them in my build thread and here.

Any more questions comments?

I have put a lot of thought and done a good amount of research for this. I'm not just going willy nilly :willy_nil either. That's another reason I'm here asking questions. I really don't have the $$$ to put into an engineer.

Again thank you all to those that helped.
 
Last edited:

kbs2244

Well-known member
Joined
Nov 11, 2006
Messages
14,065
I would add those sheet metal joint reinforcement plate where the rafters meet the wall top plate.
That joint is now under much more stress since the removal of the top plate to top plate joists.
 
To avoid these ads, REGISTER NOW!

Denwood

Well-known member
Joined
Sep 22, 2014
Messages
4,180
Location
Thunder Bay, Ontario, Canada
My approach was just nix the collar ties altogether, adding a ridge beam. Your roof looks stronger now than when you started :)

8ftceiling.jpg


ridge3.jpg


mess.jpg


final2.jpg
 

Denwood

Well-known member
Joined
Sep 22, 2014
Messages
4,180
Location
Thunder Bay, Ontario, Canada
You know, the easiest/fastest part of the entire build was the ridge beam install. I had my brother help out on the lifting for a few hours.

The rest of it took most of my free time over 3-4 months.

Your end result will be well worth the effort :)
 

kbs2244

Well-known member
Joined
Nov 11, 2006
Messages
14,065
Denwood has the perfect answer.
But those beams are heavy to thread into existing construction.
 

lakeroadster

Well-known member
Joined
Jan 19, 2015
Messages
5,166
Location
Central Colorado
Neat thread and neat project.

.... On another note, screws vs nails. I have always been under the impression that one used screws to prevent pull out & nails to prevent shear. In your case (I think) I would want to use a combination of nails & screws in this project. Your basically in need of both types of fasteners as you will need to prevent both shear & pull out.
.... Best of luck with it!!

Steve

Great point.

Structural Screws should be used in shear applications. They provide you with high tensile, torque and shear strength.

Many folks use deck screws in these shear applications which is a bad idea.

.....
Lastly I would suggest using plywood "plates" on both sides of all the joints. Much like you would see steel plates used in truss construction.
Just to be clear, I am not saying this is "the way" to go. I am not an engineer! I am just making observations & providing an opinion with regards to what I think might help you make your project a bit better.
(IMHO Overkill/overbuilt during structural construction is not only a good thing its wise!)

Best of luck with it!!

Steve

Another great idea since the original wood rafters are so old and are likely very brittle.

Your sistering of rafters should work equally as well if you bolt all the way through, using the newer lumber, on both sides, to sandwich the older rafters.

If you use truss lock screws they are designed for this very purpose. http://www.fastenmaster.com/products/trusslok-engineered-wood-fastener.html

 
OP
R

Redwolf947

Well-known member
Joined
Feb 13, 2015
Messages
613
Location
South East WI
Neat thread and neat project.

Great point.

Structural Screws should be used in shear applications. They provide you with high tensile, torque and shear strength.

Many folks use deck screws in these shear applications which is a bad idea.


Another great idea since the original wood rafters are so old and are likely very brittle.

Your sistering of rafters should work equally as well if you bolt all the way through, using the newer lumber, on both sides, to sandwich the older rafters.

If you use truss lock screws they are designed for this very purpose. http://www.fastenmaster.com/products/trusslok-engineered-wood-fastener.html


Thank you lakeroadster,

I used
http://www.homedepot.com/p/GRK-Fast...ural-Screw-45-Piece-per-Pack-112221/203533461

View media item 59782
These screws were awesome.

I don't have enough wood to do both sides of the rafters. I may pick up another box of these screws and put a few from each direction into each sistered board for the strength.

With everything I've done so far none of the old rafters cracked, split or made any sounds like they were going to.

More info to follow..
 
Last edited:
OP
R

Redwolf947

Well-known member
Joined
Feb 13, 2015
Messages
613
Location
South East WI
View media item 59665
While installing the new rafter ties I left the original ties and vertical supports in place.

View media item 59667
I used 5 of the structural screws I mention in my last post in the ends of each new rafter tie. I used 2 of the screws in each end of each collar tie. I used 3" full head ring-shank nails 4 at the top and 4 at the bottom to attach the king post in the center of the rafter ties to the collar ties. I also ran 2x4's the length of the garage to tie it all together that was 2 nails per rafter tie. I made a spacer block with some scrap to make the spacing of the ties equal at 14 1/2" in the center so attaching a ceiling material should be easier. Everything looks great so far and seems much more ridged.

In the picture below I have removed the first 2 of the original rafter ties and all of the vertical bracing and installed the rest of the new rafters. There are more pictures in my gallery if you want to take a look.

View media item 59784
I used the 3" nails to hold the sister boards in place on the rafters. I had put some strong tie plates on before I started installing the rafters so I'm using up the 2x4's I bought because the 2x6 material wont work in those spots. I am using 2x6 where the plates were not installed. I was only going to sister the one side of the rafter. I hadn't thought of doing both or using any glue or screws?

I have left the last 2 center ties in place for now to keep the lights working until I can get the outlets moved up and in place.

I want to install metal paneling like these from Menards

https://www.menards.com/main/buildi...4448677840-c-5717.htm?tid=1273224419776803150

on the ceiling. I am going to rearrange my outlet layout so they fall in the lands of the metal.

I'll have more progress pics soon.
 
OP
R

Redwolf947

Well-known member
Joined
Feb 13, 2015
Messages
613
Location
South East WI
Thank you Denwood. I have to agree 100%. I still only have the one half opened up but it is awesome looks much bigger. The light color of the new wood makes it seem brighter too.
 
OP
R

Redwolf947

Well-known member
Joined
Feb 13, 2015
Messages
613
Location
South East WI
Well I've made some progress. This last Sunday I installed more sister boards and removed the last two original ties. I wired in most of the ceiling outlets and reinstalled most of the lights. I will have to take the lights down when I put up my ceiling material but that may be awhile. I'll post some pics soon. :D
 

Denwood

Well-known member
Joined
Sep 22, 2014
Messages
4,180
Location
Thunder Bay, Ontario, Canada
Your level of reflected light will go up significantly once you do a ceiling (if white). I really like the difference mounting some lights on the angled portion of the ceiling, instead of all on the flat...something to consider if you plan on closing things up. If you're doing any vehicle work it cuts down on side shadows.
 
OP
R

Redwolf947

Well-known member
Joined
Feb 13, 2015
Messages
613
Location
South East WI
Your level of reflected light will go up significantly once you do a ceiling (if white). I really like the difference mounting some lights on the angled portion of the ceiling, instead of all on the flat...something to consider if you plan on closing things up. If you're doing any vehicle work it cuts down on side shadows.

That's the goal with a white upper wall and ceiling once I decide what way to go. You read my mind on the lighting.. Pics to follow..
 
Last edited:
OP
R

Redwolf947

Well-known member
Joined
Feb 13, 2015
Messages
613
Location
South East WI
This ceiling getting raised was an after thought. I had done some wiring already that I'm in the process of rerouting. Everything's comming together now. I like how it's looking. I still need to add some more boards of witch I'll explain later. Re-hung my heater and moved it's plug. Added a couple outlet's one on the ceiling for a cord reel and one on the back wall for a radio/speaker setup I have. I'll be building a shelf for the music stuff. I'll post some pics soon.
 

Denwood

Well-known member
Joined
Sep 22, 2014
Messages
4,180
Location
Thunder Bay, Ontario, Canada
Nicely done :) The lighting is looking very good as well. Based on the pictures it looks like your light levels are excellent. How are you feeling about the side angled approach?
 
OP
R

Redwolf947

Well-known member
Joined
Feb 13, 2015
Messages
613
Location
South East WI
Nicely done :) The lighting is looking very good as well. Based on the pictures it looks like your light levels are excellent. How are you feeling about the side angled approach?

Thanks Denwood. I like it!! I think it will put a little more light on any projects I work on. Its very bright in there!! With the white ceiling I will probably be blinded. I cant wait to get that material and insulation.

I plan a gray lower wall black boarder and white upper wall. I'm still trying to find out how you guys get those painted stripes so nice and straight.

That will have to wait some until I have the cash and I'm sure this is how I want everything situated.
 
To avoid these ads, REGISTER NOW!
Top Bottom