To avoid these ads, REGISTER NOW!

BendPak P6 lift installed, have a couple of questions

stioc

Well-known member
Joined
May 2, 2005
Messages
1,317
Location
SoCal
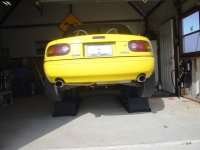
I bought the lift almost a year ago, finally I got around to unpacking and setting it up today. It's not ready for use yet but it's working as expected. I need to fasten it to the concrete properly before I actually use it.

100_2714.jpg


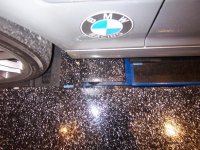
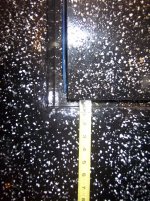
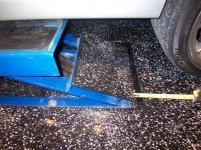
While we're on the topic of concrete how do I cut a channel into the concrete to route the hydraulic lines. What do I need to cut concrete that way. Here's an example:

http://pubpages.unh.edu/~jjy9/liftnocar.jpg

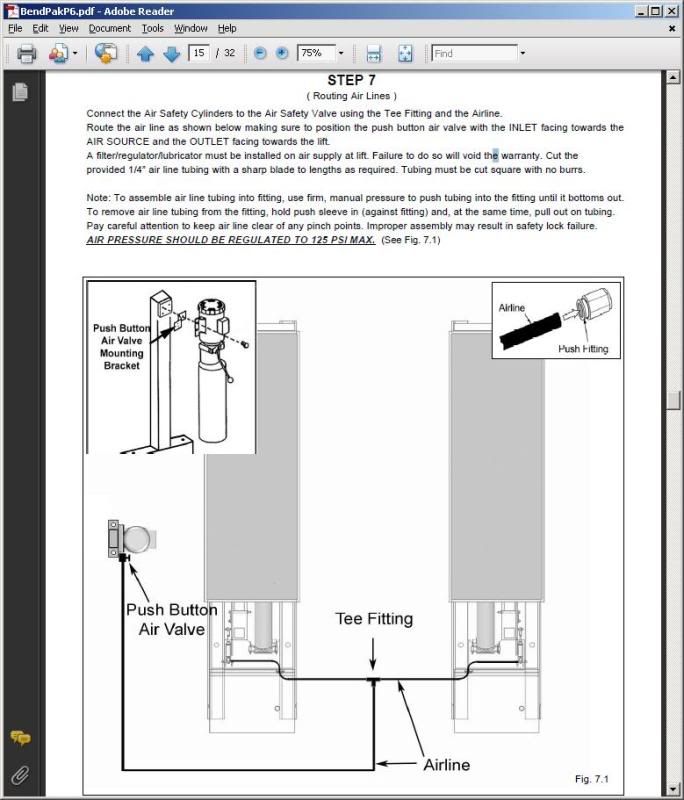
Finally, I also need to contact bendpak about their Step 7 in instructions which talks about air lines, there were none included nor do I see anywhere they'd hook up. It's all hydraulic based so not sure what the air lines are supposed to do. Maybe the lift comes in two configurations hydraulic or air.

p6airlines.jpg
 
To avoid these ads, REGISTER NOW!

e-tek

Well-known member
Joined
Dec 19, 2007
Messages
10,690
Location
Saskatoon, SK
The air on a 4-post lift is for the safety locks release. I'm not sure if yours should have them, or maybe they've retro-fitted a different system into your lift.

Asfor cutting concrete, I believe the hydraulic line is not that wide, so you could use a diamond blade on your circ saw - or rent a saw-same as you'd use for cutting relief cutsin a new concrete pad. Then you could put latex caulk/sealer over top.

But I'm wondering - do you HAVE tobolt it to the floor? Seems like it works in the photolike other siccor lifts that aren't bolted. That allowsyou to move them around....

(How canyou tell my spacebar is sticking???)
 
Last edited:
OP
S

stioc

Well-known member
Joined
May 2, 2005
Messages
1,317
Location
SoCal
Thanks for the tips E.

Yes it does "function" without bolting it to the floor but unlike a regular scissor lift this one has two independant pads/ramps so the chances of them moving in relation to each other are high. It's not really meant to be a portable lift at 850lbs.

The locks are manual so I guess I'll ignore the step about the air lines. The hydraulic hoses are 3/8" ID so for two of them we're talking maybe a 1-2" wide channel in the concrete.
 

usa#1

Well-known member
Joined
Jul 30, 2008
Messages
392
I'm not really familiar with this lift, however, if you are going to fasten it to the concrete so it doesn't move, you may be able to make a cover for the hydraulic lines out of a piece of steel "C" channel rather than trench the concrete.
 

G-force

Well-known member
Joined
Jul 2, 2006
Messages
739
Location
Oregon
I used this lift for a couple years. I had planned to run the hose flush, but once I routed it how you see, I never really felt the need to sink it. The biggest concern was not tripping over it, or the fact that my creeper could not roll over it. Not a big deal and it worked great.

3475284%3A2%7Ffp339%3Enu%3D3244%3E892%3E6%3C%3B%3EWSNRCG%3D323389943%3B555nu0mrj


3475284%3A2%7Ffp33%3B%3Enu%3D3244%3E892%3E6%3C%3B%3EWSNRCG%3D323389943%3B567nu0mrj


3475284%3A2%7Ffp343%3Enu%3D3244%3E892%3E6%3C%3B%3EWSNRCG%3D323389943%3B55%3Bnu0mrj


3475284%3A2%7Ffp339%3Enu%3D3244%3E892%3E6%3C%3B%3EWSNRCG%3D323389943%3B566nu0mrj
 
OP
S

stioc

Well-known member
Joined
May 2, 2005
Messages
1,317
Location
SoCal
Yeah I'm thinking that should work for me too and I might cover that hose in the middle of the lift with those plastic cable covers that look like speed bumps. btw, how'd you mount the power unit, do you have a pic of it. Lastly, does it leak fluid big time when you disconnect the hoses? I'll have to disconnect at least one hose to reroute. I'm using ATF fluid.
 

lowceiling

Well-known member
Joined
Jul 10, 2008
Messages
53
Location
vancouver,bc
Hi Russell,

Nice lift!!! I like that lift due to the open center, however how high does it up up?

I have a question though with regards to these types of lifts (drive over). If the jack points on the vehicle is longer (or wider) than the lift's platform, are you stuck on not being able to lift the vehicle?

Reason I ask is that, I measured my van and it measures like 71" width, and 85" long. The jack points under the car are close to those dimensions and with that being said, will this hoist work for my vehicle??

From my understanding, how the lift works is that the platform will sit/lift the sides of the car where you would normally use as jack points. However my vehicle has side skirts and therefore that side part of the van is not exposed anymore due to the sideskirts.

I dont exactly know if I am making sense, so I apologize in advance if I had confused you in anyway..sorry.

Is my solution only a lift with arms that are adjustable like a 2 post or a scissor lift with arms?

thank you and I hope that I had not confused anyone...hhehe :)
 

Titus

Well-known member
Joined
Aug 1, 2008
Messages
393
Location
Nevada, TX
I used this lift for a couple years. I had planned to run the hose flush, but once I routed it how you see, I never really felt the need to sink it. The biggest concern was not tripping over it, or the fact that my creeper could not roll over it. Not a big deal and it worked great.

+1

I have had my P6 up and running for several months, not tied down and hoses not buried. For me, I was concerned about cutting in to my concrete when I don't know how it was constructed. I have considered welding up a channel to cover the hoses... something like this: /¯\
 
OP
S

stioc

Well-known member
Joined
May 2, 2005
Messages
1,317
Location
SoCal
Lowceiling, the lifting height is 29" and it's rated for 6000lbs max. Each ramp is 18" wide and the recommended length between the ramp (pit width) is no more than 38". So it should cover most cars and light trucks it's designed for. You can download the manual from BendPak's site for everything you want to know about the lift.

Titus, G-Force, how have you guys mounted your power unit?

As for bolting it to the ground I guess I'd feel safer if it was bolted down. When I lower the car the lift shakes (it's very herky jerky movement, not smooth like the 2 post lifts I've seen at the shops. Has that been your experience too or is it an issue with mine perhaps?
 

lowceiling

Well-known member
Joined
Jul 10, 2008
Messages
53
Location
vancouver,bc
Hi Russell,

Thank you, I will check out the bendpak site.

Is your flooring more than enough thickness?? I read somewhere that they require like 4", cuz mine aint 4" thick...but I dont quite understand why it would be a big factor if its less than 4".

29" is pretty high, enough for you to get alot of room down there especially with an open center...

If you need an idea on how to hide your hydro lines, you can you gutters? and maybe screw/bolt those down to the floor?? upside down of course hahaha..covering the lines :) I dont know if I made sense though...oops!
 

Titus

Well-known member
Joined
Aug 1, 2008
Messages
393
Location
Nevada, TX
Lowceiling, the lifting height is 29" and it's rated for 6000lbs max. Each ramp is 18" wide and the recommended length between the ramp (pit width) is no more than 38". So it should cover most cars and light trucks it's designed for. You can download the manual from BendPak's site for everything you want to know about the lift.

Titus, G-Force, how have you guys mounted your power unit?

As for bolting it to the ground I guess I'd feel safer if it was bolted down. When I lower the car the lift shakes (it's very herky jerky movement, not smooth like the 2 post lifts I've seen at the shops. Has that been your experience too or is it an issue with mine perhaps?

My power unit is bolted to the wall. I haven't experienced any jerky movement when lowering a car, but if I raise and lower it without a car on it, is does jerk a little.
 

G-force

Well-known member
Joined
Jul 2, 2006
Messages
739
Location
Oregon
My power unit was attached to the floor. Always ran smooth and never had any jerking.

Expect to get ATF fluid all over when you disconnect the line. Have at least 3-4 beach towells at the ready.:mad:
 
OP
S

stioc

Well-known member
Joined
May 2, 2005
Messages
1,317
Location
SoCal
G-force, that's interesting, when I lift without the car on it I see each ramps moving up 1/2" or so at a time left, right, left right steps...with the weight on it it feels smoother. I wonder if the motor's not getting enough juice (not a dedicated circuit and only 15Amps) or if there's something wrong with the flow divider that it's not sending the juice to both ramps simultaneously.
 

E46M3

Well-known member
Joined
Jan 5, 2007
Messages
176
Location
Northeast, Upstate New York
Russell,
Not an answer to your exact question, but, this is the Bend Pack P-6-F.
Same lift, but, designed to sit flush with the floor, so the anchor bolts sit inside the frame instead of outside. The F means flush. Mine came with big bolts to sink into the floor. The P-6-F wants to be bolted down. I think you could very certainly cut into the floor as suggested in previous posts to run the lines. I had in floor radiant tubes, so cutting into the floor at a future date would have been "bad," so I ran mine underground in PVC tubes. I had a new build, so that was an option.

Here's a few shots of the build process for a "pit mount" flush version, for what its worth:

Finished product in use:

100_0977.jpg


Planning stage:

100_0701.jpg


The Bend Pack P-6-f out of the packing:

100_0674.jpg


Bolts in the plastic bag:

100_0675.jpg


The underside: You can see that the holes for the anchor points are inside the rail units in the F version as opposed to outside on the non-F version.

100_0697.jpg


The concrete form, PVC tubes to house the lines, and a place for the flow diverter in the center:

100_0733.jpg


Concrete poured, forms in place, (lift in the background in plastic):

100_0775.jpg


In process, floors done, metal flow diverter cover not in yet, ramps not epoxied:

100_0917.jpg


The bolts on this thing were one of the bigest PITA of the entire process. The nuts did not fit the bolts. Additionally, the measurements on the units spec sheet, did not match the unit shipped. I actually had to cut two of the pads that flip up, and I cut the anchore bolts heads off after the nuts so the lift plates would sit flush.

All that said, I must say that I do like this lift. Up in 30 seconds. Not a problem since installation.

Good luck. Hope this was not off topic.

Cheers,
E46M3
 
OP
S

stioc

Well-known member
Joined
May 2, 2005
Messages
1,317
Location
SoCal
Definitely not off-topic. I've also admired your garage since I saw it, you did a good job on it.

Yeah I posted in the tools section what drill I need to drill the 3/4" holes for the wedge anchors. In my case the nuts came threaded on the bolts but the bolts do look longer and might interfere with the ramps fully collapsing. Additionally there are 5 holes per ramp and 2 holes for the power unit but was only supplied 8 anchors (I need 12)...I'll check with BendPak on that...

So how did you drill those holes, what drill/technique did you use?
 

E46M3

Well-known member
Joined
Jan 5, 2007
Messages
176
Location
Northeast, Upstate New York
Russell,
Well, still not really answering your question - sorry.
The "big ***" drill I used was borrowed from my general contractor (make forgotten) and I promptly broke one of his 3/4" bits in my floor, so, I'm maybe - no - check that - I am definately - not qualified to answer this question as to the proper "technique" to drill holes for this lift. I was humbled by this damn process.
I eventually got it in. But, installation was unpleasant, and my contractor was kind enough to help me get the (his) broken drill bit out of my floor for one of the holes in the morning when I was done with my "handywork." I thought - this isn't that hard. OK, I was wrong. What I did use was sweat and a boatload of cuss words.

I put 4 anchors in per lift pad section, and 2 for the power unit support. Four smaller screws in the flow diverter base for the hydraulic version of my lift. I had enough anchores supplied by Bend Pak, I think 10 large, and that matched the number of large attach holes for my lift configuration as supplied. I did't pull up short on the bolt count.

Keep this post alive, maybe someone who didn't almost F it up can comment with a better answer than I, but this one issue was seriously the biggest pains in the entire garage build. Not proud to share this chapter of my process, but true, and not sure what to tell you to avoid my pitfalls.

I wish you much luck, and a very strong drill bit my friend...
E46M3
 
To avoid these ads, REGISTER NOW!

pmiranda

Well-known member
Joined
Jul 15, 2008
Messages
1,504
Location
Austin, TX
Stupid question, how did you guys with these get them off the delivery truck? Engine hoist? 3 friends and some lifting straps? Truck driver let you take apart the shipping crate?
800+lb shipping weight doesn't sound impossible to deal with, but not trivial.
 
OP
S

stioc

Well-known member
Joined
May 2, 2005
Messages
1,317
Location
SoCal
I requested delivery by a truck with a lift-gate. In my case the truck driver had a pallet jack (and I had one on standby too). Getting it off the pallet would be really easy with a floor jack + engine hoist. I don't have an engine hoist so I used two floor jacks, a few pieces of 2x4s and a large crowbar. Did it all by myself, my first goal was to not get hurt and second was to not drop or damage any pieces so I went slow, adjusting and readjusting and was able to get it off the pallet in the final resting place winthin an hour.
 

E46M3

Well-known member
Joined
Jan 5, 2007
Messages
176
Location
Northeast, Upstate New York
pmiranda,

+1 for what Russell said,
I requested delivery by a truck with a lift-gate.
(The above was a trick and requirement I learned on this forum by the way)

I used two floor jacks
I did too. Also some muscle. I had two contractor friends ultimately help me lift and place the units in the sub floor wells. I had to coil the hydraulic lines in the base unit for a clean install on my version (6-P-F,) so I connected the lines while the unit was on its side and guided the lines so they wouldn't bind while my friends set the unit flat in the subfloor.

I did some major lifting. Too heavy really to be safe on my own. I got my contractor friends to help because they were here. Try the same idea - friends, ...with a 6 pack of good beer - for after.

Maybe that will work out, good luck.
E46M3
 

Titus

Well-known member
Joined
Aug 1, 2008
Messages
393
Location
Nevada, TX
I got mine used for free from behind a dumpster, so it was me, 3 friends, and a pickup truck. During the restoration, I used a floor jack and a engine hoist to move them around.
 

E46M3

Well-known member
Joined
Jan 5, 2007
Messages
176
Location
Northeast, Upstate New York
Titus,

I got mine used for free from behind a dumpster
Well, OK - thats very cool. A lucky find for sure. I guess I should spend more of my time around dumpsters.

But, was everything there? What about your bolts and nuts, and hydraulic lines and fittings? Did you order replacements from Bend Pak, or just try and match up the bolts from other sources? Some of the lines can be sourced and crimped with connections from local "ez-lift" service type locals.

I briefly looked at those sources to cut my lines to length so I wouldn't have to coil them. What did you do for the install, or was everything in a neat pile for you?

E46M3
 

e-tek

Well-known member
Joined
Dec 19, 2007
Messages
10,690
Location
Saskatoon, SK
I used several of the methods you listed: I jumped into the delivery rig with my impact gun and unbolted the load, then 4-friends helped me unload it all - 15 minutes tops. I asked a couple neighbours to help me lift the ramps when I assembled it. It was the most fun I'd had in a long time! (I should qulaify that! Mrs. E-tek was away!!)
 

Titus

Well-known member
Joined
Aug 1, 2008
Messages
393
Location
Nevada, TX
Titus,

Well, OK - thats very cool. A lucky find for sure. I guess I should spend more of my time around dumpsters.

But, was everything there? What about your bolts and nuts, and hydraulic lines and fittings? Did you order replacements from Bend Pak, or just try and match up the bolts from other sources? Some of the lines can be sourced and crimped with connections from local "ez-lift" service type locals.

I briefly looked at those sources to cut my lines to length so I wouldn't have to coil them. What did you do for the install, or was everything in a neat pile for you?

E46M3

Nothing was there. I spent a good deal of money on a new power unit, flow diverter, hoses, and fittings. Got it all through Bendpak, and they took good care of me.
 

E46M3

Well-known member
Joined
Jan 5, 2007
Messages
176
Location
Northeast, Upstate New York
Titus,

I spent a good deal of money...

But, the lift unit was still free... You're ahead of us. Great find. Nice to hear Bend Pak was all good. Show us pictures when you get it set up...

E-tec, you have a P6 - or was yours a different model of Bend-Pak?

Cheers,
E46M3
 

Titus

Well-known member
Joined
Aug 1, 2008
Messages
393
Location
Nevada, TX
Titus,


But, the lift unit was still free... You're ahead of us. Great find. Nice to hear Bend Pak was all good. Show us pictures when you get it set up...

E-tec, you have a P6 - or was yours a different model of Bend-Pak?

Cheers,
E46M3
Here is mine in service:


attachment.php
 

Attachments

  • DSC03355.JPG
    DSC03355.JPG
    47 KB · Views: 375
OP
S

stioc

Well-known member
Joined
May 2, 2005
Messages
1,317
Location
SoCal
What spacing did you guys use between the ramps. I'm finding out that 36" is a bit too narrow for larger cars like my wife's 04 Accord.
 

Titus

Well-known member
Joined
Aug 1, 2008
Messages
393
Location
Nevada, TX
What spacing did you guys use between the ramps. I'm finding out that 36" is a bit too narrow for larger cars like my wife's 04 Accord.

I have mine 38" apart. This works fine for my Miatas and the wife's MINI Cooper, but I may need to move them closer together when I move my Locost (Lotus Seven Replica) project in to the shop.
 

DZeckhausen

New member
Joined
Dec 11, 2009
Messages
4
The bolts on this thing were one of the bigest PITA of the entire process. The nuts did not fit the bolts. Additionally, the measurements on the units spec sheet, did not match the unit shipped. I actually had to cut two of the pads that flip up, and I cut the anchore bolts heads off after the nuts so the lift plates would sit flush.
Great post! I'm about to order this exact same lift and we're about two weeks away from the pour, so I'm concerned about what you mentioned above. I had assumed I could obtain engineering drawings from my dealer or the manufacturer and get everything prepared in advance of lift delivery. Now it sounds like there is a problem with that plan. Can you be specific about what dimensions were incorrect on the spec sheet and what you had to do to mitigate it?

Here's where we're at right now:

<object width="425" height="344"><param name="movie" value="http://www.youtube.com/v/7slDFwafb3k&hl=en_US&fs=1&"></param><param name="allowFullScreen" value="true"></param><param name="allowscriptaccess" value="always"></param><embed src="http://www.youtube.com/v/7slDFwafb3k&hl=en_US&fs=1&" type="application/x-shockwave-flash" allowscriptaccess="always" allowfullscreen="true" width="425" height="344"></embed></object>

Thanks for your help!

Dave Z.
 

DZeckhausen

New member
Joined
Dec 11, 2009
Messages
4
Never mind! I figured out what went wrong with your installation when I saw the floor recess drawing, sent by my BendPak dealer, and compared it to your hand drawn floor plans in another post. I can see how the lift specification drawings on the BendPak site could be misleading and cause you to make the openings about 1.5" too short!

P-6F%20Recess.jpg


100_0701.jpg
 

E46M3

Well-known member
Joined
Jan 5, 2007
Messages
176
Location
Northeast, Upstate New York
Dave Z wrote:
Never mind! I figured out what went wrong
STOP DAVE - THAT'S NOT IT.

I was just out in the garage looking for that floorplan chart you just posted to answer your question - which I found - and I also measured my actual internal dimensions on the concrete.

My actual opening is 79 1/2" X 19" - but I still had to cut the back pads.

The 79 1/2" indicated on that plan from Bend-Pak is too short.

Here's why:
The rear decks are hinged and move more than an inch back in the arch when the car is lifted. I shot some quick pictures.

Picture 1: The front fixed plate pushed to the very front of the opening in the 79 1/2" recess in the floor.
Picture 2: The rear hinged plate, with the lift in the down position.
Picture 3: The same rear hinged plate, with the lift now being raised.
Picture 4: Lift down
Picture 5: Lift going up - see that - it moves back over an inch, and that's in a 79 1/2" opening. I had to cut the end of the rear lift plates.

I'm guessing the opening should be at least 80 1/4", but I'm guessing - because I forget how much I had to cut off.

Reply so I know you got this...

Cheers,
E46M3
 

Attachments

  • 100_2333.jpg
    100_2333.jpg
    156.1 KB · Views: 65
  • 100_2338.jpg
    100_2338.jpg
    155 KB · Views: 69
  • 100_2337.jpg
    100_2337.jpg
    157.8 KB · Views: 57
  • 100_2339.jpg
    100_2339.jpg
    159.7 KB · Views: 51
  • 100_2341.jpg
    100_2341.jpg
    158.6 KB · Views: 72
Last edited:

DZeckhausen

New member
Joined
Dec 11, 2009
Messages
4
Reply so I know you got this..
Got it! No worries. They're pouring new footings Monday (50%) and then the rest about a week later. So we're a good two or more weeks away from the main floor pour, meaning we'll have time to inspect the lift before we finalize.

I wonder why this company can't get their documentation in order for something as basic as this??
 

#1SomeGuy

Banned
Joined
Dec 4, 2012
Messages
511
Location
Canada
Curious, for the recessed installs of these...how do you deal with the water and **** filling things up in there? Up here in the winter parking in the garage, there's a fair bit of snow/water melting off the vehicles every day that would eventually fill things up and make a mess.
 

nerfbar81

New member
Joined
Jan 26, 2016
Messages
1
Digging up this old thread. I am a little unclear about the safety locks. Are they manual on the new lifts or do you need to hook up air to them? Or do they have a new system for disengaging the safety locks?
 
To avoid these ads, REGISTER NOW!
Top Bottom