To avoid these ads, REGISTER NOW!

Mission Creep garage - 85x40 and some more...

Radix2

Well-known member
Joined
May 28, 2014
Messages
1,853
Location
the thumb!, MI
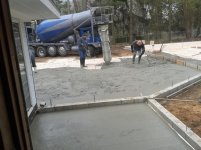
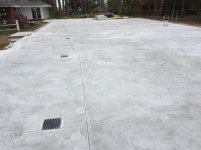
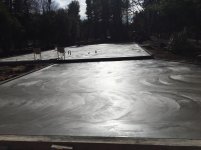
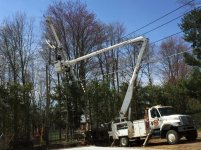
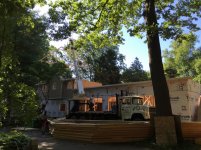
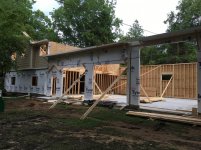
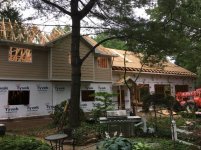
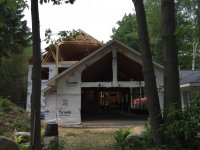
I am a bit behind in posting a build thread since we are a month or two into construction - but at least the updates can move along for a while.

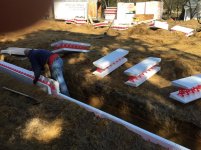
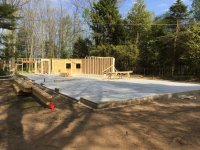
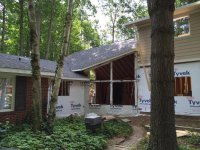
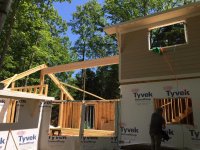
Background - I wanted to build my dream workshop and garage but the plans immediately got sidetracked by the local zoning requirements - the original plan was a 85x40 building with a 35/50 split in floor area for workshop/garage. Zoning here does not allow accessory building taller than the home.. the home is a ranch with a 5/12 roof.... needless to say it is not possible to build a good sized building under that height.

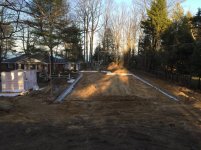
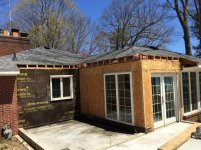
So plan B - connect the new building to the house and then it is part of the house, with no height restriction... so the first mission creep is to add a connecting addition that fulfilled another wish - for a outdoor kitchen - but making it indoors with a outdoorish/pub sorta theme.

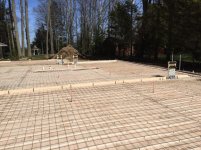
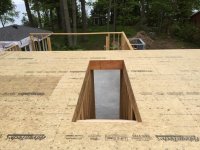
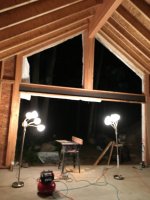
So now it is connected to the house, and once you have a first floor and no height restriction... why not add some guest rooms... and since we want decent roof pitch to better shed the rain of leaves... heck add a room in the trusses too.

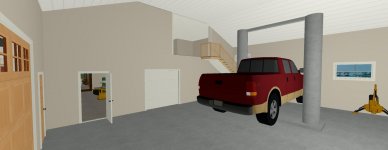
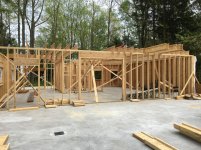
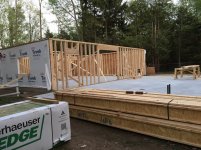
here is the basic plan - first floor - greatroom (outdoor kitchen substitute), workshop, garage. second floor - 2 bedrooms, bathroom, storage mezzanine connected to garage. third floor - home gym.
 

Attachments

  • 1st floor.jpg
    1st floor.jpg
    112.9 KB · Views: 796
  • 2nd floor.jpg
    2nd floor.jpg
    70.9 KB · Views: 595
  • 3rd floor.jpg
    3rd floor.jpg
    35.4 KB · Views: 525
To avoid these ads, REGISTER NOW!
OP
R

Radix2

Well-known member
Joined
May 28, 2014
Messages
1,853
Location
the thumb!, MI
The foundation is a full footing frostwall type - 42in deep here. The frostwalls are built using ICFs. The first hiccup was coming to the conclusion that the far end of the garage would be just too low if we maintained the house floor height throughout as planned. So a step up was made from the workshop/garage part from the greatroom. There was enough sand that we did not have to bring any in once the grading and digging were complete.
 

Attachments

  • 016089eca8418a290eb722142ed886510581798578.jpg
    016089eca8418a290eb722142ed886510581798578.jpg
    151.4 KB · Views: 404
  • 01891023eb3594217637449eeeeedf5ac6247dbba6.jpg
    01891023eb3594217637449eeeeedf5ac6247dbba6.jpg
    147.9 KB · Views: 408
  • 01a6e7ed5d9a17c9fbece2b2536153bccedc6acc7e.jpg
    01a6e7ed5d9a17c9fbece2b2536153bccedc6acc7e.jpg
    149.2 KB · Views: 392
OP
R

Radix2

Well-known member
Joined
May 28, 2014
Messages
1,853
Location
the thumb!, MI
All of the slabs will have PEX pipes in them for heat.

The insulation plan calls for 2in of foam on the inside of the footings, the ICF forms insulating the frost walls, 3in of foam on the inside of the 6in block stem walls (to form a brick ledge).

Under the slab is 4in of foam for the first 4 feet from the edge, then 2 in of foam for the rest of the floor.

Pex is fastened down to the foam, wire mesh is laid on top of the pex. There are three zones with uponor manifolds. Total pex is 5000 linear feet - they put 1000 feet in the great room because of the large window loads.
 

Attachments

  • 01c2e9374f8e52a97acc8c31e0bb985ed591b5b502.jpg
    01c2e9374f8e52a97acc8c31e0bb985ed591b5b502.jpg
    150.5 KB · Views: 279
  • 01547792b49c3db45984f426596c0ad3324293f43f.jpg
    01547792b49c3db45984f426596c0ad3324293f43f.jpg
    152.5 KB · Views: 283
  • 01c118956e8464872f6290bb7b0e082404f3c8c866.jpg
    01c118956e8464872f6290bb7b0e082404f3c8c866.jpg
    150 KB · Views: 290
  • 019f7e37d26169f6b11146e2b9b932aefda8b5a7c8.jpg
    019f7e37d26169f6b11146e2b9b932aefda8b5a7c8.jpg
    148.9 KB · Views: 266
Last edited:
OP
R

Radix2

Well-known member
Joined
May 28, 2014
Messages
1,853
Location
the thumb!, MI
Are the concrete blocks laid directly on top of the ICF frost walls?

Yes, they are mortared on top, offset to leave a brick ledge to the outside. Rebar pins were put in every block that gets a sill strap, then all the blocks were filled solid with mortar.
 

buildingup

Well-known member
Joined
Oct 12, 2013
Messages
155
Location
Holly Mi
Very interesting build and cant wait to see it done. I know what I was quoted for my 42 x 80 pole barn and can't even imagine the price tag on this let alone the tax increase with being attached to the home. Will look great once done though!
 

Bib Overalls

Well-known member
Joined
Dec 4, 2006
Messages
3,318
Location
Jonesboro, Arkansas
Yes, they are mortared on top, offset to leave a brick ledge to the outside. Rebar pins were put in every block that gets a sill strap, then all the blocks were filled solid with mortar.

Will that compromise the integrity of the insulation at the bottom of the walls?
 
OP
R

Radix2

Well-known member
Joined
May 28, 2014
Messages
1,853
Location
the thumb!, MI
Will that compromise the integrity of the insulation at the bottom of the walls?

We put 3in of foam on the inside of the block up to the floor height - the height of the block above the floor is 2in. The combined thickness of the wall will let me put a inch or so strip of foam down there behind the base molding. Not sure I have ever seen a real nice way to have full insulation when transitioning from a sill block to an insulated wood wall.
 
OP
R

Radix2

Well-known member
Joined
May 28, 2014
Messages
1,853
Location
the thumb!, MI
OK getting back to posting

I think I will go back a bit and put in a couple of renderings to show the basic look.
 

Attachments

  • Untitled 37.jpg
    Untitled 37.jpg
    129.7 KB · Views: 553
  • Untitled 35.jpg
    Untitled 35.jpg
    95.8 KB · Views: 691
  • inside garage to mez.jpg
    inside garage to mez.jpg
    46.7 KB · Views: 501

drivesitfar

Well-known member
Joined
Oct 23, 2013
Messages
36,033
Location
Pacific Northwest
RADIX: i had to see what you were building when i saw the size. i'll be here to see the progress and see if it gets close or maybe better looking than your drawings.

GOOD LUCK
 
OP
R

Radix2

Well-known member
Joined
May 28, 2014
Messages
1,853
Location
the thumb!, MI
After the pex went down, then the concrete
They did a nice job, clean, level and smooth. We had cool dry weather and the crew put down the entire 4000+ sq ft at one time.
 

Attachments

  • 01ae9cdf3a061d5d3c91b3d34aafaeb2f6790af83f.jpg
    01ae9cdf3a061d5d3c91b3d34aafaeb2f6790af83f.jpg
    143.6 KB · Views: 328
  • 01c30e4297ed4ab199ea88c9236325519c867acf65.jpg
    01c30e4297ed4ab199ea88c9236325519c867acf65.jpg
    137.8 KB · Views: 323
  • 0195562c51a40f5180e35cdf0dd3641bdee1f779f4.jpg
    0195562c51a40f5180e35cdf0dd3641bdee1f779f4.jpg
    140.4 KB · Views: 319
OP
R

Radix2

Well-known member
Joined
May 28, 2014
Messages
1,853
Location
the thumb!, MI
OK, I am committing to getting this posted up. Obviously much has happened since I got sidetracked, but I know have the photos corralled and no excuses...

As we left off, the foundation and slabs were finished, you can see the manifolds set up for the three zones.

next is where we will attach to the house with a room to be used as a indoor/outdoor styled kitchen entertainment room.

As part of the addition, the electrical service needed some work. First, it was over the location of the addition, second, the original service was a 60A fuse panel...new service will be 400A. The electrical company came out and decided the 70 year old service needed some upgrading which greatly reduced my cost - no charge to move the pole (they replaced 4 poles at the same time, new transformer too.) I had to upgrade to an underground feed to the house and running that wire was my only cost. The new service enter at the addition to two 200A panels and all the old service becomes subpanels.
 

Attachments

  • 2016-05-11_11-41-45.jpg
    2016-05-11_11-41-45.jpg
    151.8 KB · Views: 310
  • 2016-05-18_12-13-02.jpg
    2016-05-18_12-13-02.jpg
    150 KB · Views: 351
  • 2016-05-17_12-45-04.jpg
    2016-05-17_12-45-04.jpg
    150.3 KB · Views: 346
  • 2016-05-02_14-39-59.jpg
    2016-05-02_14-39-59.jpg
    148.6 KB · Views: 317
To avoid these ads, REGISTER NOW!
OP
R

Radix2

Well-known member
Joined
May 28, 2014
Messages
1,853
Location
the thumb!, MI
I am going to try to get this posted and up to date over the holidays, so this will be a bit like one of those Netflix series binges - 7 months in a couple of weeks.

Finally, some walls going up. The first section is the workshop area 35x40. There is a good chunk lost for the stairwell and the bathroom. One of those things that maybe I would do differently if I had a chance...

If you look at the picture from the deck on top of the shop, you can see the party room a bit and the little bump out with steel framing...
 

Attachments

  • 2016-06-01_18-02-20.jpg
    2016-06-01_18-02-20.jpg
    149 KB · Views: 289
  • 2016-05-27_15-42-12.jpg
    2016-05-27_15-42-12.jpg
    150.4 KB · Views: 284
  • 2016-05-26_20-48-14.jpg
    2016-05-26_20-48-14.jpg
    150.6 KB · Views: 284
  • 2016-05-24_17-53-16.jpg
    2016-05-24_17-53-16.jpg
    149.5 KB · Views: 292

matt_i

Well-known member
Joined
Mar 14, 2008
Messages
10,728
Location
SE Michigan
Great concept and waterfront as well! Looks like a lot of thought and planning went into your design :thumbup:
 
OP
R

Radix2

Well-known member
Joined
May 28, 2014
Messages
1,853
Location
the thumb!, MI
First shot is a view into the workshop and the cantilever for the landing into the storage area. The original plan was for about a third of the second floor to be a open mezzanine to the garage.

After some discussion with the building inspector on how to handle the firewall, insulation, etc....as well as some rethink about carrying a large amount of materials up there... you will see that the plan has evolved some.

Second shot is the large door from the garage to the workshop. This was framed as a 8x8. After some consideration and again the need for this door to be part of the firewall...you will see that in the end it became a 7x7 steel double door.

next shot is the start of the second floor - the full wall has been built and sided, next shot is the wall stood up with the skytrak
 

Attachments

  • 2016-06-01_18-11-25.jpg
    2016-06-01_18-11-25.jpg
    144.5 KB · Views: 219
  • 2016-06-01_18-11-34.jpg
    2016-06-01_18-11-34.jpg
    148.8 KB · Views: 215
  • 2016-06-10_15-17-27.jpg
    2016-06-10_15-17-27.jpg
    153.2 KB · Views: 221
  • 2016-06-10_15-45-16.jpg
    2016-06-10_15-45-16.jpg
    149.7 KB · Views: 232
OP
R

Radix2

Well-known member
Joined
May 28, 2014
Messages
1,853
Location
the thumb!, MI
Moving along, after getting the second story walls up, work started on the party room - the construction is TJI rafters and a 7x18 parallam ridge beam. The plan is to finish the ridge beam to match the other interior woodwork in some semi rustic way... You can see the cat has no fear of walking around up there 18 feet off the cement.
 

Attachments

  • 2016-07-06_11-10-04.jpg
    2016-07-06_11-10-04.jpg
    150.7 KB · Views: 280
  • 2016-07-05_22-13-55.jpg
    2016-07-05_22-13-55.jpg
    125.2 KB · Views: 290
  • 2016-06-17_20-13-54.jpg
    2016-06-17_20-13-54.jpg
    150.2 KB · Views: 284
  • 2016-06-17_19-27-26.jpg
    2016-06-17_19-27-26.jpg
    143 KB · Views: 267
  • 2016-06-17_14-55-21.jpg
    2016-06-17_14-55-21.jpg
    150.9 KB · Views: 267
OP
R

Radix2

Well-known member
Joined
May 28, 2014
Messages
1,853
Location
the thumb!, MI
Back wall of the garage going up, and you can see the garage access to the second story storage mezzanine and stair landing.

After the rest of the garage walls are up, the crane rolls in to install the trusses. Over the second story, the trusses are built to include an 18x35 third floor, over the garage, the trusses have a raised center - 8:12 on the top cord, 5:12 on the inside with a 13 foot wide flat center. sidewalls are 13.5 feet, the raised center is at 18.5 feet.
 

Attachments

  • 2016-07-13_09-34-30_1.jpg
    2016-07-13_09-34-30_1.jpg
    147.5 KB · Views: 236
  • 2016-07-13_09-24-09.jpg
    2016-07-13_09-24-09.jpg
    151.2 KB · Views: 224
  • 2016-07-09_16-54-50.jpg
    2016-07-09_16-54-50.jpg
    149.1 KB · Views: 242
  • 2016-07-06_14-22-42.jpg
    2016-07-06_14-22-42.jpg
    148.4 KB · Views: 241
OP
R

Radix2

Well-known member
Joined
May 28, 2014
Messages
1,853
Location
the thumb!, MI
more crane truss action - it took 2 days to set them all..

the last shot shows how the inside of the garage roof is at the same height as the second floor ceiling, making the spaces flow together.
 

Attachments

  • 2016-07-18_19-08-50.jpg
    2016-07-18_19-08-50.jpg
    143.4 KB · Views: 356
  • 2016-07-17_14-22-26.jpg
    2016-07-17_14-22-26.jpg
    150.9 KB · Views: 260
  • 2016-07-14_11-33-29.jpg
    2016-07-14_11-33-29.jpg
    151.2 KB · Views: 245
  • 2016-07-13_14-20-56.jpg
    2016-07-13_14-20-56.jpg
    152.9 KB · Views: 247

Keith_MN

Well-known member
Joined
Dec 13, 2009
Messages
137
Location
Minneapolis Metro
OK, I am committing to getting this posted up. Obviously much has happened since I got sidetracked, but I know have the photos corralled and no excuses...

As we left off, the foundation and slabs were finished, you can see the manifolds set up for the three zones.

next is where we will attach to the house with a room to be used as a indoor/outdoor styled kitchen entertainment room.

As part of the addition, the electrical service needed some work. First, it was over the location of the addition, second, the original service was a 60A fuse panel...new service will be 400A. The electrical company came out and decided the 70 year old service needed some upgrading which greatly reduced my cost - no charge to move the pole (they replaced 4 poles at the same time, new transformer too.) I had to upgrade to an underground feed to the house and running that wire was my only cost. The new service enter at the addition to two 200A panels and all the old service becomes subpanels.


This is going to be a great space.

If the old electrical service was ran in the location of the addition, how did you keep power to the house while the building was under construction, before the new service could be installed?
 
OP
R

Radix2

Well-known member
Joined
May 28, 2014
Messages
1,853
Location
the thumb!, MI
This is going to be a great space.

If the old electrical service was ran in the location of the addition, how did you keep power to the house while the building was under construction, before the new service could be installed?

The way the service is set up is with a transformer on the lot line feeding 4 houses from a secondary line that runs across the properties. The old service drop to the house was on the side opposite the addition.

So Step 1 was to replace/move the transformer overhead line/pole that was in the way the old drop was not effected.
Step 2 was to run the new underground service to the panels in the addition ( they ran a second meter for that).
Step 3 was to remove the old service drop and meter and connect the old panels to the new ones.

Had a computer snafu, more pictures coming soon.
 
OP
R

Radix2

Well-known member
Joined
May 28, 2014
Messages
1,853
Location
the thumb!, MI
Here is a shot from the lakeside to see how it flows with the rest of the house and how the attic trusses are set up. Next shot is the party room facade- through that is the workshop. The doorwall is 8x16.

The rest are just a bit of a walk around to see the overall layout.
 

Attachments

  • 2016-07-21_13-14-14.jpg
    2016-07-21_13-14-14.jpg
    147.2 KB · Views: 263
  • 2016-07-21_13-14-59.jpg
    2016-07-21_13-14-59.jpg
    146.9 KB · Views: 245
  • 2016-07-29_12-52-25.jpg
    2016-07-29_12-52-25.jpg
    144.2 KB · Views: 241
  • 2016-07-29_12-53-26.jpg
    2016-07-29_12-53-26.jpg
    148.6 KB · Views: 215

drivesitfar

Well-known member
Joined
Oct 23, 2013
Messages
36,033
Location
Pacific Northwest
RAD: looks like you are making great progress. i know at times when you post pictures and questions and maybe don't get any responses it seems like nobody is looking, but we are and maybe just don't have the answers. keep posting pictures as you have time and loving your progress.

take care and best of luck
 
To avoid these ads, REGISTER NOW!
Top Bottom