To avoid these ads, REGISTER NOW!

Canadian Triple Garage

owdlvr

Well-known member
Joined
Oct 16, 2006
Messages
119
Location
Vancouver, BC
On and off over the years I've lurked here on the garage journal. I suspect it was Jack Olsen's garage that originally brought me here, but I've stuck around for some of the threads and certainly the 'how tos'. Despite owning a few classic cars, and enough tools to be a professional mechanic, I've always rented my shop space...so having a 'build thread' didn't make much sense.

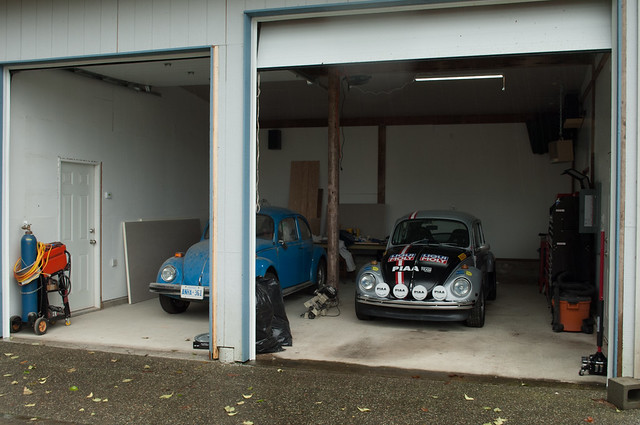
This week, however, I've signed the paperwork on what will become my new garage & shop in the fall. It's currently just a shell at the back of the property, 2 of the 3 bays are poured concrete while, oddly, the middle one is not. Metal roof, zero insulation, no electrical and only one garage door installed. BUT, it's a shop I can make my own, and ends my days of renting. With a little work, it should be a fantastic spot.

Here's what I'm starting with:

Bay #1 is currently secure, but bay #2 and #3 just have tarps for doors. Bay one's door opening is 9ft wide and 8ft tall. Bay two's opening is 9ft wide and 10ft tall. Bay three has an opening of 10ft11" wide by 11ft tall. I suspect the previous owner never finished the doors because the openings have been made in a custom size.
28147398276_2b008de4cb_c.jpg


28103423791_318bee4384_c.jpg


28103426001_bc508a6600_c.jpg
[/url]

28147400166_41643cd380_c.jpg


Three Bays, with a supporting post in between bay "two and three". The shop currently has a floor to ceiling wall in between bay one and two.
27900514620_366b053777_c.jpg


Inside Dimensions (and potentially approximate)
27900680540_07c3bdc602_c.jpg


Interior Ceiling Heights:
27900680450_3639524cb3_c.jpg


I'm currently in the planning stages, as moving in is going to be quite the problem. I have enough tools and cars that I really need the shop finished and secure before I can move, but I also want to save the money by doing the work myself. I don't live close to my new shop, so zipping over for a couple hours of work each night isn't an option. Climate wise, I need to have the shop insulated and heated for winter, but it doesn't get so cold here that I can't be doing that in October/November.

Unless there are other suggestions, my thoughts are to focus on the garage in the following priorities:

1) Floor
- the middle bay needs the concrete floor poured, and since I have the opportunity I'm going to make sure the slab we put in is appropriate for a 2-post lift. No heat going into the floor, as there is no water out to the shop and I'd rather put the budget elsewhere.
- Bay's 1 and 3, which have been poured, are finished with a broom finish like you see on a sidewalk. I'm probably going to rent a grinder to make both bays smoother, in an attempt to make it better for rolling jacks and engine stands around.

2) Doors - Need to close up bay 2 and 3. Options are (I think) ordering custom doors, re-framing the openings for standard sized doors or deferring the spend to a few years down the road and making some hinged carriage doors to keep the budget down. Option three I think is a last-resort, because doors that swing out in to the driveway area will really limit that space. Definitely would like some garage-journal input on what might be my best move here.

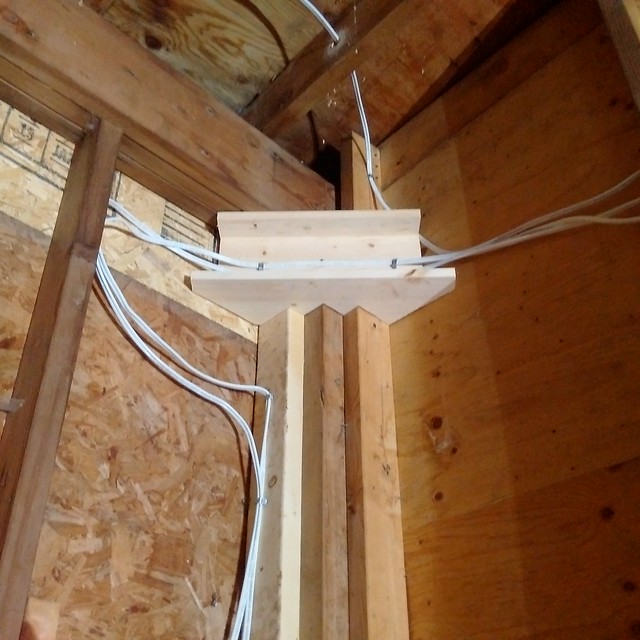
3) Electrical - has to be run from the house, trenched, and then installed from scratch in the interior. I've got a rough schematic of what I *think* I need in the shop, will post that up a little later.

4) Lighting - Because of the sloped ceiling, I'm not entirely sure what I'm going to do with the lighting. My current shop (800sq ft with 8ft ceilings) uses all fluorescent lighting. I know the downsides, but I don't think LED is in the budget, especially with the amount of lighting I will want/need in this new shop. So planning on fluorescents. Not sure if I should mount them flush to the ceiling (and thus on a slight angle) or use lights that hang off of chains.

5) Insulation - Roof and walls all need to be insulated. Having never insulated a space before, I'm not sure what I should be doing or using in either.

6) Wall covering - Wall covering, for my shop, is completely a budget question. My personal preference would be to drywall the whole shop as I like a smooth, white, wall surface. But on the other hand, I understand the benefits of being able to hang anything off of plywood/OSB.

7) Floor Paint - Current shop has epoxy painted floors, and after 10 years I have a pretty good idea how well (or bad) it will hold up. I'm okay with the slight stains and marks that happen, I just want a painted surface to avoid the large permanent oil stains bare concrete will certainly end up with.

In an ideal world, I'd finish all of the above before moving into the space. But time and money may not allow for that, so I'm going to have to figure out how I piecemeal it, or shuffle stuff side to side and away from the walls to get it all done. My home improvement or building knowledge is about a 1/10, currently, but I learn quick. I didn't know how to build engines, rebuild transmissions or restore cars before I started...but I can read manuals, I'm careful, and I'm willing to learn to save the money from paying someone else. I figure a house & garage can't be that different!

Hopefully that's a good introduction, and some things to start a discussion or questions on this new shop build.

-Dave
 
To avoid these ads, REGISTER NOW!

matt_i

Well-known member
Joined
Mar 14, 2008
Messages
10,722
Location
SE Michigan
Assuming you can still rent your shop space, you are probably going to have to work weekends on this...acquire materials and plan thru the week, then work Sat & Sun.

I would prioritize getting the concrete poured first, steel trowel finish will be more like what you want I think. Seems like there isn't much forming, just compact the subgrade, apply vapor barrier, dowel the edges, and setup reinforcement. The pour could happen pretty fast.

Next, your garage doors and electrical setup (for basic lights that aren't Li-ion powered) Theoretically you could run on a heavy extension cord (thinking #12 awg) with a couple of temporary fluorescent or CFL lights if necessary, but getting the proper subpanel setup and circuits setup would be a high priority.

I would get those three items above done, then you can work thru the winter (as fast as you can go) on insulating and drywalling. Paint the floor at the very last moment.

Now you are ready to move things in.

Best of luck to you, looks like a nice space to complete and call your own!
 
OP
O

owdlvr

Well-known member
Joined
Oct 16, 2006
Messages
119
Location
Vancouver, BC
Yup, I think you pretty much nailed it. Only difference is I will probably use a GC for the floor, doors and getting electrical to a panel in the garage. Once that's done, I'm good to move in and deal with actually wiring the shop and completing it on my own.
 
OP
O

owdlvr

Well-known member
Joined
Oct 16, 2006
Messages
119
Location
Vancouver, BC
So I'm primarily a classic car guy, focusing mainly on Volkswagen Beetles. Based on my email box this morning I'm probably going to be adding an MGB to the collection as well. I've been playing around with layouts and shop ideas, trying to map out the best setup going forward. The wall that closes off Bay 1 got me thinking that perhaps I should have a 'clean room' and a 'welding/grinding' room, since I know how dirty the shop gets with grinder mess flying around. Then I got to thinking that I'd really prefer to have the milling machine in the dirty room (due to flying chips), but ideally you don't want the milling machine in the same room as the grinder swarf. I'm also going to have to think about adding a lathe down the road, because I'm moving far away from the two I currently have access to.

Eventually I came up with the layout below. I'm thinking Bay 1 is more of a storage and 'infrequently used' items bay...at least at first. It make sense in my head to have a storage area apart from my work area, and it does seem to give me more working room over the other layouts I played with. I considered pulling the wall down in between the two bays to open the space up completely, but I realized if I plan the storage bay out well enough, it could also be the area I use to paint parts and assemblies. Again, this will probably all change once I've worked in the space for a while...but since I'm not closing until late summer, and not moving until mid-fall, one has to spend some time dreaming.

27917596900_3b7260b70d_c.jpg


For electrical, I started laying out what I think I want so I could start pricing it out, and making sure I'd have enough amperage. The diagram below suggests far more electrical outlets than I think I'd ever need, it's more of a "always have one when i need it" affair. I've included 220v in four spots, for a future 2-post lift and a future lathe...which I'm not 100% sure where I would put. My milling machine and welder are both 110v, so less of a concern that way. The workbench has a switch and double the outlets as I anticipate putting outlets below and above the work surface, some cabinets above, and a below-cabinet light on a switch. I figure I'll put one box high up on the centre post between bay two and three for a clock or other accessory, and then a lower (24-36") high outlet for general use. Might skip the bottom box and instead put a reel up high.

28164840136_f37965604e_c.jpg


The lighting probably looks really odd...but I've sort of based it on my current shop. I've got my current shop, which has low (8ft) ceilings, setup with three 4ft fluorescent T8 lamps above each car. With the air-cooled Volkswagens (engine is in the back), the best upgrade I did was to place one of those lights right above the entrance door. With the garage closed, I have light that shines right inside the engine bay. For this new shop setup, I've done the diagram with two 4ft lights in each position, as I occasionally wish I had a little more light. My thought is to setup the lighting so half is on one switch, and the other half is on a second switch.

Bay one is setup so that I have future lighting over where I think I’ll put my lathe and also more light for painting / finishing. Again, could be overkill but I’ve found a supplier for used T8 housings, $10CAD per unit. Will definitely look into the costs of LED units before I pull the trigger though.

Thoughts on the lighting?
 

Gentle_Ben

Well-known member
Joined
Nov 10, 2012
Messages
530
Location
Manitoba, Canada
Having those oversized door openings may come in handy. Maybe you could resize the one to be a standard size but leave the last one larger in case you want to moving something bigger into your shop sometime.

The garage doors on my detached garage are custom size and custom track design, I tried going to big box hardware store to get them but the cost was prohibitive, so instead I just went to a commercial overhead door place and it was no problem at all.
 
OP
O

owdlvr

Well-known member
Joined
Oct 16, 2006
Messages
119
Location
Vancouver, BC
Looks like I found a door solution that will fit a fairly reasonable budget. Going to go with a polyurethane insulated commercial door, 1-3/8" thick with chain-hoists instead of motors. The doors are R12.6, without windows, and close enough in appearance that having one door of a different type isn't going to bother me. The commercial door option does mean I get to keep the big openings as well, which is nice.

This is the door, but I'll be ordering without windows. I might put an exhaust port in the one door, though I suppose that's something I can always add down the road.

sc_therm_o_dor_image_003.jpg


-Dave
 
OP
O

owdlvr

Well-known member
Joined
Oct 16, 2006
Messages
119
Location
Vancouver, BC
Well, last monday I closed on the house. Any normal person would start fixing the walls in the house, removing the 'grandma' window coverings, and laying down a new coat of paint...but this is the Garage Journal, obviously the priority is NOT inside the house!

28147400166_41643cd380_z.jpg

The first priority is the concrete floor. Inside the three car shop, the outer two bays were completed by the previous owner. They've both been finished in a light-brush finish, similar to a sidewalk. Both have been parked on with vehicles that have leaked oil. The middle bay, however, was plywood. What? Yes, plywood over a 2x4 lattice. You can see the edge of it in my pre-purchase photo above. Well, that simply has to go!

28919440910_e6d8b8754f_z.jpg


29207500525_31b0147a82_z.jpg


Tore out the plywood floor, which was quite rotten, in preparation for my General Contractor who's going to pour the garage floor. On the plus side I worked out where the random drain pipe at the back of the garage is going, on the negative it works out that it goes to a sump in the middle of the floor, and then outside to simply drain into the ground (not the municipal sewer). The shop has no water service, so that's not a big deal. We're going to cap off the drain and fill the sump.

28919438810_787e8b6ec5_z.jpg


We also discovered that the area surrounding the drain, which is at about the correct distance from the door for a lift, as *some* concrete poured in it. Getting the 6" I requested in the middle for the lift might not be possible, and even the 4" minimum could be a pain in the neck. Normally spending the money now to chip out the old concrete and prep the depth would be the smart move, but I dug under the edge of bay to the right and it seems to have 4" plus of concrete the whole way down...so I'm not totally hosed.

The garage door guys came a few hours later, and measured up my two non-standard openings for doors. The framing work around the openings was a little questionable, but as I'm going to go with commercial doors we determined it really isn't up to snuff. The general contractor will be adding some framing work to the concrete job and header boards above the garage for the springs. I'll be going with a manual chain-hoist on both doors to save some dollars. Doors will be a Steel-Craft brand Model TD-138 Insulated Steel Overhead Door. http://steelcraftdoor.ca/therm-o-dor/ R value is 12.06, and hopefully being a commercial door they should last me a while!
td138_v3__text_insert.jpg


Quote for two doors (8'9" x 10' and 10'10" x 11') is $3000, installed. Getting the floor poured is costing me roughly $1400, with poly vapour, 4500psi concrete and a smooth finish.

It will probably be October before I get to finishing the floor, but the plan is to diamond grind both bay one and three before acid etching the entire floor. I was really hoping to go with the Armorpoxy line of products, but they won't answer any emails nor reply in the threads I've posted in. Would have been nice, as I'm looking to start with a vapour barrier, then do an epoxy and clear-coat. No flakes, no anti-slip, just one uniform colour. Anyone got any thoughts or options?
 
OP
O

owdlvr

Well-known member
Joined
Oct 16, 2006
Messages
119
Location
Vancouver, BC
Made the trip out to the new house today to drop off one of the Beetles, an Audi Coupe quattro and another load of the spare parts collection. Got to enjoy for a moment the fact that I'll finally have all my vehicles, my spare parts and my tools in one location when this is all finished. No more storage unit, buddies house and my home garage!

The GC was in this week and poured the missing centre section of the floor. While he was at it, he re-framed the front garage door openings to spec, and built the header boards. Last thing he did was climb up and fix a missing soffit piece he saw on my house. All in, $1595.00.
28613355044_06109dc4af_z.jpg


28613356154_58027bf762_z.jpg


29157683351_2026f7f05d_z.jpg


This beetle is by far the worst of my three, and desperately needing a restoration. It was bought by my dad when I was four (33yrs ago), and at the time he did some accident repairs and had it repainted so my mom could drive it while she returned to University (after having us kids). I picked the colour as kid. I can remember the best part about fighting my sister for the front seat was you got to be the one responsible for scraping the ice off the INSIDE of the windshield as mom drove in the winter.

A few years, and breakdowns, later the car was retired to my grandparents cottage...by which time I was definitely referring to it as "mine". Dad taught me how to drive stick in it when I was 13, and Grandpa was letting me drive it to the general store (on back roads) when mom and dad weren't around. A few years back I shipped it out west, where I discovered it's far rustier than cars I can buy here. I tossed in storage to deal with it "one day". With the new shop, I'll have enough room to keep workspace for my other cars, while blowing this one apart for a full nut-and-bolt restoration. Good deal!
 

MagKarl

Well-known member
Joined
Oct 15, 2012
Messages
684
Location
Olympia, WA
I love the color of the Bug. When I was about 7 years old I left my bike in a bad spot and it got run over. My Dad rebuilt the bike and I chose the same color for the repaint.

I don't know if you have Costco in VBC or would have to cross the border, but the 4ft LED shop lights are a great value. I used them in my barn and very happy with them, lots of others here have done the same.
 

Bib Overalls

Well-known member
Joined
Dec 4, 2006
Messages
3,318
Location
Jonesboro, Arkansas
The framing on the back wall is intriguing. Wounder what the two areas I can see framed up with queen posts and headers and then closed in were for?

Most likely the center bay was going to be a wash stall until the money ran out.

Overhead lights at the workbench and mill should be forward of the user to eliminate shadows on the work piece caused by the user's body.

I used OSB on my shop walls and I will be using reflective white metal on my ceilings. Drywall is nice but I would not use it on the lower four feet of a shop wall.

In terms of what you need to do and when I think you have your ducks in a row.
 
OP
O

owdlvr

Well-known member
Joined
Oct 16, 2006
Messages
119
Location
Vancouver, BC
Apologies for the slow response, it's been a pretty busy couple of weeks. I just got my 1958 Beetle back from RWM&Co, having had the entire roof and engine lid repainted due to a fire. Since I "was in there", I had a new headliner installed, and then redid the interior and prepped it for a driving event. You can still smell the fresh paint off-gassing, but that didn't stop me from taking it on the Hagerty Fall Classic, roughly 700 miles of twisty roads through Washington state! Thanks to a buddy Geoff saving my **** on the final prep, the car performed flawlessly. Just over 1000mi round trip from my house, including the event, over the last four days.

29781318285_b8f3950cb2_z.jpg


CCAfallclSat_004-XL-600x400.jpg


MG_0003cca-XL-600x400.jpg


29781319535_e80e8f7762_z.jpg


The framing on the back wall is intriguing. Wounder what the two areas I can see framed up with queen posts and headers and then closed in were for?

Not sure? Windows? Based on some of the other structures around the property I suspect my shop was originally something else at another location...or parts of it were. The previous owner was definitely a man who re-utilized things he found valuable.

Most likely the center bay was going to be a wash stall until the money ran out.

Now that is an incredibly observant, and likely correct, assumption! Darn, now I should have tiled it :p

Overhead lights at the workbench and mill should be forward of the user to eliminate shadows on the work piece caused by the user's body.

Lighting over the Mill will be set once the mill location is finalized. On the drawing the light is set back just so it doesn't 'overlap' and confuse people. For the work bench, I anticipate I will want to set it up like my current shop, with cabinets over the bench. We have short ceilings in the current shop, so lighting above the workbench isn't possible (the cabinet doors would hit them) and thus the lights are behind the user. We also don't have under-cabinet lighting. Both issues I plan to correct in the new shop.

I used OSB on my shop walls and I will be using reflective white metal on my ceilings. Drywall is nice but I would not use it on the lower four feet of a shop wall.

In terms of what you need to do and when I think you have your ducks in a row.

Yeah, still working out what I want to do with the walls. I've always had drywall, don't hang a lot of stuff on the walls because every shop has been shelving...but we'll see. It's going to end up a budget call I think.

Do you mind sharing the source of the commercial doors that you are looking at?

On the garage door front, I hear that they have just been installed! The guys forgot to send me some photos, and I won't be around for a few weeks, so I'll have to see if I can get a buddy in town to swing by for me. The whole process has been fantastic, the communication has been spot-on. I let them know from the beginning that I would be absent through most of the process, and they've gone the extra mile to make sure I'm "in the loop" on the whole process, and they completed the install well before the deadline I had set for them.

Confirmation that I've chosen the right guys? Today when he messaged me to say they had finished the installation (on a Sunday!), he asked when I would next be at the house to see them. Apparently my deposit is enough, and we'll take care of the rest only after I've seen the doors installed and I'm happy. That's good customer service. Pacific Overhead Doors is who I ordered them from. Sean is based out of Calgary, but did everything for my B.C. home.
 
OP
O

owdlvr

Well-known member
Joined
Oct 16, 2006
Messages
119
Location
Vancouver, BC
Thanks! I'm really quite happy with the '58. The original plan when I bought it was to assemble it, and flip it. But then while I was doing the assembly I got a call from a Director friend who needed it for a TV production (Man In The High Castle). I prepped it all black with as little chrome as possible, and rented it out for a number of days in season one. Now that I've done a bunch more to restore it, and after that 1000 miles, I think I'm going to keep it and not flip it. It's too much fun!


On the garage front, the square-D electrical panel is in, as is the 1.5" conduit which allows me to run internet/alarm/whatever in future. I ran 100amp service to the shop, I think this panel should be big enough, eh?

29771234211_0d0941f6bc_z.jpg


The garage doors have also been installed. I'm afraid I don't have a larger photo yet, or anything from the inside. Just this quick phone snap a buddy in town sent me. The two doors on the right (which I just had installed) aren't an exact match to the door on the left, but in this case...close enough. The exact matching doors were an additional $2500. No thanks, I'd rather spend that inside the shop.

29561104670_0eea699efa.jpg


-Dave
 
To avoid these ads, REGISTER NOW!
OP
O

owdlvr

Well-known member
Joined
Oct 16, 2006
Messages
119
Location
Vancouver, BC
Whew, long month without updates. What can I say, I've been working as much as possible on the shop...and not spending much time on the forums. I have been able to accomplish a lot, however.

Roughed in all the electrical, and came upon a problem when reaching the corners of the shop. The shop is built with 6x6 posts holding up each corner and mid-span of the shop. Due to the roof design, one can't go "up and over", so a solution for getting the wires around corners was needed. I came up with these wire boxes, which will get capped off after the walls are up:
30891302292_12ca894601_z.jpg


Lots of wiring...but not a tonne of photos of wiring.
30891302532_5eb3c6b3fc_z.jpg


I did start wiring up the panel so I could use some of the outlets in the garage, instead of running everything off a single extension cord from the house. Aiming for 'as neat as possible'.
30919449741_121fc46599_z.jpg


The walls are 90% insulated at this stage. What a pain in the neck this was. NONE of the stud spacings are standard. Well, that's not true, I think I hit 4 or 5 in the whole shop which are on actual 24" or 16" centres. Otherwise, every single piece of insulation is custom cut.
31033524455_6377a26ac6_z.jpg


30891170862_ff127fcb5a_z.jpg


Oh hey! These spots can use insulation right out of the bag! Sigh, it seriously was that exciting to discover some spots I could just pop the insulation in. This image also shows one of the LED worklights that I've chosen for the shop. They are coming from Princess Auto here in Canada, 3700 lumens and $75cdn each. They were on sale a while back for $50, but I didn't own the shop back when they were on sale. I managed to negotiate my price down to $63/unit, based on buying as many as I did. After hooking just the one light up, I think I may have bought too many!

30919448601_691cc113f6_z.jpg


Vapour Barrier. I bought 8ft / 800sq-ft rolls thinking that the smaller rolls would be easier to work with solo. I also, incorrectly, thought you worked in 8ft wide sections of wall, cutting the vapour barrier the length you needed floor to ceiling. After the first section it became painfully obvious to me that you're supposed to cut the WIDTH you want, and it suddenly becomes way easier. Some of my walls are 8', some are 10', some are 13'...so I guess it doesn't really matter what length I got, I'm going to be patching along regardless.

30891169142_2369e20486_z.jpg


I've also moved my 1971 Salzburg tribute Rally Beetle over to the new house. Poor thing has a thick layer of sawdust on it now. From magazine cover to totally abused in just four years. Sorry little buddy...
30891162262_52dd2f3978_z.jpg


I'm covering the walls in "Factory" plywood. This is Good-One-Side plywood that has some issue making it seconds grade. Some of the patches might be pulling out, or an edge is damaged, but otherwise it's good stuff for a slightly cheaper price.
30891167942_16cda607d5_z.jpg


…It’s at this point that I really wished the guy who built the structure of my shop was familiar with these two tools. A square, and/or a tape measure would have REALLY made the finishing of the shop easier. Nothing is square, there are *almost* no studs at 96” or 48”…oh the list goes on. Now, mind you, I’m not a carpenter by any stretch…so that just makes it much harder. Metal I understand, mechanical things…no problem. Wood, I dunno how you guys do it. I swear a skill saw was designed to cut everywhere BUT along a straight line!
30891171752_fc2a7d6858_z.jpg


Because I’m trying to work in the space where I’m storing two cars, and the entire downstairs of my house is filled with garage stuff, I’m having to buy my materials in short batches. I live in the Pacific Northwest, in an area that rains more than Seattle, so the habit is to watch the weather. If it stops raining for a few hours you drop what you’re doing and go and buy the materials you think you can work through for the next portion of the rainy forecast! When I bought the first load of plywood, I only bought enough for one wall ‘section’. The plywood I got was [/i]really good quality[/i] and outside of a popped patch or two, you couldn’t find any reason for them to be labeled as ‘seconds’ or rejects. Knowing that the skid I had bought from was almost finished, I went back and bought the 8 sheets they had left. Amazingly, it worked out that I finished two other wall sections with ‘just enough’ wood.

So, fast forward a week or two and I have more insulation done and decide to get more plywood. Another load of 25 sheets, and I swear I’m getting weaker not stronger with this project. Shuffled all those sheets into the shop, then shuffled them around twice more, and finished up all but one final wall section. Yesterday I went back for the last load of wood, and as we’re loading it up one of the guys says “Hey wait, this isn’t 3/8” plywood…” Turns out, when I finished off the skid of 3/8” plywood, it was replaced with 1/2” plywood. My storage bay has 50% 3/8” thick ply, and the rest of the shop is all 1/2”. Not bad!
30891159232_d8bf5362d7_z.jpg


I’ve been waffling back and forth on the paint finish for the shop. A friend of mine has a large barn finished in the same plywood, and he used clear varnish on the whole shop. I’m kind of falling in love with the warmth of the wood, the grain on the walls, and bought a test can of clear to try out on some scraps. But, as I know, a shop should have white walls to reflect light and make the space brighter. Hmmm…warmth of wood, or bright white? Eventually I came to the conclusion that the single bay would be finished in clear varnish, and the bigger main shop area would be white. Anticipating a need to shuffle the cars and tool boxes and storage around to work on other items in the shop, I figured it would be best to paint the back walls of the whole shop before moving everything. I had both the clear and white primer ready, and by flip of a coin decided to do the white areas first. So glad I did. Immediately it was evident how much brighter and better the white is going to be, and the whole shop is going to be white…all three bays.
30919435001_c4e11ef597_z.jpg


30891160372_0f7201aff2_z.jpg


And that’s where I’m at today. I need to Vapour Barrier this final wall, and then work on painting and priming the shop. I’m definitely confused on how I’m going to insulate and vapour barrier around the electrical box, but like everything else on this build I’ll find some way to make it up as I go along! I still have all the roof insulation to do, and the floor. The problem is, the floor is going to have to wait until the summer, as I’ve missed the weather window to do it this year.
30919431511_8d2a9c2187_z.jpg
 
Last edited:
OP
O

owdlvr

Well-known member
Joined
Oct 16, 2006
Messages
119
Location
Vancouver, BC
...and the main shop area is ready for primer and paint.
31026745976_47b7db0350_z.jpg


Still have to insulate the ceiling though. That'll be fun.

-Dave
 

sublime68charger

Well-known member
Joined
Sep 9, 2014
Messages
5,415
Location
SW Wisconsin
Great work so far!

Are your ceiling space uniform?
For puttin up insulation!

I understand the custom cut and fit for side walls as my 24x26 only had 2 bays of the same size.

My ceiling grid was space out at 24" across the board but the walls where all over the board.
 

Styx

Well-known member
Joined
Jul 26, 2014
Messages
316
Location
Fraser Valley, BC. Canada
Looking great Dave. I here you about the rain. I've been trying to get my last bit of siding done and the rain makes going up a ladder 22 feet kind of sketchy... October was the wettest one on record... November has been better but it seems the weekends are the wettest days...lol...
Keep the pictures coming...

Cheers Randy...
 
OP
O

owdlvr

Well-known member
Joined
Oct 16, 2006
Messages
119
Location
Vancouver, BC
Great work so far!

Are your ceiling space uniform?
For puttin up insulation!

I understand the custom cut and fit for side walls as my 24x26 only had 2 bays of the same size.

My ceiling grid was space out at 24" across the board but the walls where all over the board.

Two of the rafters are odd spacing, but it *looks* like everything else is 16" centres. Here's hoping!

Looking great Dave. I here you about the rain. I've been trying to get my last bit of siding done and the rain makes going up a ladder 22 feet kind of sketchy... October was the wettest one on record... November has been better but it seems the weekends are the wettest days...lol...
Keep the pictures coming...

Cheers Randy...

yeah, the rain has been ridiculous. I finally broke down and hired some guys to clean the gutters out on the house. I'm not a big fan of ladders to start with, but two stories up in the rain...yeah, no. Turns out they cleaned off each roof on the house, the gutters, the shop roof and then cleared all the leaves off the driveways and concrete for me too. $125! Money well spent...

Today I managed to finish two coats of primer in the main shop:
30962229211_0fcabc9570_z.jpg


30934043702_5ecec9401b_z.jpg


31040665336_07c6d2a3eb_z.jpg


31040664806_829e2f6d9a_z.jpg


-Dave
 
Last edited:
OP
O

owdlvr

Well-known member
Joined
Oct 16, 2006
Messages
119
Location
Vancouver, BC
The second coat of primer actually dried quick enough that I could have done the first coat of paint on the same night, but occasionally we’re supposed to take a break from the shop (so I hear) and actually do some other things in life. Ah well. Had to take a day or two off from evenings in the shop to finish some business paperwork, and then it was right back into the shop. The first evening back I painted the two coats of semi-gloss white, and then considered shuffling everything from the small bay into the big bay to finish the paint. Well, that idea didn’t last long as the alternate plan was to insulate the roof and then start installing some of the permanent features of the shop. So…that’s what I did.

30868426740_d214e3f9c8_z.jpg


The garage door guys came over on Sunday to finally finish up the installation. When the doors were installed back in September, there were a couple of items which didn’t get shipped by the manufacturer, and an issue where the middle door was cut incorrectly. Basically the middle door ended up being 3” narrower than it should have been, but whether it was the installer's measurement or the cuts during manufacture…doesn’t really matter. I wasn’t married to any particular width, and we explored having an all-new door made to correct the issue. Ultimately when I realized I was going to re-do the outside siding on the shop next summer, I suggested to the door guys that we simply re-frame the shop to match the door. They agreed to reframe on their dime when the seals and missing bits came in, and so what could have been a stressful issue ended up working out for everyone. As an added bonus, they fixed some issues with door number one (which they didn’t install), and added exterior seals to it…so I would still definitely recommend them.

The rafters got R12 bat insulation, which allows for the needed airspace between the insulation and the roof sheathing. I then screwed 1.5” ISO foam panels to the rafters, adding another (I think) R6-ish to the insulation rating. Once all the panels are in, I’ll caulk the seams and edges, which should give me a sufficient enough vapour barrier.

30428540023_3a661bb8e3_z.jpg


I ran out of the ISO panels, which was somewhat planned, but with the whole shop insulated with the R12 batts, I figured it was time for some fun. In went the television, the stereo and the speakers. A lot of what I’m doing in the garage is a learning experience for the work I want to do in my house. I want floating shelves in my office, so I taught myself how to build them by doing one for the stereo. My living room needs speakers hung in a hidden fashion, so I learned out to make french cleats to hang the ones in the garage.

31200248536_3af89eee23_z.jpg


31200239476_8e5b38d60c_z.jpg


I’ve had the 4800w shop heater for years in storage, didn’t even know if it worked before moving it between houses. I figured with most of the insulation in I could finally heat the place a little. Once it was up and running, I discovered my first major shop mistake. While doing the electrical, I had planned on putting in one or two ceiling fans. A buddy of mine who has a similar sized shop a few streets away told me how he has them, and never uses them. At the last minute I bailed on the fans, and didn’t wire them in. Once the heater was running, it was obvious how much they would have helped move the heat down to the floor level. ****. At the floor level I could see my breath, standing up on a ladder it was like a tropical beach.

31200246316_7922109ed2_z.jpg


I have a fan similar to one of these:
3231520.jpg
, that I temporarily mounted to the beam and turned on low. Within a half hour the whole shop was comfortable and even. So, now I will need to work out if I’m going to pull down some insulation to do the ceiling fan, or work out a post/beam mounted solution.

With that done, and a business trip looming, I tossed stuff back in the shop and will finish up the rest when I return. First job will be painting the smaller bay, and setting up all of my storage. I’m hoping my Garage cabinets will arrive while I’m gone, and I can also begin working on building workbenches and the setup for the main shop. It was nice to finally get two of my Beetles in the shop, dry and heated. The white paint has done wonders for the shop, and I love the white walls with the visible beams. It’s interestingly made the shop feel much larger, and the cars don’t feel like they are dominating anymore like they used to.

30868421410_fce2671157_z.jpg


30868424000_39626fcfe1_z.jpg


The new arrival (at least as far as GJ is concerned) is my 1971 1302s (Super Beetle) which is a tribute to the factory Salzburg Rally Beetles. The factory cars were raced in the Austrian Rally Championship in 1971, 72 and 73 by Porsche Austria. My car was built five years ago, and the exterior was a replica of the factory cars. Everything under the skin was my own selection. This past season I switched out the factory Shell sponsorship logos for the Liqui-Moly logos, as they were supporting the Classic Car Adventures events that I run. Current spec on my car is a 2110cc engine fully dry-sump with dual webber 44’s. The engine is mated to a Porsche 901 5-speed gear box, and it’s a completely stripped interior for rallying. The torsion bar rear suspension was all cut out and I build a coil-over system. Front retains the factory macpherson struts, with custom dampers and springs.

30868393750_ae58c076e7_z.jpg


30868404650_418da4ea44_z.jpg


-Dave
 
Last edited:
OP
O

owdlvr

Well-known member
Joined
Oct 16, 2006
Messages
119
Location
Vancouver, BC
30655567474_b64975ce3c_z.jpg


In between business trips I've managed to do the primer in the smaller side of the shop. Two coats of oil-based primer, and the smaller side of the shop isn't looking as small anymore. The plan is for this side to be the "storage" side, once I get the two coats of semi-gloss latex in the shop I'll build a small storage mezzanine above the garage door.

Long term, and by long term I mean like 5yrs from now, I'd like to consider closing in and insulating one of my carports outside for storage so that I can use this bay as wood shop or machine shop. But, well, I'm definitely over budget already on the shop so for now I'll enjoy it as originally planned.

31125349380_30f16d2bba_n.jpg

31125349700_f0d46368bb_n.jpg


This may come in handy for other users. With the garage separated from the house, I've missed a few package deliveries even though I am home. I found this wireless doorbell unit on Amazon, which comes with one transmitter and two receivers. The transmitter is battery powered (unfortunately), so we'll see how long it lasts. But the good part is I have a working doorbell in the shop, which is located on the backside of the house. Did NOT expect that it was actually going to work...but pleasantly surprised to find that it does. Good buy at $40, solved a simple (but very annoying) problem. Here's the item on Amazon.ca.

31200210086_3f3e84e41a_z.jpg


I've also discovered two new things this week; one a semi-serious planning mistake, and the other a quirk of my new property. The planning mistake involves my pickup truck, pictured above. The truck is 20'6" long, bumper to bumper. The shop is 23'6" deep. So, at the moment I can bring the truck in, and (in theory) have 3ft of working space at the front. That's all fine and dandy, until I bring my milling machine in and the cabinet set I've ordered. Once those are installed, my truck isn't going to fit.

...not sure that it matters. 3ft of working space isn't a whole lot, and I can't imagine I would pull it all the way in anyways. Just means no parking the truck in a heated garage if I need to work on it in winter.

The second item I've discovered is a problem with the slight slope of the concrete pad outside the garage. I knew it was sloped, for drainage, but the exposed aggregate finish has little traction when wet. Living in the PacificNW, it's wet often. I'm going to have to sink some anchors into the back of each bay so I can pull vehicles in if they aren't running. Another item to add to the list!

-Dave
 

Gentle_Ben

Well-known member
Joined
Nov 10, 2012
Messages
530
Location
Manitoba, Canada
I've also discovered two new things this week; one a semi-serious planning mistake, and the other a quirk of my new property. The planning mistake involves my pickup truck, pictured above. The truck is 20'6" long, bumper to bumper. The shop is 23'6" deep. So, at the moment I can bring the truck in, and (in theory) have 3ft of working space at the front. That's all fine and dandy, until I bring my milling machine in and the cabinet set I've ordered. Once those are installed, my truck isn't going to fit.

...not sure that it matters. 3ft of working space isn't a whole lot, and I can't imagine I would pull it all the way in anyways. Just means no parking the truck in a heated garage if I need to work on it in winter.

When I was designing my garage I posted a potential layout on Facebook, and one of my construction worker friends pointed out the error in the depth of my garage right away. I was only going to have it 25 deep and 28 wide, he pointed out that I wouldn't have enough room to work on the truck once it was inside, so I rotated my plans 90 degrees. Good thing too, since even at 28 feet deep there isn't a whole lot of extra room.

We had a similar issue on my attached garage, my wife wouldn't have been able to open the rear hatch on her Jeep with the original size it was, so we had to extend the front of the garage out an extra foot, perhaps that's something you could look at in the future?
 
OP
O

owdlvr

Well-known member
Joined
Oct 16, 2006
Messages
119
Location
Vancouver, BC
Yeah, I'm not overly worried about it. The main structure of the shop was already there when I built the house, and with the tool boxes, cabinets and tools I have it wasn't really in the cards to have the truck spending time in the shop anyhow. Besides, I should be able to time most of the repairs for summer...right? :p

-Dave
 
OP
O

owdlvr

Well-known member
Joined
Oct 16, 2006
Messages
119
Location
Vancouver, BC
Another couple of weeks have passed, but with traveling I've only had a few days in the shop...still, progress!

31714035125_050a992e57_z.jpg


I got the front lights up into the shop, and have lots of light for working. Hard to show the difference between the single light I've been using and the addition of 5 more LED lights...but the cell-phone camera comparison sort of shows it.

After waiting a month for my cabinet set to come in, I finally went down to pick it up. Waiting a month may not seem bad, but when I paid for the set on a Friday in early November, it was only after KMS Tools confirmed they had the whole kit in stock. My truck was already full, so I said I'd be back on Monday to pick it up. I got half way there (2.5 hours away) and they called to say they didn't actually have it in stock, and didn't know when it would be available.

It took a rather annoyed email, plenty of phone calls, a month of waiting and two extra days off work...but finally I could go and pick it up. KMS Tools offer for the mistakes, holding my $2700 hostage and not replying to emails? A $25 gift card. Seriously. Anyways, started to set up the cabinets on Saturday:

30904185093_4eba865aca_z.jpg


At this stage I discovered that the Chinese designed a ingenious system whereas all the hardware holding the cabinets together are hidden. But, I'm not sure they designed an system for moving the whole 13 feet of bolted together cabinets back against the wall after your done. Hmmm...well, keep building and figure it out later?

Opening the next cabinet, my heart sank.

31714034655_8876a767a1_z.jpg


30904183813_b59e846274_z.jpg


The box didn't look crushed from the outside, maybe a touch wrinkled, but the styrofoam packing on the inside was flat where it was once 2-3" thick. Ugh. After 5:30pm, store closed...now what? Its going to be another 6hrs round trip to bring this thing back, I know for a fact they don’t have another one in stock and given my $25 gift card compensation for the previous clusterf**k, I’m pretty sure at this point I’m going to be given the run around. Sigh.

Well, before building the system (which is supposed to have cabinets along the base from one side to the other), I had been thinking about whether I could remove one of the units and somehow secure the bench top so that there was a blank space to sit with a stool and have sort of a ‘desk’. With the damaged cabinet now not an option for installing, it gave me a great reason to see if I could figure it out. Assembling the back wall of pegboard without the bottom cabinets was a bit sketchy, and I wouldn’t recommend it, but I made it work. Sliding the whole assembly back towards the wall was damned near impossible, and almost bent the pegboard. But, in the end, I’m super happy:

30904182733_1e864efac8_z.jpg


The wood top is actually two pieces, each piece bolted to two lower cabinets. In my case, the 'floating' end of the one worktop needed no support, but it didn’t line up perfectly with the second piece of wood (due to uneven floor). I used a few pocket screws and some shims under the cabinets to tweak things into position and hold them solid.

31714034145_a8313b2789_z.jpg


Figured out this morning what height I want for workbenches, and started by building the plain workbench which will be going in my main shop. This replaces my super-terrible $30 Canadian-Tire "workbench" which I bought many, many years ago.

The bench is built with 3/4" Factory (sanded one-side) plywood top, and 3/4" MDF shelf bottom. Considered boxing the bottom, but decided not to at this stage. With construction adhesive, the steel brackets and a boat-load of screws...it seems pretty bomb-proof. It's 5ft wide, and 2' deep so that it will slide up beside the milling machine. It allows me to lay out milling tools and projects while working on the mill, but also use it for general work when I'm not using the mill. I considered not gluing the top down, so it could be replaced, but then realized I've never had the need to replace the Canadian Tire top...so this should be just fine. Worst case scenario I screw a new top to this one, and shorten the legs by 3/4"

31714033865_aca591381a_z.jpg


30904184123_c03a164b31_z.jpg


31598410721_4a0785b932_z.jpg


I was also able to follow up today with a call to KMS to let them know about the bent cabinet. I got the Victoria store manager on the phone, the same one who ‘gave’ me the $25 gift card. I told him who I was by name, and that I had picked up the 20pc Garage storage unit earlier this week. He remembered me, and then I let him know that I opened up the 5-drawer cabinet and it was badly bent. Fearing the worst, I waited to hear what he said…

“Ah ****, I’m so sorry about that. I know we don’t have one in stock, but let me call the head office and see what store has one in stock. I’ll have it shipped right to your house directly, and you can either salvage the one you have for whatever you like or simply take it to metal recycling. So sorry about that, I’ll call you back as soon as I know how fast I can get one to you.” Uh, what? Is this the same guy from earlier in the week!?! A few hours later he called me back, a new cabinet is leaving another towns’ store on Monday and headed directly to my house. I was not expecting that, and have to give credit where credit is due. THAT is/was great customer service.

The base of the damaged cabinet is badly mangled. The base is removable, but the mounts which are part of the main cabinet are even worse. The welds are pulling out, and a bit of work with the body hammers and such doesn’t have me too confident that I can get it flat and useable (with my body hammer skills). I could cut out the bad metal and weld in new, but that will demo the powder-coating. Need to sleep on it, I have an idea which just might work…

-Dave
 
Last edited:

madoc1

Well-known member
Joined
Dec 11, 2012
Messages
1,242
Location
spicewood, tx
just found this. an amazing transformation of your shop, but i am a bit confused. in your 12/7 post you state the shop basically was there before you built the house. i thought the house was there from the beginning. whatever. nice work and i love the bugs. my school car for three years was a '58 baby blue conv. beetle. loads of fun with that thing, even if it only had 36hp. used to tailgate trucks and busses to get a pull. lol. what's next?

jim
 
OP
O

owdlvr

Well-known member
Joined
Oct 16, 2006
Messages
119
Location
Vancouver, BC
just found this. an amazing transformation of your shop, but i am a bit confused. in your 12/7 post you state the shop basically was there before you built the house. i thought the house was there from the beginning. whatever. nice work and i love the bugs. my school car for three years was a '58 baby blue conv. beetle. loads of fun with that thing, even if it only had 36hp. used to tailgate trucks and busses to get a pull. lol. what's next?

jim

Probably just poorly typed by me. I bought the house/property/shop in the summer, so it is all "new to me". The shop was just a roof and bare walls when I bought it, but the house was built in 1992 and quite liveable (if you don't mind decorating designs by a 'grandma').

Still working on finishing up the shop, and then I need to start working on redecorating the inside of the house to better suit my demographic...

-Dave
 
OP
O

owdlvr

Well-known member
Joined
Oct 16, 2006
Messages
119
Location
Vancouver, BC
30904183813_b59e846274_z.jpg


Started hammering out the bent cabinet, and soon realized that the 18ga metal wasn't going to move around the way I hoped...especially with the way the spotwelds were positioned in the middle of the main damage. Then an idea hit me, and I took some measurements. To the table saw!

31598410191_0da056714b_z.jpg


My recently purchased Kreg Jig made a secure base for wheels really easy to make. Since it uses the bottom of the cabinet instead of the edges, it now sits flat and level. Just needed to make a top for it, and my bent 5-drawer cabinet will now become the lower rolling chest for my milling machine tools.

30904183313_7f8961833d_z.jpg


31620995341_fbbe825527_z.jpg


Before I moved, I almost threw out all my pegboard hooks. I HATE pegboard, with a passion. I have no good reason for hating pegboard, it's just one of those things that I've never liked. The new cabinet system uses pegboard behind the work surface, and I realized that all of my fab-bench misc items hung on pegboard for the last 12 years. My dwindling budget doesn't allow for building shelves or wooden cabinets, so if I don't use pegboard what will I do? So...pegboard it is. At least I trimmed it out so it doesn't look super cheap and crappy :p

31363818250_69e0cbbfc3_z.jpg


Once I find the box hiding all my electrical goodies, I'll make the wiring for the workbench power bar disappear.

-Dave
 
OP
O

owdlvr

Well-known member
Joined
Oct 16, 2006
Messages
119
Location
Vancouver, BC
The repaired and modified lower cabinet worked out perfectly as a new lower box for my milling tools. The old lower box made the red top look "good", so this is quite an improvement! I will now need to avoid the temptation to buy a new top box.
31735691516_6a229e5297_z.jpg


I moved my Craigslist cabinet find into the shop, and started looking for boxes labeled "oil, lubricants, paints and cleaners". I really hope I've found all those boxes, I'm almost out of space! I do have doors for this cabinet, but need to find a source for hinge pins as two of them are missing.

31735690886_5a32d16b3c_z.jpg


30931502534_f868bb1ebd_z.jpg


31735690226_c8a88fd1c5_z.jpg


Did a little decorating, and then decided I should make the shelves for my axle stands. Thought about ripping some 2x4's down, and then for some strange reason changed my mind. Totally way overboard on these, and I'm going to either tear 'em apart and redo them, or panel the unit and turn it into a cabinet. I left the top unfinished until I decide what to do.

31735689466_aa2d53da9a_z.jpg


31662031791_49e2c0ce97_z.jpg


Sigh. Hate doing a job, and then deciding I really don't like it afterwards.

-Dave
 
OP
O

owdlvr

Well-known member
Joined
Oct 16, 2006
Messages
119
Location
Vancouver, BC
i think it looks good. maybe a dab of paint.
p.s. your blue bug needs a bath.:)

jim


Yeah, I'm thinking if I paint the 2x4's white, and add a top shelf it might look okay.

Blue car needs a serious dusting at the very least!

-D
 
OP
O

owdlvr

Well-known member
Joined
Oct 16, 2006
Messages
119
Location
Vancouver, BC
Following the Christmas holidays I brought my '58 from the old house over to my new one. As the Security cam photo shows, things are getting a little bit tight in the main shop with three cars!

I've certainly worked in shops with less room, but there is a whole other bay just beyond the wall on the right waiting to be finished!

32046269086_68dd8d5b1a_z.jpg


With just enough room to walk around, but not really do any work, I've switched gears to getting the smaller bay finished. First step was to build the storage shelf I had planned for above the garage door. I probably overbuilt it, using 2x8's and 3/4" plywood, but I figured it was better to be overbuilt then have it drop down onto a car one day. Because of the door clearance it ended up higher on the wall than I would have preferred, but I suppose it could be worse!

31936900912_28ef5849e7_z.jpg


With that done, I could move a bunch of stuff up top, giving me room to build myself a wood working bench. It's pretty small, have to slide the mitre saw off the table to do any real work with the table saw, but it will fit where I need it to fit in the shop. Table saw and router table were inherited from my grandfather. I then added a dust-collection system, since I hate the sawdust blowing around the shop getting on everything. It's not quite as effective as a commercial system, but seems to pull all the fine dust out of the air which is what I really want.

31939704811_2378c55fb5_z.jpg


32045958036_827f1593df_z.jpg


32085520115_4572b1c460_z.jpg


31274755053_408b84047d_z.jpg


The next photo doesn't show all of the work done, but I've finished up all the wiring in the shop. I hung the lights in bay 1, which is so much nicer than working off a construction LED unit. Speakers have been hung on the wall, and the next job is sorting out the storage for all of the wood I have lying around.

31274755303_0cb41cc776_z.jpg


-Dave
 
Last edited:
To avoid these ads, REGISTER NOW!
Top Bottom