To avoid these ads, REGISTER NOW!

Makita model 2415 15" Table Saw

Grumblebum

Well-known member
Joined
Aug 10, 2015
Messages
1,940
Location
Wollongong Australia
Fellow GJ'ers

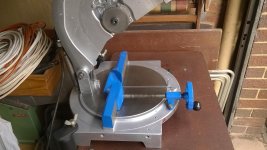
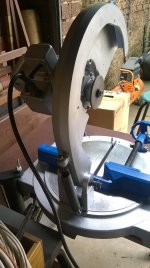
I have been gifted an old Makita model 2415, 15" Table Saw and am wondering if anyone else has one or one similar.

My searches for product information so far have not shown up much other than a few of the same model on some auction sites.

One site has suggested it is 1982-87 vintage.

It's very heavy and my guess is 30+ kgs (66+ lbs).

It works fine and I plan to give it a basic strip down and clean up hopefully being able to find the original makita grey colour under the current grey spray that has been applied at some point.

Seems to just be missing the clamping device and a small bottle that I've seen in another photo that sits in a clamp bracket on the top of the main shroud. (you can see the holder just to the left of the on/off buttons in the first pic)

I think I may have found a site that has replacement degree measurement decals and will email them to see what they have as they don't have pictures against their part descriptions.

The serial number plate still had the original plastic protector on it so it looks new underneath. Anyone have any suggestions for removing the remainder of the plastic so as not to scratch the plate ?

Hoping that someone may have a lead on a product manual or other information.

View media item 61843
View media item 61842
View media item 61844
Cheers Grumblebum.
 
To avoid these ads, REGISTER NOW!
OP
G

Grumblebum

Well-known member
Joined
Aug 10, 2015
Messages
1,940
Location
Wollongong Australia
Badass aluminum saw.

Thanks Know Wosad, hoping to get it working on some projects soon. :thumbup:

Just a bit of progress thus far cleaning up the saw.

Stripped back the blade cover as a test piece. Light rust underneath the paint but it was not pitted badly. The process has been paint stripper, wash and scrub with steel wool, wire wheel and scotch brite pad on a drill then acetone wipe over before painting with a couple of coast of hammertone.

View media item 61914
View media item 61915
View media item 61973
Then started on the motor cover and switch housing...

View media item 61974
View media item 61975
Picked up a set of circlip pliers so I could start removing the motor to get that cleaned up this weekend.

View media item 62054
Cheers GB :beer:
 
OP
G

Grumblebum

Well-known member
Joined
Aug 10, 2015
Messages
1,940
Location
Wollongong Australia
At least in the US, that would more likely be called a chop saw. What is the rotational speed?

Yeah we call them chop saws or cut off saws here too. Not sure why they called it a table saw in that regard but that what it says on the placard.

It says 3000 rpm if I'm reading it right. Bit hard to read the info until I can clean the placard up.

They guy who owned it is visiting family in Germany currently so I'll try to find out more about it when he gets back. My internet searches have only found a few other examples of the same unit so far.

Cheers GB. :thumbup:
 
OP
G

Grumblebum

Well-known member
Joined
Aug 10, 2015
Messages
1,940
Location
Wollongong Australia
This pic is not my saw, but shows the old Makita electric works circular decal. I've not been able to find even a logo of this anywhere apart from the old Makita caps, so I'll have to try to reproduce one.

Will also need to see if I can find the mitre angle decal or something very close for the front of the swivel base.

View media item 62067
 

Stewie D

Member
Joined
Jun 19, 2016
Messages
9
Location
Sydney, Australia
I think you'll find it is older than you think GB. I have a Makita LS1440 which I bought in 1982 and yours looks decidedly older than that and like yours probably is, the base is not cast ali but cast iron so it's as heavy as.

Stewie
 
OP
G

Grumblebum

Well-known member
Joined
Aug 10, 2015
Messages
1,940
Location
Wollongong Australia
I think you'll find it is older than you think GB. I have a Makita LS1440 which I bought in 1982 and yours looks decidedly older than that and like yours probably is, the base is not cast ali but cast iron so it's as heavy as.

Stewie

I think you are correct Stewie. They seemed to have used 2414/2415 for the portable abrasive cut off saw models as well - the ones with the orange shroud over the blade.

I'm not sure if I'll find a manufacture stamp in the base when I strip it back but will see if I find anything.
 

VivWoodworm

Member
Joined
Sep 10, 2016
Messages
12
Location
Pretoria, South Africa
Almost finished re-furbish on my 2415. I've had it for many years using it only on steel. A very good machine even for some heavy work. My first post, but will try to attach some pics and yes, the speed is 3000rpm as can be seen on the motor plate. I do however have a problem with the machine that I can't figure out. In my next post I will show the problem area in detail and maybe some of our learned friends can throw some light on the subject.
Cheers for now.
 

Attachments

  • Makita 007.jpg
    Makita 007.jpg
    148.8 KB · Views: 92
  • Makita 009.jpg
    Makita 009.jpg
    148 KB · Views: 90
  • Makita 010.jpg
    Makita 010.jpg
    146.5 KB · Views: 84
  • Makita 011.jpg
    Makita 011.jpg
    143.6 KB · Views: 85
  • Makita 001.jpg
    Makita 001.jpg
    137.9 KB · Views: 83
OP
G

Grumblebum

Well-known member
Joined
Aug 10, 2015
Messages
1,940
Location
Wollongong Australia
Almost finished re-furbish on my 2415. I've had it for many years using it only on steel. A very good machine even for some heavy work. My first post, but will try to attach some pics and yes, the speed is 3000rpm as can be seen on the motor plate. I do however have a problem with the machine that I can't figure out. In my next post I will show the problem area in detail and maybe some of our learned friends can throw some light on the subject.
Cheers for now.

Thanks for sharing VivWoodworm. Your saw is looking great.

I am currently stuck trying to remove the motor assembly as I can't get this flange to come off over the bearing. Did you remove your motor assembly or leave it in tact ? I was going to fabricate up something so that I could get my small bearing puller to grip to but maybe you have some insight ?

View media item 63778
I have some questions please..

Do you know how old the model actually is ? and would you by chance happen to have an operators manual ?

I've not had any luck locating much information online.

Cheers GB.
 
Last edited:

VivWoodworm

Member
Joined
Sep 10, 2016
Messages
12
Location
Pretoria, South Africa
Good Day Guys,
Herewith some pics of the problem area I have at the moment.
The pedestal at the rear of the rotating table has a 6mm hole through the pedestal below the pivot pin. On the rear end of the blade housing is a clevis with a 4mm spring pin inserted. This clevis lines up with another clevis on the inside of the pedestal through which the 6mm hole passes.
It seems to me that a pin was inserted through the 6mm hole through the pedestal and subsequently something was attached to the 6mm pin and the 4mm spring pin.
The photo's you posted before clean-up does not show any detail in this area.
There was nothing attached at this point when I got my machine and it bugs the hell out of me.
My machine also did not have the inner steel plate guard which attaches to the spindle hub with a circlip as shown in your photo's.
It does however have an outer pivoting perspex guard which is broken, but I will attempt to repair it.
Any response to my questions will be greatly appreciated.
Thanks,
Viv
 

Attachments

  • Makita 030.jpg
    Makita 030.jpg
    135.4 KB · Views: 44
  • Makita 029.jpg
    Makita 029.jpg
    138.5 KB · Views: 48
  • Makita 027.jpg
    Makita 027.jpg
    140.5 KB · Views: 50

VivWoodworm

Member
Joined
Sep 10, 2016
Messages
12
Location
Pretoria, South Africa
Hi GB,
OH YES.....The pains of engineering LOL.
If ever it was easy, we would all be doing it.
This is a tricky or shall I say sticky business.
I had the same problem and thus is what I had to do. Fortunately it only cost a lot of time and patience and I managed to remove it in one piece.
Get yourself a piece of wooden dowel about 8mm dia. and as long as you will need to make your life a little easier.
Using a medium weight hammer and your dowel, tap all around the rim of the housing, as you would a hammer and chisel (but please...no chisels).
Now get yourself an old screwdriver and grind the flat end of the blade until you have almost a knife edge.
Insert this edge in the seam between the two castings and again very gently tap all around in the seam.
You will have to perform the dowel and screwdriver trick many, many times all around the seam.
Whatever you do don't be in a hurry because this is going to try your patience. Eventually you will be able to insert a regular screwdriver and again gently lever it open all around the perimeter of the castings.
GOOD MAN....Now you have the casting with the driven gear in your hand, put it down somewhere out of the way.
NOW....Looking directly at the face of the main body casting you will see two casting webs radiating outward toward two phillips-head screws. Unscrew and remove them. They are quite long and screw into the motor housing.
Inside the cavity where you removed the driven gear casting at 9 o'clock and 3 o'clock set quite deep into counter-bored holes you will find another 2 phillips-head screws. After you have removed all the gunk inside the counter-bored holes, use the same size screwdriver as before and remove them. They also screw into the motor housing.
Before going any further remove the two retaining threaded caps and the two carbon brushes at the rear end of the motor. By gently tapping the motor housing you will be able to safely remove the motor.
At the front and rear bearings you will see two flexible plastic/rubber discs.
These serve both as seals and spacers. Note very carefully their orientation so as to re-assemble them correctly. Note in particular the raised rim on each of them and re-insert the same way around when re-assembling!!!!
Replace all four bearings with new ones having seals both sides.
When stripping down the driven gear casting and gear note also the order in which to re-assemble correctly.
To take photo's of the laid-out parts is always a good idea. ASK ME.. I've cocked-up many a time in my long engineering life (now retired).
Lastly, to answer your question about a manual, if I had one I would have loved to sell it to you for USD200!!! As far as the age goes, the guy I bought it from about 20 years ago said he bought it new in 1961.
Good luck and do let me know how it works out for you.
VW.
 
To avoid these ads, REGISTER NOW!
OP
G

Grumblebum

Well-known member
Joined
Aug 10, 2015
Messages
1,940
Location
Wollongong Australia
VivWoodworm, I believe you are missing what I would guess is called the "depth of cut control adjuster".

View media item 63796
View media item 63797
View media item 63798
Thanks for the info on removing the motor, I hope to have some time on the weekend to try again.

Once I can take that assembly apart I could take measurements and some better photos for you.

Also did your unit come with the oil dripping bottle up the top ? I just have the broken base of the bottle.

Cheers GB.
 

VivWoodworm

Member
Joined
Sep 10, 2016
Messages
12
Location
Pretoria, South Africa
Hi GB
Thanks for the great photo's.
You are 100% correct !!!
Now that I see the situation I do recall having the parts at some time.
Knowing now what to look for I'll go back into the dim depths of the shop and sure as hell I'll find the bits and pieces.
Originally came with the oil bottle but again I'll be dammed if I know what happened to it (same with the steel guard I mentioned) however, I can't imagine what the purpose of the oil is ???
One certainly wouldn't want oil on an abrasive cutting disc !!!
Regards
VW
 

VivWoodworm

Member
Joined
Sep 10, 2016
Messages
12
Location
Pretoria, South Africa
Hi GB,

Repaired the outer perspex guard and found the (what they call) Set Plate.
That's the adjustable arm that fits onto the (what they call) Holder. These are the protruding bars that support longer lengths of material, either side of the base.
The Set Plate can be set to a predetermined position for cutting multiple pieces of material that need to be the same length, by positioning it and locking with the thumb screw.
You can see the above in the photo's attached.
Should you be interested, and you happen to have the $200 I mentioned earlier I can let you have a copy of the Instruction Manual. LOL.
I found it by accident whilst going through some of my old workshop files.
I can make you a copy but the problem is I don't know how I will get it to you.
I can scan the 20 pages and email them to you, but obviously I don't have an address.

Regards,

VW
 

Attachments

  • Makita 031.jpg
    Makita 031.jpg
    144.4 KB · Views: 53
  • Makita 032.jpg
    Makita 032.jpg
    146.8 KB · Views: 38
OP
G

Grumblebum

Well-known member
Joined
Aug 10, 2015
Messages
1,940
Location
Wollongong Australia
VivWoodworm, your saw is coming together nicely. :thumbup:

I do not have the perspex guard on mine, the guard is completely metal. Nor do I have the bars or set plate, but they do look to be standard Makita type fittings and I might be able to test fit a set from another saw :dunno:

I also don't have the clamp to hold stock against the back block. :sad:

I would certainly love a copy of the user manual, can't believe you found one. I'll PM you an email address, however I am sorry that I don't have $263 in AU dollars to donate ;) Sharing is caring right ?

With a bit of luck this weekend I hope to follow your instruction to remove the motor unit so that I can crack on with the tidy up. I'll try to take pics of each step so that it can be posted back here for future reference.

Cheers GB.
 

Bengadgets

Member
Joined
Nov 13, 2016
Messages
6
Location
Pretoria, S Africa
Hi VivWoodworm,
I followed your progress with 2415 because I have one in perhaps wors condition,but every part still with me.If my first post accidentically appears where you can read it let me know.Being around the corner might help you.
Enjoy the work, Ben.
 

Bengadgets

Member
Joined
Nov 13, 2016
Messages
6
Location
Pretoria, S Africa
Hi Viv,
Looks right to me.My saw is still fully assembled.....And running on its last breath. By just looking at it might solve some of your problems. I'm at 131 Danie Theron st in Pretoria north.
Rgards. Ben.
 

wilhelmStr

New member
Joined
May 15, 2017
Messages
1
Location
Port Elizabeth, RSA
Hi Viv and Ben
This weekend I bought a Makita 2415 and planning to do a restoration job on it.
Many thanks for all the details and photos you shared here.
Could you perhaps help me with a copy of the manual?
Many thanks and all the best
Wil.
 
OP
G

Grumblebum

Well-known member
Joined
Aug 10, 2015
Messages
1,940
Location
Wollongong Australia
Well it has been a long time pondering this step but finally tonight got the spindle assembly removed.

I had tried my best to follow the directions of vivwoodworm, but only manged to get the outer flange removed, which broke the gold cover gasket which I'll need to remake.

It didn't all come out in a single assembly in my hand. Took much perusal of the assembly diagram (which I still need to post here still) to see it was a spindle and wasn't threaded into anything stopping it coming out.

View media item 87456
A scrap of ply and a tyre lever and gently lever from behind the bearing and slowly turning the spindle around eventually got it out!

View media item 87457
And then I could hold it in my hand as originally expected.

View media item 87458
The two screws that hold the motor on are under the grease here in the red circles.

View media item 87459
Easily out now.

View media item 87460
And gently remove the motor assembly

View media item 87461
Now ready for a good clean up. This saw must have been used for both wood and metal, the debris is all gunked up inside. Once back together it will be for metal use only.

View media item 87462
Hopefully not so long between posts on this one now and we can get it finished and back in use.
 

cargill

New member
Joined
Dec 5, 2018
Messages
1
Location
CENTRAL COLORADO
hello everyone ,
i'm working on my very old Makita table saw model 2415, 15 inch.
saw your forum and decided to join.
I'm looking for pictures and maybe a owners manual.
thanks
 
To avoid these ads, REGISTER NOW!
Top Bottom