To avoid these ads, REGISTER NOW!

Thin Brick Dormers -- Garage

bimmer1980

Well-known member
Joined
Feb 5, 2009
Messages
2,103
Location
York, PA
Thought I would set up a thread on how I did the dormers on my garage. I don't have a complete build thread, but thought I would start with this...

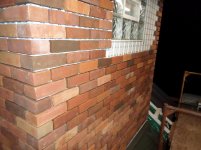
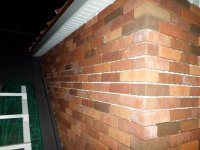
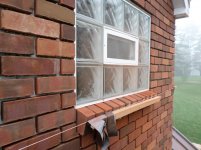
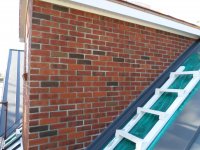
The rest of the main garage is bricked in a traditional manner. The two dormers I have on the garage also needed to look like brick. I wanted to use a product that would be less weight and easier to handle being up on scaffolding and up the roof.

This project was very involved, so I'll cover some steps and go from there.

More details to follow....

SAM_4259.jpg

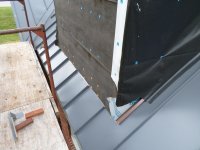
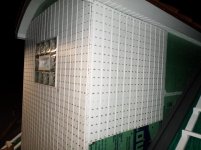
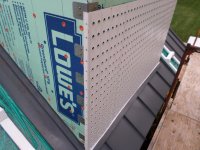
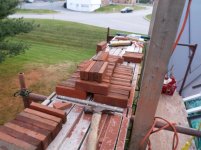
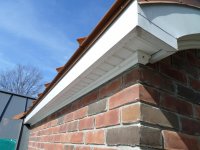
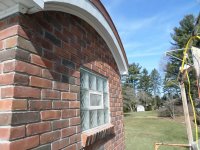
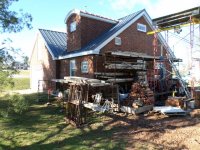
Here you can see the back side of the garage with the scaffolding set up to reach the dormer. Also notice the curved standing seam metal roofing. That is a story for another day.........:shocking:

SAM_4276.jpg

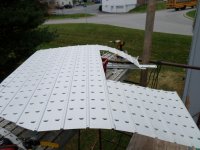
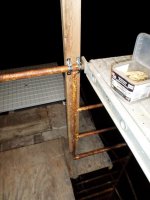
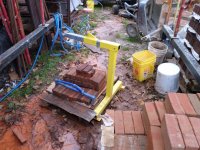
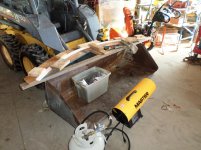
Here you will notice that I counter weighted the scaffolding at the bottom. I will be putting a roof ladder that will rest against the scaffolding. I wanted to ensure the scaffolding would not slide or start to tip. A ton (literally) of cement blocks should do the trick
 
To avoid these ads, REGISTER NOW!
OP
B

bimmer1980

Well-known member
Joined
Feb 5, 2009
Messages
2,103
Location
York, PA
Since the rest of the roof is standing seam, I need to finish some details to tie the standing seam steel into the dormer and prepare it for the thin brick walls.

Z-clips screwed into place. Used two vise grips and a string to get them all in a line.

Trim piece folded and prep'd to hook over Z-clips.

Template made for side trim.

Put blocking on the inside framing for the trim to attach to on the sides and front of the dormer.

Notice the old crappy roof ladder.... that is about to change....
 

Attachments

  • SAM_4325.jpg
    SAM_4325.jpg
    139.9 KB · Views: 51
  • SAM_4337.jpg
    SAM_4337.jpg
    138.8 KB · Views: 49
  • SAM_4336.jpg
    SAM_4336.jpg
    141 KB · Views: 43
  • SAM_4343.jpg
    SAM_4343.jpg
    136.2 KB · Views: 45
  • SAM_4356.jpg
    SAM_4356.jpg
    140 KB · Views: 49
OP
B

bimmer1980

Well-known member
Joined
Feb 5, 2009
Messages
2,103
Location
York, PA
Next project was to make a better roof ladder. Fab'd this up out of 2x4's.

I used construction adhesive, some pin nails and torx screws.

Then put a coat of paint on it since I knew it was going to be outside for quite some time....

Layered on some foam pads on the bottom to protect the roof.
 

Attachments

  • SAM_4367.jpg
    SAM_4367.jpg
    135.3 KB · Views: 32
  • SAM_4365.jpg
    SAM_4365.jpg
    137.2 KB · Views: 29
  • SAM_4361.jpg
    SAM_4361.jpg
    139 KB · Views: 28
  • SAM_4359.jpg
    SAM_4359.jpg
    136.1 KB · Views: 29
  • SAM_4358.jpg
    SAM_4358.jpg
    136.9 KB · Views: 33
OP
B

bimmer1980

Well-known member
Joined
Feb 5, 2009
Messages
2,103
Location
York, PA
Then I started putting a layer of 1/2 foam on the walls of the dormer. Once the foam was cut, nailed and taped, I could start with the installation of the Elite wall panels.

I needed to pay special attention to the corners to give them support. I came up with using metal plates that were bent and then screwed into place. Then the corner of the Elite panels would use tek screws to attach to the metal. The metal plates were large enough to get a screw into the studs at the corner.

One of the key points with masonry is that it is ideal if the brick courses line up with the openings. So I took my brick rule and laid out the course to get it to match with the top of the window. Then I measured down and marked where the panel splices would happen. Then I figured out where the bottom of the panel would need to be cut to line up with the front metal trim by the standing seam roof.

The panel was then leveled and screwed on. Due to the foam behind it, I had to be careful about how tight the screws were placed. I also used to steel trim pieces to support the panel splices.

The first dormer, I used a set of tin snips for all the cutting. This got very tedious in a hurry. I started searching for a better option.....
 

Attachments

  • SAM_4388.jpg
    SAM_4388.jpg
    148.6 KB · Views: 51
  • SAM_4387.jpg
    SAM_4387.jpg
    136.2 KB · Views: 42
  • SAM_4386.jpg
    SAM_4386.jpg
    132.9 KB · Views: 42
  • SAM_4384.jpg
    SAM_4384.jpg
    138.1 KB · Views: 40
  • SAM_4375.jpg
    SAM_4375.jpg
    141.3 KB · Views: 41
  • SAM_4371.jpg
    SAM_4371.jpg
    136.4 KB · Views: 42
  • SAM_4368.jpg
    SAM_4368.jpg
    140.5 KB · Views: 44
Last edited:
OP
B

bimmer1980

Well-known member
Joined
Feb 5, 2009
Messages
2,103
Location
York, PA
Lights and more elite panels....

It was getting late in the year and it was now starting to get dark at 6pm and then earlier. Since it was still decent weather, I wanted to be able to keep working in the evenings after work. I didn't want a huge investment in a light system, but needed up higher than I was to cast the light onto my working area.

After some browsing at Lowes, I came up with the following solution. Closet hanger brackets, screwed to some 2x4's and then conduit clamped onto the scaffold bucks. Then two pieces of conduit laid into the closet hanger and the lights were then attached to the conduit by a couple of 10 gauge wires twisted on. I zip tied on an electrical cord and splitter. Behold, let there be light!

Then I could continue to work on the many detail in the evening.

I finished installing all the corner metal pieces. Then marked and cut the Elite panels.

I used my Roper Whitney 412 box and pan brake to put a fold on the corner pieces. Then they were screwed into place.

Details and pictures to follow...
 

Attachments

  • SAM_4415.jpg
    SAM_4415.jpg
    134.6 KB · Views: 30
  • SAM_4408.jpg
    SAM_4408.jpg
    138 KB · Views: 24
  • SAM_4403.jpg
    SAM_4403.jpg
    135.6 KB · Views: 23
  • SAM_4400.jpg
    SAM_4400.jpg
    139.6 KB · Views: 20
  • SAM_4397.jpg
    SAM_4397.jpg
    133.3 KB · Views: 14
  • SAM_4396.jpg
    SAM_4396.jpg
    136.2 KB · Views: 21
  • SAM_4393.jpg
    SAM_4393.jpg
    142.2 KB · Views: 21
Last edited:
OP
B

bimmer1980

Well-known member
Joined
Feb 5, 2009
Messages
2,103
Location
York, PA
Cutting bricks. I used my masonry brick saw to cut all the bricks. While I could have purchased the cut bricks, they were rather expensive and I wanted to use a slightly thicker brick. Hence, trading time for money, I spent many hours cutting.

Each of the corner bricks took three cuts to make. Then they were all washed and set in the sun to dry out.... It is now early December of 2015.

The flats were easier to cut, but it still took a lot of time.

After they were cut, washed and dried, they were then stacked on the small pallet of the scaffold crane, hoisted up and then set on the work bench of the scaffolding in front of the dormer.

Then I could proceed with getting the bricks glued on. This picked up some momentum and I made good progress...
 

Attachments

  • SAM_4726.jpg
    SAM_4726.jpg
    147.6 KB · Views: 61
  • SAM_4724.jpg
    SAM_4724.jpg
    148.9 KB · Views: 61
  • SAM_4719.jpg
    SAM_4719.jpg
    141.7 KB · Views: 51
  • SAM_4757.jpg
    SAM_4757.jpg
    144.6 KB · Views: 31
  • SAM_4749.jpg
    SAM_4749.jpg
    137.9 KB · Views: 32
  • SAM_4747.jpg
    SAM_4747.jpg
    150.1 KB · Views: 30
  • SAM_4737.jpg
    SAM_4737.jpg
    154.8 KB · Views: 29
Last edited:
OP
B

bimmer1980

Well-known member
Joined
Feb 5, 2009
Messages
2,103
Location
York, PA
As I progressed with installing all of the bricks, I needed to cut some bricks to line up with the roof line and to go around the window and the top of the arch. While I could have climbed down the scaffolding and cut them on the brick saw, this would get to be a lot of time climbing up and down...

So I bought a 4.5" diamond blade for my angle grinder. This worked extremely well for the thin bricks. As you recall, I already had power up to the scaffold for the lights.

The only downside to the angle grinder is that it releases a plume of brick dust with every cut. I ended up being covered in brick dust.

To help with the brick dust and residue, I ended up pulling and air line up there and also having a blow gun to clean the bricks (and me) off after each cut.
 

Attachments

  • SAM_4871.jpg
    SAM_4871.jpg
    144.2 KB · Views: 30
  • SAM_4869.jpg
    SAM_4869.jpg
    143.7 KB · Views: 34
  • SAM_4854.jpg
    SAM_4854.jpg
    145.8 KB · Views: 32
  • SAM_4851.jpg
    SAM_4851.jpg
    142.5 KB · Views: 32
  • SAM_4848.jpg
    SAM_4848.jpg
    136.6 KB · Views: 35
  • SAM_4846.jpg
    SAM_4846.jpg
    137.8 KB · Views: 33
  • SAM_4845.jpg
    SAM_4845.jpg
    141.6 KB · Views: 37
OP
B

bimmer1980

Well-known member
Joined
Feb 5, 2009
Messages
2,103
Location
York, PA
While this work was happening, I made two purchases.

I finally located a nibbler that would cut corrugated metal. Most common nibblers do not have the relief in the dies to allow cutting over profiled metal. I finally found a series of nibblers that were meant for corrugated metal. I then purchased the Makita version from Homedepot.com. It showed up in the mail a few days later. I must say, it was well worth the $160.

The second purchase was a mortar gun that I found on craigslist for $50. I did need to put a new cord on it, but that wasn't too bad. I did later find that I need some smaller tips, so I ordered them prior to doing the second dormer. You'll see why when I show the initial mortaring on this dormer....
 

Attachments

  • SAM_4713.jpg
    SAM_4713.jpg
    142.2 KB · Views: 28
  • SAM_4711.jpg
    SAM_4711.jpg
    143.8 KB · Views: 28
  • SAM_4714.jpg
    SAM_4714.jpg
    145.4 KB · Views: 29
  • SAM_4445.jpg
    SAM_4445.jpg
    143.1 KB · Views: 27
  • SAM_4444.jpg
    SAM_4444.jpg
    133.3 KB · Views: 28
OP
B

bimmer1980

Well-known member
Joined
Feb 5, 2009
Messages
2,103
Location
York, PA
Christmas Eve, I made a push to get the rest of the bricks cut and glued on. The weather was surprisingly temperate, so stayed on it....

Then Christmas day I was able to get the sill bricks glue on and clamped into place with a wood strip and screws.

The day after Christmas, I was able to start putting the mortar in. This took all day.

I could do about a 1x2' area with the mortar gun before it was empty, then refill and keep going. After the mortar was placed, it had to be pressed in and then sometimes repointed. My mortar joints were deep and the mortar was hard to get it to fill all the way back to the Elite panel.

Also, since the tip of the mortar gun was too big, I could not stick it in the mortar joint and fill. Hence it ended up quick smeary on the brick.

Had I been thinking, I would have slowed down and washed the brick with a sponge....

But I plunged on and got the mortar in.

Then had to tool it to make sure it was packed. Then all the joints had to be raked and then brushed. I really do dislike the raking part.......
 

Attachments

  • SAM_5241.jpg
    SAM_5241.jpg
    139.5 KB · Views: 43
  • SAM_5240.jpg
    SAM_5240.jpg
    143.5 KB · Views: 33
  • SAM_5234.jpg
    SAM_5234.jpg
    145.4 KB · Views: 32
  • SAM_5233.jpg
    SAM_5233.jpg
    143.1 KB · Views: 35
  • SAM_5227.jpg
    SAM_5227.jpg
    143.1 KB · Views: 38
  • SAM_5212.jpg
    SAM_5212.jpg
    144.8 KB · Views: 36
  • SAM_5214.jpg
    SAM_5214.jpg
    142.2 KB · Views: 38
To avoid these ads, REGISTER NOW!
OP
B

bimmer1980

Well-known member
Joined
Feb 5, 2009
Messages
2,103
Location
York, PA
I did not mortar in the sill as I knew it was going to take longer than the rest of the bricks and it was already late when I finished mortaring the regular bricks.

So the following day, it was decent out side, so I mixed up a small amount of mortar and worked on packing the joints of the sill. This took quite some time.

Then cleaned up the tools.

The following day, was chilly and raining, so no work there....
 
OP
B

bimmer1980

Well-known member
Joined
Feb 5, 2009
Messages
2,103
Location
York, PA
on 12/29/15, I was able to get the pressure washer out and start cleaning the bricks. It was a cold wet, miserable day. I ended up gouging some of the mortar while cleaning with the pressure washer. For obvious reasons, I didn't have my camera up.

I did repoint some of the gouges as decent days in January allowed......

Winter had finally arrived, so I had to stop work.....
 
OP
B

bimmer1980

Well-known member
Joined
Feb 5, 2009
Messages
2,103
Location
York, PA
Finally in February, we had some decent days. I wanted to get the trim at the top of the brick courses installed.

I had planned on using a PVC trim instead of the formed metal cove trim I used on the rest of the garage.

The curved piece across the top of the front of the dormer was a little tricky. The PVC was too rigid to force into the curve by itself. I needed to warm it up....

I first build a quick jig that was close to the shape of the top of the dormer. Then I used the propane heater to gently warm the pvc. It is easy to burn the pvc, so I did not get it as warm as I would have liked. It still took a lot of force to put it into the form.

After it cooled off, a buddy and I worked on installing it. It took all four hands and then some to get it installed. I also had to cut it to length to fit.

I glued and screwed all the trim into place.
 

Attachments

  • SAM_5571.jpg
    SAM_5571.jpg
    140.4 KB · Views: 29
  • SAM_5569.jpg
    SAM_5569.jpg
    139.3 KB · Views: 34
  • SAM_5568.jpg
    SAM_5568.jpg
    147.7 KB · Views: 38
  • SAM_5556.jpg
    SAM_5556.jpg
    142.4 KB · Views: 35
OP
B

bimmer1980

Well-known member
Joined
Feb 5, 2009
Messages
2,103
Location
York, PA
As few days later, I still needed to deal with the mortar residue, but I finally had a bright idea, I would use a grinder with a wire wheel. This ended up working quite well, but it was a lot of work. I actually wore out 2-3 wire wheels in the process.

Then I did another pressure washing and I could finally start taking the scaffolding down....
 

Attachments

  • SAM_5660.jpg
    SAM_5660.jpg
    149.3 KB · Views: 31
  • SAM_5661.jpg
    SAM_5661.jpg
    137.9 KB · Views: 33
  • SAM_5664.jpg
    SAM_5664.jpg
    140.6 KB · Views: 33
  • SAM_5667.jpg
    SAM_5667.jpg
    145.1 KB · Views: 31
  • SAM_5669.jpg
    SAM_5669.jpg
    152.6 KB · Views: 43
To avoid these ads, REGISTER NOW!
Top Bottom