To avoid these ads, REGISTER NOW!

Flail's Third Place

Flail

Well-known member
Joined
Aug 5, 2016
Messages
412
Location
Kin folk said, “Californias the place you wanna be
Time for my build thread. Been building this for a while and it's hard to come up with a name for a build thread. I chose "Third Place" from Ray Oldenburgs book, The Great Good Place. I'm prefacing it with Flail, me, to show its my third place. The third place is not home, it's not work, it's my escape where I hope to have food, drinks, hobbies and my specific friends. I actually started this in the fall of 2014 with excavation and prep work over the winter. The actual structure went up over last summer and I hope the rest to be done "real soon" but we all know life gets in the way. Taking from many threads I chose many things I wished to have in my building. Some are compromises, some I can't afford, some will come over time. My list includes:

40' x 90' x 16' walls with an upstairs mezzanine.
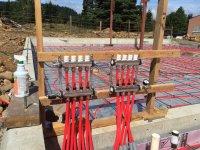
In floor heat.
Cement floor.
Adequate power service with outlets for welders, power tools, lathe and mill.
Natural gas for water and heat.
Bathroom.
Upstairs bar, ping pong room, lounge, media room and an office.
Downstairs shop, in floor lift, tool room.
Air compressor and piping.
Piped hot and cold water to the shop, barn and front of shop.
Insulation
Drywall
Porcelain tile in the shop
Stucco outside
Metal roof.
conventional construction. This as I'm on muck that sits on top of rock hard hardpan 2 feet down. Poles (polebarn) would be always submerged once you figured out how to get a 5' deep 2' diameter hole into the rock.

So here's where it starts.......
attachment.php


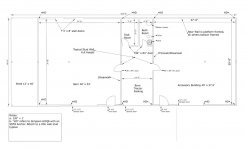
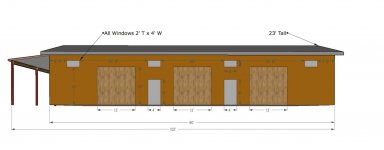
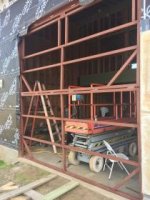
Where I live I am only allowed a 1500 sq ft outbuilding on my property. Not enough to park your truck, tractor, tools projects etc. You are allowed to be as tall as 24'. I was able to make my building 3600 sq feet as 2100 sqft are "agricultural". To become agricultural I had to become a farmer and decided to raise bovines. The right 2 garage doors are agricultural and the left garage door my shop. I will need to invoke my imagination as to what I own is agriculturally related.

attachment.php


attachment.php


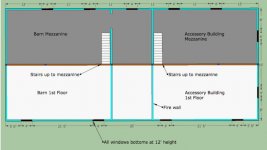
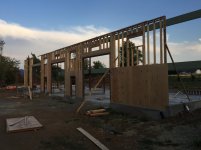
You may notice all the windows are 12' at the bottoms. They are high for light and some extra measure of security and privacy. All the outside doors are commercial super heavy models I got for free which I will clad in metal. My door "frames" are part of the metal structure of the building, they are 3" x 6" 1/8" wall tubing. It will be easier to kick a hole through the wall. The walls are 2x6 on 16" center covered with 1/2" plywood then 1/2" cement board then synthetic stucco.

[/IMG]
attachment.php

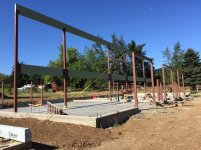
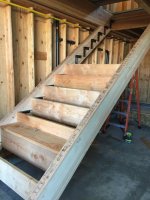
The structure is somewhat like my home. There are 6 steel columns which support beams onto which everything else is hung. Once this framework was up I was able to do a suprising amount of stuff by myself.

attachment.php


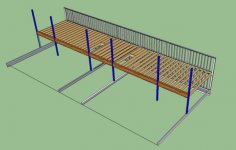
A 24 foot height limitation was a pain in the ***. If the 1st floor is is 8' and the mezzanine deck is 1 1/2' thick this leaves 6 1/2 feet left at the outside wall for a 3/12 pitch roof on a 40' wide building. I can't have a 6 1/2' tall upstairs, that is ridiculous! I dislike handling scissor trusses and thus decided to make the roof out of I-joists (TJIs). This essentially gave me 11 1/2' of headroom at the center beam. By making a mezzanine on one half the building I was able to leverage 3600 sqft to 5400 (3600 + 1800) and still have head room (16'!!!) for a car lift and amble room to stack hay in the wifes barn.
 

Attachments

  • Floor Plan .jpg
    Floor Plan .jpg
    99 KB · Views: 525
  • Elevation North.jpg
    Elevation North.jpg
    36.4 KB · Views: 524
  • Beam column foundation.jpg
    Beam column foundation.jpg
    91.5 KB · Views: 524
  • Cross section.jpg
    Cross section.jpg
    129.9 KB · Views: 523
  • Upstairs.jpg
    Upstairs.jpg
    132.6 KB · Views: 522
Last edited:
To avoid these ads, REGISTER NOW!
OP
F

Flail

Well-known member
Joined
Aug 5, 2016
Messages
412
Location
Kin folk said, “Californias the place you wanna be
pic 1: initial excavation, pic taken from way up on a man lift. Hired a local guy to bring in his Case Extendahoe for the day. I would have killed my Kubota backhoe. Although the dirt looks innocent, at about 20" it is more or less cemented rock and it takes a lot of weight to get through. I basically used the Kubota for cleanup.
13E7892E-75C6-432E-845D-9B0DB226C794.jpg

0980EE6F-1444-470A-BE62-CE86C559239B.jpg

Pic 3 shows one of the baseplates of my steel columns attached to the form for precise placement of the posts. Looks like a lot of rebar but it all had to be engineered as there are free spans greater that 25' and this is a high wind and earthquake area.
E3D0D38C-B1C9-4F41-99ED-6394BBD32A6A.jpg
 
Last edited:
OP
F

Flail

Well-known member
Joined
Aug 5, 2016
Messages
412
Location
Kin folk said, “Californias the place you wanna be
Pic 4: some of the pvc I placed in form to allow the PEX a place to go throw the foundation.
60AFF3D9-12D0-4D7E-ADB4-827021B0B5B1.jpg

Pic 5: Initial pour of the footings. This occurred around thanksgiving. The footers under the walls are 8" x 16". Under the six posts that support the ridge beams are 6' x 6' x 16" thick chunks of concrete.
Footer.jpg

Pic 6 The conditions I had when I stripped my initial forms. Much fun and cold fingers. Water cure should make the concrete strong
The rebar with the pink ribbon on it is my UFER ground.
The local lumber yard rents out the forming wedges which was good as I needed 1200.
Swamp.jpg
 
Last edited:
OP
F

Flail

Well-known member
Joined
Aug 5, 2016
Messages
412
Location
Kin folk said, “Californias the place you wanna be
pic 7: Question? How do you stand up a bit 21' tall 700 pound post by yourself?
Pic 8: With a tractor.

These 6 posts are 21 feet tall, 6"x6" .25 wall with the bracket bottoms made of 7/8" plate with 5/16" side wall. Local steel yard cut out all the plate sides, bottoms and post bases and put all the holes in them (cnc flame cutter) for 40 pieces for $100. I'd still be cutting and drilling today if it were me. Many of the holes were also designed as slots to allow for seasonal movement of the beams. I welded this all together with arc outside under a tarp in the winter rain per the specs supplied by the engineer. Sure wish I had a shop to work in :lol_hitti
In the second picture you can see a piano wire I strung between the first and last poles. All six poles were in perfect alignment on the bases and I was able to jack them around on their bottom studs to make them also line up 12 feet off the ground.I had cast the bases in place on their studs when I poured the footings. The column bases were all numbered with direction orientation and had metal welded on to orient them to the columns when welded together. This assured the columns would end up where I wanted them when they were finally bolted down. I used non shrink grout under the column bases to prevent wobble.
 

Attachments

  • 28871684-A481-4861-A257-25E26F9A30BF.jpg
    28871684-A481-4861-A257-25E26F9A30BF.jpg
    145.2 KB · Views: 105
  • 0612927A-FC4D-417A-8B34-A69E9C00A965.jpg
    0612927A-FC4D-417A-8B34-A69E9C00A965.jpg
    149.1 KB · Views: 77
Last edited:
OP
F

Flail

Well-known member
Joined
Aug 5, 2016
Messages
412
Location
Kin folk said, “Californias the place you wanna be
Pic 9: See the beautiful working conditions.:eyecrazy: 
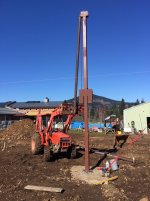
My "soil" is rock infused with clay. Imagine rock from peas to 18" packed together as tight as can be with mud oozed between it. In the summer it is like concrete, in the winter it is like grease on round rocks. I slipped and had too many near falls. I was the happiest person when I was able to get my building "out of the ground".
Pic 10: Eventually I ended up with all 6 post up. I cast in-place garage door frames (12' x 12') and mandoor frames of 3' x 7' all made of 1/8" wall 3"x 6" tubing. These are shown ready to all be intergrated into the stem wall concrete.
 

Attachments

  • 46F4952D-FD8D-4A4F-93FA-A93A81823091.jpg
    46F4952D-FD8D-4A4F-93FA-A93A81823091.jpg
    148.6 KB · Views: 79
  • 4699F6B2-8663-4F09-81D5-32D422DD3EAC.jpg
    4699F6B2-8663-4F09-81D5-32D422DD3EAC.jpg
    150.4 KB · Views: 81
Last edited:
OP
F

Flail

Well-known member
Joined
Aug 5, 2016
Messages
412
Location
Kin folk said, “Californias the place you wanna be
Pex in place and Pex manifold.

so the layers are: earth, gravel, vapor barrier, a little sand, 2" aluminized foam, Pex stapled to the foam with plastic staples, rebar, and 6" of concrete.
 

Attachments

  • Pex in place.jpg
    Pex in place.jpg
    149.5 KB · Views: 95
  • Pex Manifold.jpg
    Pex Manifold.jpg
    152.5 KB · Views: 91
Last edited:
OP
F

Flail

Well-known member
Joined
Aug 5, 2016
Messages
412
Location
Kin folk said, “Californias the place you wanna be
Concrete day!
Everythings slopes out towards the garage doors. I attached 2"x2"x1/8 angle to all perimeters to guide the concrete guys slopes. They though it was a bit excessive, but it kept everything spot on. In the right picture there is a framed in box. That is for the septic pump. I couldnt gain enough elevation above my sewer so will pump. It wont be much, just a toilet and a sink or two. In the right bay you can see the framed in spots for the scissors lift in front of the garage door.
 

Attachments

  • Concrete day again.jpg
    Concrete day again.jpg
    153 KB · Views: 98
  • Concrete day.jpg
    Concrete day.jpg
    146.9 KB · Views: 98
Last edited:
OP
F

Flail

Well-known member
Joined
Aug 5, 2016
Messages
412
Location
Kin folk said, “Californias the place you wanna be
Best $230 dollars I spent was to have the concrete plant bring over their crane and set my beams. Two guys on the ground and the plant guy running the crane. We were done in 1 hour flat. The beams are all 5.5" x 24". I could have used smaller beams for some of the shorter spans but it made sense to stay consistent on size as it simplified the framing for the roof and mezzanine.

The bulk of the framing was done by myself (58yo) and a 59 yo carpenter. I lost 20 pounds last summer. Hard work and global warming (or at least it was smoking hot outside).

Built the front wall 16' tall and the individuals sections were heavy. 1st section was 16' high, 15' wide, out of 2x6 on 16" centers. Used the the tractor with the gin pole and the man lift in all sorts of ways that the manufacturer forbids.I bought the manlift from an auction that dealt with Boeing surplus. I waited a year before I found just the one I wanted. It has paid for itself and works perfectly.

As I previously erected and bolted the door frames in place, it provided a lot of bracing for the walls during construction. I was blessed with an exceptionally windless late summer. Not the case this year.
 

Attachments

  • Beam me up.jpg
    Beam me up.jpg
    148.2 KB · Views: 96
  • day one framing.jpg
    day one framing.jpg
    148.9 KB · Views: 100
Last edited:
OP
F

Flail

Well-known member
Joined
Aug 5, 2016
Messages
412
Location
Kin folk said, “Californias the place you wanna be
If you frame long enough you'll eventually get to the mezzanine followed by the roofline. Can't believe how many framing connectors and large nails were involved in this process. There were 142 Simpsom 3/12 beam to TJI connectors down the ridge line each with 16 big nails (16 x 142= 2272) while standing in the manlift. The roof TJIs are 16" tall. Each one of the TJIs needs blocking on both sides to be secure in its connector. It was a lot of tedious cutting, gluing and nailing. Palm nailer is a great invention.
So, the bottom floor is 40 x 90 and the mezzanine is 20 x 90, 5400 total! The mezzanine is supported by 16" TJI's with hangers as well.
 

Attachments

  • Mezzanine.jpg
    Mezzanine.jpg
    146.7 KB · Views: 155
  • Roofline.jpg
    Roofline.jpg
    145.6 KB · Views: 131
  • 06B4E434-1747-4780-9541-86AEFBA3C48F.jpg
    06B4E434-1747-4780-9541-86AEFBA3C48F.jpg
    148.1 KB · Views: 145
Last edited:

Red Voodoo

Well-known member
Joined
Mar 22, 2011
Messages
216
Location
Eagle Neck, Georgia
That's a very impressive build Flail. Looks like you're in a pretty, rural area... do you mind giving us an idea where?

Looking forward to more!
 

wasfast

Well-known member
Joined
Apr 10, 2014
Messages
874
Location
San Diego CA
Indeed a large scale build. Hood River is a beautiful area, home to some of the best wind surfing in the world thanks to the Columbia River Gorge "breezes". They also grow a few apples in the shadow of Mt. Hood too.

What's the main use for your third place?
 

Bib Overalls

Well-known member
Joined
Dec 4, 2006
Messages
3,318
Location
Jonesboro, Arkansas
I don't know how far it is to your primary residence but even if it is close a small guest room with access to a full bath and efficiency kitchen will prove itself useful.

What function will the closed in center bay be used for? Good place for a bridge crane.
 
To avoid these ads, REGISTER NOW!
OP
F

Flail

Well-known member
Joined
Aug 5, 2016
Messages
412
Location
Kin folk said, “Californias the place you wanna be
I'm having a hard time managing my Picts. Some times they come up as thumbnails and sometimes as one line descriptions that open the pict on a new page. The instructions are not too helpful. Some folks are also posting full pics. How I get this picture posting thing to bend to my will?
 

jbmatth

Well-known member
Joined
Jun 3, 2013
Messages
5,681
Location
Northern Ok.
First off wow, this is going to be one great building, I'll subscribe to follow along and see where you take this. Congrats on doing most of this yourself and making it that much more affordable. Now onto picture uploading, this is what I do in my thread, I have since switched to the second method as it can be viewed by all visitors not just those logged into GJ.

There are two main ways I attach images, the first is to click the Go Advanced tab under the Reply Box, then click the paper clip icon. From there find the photos on your computer you want to upload and upload them. Drag and drop the link into the Reply Box where you type. Highlight the link/address, copy it then click the Insert Image icon that looks like gray mountains with yellow background, paste the link/address there. Rinse and repeat until you have up to the limit of 7 images uploaded per reply.

The other method is to go to your User CP in the black ribbon up at the top of the page. From there click on Pictures & Albums, click Add Album, give it a Title and Description if you desire, set your privacy as either public (preferred) or Private. Next click Upload Pictures, find the photos you want to add to the album then click Upload Pictures. Edit the Caption if desired, then click Save Changes. Once you have all of the photos uploaded you want to add to a reply click on the first photo you want to add, copy the second link (BB Code), then paste that in the reply on your thread.

Hopefully this helps you out,
JB
 

Bierisch

Well-known member
Joined
Sep 30, 2013
Messages
163
Location
San Antonio, Tx
...There are two main ways I attach images, the first is to click the Go Advanced tab under the Reply Box, then click the paper clip icon.... The other method...

Thanks, starting to understand

To get the large images in the post, I first upload them to an external site like Photobucket, then click the little picture when posting a new post, then copy the link directly to the picture, paste it in the blank, then submit reply.
 

jbmatth

Well-known member
Joined
Jun 3, 2013
Messages
5,681
Location
Northern Ok.
To get the large images in the post, I first upload them to an external site like Photobucket, then click the little picture when posting a new post, then copy the link directly to the picture, paste it in the blank, then submit reply.

Thanks, I forgot to mention I don't use photo hosting sites because I've seen all too many threads that have lost many many photos due to the host changing something. The way I'd described above will post good sized photos in with the text as well. The comments on my thread within the last year have been like this.

JB
 
OP
F

Flail

Well-known member
Joined
Aug 5, 2016
Messages
412
Location
Kin folk said, “Californias the place you wanna be
So today I decided to put is some stairs. I have never liked the idea of taking a perfectly good 2x12 stringer and cutting treads and risers out of it.
Seems like you're cutting out alot of the structure and unless the stairs are tied to a wall they can wave back and forth as you ascend/descend.
Thus I started with some 3.5" x 12" glulams.

attachment.php


The glulams are cut to size and then attached at the top with a piece of grade 5 allthread. Had to drill 1' vertically through the horizontal glulam it
attaches to and about 10" through the stringer. Will cut the excess allthread off later. The all thread appears to go at an angle. It is really vertical
but I bent it at an angle on the bottom to match the slope of the stringer. This was tough allthread and I bent a 1" schedule 40 pipe trying to
bend it cold. I eventually had to heat it with a torch to make the bend.

attachment.php


Welded up some tread and riser brackets out of 2"x2"x1/8" angle iron. The tread portion is 8" with 6 holes and riser portion is 6" with 4 holes.
Overall the bracket is 8"x8" after welding.

attachment.php


Here the brackets are screwed onto the stringer.

attachment.php


Attaching treads and risers. I had a bunch of 2x12 and used this for both. I cound have used 2x10 for the risers, but used what was on hand.

attachment.php


Here you can see a bracket in place from the underside of the stairs.

attachment.php


Finished stairs. Now I can carry furniture up the stairs without fear of collapse.

attachment.php
 

Attachments

  • 7Complete Stairs.jpg
    7Complete Stairs.jpg
    139.2 KB · Views: 750
  • 6BracketInPlace.jpg
    6BracketInPlace.jpg
    154.5 KB · Views: 740
  • 5StairsGoingTogether.jpg
    5StairsGoingTogether.jpg
    138.8 KB · Views: 744
  • 4BracketsOnStringer.jpg
    4BracketsOnStringer.jpg
    134.5 KB · Views: 748
  • 3StairBracket.jpg
    3StairBracket.jpg
    140 KB · Views: 744
  • 2Stairs Allthread.jpg
    2Stairs Allthread.jpg
    140.5 KB · Views: 753
  • 1GlulamStringer.jpg
    1GlulamStringer.jpg
    139.4 KB · Views: 768
Last edited:
OP
F

Flail

Well-known member
Joined
Aug 5, 2016
Messages
412
Location
Kin folk said, “Californias the place you wanna be
Putting on a pic of my garage door. Decided to make horizontal bifold doors. The frames are made of 2"x2"X1/8" tubing on the perimeters and 1/16"wall on the infill. Upper windows are tempered glass. Hinges at top and the midpoint hinges are 5" ball bearing hinges sourced off eBay. Screws are lo Locktited in. The two accompanying videos are preliminary. There will be roller track devices that will prevent doors from swinging out and banging. Doors are very stable in open position even in very high wind.


attachment.php


Attachments

  • image.jpg
    image.jpg
    14.9 KB · Views: 423
Last edited:

jbmatth

Well-known member
Joined
Jun 3, 2013
Messages
5,681
Location
Northern Ok.
Very impressive stairs, you don't fool around when you build! Glad to see you have worked out the picture posting thing. I'm starting to see more and more of those airplane hanger doors show up here and it has got me thinking. How are you opening them, and about how much do you think you will have in them when all is said and done?
Thanks,
JB
 
OP
F

Flail

Well-known member
Joined
Aug 5, 2016
Messages
412
Location
Kin folk said, “Californias the place you wanna be
I am using a harbor freight 1 ton electric hoist to open and close the door. 1 ton is more than I need to operate this but would rather be over built with a big heavy door up in the air. I am changing the hoist control from a pendant to an in wall switch. Also working on an automatic latching system to lock and unlock the doors

Cost for the bifold doors breaks down like this:
Metal frame $250.00
Windows: $300
Wood Sheathing (cedar): $300
Harbor Freight 1 ton electric hoist $225
Screws and miscellaneous: $75
Total: $1150

Bifold door to do includes:
Finish the sheathing and trim.
Add weather stripping.
Add the auto latch/lock system.
Integrate the control into building wiring.
Insulate door with 2" rigid foam.

Wife is insistent on a slider in her barn. Cost and appearance will be about the same. Instead of a hoist I'll be buying track.
 
Last edited:

jbmatth

Well-known member
Joined
Jun 3, 2013
Messages
5,681
Location
Northern Ok.
Great thanks for the info, with the big barn doors on my shop it just lets in too much unwanted stuff. The design on the building will not let me use any interior opening doors and still retain close to the full 12' height. I'll file this away for when I cross that bridge who know when.
Thank you,
JB
 

matt_i

Well-known member
Joined
Mar 14, 2008
Messages
10,724
Location
SE Michigan
Very nice build from the form & pour to the steelwork, excellent staircase design. I bet you are going to have to pour some more concrete :) Those heavy hooves are prone to tear up the grassworks ;)
 

wasfast

Well-known member
Joined
Apr 10, 2014
Messages
874
Location
San Diego CA
Wow, talk about heavy duty. I think this related extraction from above should be part of your signature:
I'd rather have it overbuilt
 

Pluribus

Well-known member
Joined
Dec 16, 2012
Messages
2,143
Location
Skagit County, WA
There's a whole lot of, "wow!" in this build. Hood River is a beautiful area, too. Stopped in there for a swim on one of those 95 degree days while on my way back from Sisters this summer. Will definitely look forward to updates!
 
To avoid these ads, REGISTER NOW!
Top Bottom