To avoid these ads, REGISTER NOW!

My 24'x24' Motorcycle Garage/Shop in Alaska

JagLite

Active member
Joined
Apr 12, 2013
Messages
34
My little shop is only special in one way...

It is mine. :thumbup:

The house and garage were built in the '70's very cheaply for low income housing.
That means 2x4 walls with minimal insulation, inadequate electrical, etc.

We bought the house 2 years ago and have been remodeling it (slowly) ever since.

The best thing I liked about the house is the 2 car detached garage where I could play with my bikes and projects in the long, cold, and dark winters here in Anchorage, Alaska.

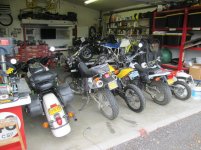
Rather than bore anyone, here are some pictures of it now, and then in later posts I will start back at the beginning.

Welcome! Come on in...

IMG_5982.jpg

IMG_5978.jpg

No, it is not a business, just my own bikes and projects.

IMG_6505.jpg

IMG_6502.jpg

IMG_6496.jpg

IMG_6008.jpg

I ride my bikes in the summer and work on them in the winter.
 

Attachments

  • IMG_6497.jpg
    IMG_6497.jpg
    146.2 KB · Views: 139
To avoid these ads, REGISTER NOW!
OP
J

JagLite

Active member
Joined
Apr 12, 2013
Messages
34
Back to the beginning...

Moving in:

DSCF1155.jpg

I threw some cheap board shelves on the wall to get some stuff off the floor.

New Garage Full 01.jpg

I don't have any pictures of it before I started hanging stuff on the walls, there was barely room to walk/crawl over all the boxes, bikes, tools, and furniture that filled the entire garage.
What a mess that was! :wtf:

New Garage Full 03.jpg

I had hoped to repaint the existing cabinets before filling them up but there was no time, I had to put stuff somewhere just to be able to move other things around.

New Garage Full 04.jpg

New Garage Full 05.jpg

I bought a used 20' container for storage and put it beside the garage, next to the fence.

DSCF1252.jpg

I had to figure out how to move the container from the driveway and around the side of the garage...

I bought 2 used (with bent axles) heavy duty trailer wheels/axles, cut the axles in half and made fixtures to hold the axles in the fork lift slots in the sides of the container.
Then I pushed the container with my ATV. :thumbup:
It actually worked!
I had to push the ends sideways a bit to turn, push forward, push sideways, push forward again, and so on.

DSCF1238.jpg

Ugly as anything but mostly out of sight and I would paint it dark brown the next summer to make it sort of disappear.
 
OP
J

JagLite

Active member
Joined
Apr 12, 2013
Messages
34
Thanks guys, I have done some changes in the shop over the past two years and have many more in mind.
Nothing major though, just cabinets, workbenches, and paint.

Continuing on, I had an 8'x4' build table from my last house (1 car garage) but it proved to be too big for motorcycles so I decided to use it as a loft.
Of course it is heavy with 1/2" plywood top and bottom on 6" light metal studs.
How to get it up on a ledger on the wall by myself...

Decide where I want the loft:

DSCF1295.jpg

Install ledger to wall studs:

DSCF1299.jpg

Lift with the hoist:

DSCF1302.jpg

I used the ladder behind it as a slide:

DSCF1303.jpg

When the hoist was maxed out I switched to using it under the platform to lift from below:

DSCF1309.jpg


DSCF1311.jpg

Strapped to temporary eye bolts:

DSCF1308.jpg

Doing things by yourself forces you to be inventive at times. :lol:
 
OP
J

JagLite

Active member
Joined
Apr 12, 2013
Messages
34
Loft installation continued:

When the hoist won't lift high enough you add a floor jack, when it won't be high enough you add something else... ;)

DSCF1315.jpg

I used Simpson clips to hold the deck to the ledger:

DSCF1320.jpg

Then throw some stuff up there to get it out of the way:

DSCF1329.jpg

Notice also the dresser below the loft?
That came out of the master bedroom in the house and was too nice to demolish so I decided to repurpose it in the shop.
It was built into the wall in the house??? :eyecrazy:
I had to put up sheetrock to cover where it had been.

The dresser got painted later on so it is now "Tool Box Red" with stickers on it to make it shop worthy. :lol:
 
OP
J

JagLite

Active member
Joined
Apr 12, 2013
Messages
34
Engine Build Bench

Next came a new work bench dedicated for bike engine rebuilding.
I decided to put it next to the storage drawers and under the loft:

Framing:
Work Bench 02.jpg

Fitting top:
Work Bench 04.jpg

MDF backwall panel:
Work Bench 09.jpg

Everything looks better with paint:
Work Bench 010.jpg

Work Bench 011.jpg

The top is made of 1" plywood (2 1/2" layers) and is banded with 1x4 Poplar standing 1/2" higher to hold the 1/2" Melamine top surface that is not fastened down so that it can be flipped over when the top gets trashed over time.

Work Bench 014.jpg

Ready for the Triumph TR6C engine to be rebuilt:
DSCF1460.jpg
 
OP
J

JagLite

Active member
Joined
Apr 12, 2013
Messages
34
Deep Storage Rack

More storage needed so I designed a shelf rack to put plastic totes on.

Ledgers lag screwed into the wall studs lock it in place:
DSCF1515.jpg

I used doubled 2x4's for the posts rather than cutting notches in 4x4's
DSCF1524.jpg

No plastic totes yet so I just put stuff on the shelves
DSCF1536.jpg

Painted up and in use
DSCF1663.jpg

Yours truly, the old guy (62) playing in my shop after work:
IMG_0289.jpg
 
OP
J

JagLite

Active member
Joined
Apr 12, 2013
Messages
34
Bike Work Tables

Great rolling benches!
I actually tried to post again yesterday about my bike build tables but I was too slow and lost the picture links so here it is again:

I built one a few years ago but wanted a better design.
I wanted them to be lighter, longer, and have a full shelf under the top to store the parts and pieces for each bike under it.

Here they are:
IMG_0923.jpg

(1) sheet of 5/8" plywood make the top and shelf
(7) 2"x3" studs for framing
Light, simple, cheap, and strong

IMG_0929.jpg

I like to paint everything:

IMG_0934.jpg

I painted my old build table to match

IMG_0948.jpg

Put them where they go and bolted on wheel chocks and tie-down eye bolts

IMG_0955.jpg

Bike projects now on them and take pictures before loading the shelves up with parts...

IMG_0964.jpg

IMG_0968.jpg
 
OP
J

JagLite

Active member
Joined
Apr 12, 2013
Messages
34
Bike Work Tables continued

Now, how do I get the bikes on and off you wonder...

A nice aluminum loading ramp makes most bikes easy:

IMG_0969.jpg

IMG_0976.jpg

For some that are heavier I roll the tables out to get more room

IMG_0979.jpg

IMG_0980.jpg

I lift the far end with my floor jack and slide a 4 caster roller under each side, then I just lift the close end with my floor jack and roll it around.
At first I put the castor rollers under each end but I find using the floor jack just as easy.
I like rollers on things to be able to move them around but I didn't want my build tables to be on wheels because I find it aggravating to have the whole bike and table move when I am wrenching.

IMG_0981.jpg

IMG_0982.jpg

IMG_0984.jpg
 
OP
J

JagLite

Active member
Joined
Apr 12, 2013
Messages
34
Bedroom Dresser to Tool Box conversion

So, how can I make the ugly dresser look okay in my shop?

Paint!

IMG_1036.jpg

IMG_1035.jpg

IMG_1039.jpg

IMG_1043.jpg

And a new top that fits tight against the wall will help

IMG_1056.jpg

I got 2 wall mount cabinets with fixed metal shelves that I installed over the "tool Box"
IMG_1073.jpg

I hadn't stuck on any stickers yet in those pictures but now, 2 years later I have a bunch on it
 

Attachments

  • IMG_1040.jpg
    IMG_1040.jpg
    133.7 KB · Views: 23
OP
J

JagLite

Active member
Joined
Apr 12, 2013
Messages
34
Wall art

One of the local mc dealers was moving into a new building and they had a garage sale to get rid of old stuff.

I found this neat Triumph Rocket 3 header and bought it for wall art:

IMG_1212.jpg

It was only $10 so I kept looking around and picking out things until I finally asked if I could make a pile and work out a price we were both happy with and they agreed.

So...


One trailer load of exhaust systems, fuel tanks, handlebars, and racks...


IMG_1181.jpg

IMG_1192.jpg

IMG_1191.jpg

IMG_1188.jpg

$80 for everything :thumbup:
 
To avoid these ads, REGISTER NOW!
OP
J

JagLite

Active member
Joined
Apr 12, 2013
Messages
34
Thanks Bronson,

I knew Birney Jarvis back in the early 70's when he and Joyce lived in Lahaina where I lived on my boat.
Took them sailing many times and got to hear his amazing stories.
We rehashed every episode of Bronson and Kung Fu...

I found his website online a couple years ago and contacted them.
They remembered me and my family well they said.
I was concerned when he didn't answer my last email, then Joyce replied to tell me that Birney had died.

He interviewed my family on TV after we arrived in Lahaina on our sail boat when Birney had a TV show on the local cable network.

Birney, Joyce, and I had plans to ride Honda XL250's from Anchorage to Ushia and he would write weekly trip articles for the newspapers. He even got Honda to sponsor us with two new bikes. Then the oil crisis of 1973 hit and Honda politely declined to provide the bikes fearing potential bad publicity during the gas rationing days.

We had the money for the trip but not enough to buy the bikes too so the plan never got off the ground.

That would have been an adventure for sure!

What a character he was...
 
Last edited:
OP
J

JagLite

Active member
Joined
Apr 12, 2013
Messages
34
Stickers

These are from Feb 2015 with a couple additions in the shop

Some stickers on the "tool box" and a flat screen TV hooked to a laptop

IMG_2311.jpg

IMG_2314.jpg

IMG_2315.jpg

And the parts for two project bikes on the build table shelves...

IMG_2317.jpg

IMG_2318.jpg
 
OP
J

JagLite

Active member
Joined
Apr 12, 2013
Messages
34
New work bench

From March 2015, a neat ss work bench from Home Depot is added to the shop:

IMG_2594.jpg

Nice lightweight and clean looking work bench with nice drawers.
It is all bent ss sheet metal so the edges are extremely sharp.
Almost every review said to wear gloves when putting it together. :thumbup:

IMG_2615.jpg

But where to put it is the question :dunno:

I was planning to replace the original and very ugly work bench along the window wall so I decided this would be a good time to start designing what I wanted.

IMG_2708.jpg

I thought of buying a few more of the ss work benches and ganging them together along the window wall

IMG_2614.jpg
 
OP
J

JagLite

Active member
Joined
Apr 12, 2013
Messages
34
New work bench 2

After I measured I realized the lower shelf of the upper cabinets would not work with the ss tool bench top storage I went with plan number 2.

By drawing up a simple work bench plan using 2x4's and plywood.

First step is to remove the existing junk bench:

IMG_4710.jpg

What a mess it makes when you have to move everything from one area and put it... somewhere :eyecrazy:

IMG_4711.jpg

My two assistants were always ready to help :beer:

IMG_4716.jpg

IMG_4717.jpg

IMG_4720.jpg

IMG_4722.jpg

Just a simple bench with legs in front and the back ledger lag screwed to the wall studs.
Built and being painted...

IMG_4724.jpg
 
OP
J

JagLite

Active member
Joined
Apr 12, 2013
Messages
34
New work bench 3

New work bench installed...

IMG_4900.jpg

I put the ss work bench under the window because I could cut the shelf that went between cabinets there.

IMG_4901.jpg

Did you notice my camouflage dog? ;)

IMG_4902.jpg

The overhead cabinets are UGLY but I decided to keep them even though I have built many cabinets and worked as a cabinet builder and installer for years.
I would rather spend my time on other projects is all.
Eventually I will paint the face frames and the interiors and finally I will make doors to cover up the mess...

IMG_4905.jpg

Finally able to get back to my bike projects, primarily rebuilding the 1971 Triumph engine for my 1965 Rickman Metisse :thumbup:

IMG_4907.jpg

Ahh, notice I got some plastic tote tubs for my storage rack shelves...
Hiding things makes them look better, and I have a paper for each tub that lists what's in it.

IMG_4908.jpg
 
OP
J

JagLite

Active member
Joined
Apr 12, 2013
Messages
34
Metal Mess Maker Stand

I wanted a mobile stand to put my grinder and drill press on so that I could move it by the door to put most of the shavings and mess outside.

Once again I drew up plans for a wood stand on rollers, when I happened to look at my rolling tool boxes and got a better idea...

IMG_4751.jpg

IMG_4752.jpg

IMG_4753.jpg

The top has a filler piece under it so the top doesn't sit on the top flange of the cabinet only.

IMG_4754.jpg

The drill press and rear bolts of the grinder are bolted through the top of the cabinet so the top can't move.

IMG_4892.jpg

I had a spare vice so I bolted it on.
I only use it for light stuff because the tool box would roll around.
I have a 6" vice on the new work bench for heavy duty pounding and bending. :thumbup:
 
Last edited:
OP
J

JagLite

Active member
Joined
Apr 12, 2013
Messages
34
Paint!

With the red paint for the work bench out I painted the face frames of the overhead cabinets...

IMG_5003.jpg

IMG_5004.jpg

The new work bench comes in handy when the bead of the tire is fused to the rim... :mad:

IMG_5023.jpg
 
OP
J

JagLite

Active member
Joined
Apr 12, 2013
Messages
34
Bike work

I spend most of my "free" time in the winter working on various bike projects.

One shop tool that I recommend to everyone is folding tables.
Since most horizontal surfaces quickly get buried under "stuff" it is quite handy to have a folding table (or 3 :thumbup:) to set up to put things on for specific projects.

IMG_5426.jpg

IMG_5427.jpg

IMG_5428.jpg

IMG_5429.jpg

IMG_5430.jpg

IMG_5432.jpg

This way I can keep all the parts and tools that I am using on the table until the job is done. Then I put everything away and fold up the table. :thumbup:

I have 3 folding table, one 6', one 7', and one 8'.
I usually only need one for a job but there have been times when I have used two or all three at the same time.
And I often set them up outside during the summer if I am working on a job outside.
Much nicer than having everything on the ground.

I will add that another favorite tool in my shop is a very comfortable chair. :thumbup:
I learned long ago that a "thinking chair" will save me a lot of time and trouble by planning out before starting.
And sometimes I just like to sit and ponder my projects ;)

And rolling mechanics stools are excellent if you are working on motorcycles. :thumbup:
 
OP
J

JagLite

Active member
Joined
Apr 12, 2013
Messages
34
Handy tools

A few things I find very handy

Floor pads/mats from Lowe's
IMG_6860.jpg
They are about 4' square and they come four in a pack.
They hook together easily so you can make a lot of shapes/sizes.
At under .75c per square foot they are excellent.


IMG_6862.jpg

Mechanic stool to roll around and holds tools/parts
IMG_6864.jpg

I like this one too even though it doesn't have a parts shelf.
It is a bit taller so I can use whichever one is the best height.

IMG_6865.jpg

Bike covers are very nice too.
I got 4 of them at Cycle Gear for under $20 each.
I just use them inside as dust covers, or to hide a project.
IMG_6867.jpg

I use this bar stool when working at my engine bench.
IMG_6868.jpg

Under the work bench is one of my 3 folding tables.
Behind it are 4 motorcycle engines on wheeled bases.
Future projects...
 
OP
J

JagLite

Active member
Joined
Apr 12, 2013
Messages
34
Bike work table

Here is the link to the thread on building the bike work tables:

Bike Build Table for cheap!

One sheet of plywood and seven 2x3's (each table) gives you this
IMG_0923.jpg

IMG_0928 - Copy.jpg

IMG_0941.jpg

Simple, cheap, light, and strong, what's not to like?
 
OP
J

JagLite

Active member
Joined
Apr 12, 2013
Messages
34
My 24'x24' Motorcycle Garage/Shop in Alaska Storage

I put my bikes in storage for the winter, the ones I am not working on this season that is, and I took a few pictures.

We all need/want/wish for more storage at times and it is not easy or cheap to add more.

If you can get permits and all to build a bigger shop or add on, and can afford to do it, that is the best long term investment.

Most of us can't for one or more reasons so we look for alternatives.

Many of us have used the fabric covered steel tube frame "buildings" and they can be great and will last for a few years, usually. The fabric covers and zipper doors are replaceable and the cost is fairly low. The investment rating is zero in my experience though. And security is about non-existant.

The option I went for a few years ago was to buy a used shipping container.
They come in standard 20 ft and 40 ft lengths but there are a few other special sizes that come up for sale on occasion. All are the same 8 ft width I believe. Most are 8 ft tall with a few taller ones (10 ft I think).

The prices are close to the same for the 20 ft and 40 ft, probably because more of us have a place to put a 20 ft than a 40 ft.
(I paid $2,000 which was the going price at the three places that sell them here, currently they are about $3,000 here)

They can be wrapped with wood siding, vinyl siding, shingles, or anything to make them look better. I have seen very nice pictures of what others have done to the exterior and interior so anything is possible.

All I have done to mine is to paint it dark brown and hide it behind the garage so it isn't visible from the road. :thumbup:

IMG_6896.jpg

The fabric "flap" is over the padlocks to keep snow from getting inside the locks and freezing.

IMG_6878.jpg

There are 7 bikes in there in the picture above, and I put three more in after that picture.

Ah, I found one after all the bikes were in:

IMG_6892_zpseh0gvrg1.jpg

Since a container is "temporary" it (usually) doesn't require permits to park one on your property.
The 20 ft is easier to deliver since it can go on any slide-back flatbed tow truck.
The longer ones require special delivery vehicles and they are more limited in where they can maneuver.

I have drawn up plans to insulate it and add siding, a window, and even a pitched roof but I don't know when/if I will ever do it.

Investment rating? I give it two thumbs up. :thumbup::thumbup:
You can sell it for what you paid for it, or if selling your house it can add to the value of the property (if it isn't hideous).

Security is also excellent, as good if not better than a garage.

So, consider a container for your storage needs, it might be just the thing. :beer:
 

Gerald O

Well-known member
Joined
Mar 5, 2013
Messages
1,884
Location
NC
LOL! Only in Alaska would a shipping container next to the house add to the property value!

Good for you on having a nice garage to work on stuff. :thumbup:
I grew up in and around Anchorage, and never had a garage to work on stuff. Usually it was lying on my back in the dirt with the car up on blocks. Best I ever had was a carport. Rebuilt engines and snowmobiles in the living-room. :p
 
OP
J

JagLite

Active member
Joined
Apr 12, 2013
Messages
34
I guess you are correct there!
I can just picture an old container sitting next to many of the beautiful garages we see pictures of.
It would probably look like the Beverly Hillbillies.

When we were selling our last house several interested buyers asked if the container was to stay.

So the container suggestion will only work for those of us in less fancy neighborhoods.

Although when I put the new RV cover on my motorhome last month I thought that would be a great way to camouflage a container.
 
To avoid these ads, REGISTER NOW!
Top Bottom