To avoid these ads, REGISTER NOW!

An active couple; a new house and a hasty decision to move…

Robey5

Well-known member
Joined
Jan 18, 2010
Messages
406
Location
North of Detroit, Mi
Hello all. I have spent a LOT of time on this board lurking. Some of the posts and builds here are QUITE impressive. Over the time I have looked around here, I have been able to "borrow" some ideas in my quest to get a home (err, garage) that I can work in, store play things in, and be comfortable with.

SO - My wife and I are always into something.
She: a small business owner, and works part time worker for her family's business, an avid physical fitness nut, regular snow boarder (gets about 30 ride-days a year).

I am a commercial guy in the automotive industry. A degreed engineer who later went on to get a finance-focused MBA and have been working for a T-2 supplier for a while. My interests include sports cars, playing beer-league baseball, playing beer-league hockey, drinking beer, wood working, and staying in shape (not necessarily in that order).

After we tried to make a sensible addition on the ‘quad’ that we lived in for over a decade, and could not really get it to work (height variance and set-back problems with our ‘lot’ … thank you local Building department to make moving an easy decision…) we decided to look for a bigger house.

This time, it was with a focus on bigger, more storage room and a full basement. There was a number of other factors that included the ‘need’ for a bigger garage, an open floor space, more property (to build an additional garage in the near future) etc, but it was a ‘clean slate’ for us to start from.

We bought a house that was ‘spec built’ by a builder some years back, who proceeded to loose his hide (including this house and the surrounding property) in 2009. The house set vacant and partially finished for a few years, and was purchased by a developer in it’s partially finished state. That didn’t bother me, as far as I was concerned, it was ‘done settling’ with this time that it sit.

What I later had an issue with was the ‘builders warranty’ that did not get honored when we had a serious issue with a faucet supply line that sprang a leak and flooded our new home’s guest bedroom, and our kitchen and soaked everything in the water’s mission to get to it’s lowest point (the basement).

Over the next several weeks, my wife and I worked our way to try to get the developer to ‘fix’ the problem that ended when we decided to make a damage ‘claim’ with our home owner’s insurance.

This was quite a disappointment; a “new” house, and a MAJOR claim from our insurance company about 4 weeks after moving in. To add insult to injury: discovery of this disaster was when we returned from a week’s vacation at Hilton head, SC. In other words, that day’s return to home from vacation was quite a disappointing endeavor. What was worse: we hadn’t received any offers on our “old” house (which later sold for about $15k less than we were forecasting, and $5k less than we PAID for it over a decade ago.)

Now to the rehab: it took over 3 months for the destruction process to start, after we pulled some of the wood floor that had swelled from the amount of water than went through it – the contractors we chose just got started with the demolition. In sum, we’ve lived in a house that has been in a partial state of completion for longer than not.

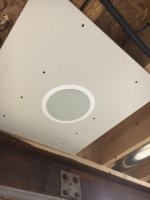
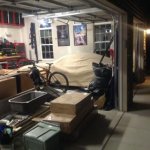
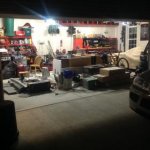
On to the good: The (attached) garage is about 20X32 (3 car garage) with a 10+foot ceiling. This is enough room for the time being to be able to ‘grow into’.
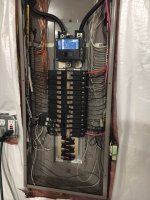
It has a full basement. With 10+ foot ceilings; exposed rafters and a 200A electrical service with a sick amount of room in the electrical panel to expand.
The master ‘suite’ has a his/hers vanity and his/hers closet (now, I can actually put all my gear in one place, including my wicked shoe collection!) and there is a large amount of brick on the exterior. They used a bit more siding than I would have liked, but the way that we fixed this ‘issue’ is by getting a contractor to apply a pretty bitchin stone veneer up about half way up the wall on the exterior.

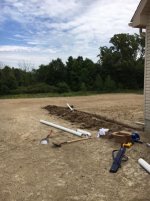
For anyone reading, this will be a thread to capture what we will do to the garage, including it's contents ... as well as get some input on the way to organize better. This also will be a place for me to capture the build of the detached garage when that gets kicked into action.

Because this forum is all about the pictures, I will post the old, and the new to put the move into perspective.
 
Last edited:
To avoid these ads, REGISTER NOW!
OP
R

Robey5

Well-known member
Joined
Jan 18, 2010
Messages
406
Location
North of Detroit, Mi
Here is a picture of the garage attached to the old house, on the last 'move out' day. As you can see it is a bit size constrained, it barely was able to fit my JGC in there with all the other goodies that we have.

Sorry for the small picture, but you get the idea, it was a 24X20, with a number of home-brewed cabinets. We took the add-on stuff that I installed over the years (a reznor workshop furnace, a craftsman work bench and cabinets, a garage-er-ator) that will be installed as we get to it in the new house.
 

Attachments

  • garage old.JPG
    garage old.JPG
    39.1 KB · Views: 1,447
Last edited:
OP
R

Robey5

Well-known member
Joined
Jan 18, 2010
Messages
406
Location
North of Detroit, Mi
And now, we have the new.

Sadly, the garage becomes a dumping ground for moving stuff that does not really have a 'home'. This was a snap-shot of the second day of moving into the new house back in August. We have been taking on a mission of organizing stuff as it comes in the house, and throwing out stuff that is deemed '****'. I will take a better picture of this area in the near future as we have added some shelves, put the work bench in there, and have been trying to make this a use-able garage.


Here is the mission (not really in order):

Power outlets: There are currently 4*110 single-gang outlets randomly placed throughout the garage, all in places that don't make a whole hill-o-beans of sense. We will increase this by at least 2X. I will also be adding a 2-phase outlet for welding or my little temporary heater.

Lighting: I installed some LED workshop-lights in place of the low-end CFL bulb fixtures for the time being. What needs to be taken care of is additional lighting so that I can see what I am working on! When I do that, I will be roping some soffit lighting into the areas out-doors that make sense (the coach lights are on a timer, so recessed soffit lighting will be on that circuit).

Stereo: We are really into music. I love throwing on some tunes to accompany my latest project (be it Respighi, Ramones, Rage, Rammstein or anything in between) - and I have a stereo there, but the speakers need to be mounted in the corners on the wall to get them off of the work-bench so that I can have room to work on the work bench.

Paint scheme: Not sure what colors yet, but I am thinking that grey with a red-stripe about half-way up will do, and white ceilings...

Garage door for "sportscar" area: We will eventually install a shaft-style opener and get the track up to the ceiling to accommodate a lift.

Lift: I have always wanted a lift. Not sure if it will be a 2 post or a 4 post, but I will need to be able to put two cars in a 1-space area, so a lift will be installed in the mix eventually.

Floor: Race-deck will complete the look, and though I do not have an infinite budget - I like this solution for at least the sportscar area.

Furnace: I would like to install my reznor furnace. I have a gas line in the garage for this, but it is put in one of the more bizarre of locations, so that may have to be adjusted. Don't worry: the garage is insulated and I am sure that the contractors did an awesome job making sure that it has no air-gaps or drafts....


Time-line: I work on many things at once, and some times have heavy surges in work-hours - meaning that the home-projects take a back seat. When I get home, I try to do one small project per day and try to get that one project as completed as possible before putting the tools away for the evening. In other words, this 8 'item' project could (quite possibly) take me 2 years.

Maybe as I go along, I will include some of the indoor stuff that I am upto as well. I wouldn't be the first on that.
 

Attachments

  • garage new.JPG
    garage new.JPG
    50.9 KB · Views: 1,246

Bib Overalls

Well-known member
Joined
Dec 4, 2006
Messages
3,318
Location
Jonesboro, Arkansas
I can sympathize with you on the flooding. On two occasions a rental house we owned flooded. We replaced carpet and sub-flooring twice. The house had a wet, musky smell that lasted until the end of the winter heating season.

If you can do it you should put your lights on a circuit separate from the one you use for your outlets. This way you will not be in the dark if one of your power tools takes a dump.

If you think your wife will want to put a refrigerator and/or freezer in "your" garage you should provide separate circuits for them.

Even though this forum is called the GARAGE JOURNAL most of the members have a range of interests that include working on houses, hot rods, metal fabrication and welding, wood working, beer drinking, etc. Please feel free to share your other garage and shop related vices with us.

PS: I use Flickr.com as my photo host. It is free and works well with this forum. By uploading your images to a photo host they can be linked to your posts and display in full size where you want them in the text field. Another tip is to run your images through the Pickmonkey.com auto adjust feature before you upload them to your photo host. You can also use Pickmonkey to crop, resize, and make other edits. For display on forums I resize my pictures to a 1,000 pixel width.
 
OP
R

Robey5

Well-known member
Joined
Jan 18, 2010
Messages
406
Location
North of Detroit, Mi
With the forced renovation in progress, I will be working on roping the kitchen/dining area so that we can get LED rope-lighting as the cabinet lighting. I will snap a couple pics this weekend of the carnage.

Regarding a shed: I do not have a shed yet. That is on the list for next spring. I have a pretty long list of stuff to do all over the house. I do not have a big mower for the lawn yet, but I need a place to store lawn equipment and the newly acquired 2-stage snow blower.
 
OP
R

Robey5

Well-known member
Joined
Jan 18, 2010
Messages
406
Location
North of Detroit, Mi
Ok...

We have a little progress, as we (I) took last weekend to rope the kitchen last week, and this week: we had a bit of drywall work done.

Then, with all the work going on indoors, I decided to organize the garage a little and do a little cleaning.....
 

Attachments

  • image.jpg
    image.jpg
    12.3 KB · Views: 796
OP
R

Robey5

Well-known member
Joined
Jan 18, 2010
Messages
406
Location
North of Detroit, Mi
Another shot from the garage, as I realize that I am going to need to use a photo editor because these pictures are too 'heavy' to upload more than one at a time...


As you can see, there is a lot of **** in here. I think that my mission to do a sweet detached garage may need to be put a little higher on the list of things to do....

BUT, with due time (I am sure) ... As a lot of this stuff does not really belong here (i.e.: kitchen cabinets and oven, etc....) will be installed shortly in their rightful place.
 

Attachments

  • image.jpg
    image.jpg
    14.5 KB · Views: 1,061
OP
R

Robey5

Well-known member
Joined
Jan 18, 2010
Messages
406
Location
North of Detroit, Mi
Rich:

Thank you for stopping by! I am working on some bigger pictures, it would be rather helpful to see what I am working with.

So - I have been busy with the to-do list around a brand new house. Back in the summer, my first mission was to get all of the gutters to drain away from the house. What this became is a lesson on how to repair sprinkler lines and how incredible digging in clay at our house is.

I chose schedule40 pipe for the first several feet of the run, so that things like future bushes, shrubs and what-not do not grow into the pipe. Once I felt like it was far enough away from the house, I connected corrugated tube to the sched40 with an adapter, and pitched the system away from the house.
 

Attachments

  • IMG_0558.jpg
    IMG_0558.jpg
    49.7 KB · Views: 823
  • IMG_0687.jpg
    IMG_0687.jpg
    61.9 KB · Views: 982
OP
R

Robey5

Well-known member
Joined
Jan 18, 2010
Messages
406
Location
North of Detroit, Mi
This trenching project took me several evenings, and was broken up by a couple of business trips and times where I had to get other things done around the house; I also had a baseball tournament somewhere in there that took away a weekend of work on the house....

In total, I was able to complete the trenching/digging project at the end of September; just in time for SOME of the rye-based seed I bought to "take" and start to grow.

For the time being, I just left the ends of the corrugated tube to drain to "daylight" - until next season when I put a pop-up drain box and some pebble to manage the water.

At the conclusion of this gutter-drain-management project, one of my neighbors came over and said something along the lines of, "wow, I cannot believe that you did that all by yourself... that looks like a lot of work, how much would you charge to come by my house to do that?"

I chuckled and replied (paraphrasing) "... I suppose I could do that, but I am pretty expensive for this type of work..."

As I walked back up to finish my back-fill of the trenches after I tested the gutters and system for leaks, I started to question myself: why did I do this, and not hire it out? ...then I remembered that time that I hired a person to dig at my old house and came home to work that I had to re-do, and sadly never saw that person again.
 

Attachments

  • IMG_0730.jpg
    IMG_0730.jpg
    59.5 KB · Views: 792
  • IMG_0729.jpg
    IMG_0729.jpg
    57.2 KB · Views: 735
  • IMG_0742.jpg
    IMG_0742.jpg
    65 KB · Views: 832
  • IMG_0741.jpg
    IMG_0741.jpg
    71.7 KB · Views: 761

FJ 432

Well-known member
Joined
Aug 2, 2010
Messages
3,723
Location
Littleton Colorado
I started to question myself: why did I do this, and not hire it out? ...then I remembered that time that I hired a person to dig at my old house and came home to work that I had to re-do, and sadly never saw that person again.

By looking at your photos the answer to your question is obvious to an outsider like me.

You do great work that is now complete and will be trouble free!
Great job.:beer:
 
OP
R

Robey5

Well-known member
Joined
Jan 18, 2010
Messages
406
Location
North of Detroit, Mi
After I was able to get some of the back-fill in the trenches, and I had the kid next door run over the trenches with his family's mower to "flatten" the clay, I was not satisfied with the connection that went from the downspout into the Sched40 pipe. So, I changed it to an adapter that fits a bit more cleanly (purch-ed from Amazon, which is WAY cheaper than the big-box store, and had a very bad selection of this stuff).


The "old" version is the black cap that connects to corrugated pipe much cleaner (...but not the case with sched40).

The "new" and better fitting version requires a coupler on the Seched40, and then connects square with the glue-compound.

I decided that I would glue the coupler on, but would leave the adapter not glued so that I could remove it to clear the pipe in the event that there is a clog in the future. I will also paint these so that it blends in a bit.

Oh yeah: I also replaced a couple downspouts that were damaged by the contractors who were doing the stone work at the time I replaced the caps.
 

Attachments

  • IMG_0807.jpg
    IMG_0807.jpg
    56.1 KB · Views: 801
  • IMG_0808.jpg
    IMG_0808.jpg
    50.8 KB · Views: 850
Last edited:
OP
R

Robey5

Well-known member
Joined
Jan 18, 2010
Messages
406
Location
North of Detroit, Mi
FJ:
Thank you for stopping by. I/We love Colorado. We make an effort to go to one new place to go snowboarding every year, and Co has a LOT of places that are world class. Among our favorites: A-basin, Telluride, and Snowmass. This season, we have our eye on a couple places that we have not been to, among them being Steamboat.

On to the house....
Over the last couple months (among the re-construction of our kitchen) - we decided that we needed to tackle organization in the basement. SO: we scooped some shelving units ("Muscle rack" model UR184872-R if anyone cares) and liked them enough to buy 7 of them, and put things like my tools that need to be indoors in them - in the basement. Also on these racks are the construction materials, camping gear, another for all the sporting equipment, another for seasonal decor.

In the activity of organizing; it started to drive me nuts that I could not see in the basement. ...or plug things in to clean (ie: shop-vac). So, I wired up 12 recessed lights in the basement on their own circuit. What the contractors left there was the "pull string" lights, and I do not like these. They are also shared on various circuits; so I am going to treat these blue boxes as junction boxes.

At this point, I would like to applaud the electrician who roped this house. I will give him an A-. An A, because I like that he did a solid job labeling the wires. Everywhere, including in each J-box in the house. Also made sure that the wires in the box (200A service) are very orderly. I am going to give him a minus because, it looks like someone else got in there after the electrician was in there and put a couple random things in the mix (for instance, the "box outlet" is linked to the door chime, and they threw the wires in at the bottom and didn't arrange the wires very orderly). The other thing that he gets a minus for: there are 6 screws on the box that holds the cover door on the box. 3 of them are one type and are rusty, 2 of another type and my favorite: a drywall screw to finish the effing job off. Once I pulled the cover off, I went ahead and purchased the Eaton brand screws that belong there.
 

Attachments

  • IMG_0845.JPG
    IMG_0845.JPG
    138.8 KB · Views: 819
  • IMG_0846.JPG
    IMG_0846.JPG
    96.3 KB · Views: 652
OP
R

Robey5

Well-known member
Joined
Jan 18, 2010
Messages
406
Location
North of Detroit, Mi
I am sure that anyone reading is about ready to fall asleep with my rambling, but I am going to take a quick moment to say that I am very appreciative for things that my father has taught me over the years. The recessed lighting system: pretty easy stuff. 12 lights on a dedicated 15A circuit, running LED light bulbs (down-light style): the developer suggested that he could add this to our basement at a cost of $120 per light, and I would have to buy the bulbs on my own. When I stopped laughing (internally) I said that I would tackle it on my own when I get time. That 'time' happened over the weekend, and man it makes a major difference down there, and my wife is happy to be able to flip a switch to be able to see the work out area now. My only complaint is that running wire beats my hands up a bit, but had I not listened to dad a while ago when he helped me wire a couple recessed buckets in my old house many years ago I would have been a bit lost on this project.

On to another fun part in my basement. My father is an accomplished wood worker. Me: not so much. So, when we had the old house, and a lot of trees had to be cut down, I knew that I was dealing with old-growth hard wood and was going to find a way to save it for later. To the point, about 7 years ago, we had 10 trees cut down by a company (in January, when they were at a slow time) who was willing to "drop-em dirty" and leave the massive runs of logs there for me to clean up: because --- I am cheap, and I wanted to harvest the nice wood. Only 2 trees were garbage pine, so those went into our fire pit as soon as the weather broke. All others were a mix of hickory, maple and red oak. I friended someone in our old neighborhood who has a super sweet saw mill, and cut the logs into 6Q planks.

This rough-cut lumber sat in an area where it was kind of protected by the elements at the old house for about 4 years, and I loaded it up when the time was right and brought it home to be stored in a more temperature controlled environment at the new house.
 

Attachments

  • IMG_0643.JPG
    IMG_0643.JPG
    97.2 KB · Views: 583
  • IMG_0644.JPG
    IMG_0644.JPG
    124.2 KB · Views: 644
  • IMG_0630.jpg
    IMG_0630.jpg
    55.9 KB · Views: 559
OP
R

Robey5

Well-known member
Joined
Jan 18, 2010
Messages
406
Location
North of Detroit, Mi
When I brought the rough-cut lumber to the old house, there was a fluid plan that included me making this into a hard-wood floor at our old house. Since we have a beautifully finished wood floor now (in the new house), the plans have changed for this lumber. In fact, we don't really have plans YET; but I have asked my father to entertain the idea of making a platform bed that has some drawers in the side for the master bedroom. Since the wood is not going anywhere, I have (over the years) given dad some of the material for his various projects that he is working on. I don't have any pictures that I can post of his work, but he gave my lil-sis a dining room table a couple years ago from some of the oak he grabbed from my stash that is beautiful. It is so nice, that I have to declare it a work of art, which took him a little time to do, but is much nicer than going to a local furniture shop and picking up anything in the "reasonable" price range.
 
Last edited:
OP
R

Robey5

Well-known member
Joined
Jan 18, 2010
Messages
406
Location
North of Detroit, Mi
Ok ... I did find a picture of dads work (as WIP) - of the table in question. Size/scale is tough to see here but you get the idea.
 

Attachments

  • 49965985429__F3A63ED9-C823-4D8B-8FD7-AAAD8648E5DE.JPG
    49965985429__F3A63ED9-C823-4D8B-8FD7-AAAD8648E5DE.JPG
    126.4 KB · Views: 645
OP
R

Robey5

Well-known member
Joined
Jan 18, 2010
Messages
406
Location
North of Detroit, Mi
There are a few things that I need to get to before I am able to get to the garage, but I think that I am going to start my planning phase on putting more electrical outlets in the garage.

One of those things in the 'planning phase' is to decide what type of outlets that I will need. In the planning of adding outlets, I have noticed a number of guys putting 20A outlets in the garage. This (of course) will require going to the 12-2WG wire, which is not a problem, but should I set up app of the additional outlets on this 20A circuit? I have a lot of room on my breaker panel to do this, but is it worth the PITA factor? I already have a 220 line (2-phase) set up for the future welding ability.
 

matt_i

Well-known member
Joined
Mar 14, 2008
Messages
10,717
Location
SE Michigan
Hi I was admiring your gutter burial project, I have about 6 of these I would like to do on my own house. I was wondering how to transition the Sch40 to the downspout rain conductor because nobody seems to sell this nor barely have any info about which size pipe adapts....and you have this beautifully pictured, so Thanks! for the info.

One theory on duplex outlets I like is to put in double-gang "quad boxes" around your perimeter but wire the circuits so the left outlets are all on one 20A circuit, and the right outlets are all on another 20A circuit. Then you never really run out of power for plug-in tools and such.

The 240vac is still a single phase despite being double the voltage...people may look strangely at you if using "2 phase" terminology as it jumps from single to three phase with one more hot wire...not trying to nitpick but hopefully save confusion :)
 
To avoid these ads, REGISTER NOW!

Bib Overalls

Well-known member
Joined
Dec 4, 2006
Messages
3,318
Location
Jonesboro, Arkansas
I use 12/2WG whenever I wire up a 120V circuit. In a shop I like dedicated circuits for table saws and any other power tool that requires 15 amps. For general use circuits I try to limit the number of duplex outlets to 4 or 5. I usually put the garage door opener at the end of one of the general purpose circuits. I always put the ceiling lights on a separate circuit with other lights in the house.
 
OP
R

Robey5

Well-known member
Joined
Jan 18, 2010
Messages
406
Location
North of Detroit, Mi
Matt_i, Bib: thank you for the input. I think that you both have a great approach to this little mini-project; and I will plan accordingly. On the list for this one: 8*2gang boxes; all will be run using a 20A circuit. By the way, I will take the idea that Matt presented, and have a 2 gang using 2 different breakers. While I was in the box last time (a few days ago): decided that I would use one of those 2*20 double-rocker fuses that Eaton has (in my instance it is called a C-H type, something to do with "Hammer" ... which I do not know why this is the case, perhaps it is just the name of Eaton box that I have, perhaps someone smarter than me can inform me...).

I finished up another project, which included putting an input speaker in the basement near the work-out area, because I am getting tired of listening to my music on a phone speaker while running on the treadmill. I will include pictures later.

As I wrapped up on the recessed light project, I had a small casualty... my voltage detector that has been with me for 3 houses and nearly 16 years bit the dust. Guess that I will have to spring for a Klein one now... (wife said, "hey: you can get a really nice one now, and just throw that one out, right??" ... She is blessing the upgrade, that's good!)
 

Attachments

  • IMG_0729.jpg
    IMG_0729.jpg
    136.2 KB · Views: 398
Last edited:
OP
R

Robey5

Well-known member
Joined
Jan 18, 2010
Messages
406
Location
North of Detroit, Mi
I know that this is a bit more of a boring post, but here is a couple shots of the in-wall speaker in the basement. It is not connected to the receiver yet, but you get the idea. I really like these input speakers because they are a solid value (less than $90 per) and put off a good sound quality.

The other 'good thing' about this speaker is that it puts out a stereo sound that can be enhanced with a little insulation in behind the speaker itself. For reference, this is my first run with this house and installing in-wall speakers (I put 3 of them in my old house and they were really nice), so this should serve as a good test. I also got a Klipsch speaker for the master bathroom because it is a bit more resistant to steam. That will also be put on a volume control.
 

Attachments

  • IMG_0853.JPG
    IMG_0853.JPG
    92.6 KB · Views: 383
  • IMG_0854.JPG
    IMG_0854.JPG
    79.7 KB · Views: 355
  • IMG_0851.JPG
    IMG_0851.JPG
    98.9 KB · Views: 383
Last edited:
OP
R

Robey5

Well-known member
Joined
Jan 18, 2010
Messages
406
Location
North of Detroit, Mi
Weather is starting to turn here in the mitten-state, and we will have to focus our efforts on indoor stuff only very soon. The week-end before the holiday - I decided to push some rocks into place in front of our house. For reference, these rocks were grabbed from a nearby source, and I moved them to our yard with my wheelbarrow. I also was given a bird bath (just in time for all of the birds to migrate....) that I put here with my set up. I put these rocks about 24 inches off the wall so that I can put a planter set-up here, and put some box shrubs in there (against the wall). Plans are: when the weather is right - I will put the shrubs in, put some sod in here, and maybe a little paver-pad for something like a little bench or something. The rocks are very heavy (3-500lbm each...) and I also put some of these around the yard to distract the view of our well head, and our driveway stanchion/drain.
 

Attachments

  • IMG_0857.jpg
    IMG_0857.jpg
    55.8 KB · Views: 565
Last edited:
OP
R

Robey5

Well-known member
Joined
Jan 18, 2010
Messages
406
Location
North of Detroit, Mi
Because we now have a yard that supports the possibility to have a flag pole, and my wife's family business is custom flag making: we installed a 20ft flag pole 2 weeks prior to the holiday weekend. A quick back-story is that mom-in-law really liked me. (not sure why, but past tense is correct here) ... we lost her earlier this year, and it's been a particularly difficult year for my wife as they were very close. SO: on that weekend, we put the flag-pole in the ground, my wife put a little dedication to her on the cement we finished.

In the background, you will see that these pictures were taken before I took on my little rock-moving project.
 

Attachments

  • IMG_7350.jpg
    IMG_7350.jpg
    55.2 KB · Views: 685
  • FullSizeRender.jpg
    FullSizeRender.jpg
    85.1 KB · Views: 604
OP
R

Robey5

Well-known member
Joined
Jan 18, 2010
Messages
406
Location
North of Detroit, Mi
Moving back inside, we got the tile down on the floor; looks good. This is prior to getting the base cabinets installed, as well as the granite, and other items - but I will take some pictures of that progress as well (soon enough!).

For the record, the wife chose the pattern. We (together) chose the colors, and I was really a fan of doing a diamond pattern and alternating colors; but she was not nuts about it. After doing a lot of researching on different pattern types 'we' landed on this as the winner. We like it....
 

Attachments

  • IMG_7239.JPG
    IMG_7239.JPG
    121.5 KB · Views: 525
OP
R

Robey5

Well-known member
Joined
Jan 18, 2010
Messages
406
Location
North of Detroit, Mi
It has been a very busy 10 (or so) days. We have hired a painter who we have worked with in the past to do the ceilings, walls and eventually molding.

What happened was - we had a 'finish and trim guy' who took the old (flood damaged) molding off the wall, and they tried to put this stuff back on the wall. We wanted to get the molding done before the painter came through .... Long story short: MDF does not lend itself to be a very durable product when attempting to use it a second time, AND you have guys who are trying to get the job done quickly. I was able to discover this messy work when I got home from a business trip, just in time for the guy to be packing up the gear and leaving. I will allow the pictures to do the speaking here, except I need to report that I was suffering from retinal damage every time I looked in the general area of the molding that was re-hung ....sloppily. ...so sloppily that I had to take this mess down and re-do the work (with some new base) to get it looking correct. I think that one picture of the way it *was* will say enough; and there were about 10 joints that looked like this.

I also had to take that base-shoe off, because I like the look of the clean right-angle. In the mele of me pulling the base and shoe to fix this mess, I determined that the reason the original contractor put the base-shoe there is because they laid the wood floor (that was originally there) after the baseboard was installed, and they used the base-shoe to cover the gap. I would have done it a little differently ... but it's done. I will also terminate the base-shoe on the wood at the transition to the tile.
 

Attachments

  • IMG_0901.JPG
    IMG_0901.JPG
    115.4 KB · Views: 528
  • IMG_0899.JPG
    IMG_0899.JPG
    107.8 KB · Views: 526
  • IMG_0877.JPG
    IMG_0877.JPG
    93.8 KB · Views: 589
Last edited:
OP
R

Robey5

Well-known member
Joined
Jan 18, 2010
Messages
406
Location
North of Detroit, Mi
The weekend was full of wrench turning, as I was able to "break in" the new garage with an essential car repair.

http://www.jeepgarage.org/f107/2011-wk2-water-pump-and-radiator-a-precautionary-tale-107921.html

I had to replace the water pump and radiator on my daily driver, the latter of which was the more difficult job. In order to get the needed room to pull the jeep in, I had to finish a little trim work in the house. I had my table saw set up, as well as my chop-box and a couple tables for setting things up and having support for the long lengths of molding that I was working with.

Next on the agenda is to install the lighting in the kitchen now that I have been able to break-in the garage.
 
OP
R

Robey5

Well-known member
Joined
Jan 18, 2010
Messages
406
Location
North of Detroit, Mi
Had a busy weekend: but we would not want it any other way.

Friday: finished the Jeep by doing a flush-n-fill with the correct coolant.
Saturday morning: I replaced the front rotors in my wife's (filthy) car.
Saturday afternoon: niece birthday party (...I attended with a pretty credible Elmo costume on...)
Sunday morning: Testing of new blower. This weekend marked the first 'real' snow at the house (got about 8 inches). It's cold in the upper mid-west, so now that I have a nice, reliable snow blower I had to test it after I fought with POS blowers for the better part of the past 10 years. I treated myself to a Toro 2-stage blower that is a very nice model; after dealing with half busted craigslist specials that needed various things fixed, including the Honda blower that seized the engine in the worst snow of our year last season. When the sale on the old house closed, I went to my local Ex-mark/Toro dealer and picked up a sweet 2stage Toro which has all galvi hardware, and is likely to last a life time.

After the first pass with the new blower, my wife and I packed up the jeep and went out to snowboard for a little recess from all the work around the house. She is quite a rider, gets 30-40 ride days a year and gets the most of her season pass at a local hill we frequent.
 

Attachments

  • IMG_7727.JPG
    IMG_7727.JPG
    104.1 KB · Views: 578
  • IMG_7729.JPG
    IMG_7729.JPG
    93.2 KB · Views: 545
Last edited:
OP
R

Robey5

Well-known member
Joined
Jan 18, 2010
Messages
406
Location
North of Detroit, Mi
We have been trying to button up as much as possible before the Christmas holiday. We are pushing the painter to move things along as much as a solo-act can be pushed. In parallel, I have been tackling the under counter lighting. If anyone is watching: I have put the LED ribbon-lighting in under the cabinet on both levels. You can make this stuff a number of different colors, and the adhesive is pretty strong.

For reference, I have done under counter lighting in the past, with those halogen hockey pucks. That system worked OK (at the old house) but ... those things are extremely HOT, and didn't really give a choice to be different colors. Not complaining, but that install was a little easier than this one. On the other hand, this LED lighting system is much cooler (pun intended) than the old systems.
 

Attachments

  • IMG_0911.JPG
    IMG_0911.JPG
    132.6 KB · Views: 447
  • IMG_0910.JPG
    IMG_0910.JPG
    121.4 KB · Views: 443

InDaRed2

Well-known member
Joined
Sep 21, 2015
Messages
319
Location
MO
We have been trying to button up as much as possible before the Christmas holiday. We are pushing the painter to move things along as much as a solo-act can be pushed. In parallel, I have been tackling the under counter lighting. If anyone is watching: I have put the LED ribbon-lighting in under the cabinet on both levels. You can make this stuff a number of different colors, and the adhesive is pretty strong.

For reference, I have done under counter lighting in the past, with those halogen hockey pucks. That system worked OK (at the old house) but ... those things are extremely HOT, and didn't really give a choice to be different colors. Not complaining, but that install was a little easier than this one. On the other hand, this LED lighting system is much cooler (pun intended) than the old systems.

What LED system did you end up using? Looking to do this at my house and curious on what you went with.
 
OP
R

Robey5

Well-known member
Joined
Jan 18, 2010
Messages
406
Location
North of Detroit, Mi
InDaRed2:
Thanks for dropping by! I used the "SurLight LED SMD5050 waterproof strip light"

I scooped the kit(s) from Amazon, and after some soldering and some research on making the connections, I was off to the races. If I were to do it again, I would figure out a way to make all of the runs be on one controller so that we can have colors change in harmony. I also went a bit over-kill with the waterproof strip-lights. Under the cabinet I think that plain-old ribbon lighting would do the job.

The house has been a LOT of activity over the past bit; we have a painter who is working at a pace all his own, and because he does very good work, I will not complain about his time line. Along the way, I had 3 doors that needed to be trimmed down because the tile floor is a bit less than 1/4 inch higher than the original wood floor.

As this has been a task (door trimming....) on my list for a bit, I chose last night to fire up the edge planer and make some cold sawdust.

I am still honing my skills with this tool and making my cuts square and without any tear out. I did passes (at 1/32 inch) with my fun edge planer and snapped a couple pictures.
 

Attachments

  • 50389040827__6D9254D1-00AB-43C6-8821-8CE02B1D9031.JPG
    50389040827__6D9254D1-00AB-43C6-8821-8CE02B1D9031.JPG
    137.6 KB · Views: 362
  • 50389042350__CC925FCB-27F8-425C-86E3-7D0F53A9FDF4.JPG
    50389042350__CC925FCB-27F8-425C-86E3-7D0F53A9FDF4.JPG
    57.8 KB · Views: 357
  • IMG_0926.JPG
    IMG_0926.JPG
    101 KB · Views: 384
OP
R

Robey5

Well-known member
Joined
Jan 18, 2010
Messages
406
Location
North of Detroit, Mi
While I was in the garage, I realized that I did not post a pic of one of my garage enhancements.

I put a "wall control" pegboard system in the garage for commonly used tools and a place to put my cordless drivers and such.

The wall control pegboard is an idea that I saw on the board while lurking --- I am not sure who I can give credit to on this, but these kits went on sale recently and I decided that it would help keep these tools and such in order.
 

Attachments

  • IMG_0925.JPG
    IMG_0925.JPG
    140.1 KB · Views: 476
OP
R

Robey5

Well-known member
Joined
Jan 18, 2010
Messages
406
Location
North of Detroit, Mi
One nice thing about having a pro painter in your house is that you can use his equipment from time-to-time that he leaves behind.

We have 18 foot ceilings in our living room, and I am still working on getting our house's surround going.

As one of the 'tasks' that I had on the list while the painter's scaffolding was in the living room was to install our in-ceiling speakers for rear channels in the 7.1 system. Here's a couple snap shots of the results. They are 8 in directional in-wall speakers by Polk.

...standing on scaffolding is not a place that I would like to regularly be standing, for the record.
 

Attachments

  • IMG_0922.JPG
    IMG_0922.JPG
    60.7 KB · Views: 317
  • IMG_0920.JPG
    IMG_0920.JPG
    52.7 KB · Views: 293

920kip

Well-known member
Joined
Aug 11, 2011
Messages
168
Location
Titletown USA
Great job on your projects. A man who can wear many hats. Keep up your postings, they are of interest to many here I am sure.

Cheers,
Kip
p.s. Lions meltdown coming ;-)
 
OP
R

Robey5

Well-known member
Joined
Jan 18, 2010
Messages
406
Location
North of Detroit, Mi
920kip:

Lions meltdown coming: the 6+a hook line on the Dallas game was a sucker's bet, those of us who have suffered through lions fandom knew that we'd see a train be run on the Lions in Dallas. They will loose this Sunday as well. Thank you for stopping by.

SO: Those of us in the auto-industry enjoy a holiday time off that includes "no work" between Christmas and New Years day. Unfortunately for me: I have a project in crisis mode, and that meant doing conference calls at a rather early hour because my colleagues are in Asia as the lead in this messy project.

In addition to the "office work" that I had to do, my list was pretty darn long to tackle at the house during my free time. One of the things on the agenda was to get the backsplash figured out.

As much as I love and admire my wife, she insisted that we have this done by a pro that we trust even though I strongly felt that I could knock this out in 2.5 dedicated day job. SO: we had a pro swing by and do the back-splash in 2 days (one day to lay tile, the next day to grout/caulk...). Enjoy the pictures. Imagine my confliction when I came home from a material run (for a different job) and found my wife in the kitchen with my small 1/4X1/4 inch trowel and the tile adhesive bucket open ... for her to be popping tiles (post layout) and installing tiles and making slight adjustments to the layout. I just smiled and appreciated the irony, and really love the outcome.
 

Attachments

  • IMG_0818.jpg
    IMG_0818.jpg
    143.4 KB · Views: 392
  • IMG_0817.jpg
    IMG_0817.jpg
    137.3 KB · Views: 396
  • IMG_0819.jpg
    IMG_0819.jpg
    146.7 KB · Views: 437
OP
R

Robey5

Well-known member
Joined
Jan 18, 2010
Messages
406
Location
North of Detroit, Mi
Next on tap, I fired up the planer and made some step-up transitions. This transition is to go between the tile and the maple floor, where there is a 1/4 inch height difference, ... a feature that I did not want to have in the first place. I am making the best of it, and hopefully over the years, I will notice this feature less and less. The gap between the wood and the tile will be filled with grout colored/textured caulk (sanded...)

I will be doing the caulk today (hense, the tape....)
 

Attachments

  • IMG_0822.jpg
    IMG_0822.jpg
    142.1 KB · Views: 330
  • IMG_0821.jpg
    IMG_0821.jpg
    145.2 KB · Views: 316
  • IMG_0820.jpg
    IMG_0820.jpg
    145 KB · Views: 350
OP
R

Robey5

Well-known member
Joined
Jan 18, 2010
Messages
406
Location
North of Detroit, Mi
Then, on one evening I had my mother and lil sis, BIL, and nephew over for our private christmas party.... When we wrapped up, everyone packed up and was ready to leave, I could hear my mother's car making some pretty incredible noise that I was familiar with. She has a trailblazer that has near 200k on the odo, and I know that despite popular opinion of these vehicles, this thing is pretty reliable. I could hear the water pump bearing screeching and growling, and ... knew that this was a ticking time bomb that needed to be addressed like NOW.

Putting aside my distaste for the nasty divorce of my folks from the past (good gravy, as I write this ... I'm still bitter about this? geeeez... it was like 15 years ago....), I could NOT ignore the sound, and I asked mom to stay for the night, ... I would tackle another water pump job that next morning (conference call at 7; wraps at 8:30, I could go grab the pump after the meeting and have it installed by noon, what could possibly go wrong?????).

In my mind, I could not just let her go home on a car which was questionable in reliablility... and a job I could knock out.... as she would have had to go through some kind of gnarly areas to get home, and I was not cool wth that.

If you're interested, google a water pump/fan clutch bolt on an Envoy/trailblazer with a 4.2L IL 6 some time, you will see that MANY people have struggled with the "stuck" 34mm bolt that holds the water pump to the fan clutch. For your viewing enjoyment I've attached a couple pics to show that, while it took gorilla strength to break this beast loose, got it apart, and installed a new water pump, which took me about 6 hours in total.

I did score a pretty sweet new heavy duty tool in the transaction, which cost $80 at my favorite place to scoop tools "performance line tool center" near my office. I guess that next time I have to apply 400+ftlb of torque on a massive pulley bolt while holding the pulley still with this thing, I will be set. I don't think that these people will return a tool that I have used, and I may need it in the future.

Later that day; Mom had a car that was not making noise (from the front of the engine, at least) and was happy that her son was able to hook the job up while she was in the comfort of a nice couch.
 

Attachments

  • IMG_0815.jpg
    IMG_0815.jpg
    139.7 KB · Views: 413
  • IMG_0824.jpg
    IMG_0824.jpg
    139.9 KB · Views: 383
Last edited:
OP
R

Robey5

Well-known member
Joined
Jan 18, 2010
Messages
406
Location
North of Detroit, Mi
It's been a little bit since my last post, but I can reassure the board that I've been staying busy.

We hosted a party on NYE: a good way to break in the new pad, now that we're about 90% done with the rehab of the house.
Along the way, I was able to get more speakers installed. I have one more speaker to install along with a volume control. The wires will be run in the coming weeks, but I figured that I will get all of the speakers installed before running the wire. For reference, I've attached a pic of the set that are in the office.

Before I knew it, I came up to another birthday. ...and we broke in the house with the second bash. We had a lot of people over, and I may not have felt 40 before the weekend, but I most certainly did feel over 40 on Sunday. Even though I was trying to stay away from the 'gift factor' of my birthday (because, as an adult it is a little lame) - my lil sis got me a dewalt 'cut off' tool which works like a cordless roto-zip, and my mom hooked me up with a new 3/8 inch driver (snap-on!!).

A back-story: I stick with craftsman for the most part, but over the years, I've noticed a considerable decline in craftsman's quality, specifically in their drivers. They still honor their "if you break it, we will replace it warranty" but: I think that they've started to make them with that in mind (...if it breaks, we will just swap it with a half busted re-furb...) - and though my craftsman sockets work great, I have now broken 3 3/8 inch craftsman drivers in one year. The last one cost me dearly in a good knuckle bashing, and I said: time to start to look for better drivers that will last a life time. Mom asked what I wanted: I asked for a snap-on driver.
 

Attachments

  • IMG_0953.jpg
    IMG_0953.jpg
    54.9 KB · Views: 298
  • 50551587034__C5ED2EEE-66E5-40A8-A23A-AEBE6F49EF79.JPG
    50551587034__C5ED2EEE-66E5-40A8-A23A-AEBE6F49EF79.JPG
    64.3 KB · Views: 217
  • 50551586197__BCB94094-C21F-471A-9011-1B659B4CB663.JPG
    50551586197__BCB94094-C21F-471A-9011-1B659B4CB663.JPG
    84.8 KB · Views: 221
Last edited:
OP
R

Robey5

Well-known member
Joined
Jan 18, 2010
Messages
406
Location
North of Detroit, Mi
I figured that my next 'fun' project would be running wires around in the attic for the multi-zone sound system.

Unfortunately, as I was cleaning up a little mess in the basement, I noticed something that I am going to have to address kind of immediately, but I have not decided quite how I am going to 'fix' this yet.

What we have here is the exit waste line to the septic tank. The foundation is poured around this pipe, and I now notice that these pictures are a little tough to see what's going on here. There is a corrugated pipe which is what was used as the form to pour around, and they put the waste pipe through said hole, leaving a good 1 inch gap all around the actual pipe and the cement.

There is not any water coming in (thankfully) and it is not drafty, and I cannot see what is going on on the other side. My first inclination was to fill that hole with hydraulic cement. I am not sure if that is the best method.
My next thought (for about 22 seconds) was to break out the spray foam and fill it in.
However, I am sure that (after seeing some of the incredible projects here) someone would come up with a better solution that involves a rubber gasket... maybe some better pictures are needed.
 

Attachments

  • 50630835678__54F70F04-F84E-40E7-8E25-B0BA1A610D07.JPG
    50630835678__54F70F04-F84E-40E7-8E25-B0BA1A610D07.JPG
    87.3 KB · Views: 259
  • 50630837761__53D5A502-207B-4EA0-9F6B-868ACF7F6640.JPG
    50630837761__53D5A502-207B-4EA0-9F6B-868ACF7F6640.JPG
    90.9 KB · Views: 262
  • 50630839247__22792E56-73E6-46C8-B544-624775EE2545.JPG
    50630839247__22792E56-73E6-46C8-B544-624775EE2545.JPG
    77.6 KB · Views: 421
To avoid these ads, REGISTER NOW!
Top Bottom