BreeStephany
ALLIANCE MEMBER
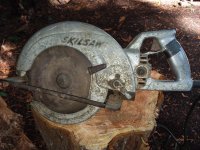
A couple of months ago, I picked up a vintage Skil 825 8-1/4" worm drive saw, with the intent of restoring it for a friend as christmas present.
A couple of days ago, I finally got around to restoring the saw.
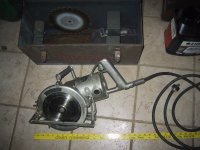
Overall the saw was in pretty good condition when I got it, however, it had a thick layer of oil and saw dust that needed to be cleaned off before I could truly assess the condition of the paint below.
After stripping it down and letting it sit in the parts washer for a while, I took the parts to a wire wheel and removed the majority of factory paint before painting in primer, paint and clearcoat.
Original Condition
View media item 66250
View media item 66251
View media item 66252The strain relief was broken on the saw when I received it. I modified a brass fitting to replace the broken strain relief.
View media item 66253The saw wasn't in too bad of condition, but had a lot of grease and sawdust that had to be cleaned up and scrubbed off in the parts washer before prepping for a new coat of paint
View media item 66254
View media item 66255
Disassembly
View media item 66256After stripping the saw down to individual components, I started cleaning each piece using my parts washer, a toothbrush. compressed air and a bit of time.
View media item 66257
View media item 66258When I got the saw, the strain relief was broken at the threads where it entered the saw. I could not readily source a new adapter, so I found a 3/8" brass NPT adapter, which I bored, polished and painted.
View media item 66259
View media item 66260
Restoration
View media item 66261After cleaning all of the parts, I took those that were to be painted to a wire wheel, removed the majority of old paint, applied 2 coats of primer, 4 coats of paint and a coat of clearcoat.
View media item 66262
View media item 66263Everything painted up and ready for reassembly.
View media item 66264
View media item 66293
View media item 66294Pulling field coil leads back into the handle.
View media item 66295The new strain relief was threaded for 3/8" NPT, which was slightly larger than the stock threads. I used a tap to tap the threads to fit the new strain relief.
View media item 66296Field coil installed and handle ready to be wired.
View media item 66297Packed the back armature bearing and installed the armature back into the saw.
View media item 66298Gear case installed. The armature bearings were in great shape, so I reinstalled them, however, there was an ever so slight 'stick spot' on the blade shaft bearings, so I replaced both of those and reinstalled the blade shaft.
I reinstalled the bearing caps and gear case covers after applying a light coat of RTV sealant.
Finished Restoration
View media item 66299All assembled and back together.
View media item 66300
View media item 66301
View media item 66303
View media item 66304
View media item 66305
View media item 66306
A couple of days ago, I finally got around to restoring the saw.
Overall the saw was in pretty good condition when I got it, however, it had a thick layer of oil and saw dust that needed to be cleaned off before I could truly assess the condition of the paint below.
After stripping it down and letting it sit in the parts washer for a while, I took the parts to a wire wheel and removed the majority of factory paint before painting in primer, paint and clearcoat.
Original Condition
View media item 66250
View media item 66251
View media item 66252The strain relief was broken on the saw when I received it. I modified a brass fitting to replace the broken strain relief.
View media item 66253The saw wasn't in too bad of condition, but had a lot of grease and sawdust that had to be cleaned up and scrubbed off in the parts washer before prepping for a new coat of paint
View media item 66254
View media item 66255
Disassembly
View media item 66256After stripping the saw down to individual components, I started cleaning each piece using my parts washer, a toothbrush. compressed air and a bit of time.
View media item 66257
View media item 66258When I got the saw, the strain relief was broken at the threads where it entered the saw. I could not readily source a new adapter, so I found a 3/8" brass NPT adapter, which I bored, polished and painted.
View media item 66259
View media item 66260
Restoration
View media item 66261After cleaning all of the parts, I took those that were to be painted to a wire wheel, removed the majority of old paint, applied 2 coats of primer, 4 coats of paint and a coat of clearcoat.
View media item 66262
View media item 66263Everything painted up and ready for reassembly.
View media item 66264
View media item 66293
View media item 66294Pulling field coil leads back into the handle.
View media item 66295The new strain relief was threaded for 3/8" NPT, which was slightly larger than the stock threads. I used a tap to tap the threads to fit the new strain relief.
View media item 66296Field coil installed and handle ready to be wired.
View media item 66297Packed the back armature bearing and installed the armature back into the saw.
View media item 66298Gear case installed. The armature bearings were in great shape, so I reinstalled them, however, there was an ever so slight 'stick spot' on the blade shaft bearings, so I replaced both of those and reinstalled the blade shaft.
I reinstalled the bearing caps and gear case covers after applying a light coat of RTV sealant.
Finished Restoration
View media item 66299All assembled and back together.
View media item 66300
View media item 66301
View media item 66303
View media item 66304
View media item 66305
View media item 66306