To avoid these ads, REGISTER NOW!

Show me your home made metal lathe stands

larry4406

Well-known member
Joined
Jan 27, 2006
Messages
19,325
Location
Northern Virginia
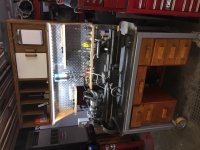
I recently bought a Craftsman/Atlas 12 inch lathe 101.27440. I need to correct some wiring issues before I can get it up back up and running. This forum is a bad influence...

It came with a poorly made metal stand with wood top. I need to build a stand/bench for it and am looking for ideas.

For those with metal lathes - Do you stand while using or do you sit? If you sit, then I am thinking there needs to be a knee space in the middle. If you stand, then I'm thinking a knee space is not needed.

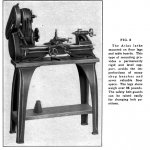
This guy advocates a spanning beam design. To that end, it is similar in concept to the continuous wood platform that Craftsman/Atlas recommended (except he uses a metal beam) in their original manual and optional stand they provided back then.
http://users.picknowl.com.au/~gloaming_agnet/cq9325rev4.html

I am thinking along the lines of a Steevo inspired build using two Harbor Freight 7 drawer tool cabinets, one on each end, with the open knee space, the spanning beam concept with chip tray/tool surface below. I like the metal beam concept as it could be bolted on the ends to the legs allowing the lathe to remain attached to beam while the stand is disassembled for moving/relocating. This keeps the beam rigid while the remainder of the stand can be bolted and braced. I would use leveling feet like Steevo did

I have a 240V Lincoln MIG, drill press, grinder, etc so the metal work is easy. Also have wood working equipment in the event folks advocate a wood top (friend has large planers so I could build a very thick oak top if that is what is recommended as I have read that wood helps dampen out vibrations).

I am 6'-2' so I am thinking that the bench would be proportioned to put the compound up at about elbow height will standing while I could still use a stool.

So what say you that use lathes and have built your own stands? As always, pictures greatly appreciated.

I have a few other house projects still in the works, so the lathe and stand is not yet a high priority but its time to start getting smart.
 

Attachments

  • Craigslist Ad Picture.jpg
    Craigslist Ad Picture.jpg
    140.5 KB · Views: 177
  • Atlas lathe on OEM stand.jpg
    Atlas lathe on OEM stand.jpg
    138.2 KB · Views: 154
  • Spanning beam concept on wood legs.jpg
    Spanning beam concept on wood legs.jpg
    21.7 KB · Views: 203
To avoid these ads, REGISTER NOW!

pepi

Well-known member
Joined
Mar 27, 2013
Messages
2,883
Location
Woodstock, GA
Here is the one for mine a Craftsman product. Never have done very much seat time when machining. Welding is another whole deal when it comes to that.
 

Attachments

  • 3.jpg
    3.jpg
    144.8 KB · Views: 440

astroracer

Well-known member
Joined
Jun 22, 2005
Messages
3,001
Location
Mid_Michigan
You won't want to sit while machining after the first hot chip lands in your lap.

:shocking::)

Get a HF 44" roller to set it on. Storage and organization for all of your tooling and accessories.
I had my Smithy on this homemade stand 22 yrs.
photo2-vi.jpg

Put it on a HF44 a couple of years ago and wondered why I hadn't done it along time ago.
photo2-vi.jpg

HF has these on sale for 350. That is a good price for the quality of the cabinet.
Mark
 

rsanter

Well-known member
Joined
Dec 22, 2007
Messages
18,521
Location
visalia ca
I recomend using a toolbox as a base. I have my grizzly lathe on a HF 44" box and it is the best thing I have done.
If the weight of the lathe is an issue then building a steel frame around the box will work good.

The beam approach you showed is a good thing for that type of lathe and likly for yours as well. It can make it easier to level/setup the lathe bed and will reduce the potential for an induced twist when and if you move it.
Your lathe does not need to be 'level' to the ground but all parts of the bed need to read at the same angle of 'level' for the bed to be true.
The beam should be much more stout than the rest of the frame so if you move the thing any flex to adjust to the floor should be in some other part of the structure.

Bob
 
OP
L

larry4406

Well-known member
Joined
Jan 27, 2006
Messages
19,325
Location
Northern Virginia
I recomend using a toolbox as a base. I have my grizzly lathe on a HF 44" box and it is the best thing I have done.
If the weight of the lathe is an issue then building a steel frame around the box will work good.

The beam approach you showed is a good thing for that type of lathe and likly for yours as well. It can make it easier to level/setup the lathe bed and will reduce the potential for an induced twist when and if you move it.
Your lathe does not need to be 'level' to the ground but all parts of the bed need to read at the same angle of 'level' for the bed to be true.
The beam should be much more stout than the rest of the frame so if you move the thing any flex to adjust to the floor should be in some other part of the structure.

Bob

Bob - your thoughts on rigid beam and flexure of the other parts is what I was thinking as well and is in line with the link posted (he indicates the beam approach is done this way on ships to not be subject to the twisting of the ship). My lathe is almost 6' long (72"), so the HF44 box by it self will not work as the base. I like the idea of a frame where the tool box can roll underneath though...

Had not thought about the negative aspect of a hot chip landing in one's lap while sitting.

Keep the ideas and pictures coming!
 

sanddan

Well-known member
Joined
Jul 7, 2005
Messages
708
Location
Oregon
I built the stand for my PM1340 -GT lathe as the factory stand supplied with the lathe was flexing causing some vibration. My goals for the stand was to increase stiffness and mass of the stand, add some storage as the factory stand (as are many on this size range) has very little built in storage and to keep with a "Factory Look".

The stand is mostly 2x2x.120 wall tubing with the skin being 12 gage sheet. I went to an autobody supply store to get paint that was a close match to the factory stand and body worked the seams so it would look more like a one piece stand than a fabricated one. It is designed around a HF 44" upper tool box that I removed the lid and flange from to clean up the look.

lathe setup6.jpg

lathe setup5.jpg
 

zmotorsports

ALLIANCE MEMBER
Joined
Oct 20, 2009
Messages
21,412
Location
Northern Utah
I built the stand for my PM1340 -GT lathe as the factory stand supplied with the lathe was flexing causing some vibration. My goals for the stand was to increase stiffness and mass of the stand, add some storage as the factory stand (as are many on this size range) has very little built in storage and to keep with a "Factory Look".

The stand is mostly 2x2x.120 wall tubing with the skin being 12 gage sheet. I went to an autobody supply store to get paint that was a close match to the factory stand and body worked the seams so it would look more like a one piece stand than a fabricated one. It is designed around a HF 44" upper tool box that I removed the lid and flange from to clean up the look.

lathe setup6.jpg

lathe setup5.jpg

I was hoping you would post up your stand when I saw this thread Dan. I love that stand and will be building one myself once the new shop is done.

Mike.
 

sberry

Banned
Joined
Jun 18, 2005
Messages
35,747
Location
Brethren, Michigan
I almost said screw it and wrote a check for a new 44 the other day,,, I came so close. Today I am sitting here figuring out what I could do for free and it cost almost much as that.
I got some drawers we use a lot in a worn out overloaded chest. It really is getting old. I need the 44 and an intermediate for some ore in a space and I could be set, the shate is just piled too deep.
 

kbs2244

Well-known member
Joined
Nov 11, 2006
Messages
14,065
I used to make sales calls on a guy that had a small (20 inch?) lathe on a bench made from a pine 2x4 frame filled in two of with the 3 drawer sides from a "tanker" type desk.
He liked all he storage but said it would give him bad "chatter" sometimes.
On one visit I noticed he had another, bigger lathe on the same style stand.
This one was 3 drawer units wide.
I asked him about the chatter issue.
He said he had made two changes to the frame.
He used 2x4 steel tube that he filled with oil soaked sand before sealing the ends.
He said the added weight and stiffness eliminated his chatter problems.
He said he was going to remake the base for the small lathe but ended up selling it instead.
 
To avoid these ads, REGISTER NOW!

EdT

Well-known member
Joined
Sep 21, 2010
Messages
1,104
Location
North Georgia
A lot depends on how you work. I don't think sitting down is a great idea, but I'm sure some do. The main thing I always wish I had more of on my two lathe stands is more space in front of or near the lathe to put stuff on. Whether that be multiple WIP parts or interchangeable tooling or whatever. So that could be a consideration. Depends on whether you're OCD and put everything away immediately after you use it or let stuff pile up as you work. I fall into the latter group, so I value the space. An auto parts store oil drip pan under the lathe is not a bad idea. 110V outlets integral to the stand on the front. Drawers instead of doors. Stiff enough to support the machine and not rely on the bed of the machine to keep itself straight.
 

Provincial

Well-known member
Joined
Sep 21, 2011
Messages
6,871
Location
Near Salem, OR
The most rigid stand for a Craftsman/Atlas lathe I ever saw was in a moonlighting shop operating in a rickety garage that used two of the old Craftsman 12" lathes (not the more modern design) making 1" Acme screws for a paving machine. The stand consisted of two reinforced concrete pyramids about 30" tall and about the same on all four sides of the base. The feet of the lathe bed were cast into the concrete with only about 2" of the feet showing. I was told that the feet were attached to J-bolts embedded in the concrete.

These screws were cut in 3 passes, with a spindle speed around 30 RPM. The gear train for the lead screw was made with cast iron gears (instead of the original die cast gears) and the half nuts were made of bronze. I don't remember the size of the electric motor, but the spindle drive was roller chain instead of v-belts.

The ways on those old Craftsmans were 3/8" thick, instead of 1/2" like the later models, and even so there was little or no chatter with the heavy cuts. I think that the concrete absorbed the vibration from it's mass and also the design kept the bed from flexing.

Filling tubing with sand should work well for reducing vibration, and adding oil to the sand would help prevent rust. I could also see filling a steel tube frame by pouring it full of molten lead for added weight and vibration dampening.

I mounted an 24" Atlas on a Craftsman sheet metal workbench (with two rows of drawers) by making a top from two layers of 1-1/4" plywood subfloor glued together. I had the local heating contractor make me a chip pan top for the entire surface with an angled front lip to make it easier to clean the chips out. The lips all around were doubled-over to leave a rounded edge and all the seams were soldered. I bolted pieces of angle iron in the bottom of the vertical end frames of the bench with a 1/2" nut welded in and used commercial feet for height adjustment.

Elbow height for the compound may be a little low. You don't want to have to bend over when operating the carriage wheel or the cross feed knobs. Now that I am older, my back tells me not to bend over like I used to!
 
OP
L

larry4406

Well-known member
Joined
Jan 27, 2006
Messages
19,325
Location
Northern Virginia

astroracer

Well-known member
Joined
Jun 22, 2005
Messages
3,001
Location
Mid_Michigan
Measure from the floor to the bottom of your bent elbow. My comfortable working height is 40" to 42". The HF 44 put my lathe right there for me...
Mark
 

LDKracing

New member
Joined
Mar 18, 2017
Messages
2
Repurposed old wooden desk and top section of computer desk for Southbend Lathe .
 

Attachments

  • IMG_5496.jpg
    IMG_5496.jpg
    135.6 KB · Views: 213

LDKracing

New member
Joined
Mar 18, 2017
Messages
2
Yes it was a old fire extinguisher I cut in half and attached to the carriage so it follows the tool post .
 
To avoid these ads, REGISTER NOW!
Top Bottom