mattblast
Well-known member
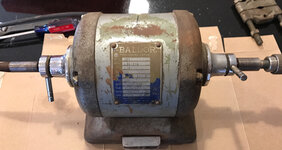
I had a couple hours of free time this afternoon and decided to restore this Baldor 221 polishing lathe with my 18 year old son. He did everything but the sand blasting and the painting. 2 hours later and the only thing left is waiting for the paint to dry and then to reassemble.

I picked this up 3 years ago for $25 at an estate sale. It's ugly, the bearings are shot, and there is some side to side play in the rotor. It worked well enough to use and I did, but a year or two ago I upgraded to a 3/4HP buffer and this small polisher sat in the corner unused. In the process of reclaiming space in the garage I decided to tackle this project.

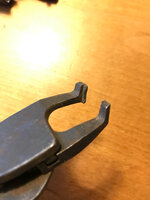
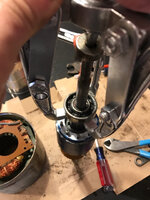
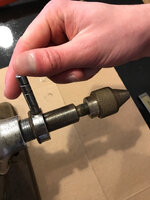
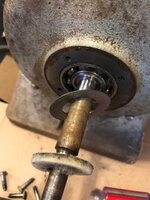
The first step is to remove the chuck and the arbor. They are friction fit on a tapered shaft. Ideally you only have to use the ejector handle to pop them off, but they were on a long time and didn't want to budge. A squirt of Kroil got the right side chuck off but the left side needed some heat before it would let go.

Next step is to remove the rest of the ejector assembly with 4 slotted screws on each side.

This exposed the bearings.

Left side - felt, washer, bearing

Right side - felt, 2 washers, wavy washer, 2 washers
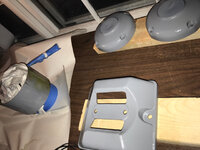
Then flip it over to remove he base.

The rubber feet are hard and need to be replaced.

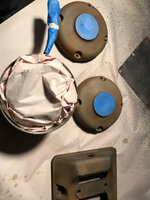
A bit dirty inside. Possibly water got in base and caused rust.
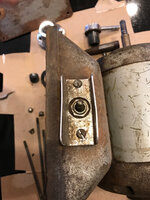
The wiring is simple - line goes to two wires marked L. 3 wires from stator marked 1, 2, and 3 connect to wires with same marks that go to the switch.
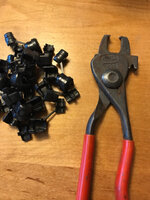
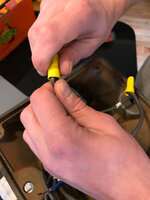
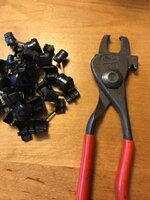
Removed the power cord and strain relief with a Heyco "strain relief bushing assembly pliers" which make easy work of it and preserves the strain relief for reuse. A great speciality tool to buy if you do restorations.

Next the switch is removed and the base is unbolted from the stator.


Ugly by the switch. Previous owner must have used the switch with wet hands.
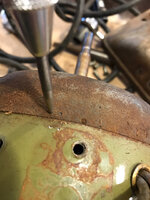
End bells are marked with one punch on right and two on left to aid in reassembly.

On a previous motor restore I didn't punch deep enough and after blasting and painting I couldn't find my marks. This time I was sure to leave deep enough marks.
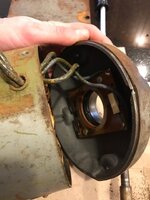
On the left side is a centrifugal switch that had to be disconnected.

They left enough slack in the wire to get good access to the two screws (some motors require you to put screwdriver through stator to reach the screws)
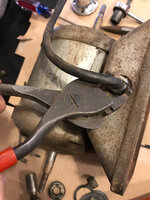
Next the drive rivets need to be removed so that the label can come off. This was done by prying from behind to push them out a little, then gripping them with a diagonal cutter to pull them out. This leaves rivets in original condition and doesn't damage the tag.


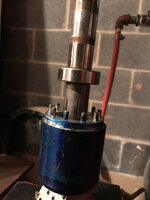
And here is the rotor.

A 3 jaw puller popped the bearings right off. They were 6203Z SKF bearings. Shield on one side, open on the other.


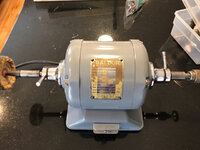
While the hardware soaked in the ultrasonic cleaner we went to the garage to blast the two end bells and base.

For several years I would blast with glass bead using the siphon gun in the cabinet. That was slow. For this job I hooked up a pressure blaster to the cabinet and filled it with aluminum oxide. It took less than a minute to fully blast the three parts with this setup. The deadman nozzle produces a heavy spray of media and it strips the metal bare very quickly. A pressure blaster also requires fewer CFMs. The compressor didn't even cycle during the blasting.


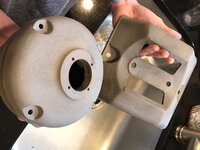
Here are the parts fresh out of the blaster

I use hot water and soap to clean off the media dust. The metal will flash rust so you have to dry them. Don't use a paper towel or little fibers will stick to he surface and ruin the paint job.
The stator and base cover were sanded with a RA sander working through 3 grits to 220.

Then to my primitive paint booth (a table covered with paper, some bad lighting and an exhaust fan blowing out window).
The pores in the iron will hold moisture so if I don't give the parts time to dry I use a torch to dry them. The heated parts also helps with the paint quality. You can see moisture getting chased away with the torch.

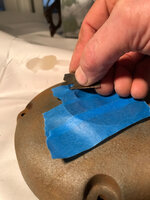
The bearing surfaces and the wiring is masked off.

And the tape is trimmed with a razor.

Then two light coats and it gets set down to dry.


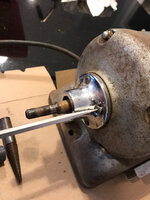
By the time the bearings arrive the paint will be cured and I'll reassemble.
I picked this up 3 years ago for $25 at an estate sale. It's ugly, the bearings are shot, and there is some side to side play in the rotor. It worked well enough to use and I did, but a year or two ago I upgraded to a 3/4HP buffer and this small polisher sat in the corner unused. In the process of reclaiming space in the garage I decided to tackle this project.
The first step is to remove the chuck and the arbor. They are friction fit on a tapered shaft. Ideally you only have to use the ejector handle to pop them off, but they were on a long time and didn't want to budge. A squirt of Kroil got the right side chuck off but the left side needed some heat before it would let go.
Next step is to remove the rest of the ejector assembly with 4 slotted screws on each side.
This exposed the bearings.
Left side - felt, washer, bearing
Right side - felt, 2 washers, wavy washer, 2 washers
Then flip it over to remove he base.
The rubber feet are hard and need to be replaced.
A bit dirty inside. Possibly water got in base and caused rust.
The wiring is simple - line goes to two wires marked L. 3 wires from stator marked 1, 2, and 3 connect to wires with same marks that go to the switch.
Removed the power cord and strain relief with a Heyco "strain relief bushing assembly pliers" which make easy work of it and preserves the strain relief for reuse. A great speciality tool to buy if you do restorations.
Next the switch is removed and the base is unbolted from the stator.
Ugly by the switch. Previous owner must have used the switch with wet hands.
End bells are marked with one punch on right and two on left to aid in reassembly.
On a previous motor restore I didn't punch deep enough and after blasting and painting I couldn't find my marks. This time I was sure to leave deep enough marks.
On the left side is a centrifugal switch that had to be disconnected.
They left enough slack in the wire to get good access to the two screws (some motors require you to put screwdriver through stator to reach the screws)
Next the drive rivets need to be removed so that the label can come off. This was done by prying from behind to push them out a little, then gripping them with a diagonal cutter to pull them out. This leaves rivets in original condition and doesn't damage the tag.
And here is the rotor.
A 3 jaw puller popped the bearings right off. They were 6203Z SKF bearings. Shield on one side, open on the other.
While the hardware soaked in the ultrasonic cleaner we went to the garage to blast the two end bells and base.
For several years I would blast with glass bead using the siphon gun in the cabinet. That was slow. For this job I hooked up a pressure blaster to the cabinet and filled it with aluminum oxide. It took less than a minute to fully blast the three parts with this setup. The deadman nozzle produces a heavy spray of media and it strips the metal bare very quickly. A pressure blaster also requires fewer CFMs. The compressor didn't even cycle during the blasting.
Here are the parts fresh out of the blaster
I use hot water and soap to clean off the media dust. The metal will flash rust so you have to dry them. Don't use a paper towel or little fibers will stick to he surface and ruin the paint job.
The stator and base cover were sanded with a RA sander working through 3 grits to 220.
Then to my primitive paint booth (a table covered with paper, some bad lighting and an exhaust fan blowing out window).
The pores in the iron will hold moisture so if I don't give the parts time to dry I use a torch to dry them. The heated parts also helps with the paint quality. You can see moisture getting chased away with the torch.
The bearing surfaces and the wiring is masked off.
And the tape is trimmed with a razor.
Then two light coats and it gets set down to dry.
By the time the bearings arrive the paint will be cured and I'll reassemble.
Attachments
-
 0d84dcfab4cbe3bc825bfd051fe60538.jpg320.2 KB · Views: 1
 -
 e1a8a559e2f38a734faffe0abee22fa1.jpg308 KB · Views: 1
 -
 82a35469a5976a3dea2db29e8adbf7d9.jpg336.9 KB · Views: 1
 -
 a909d07abbe71a4883571dfc00330198.jpg426.2 KB · Views: 1
 -
 22a3e935503e6536e0f6a50577cfbaf3.jpg343.5 KB · Views: 1
 -
 e417f8edc7e9d3d2fe6ea73d39b16339.jpg333.3 KB · Views: 1
 -
 d293d6b28999abd665aec25b6cb996c5.jpg350.5 KB · Views: 1
 -
 4e723aa1d1f657f883de934f6269b6d6.jpg62.3 KB · Views: 1
 -
 55d63905c38ee5a331d8b27b30168bba.jpg334.7 KB · Views: 1
 -
 17facc8aba44e5dec3cf0cb9137a5aa8.jpg49.9 KB · Views: 1
 -
 1e75bd5a70f255ba80d1135538008ac5.jpg299.2 KB · Views: 1
 -
 73d160aede13ebfbfc0b5c59d82bbee9.jpg352.1 KB · Views: 1
 -
 e9820f1256830f23a04506f06b79e5ea.jpg383.8 KB · Views: 1
 -
 e28864a29560578c5b85d56c593ab0d7.jpg342.6 KB · Views: 1
 -
 d54e3e8a6f8a8e1ed9b69b08cb7fb951.jpg333.8 KB · Views: 1
 -
 91ee391f4c8d90cd2a373047ccf4845f.jpg332.1 KB · Views: 1
 -
 441ccf73ac572b36d69ce714a506642e.jpg304.9 KB · Views: 1
 -
 108f561b2467d52e12e9337b0b33ac5b.jpg246.1 KB · Views: 1
 -
 cf418daf2b23805224ed598f5526ba54.jpg299.7 KB · Views: 1
 -
 3356b33bd0ea61963a6acc123fbdbb07.jpg328.7 KB · Views: 1
 -
 2ad80cbe97c9ae751b9a7215fa3df975.jpg299.7 KB · Views: 1
 -
 e6f3dbc5b216ed244eab76ae99b5888d.jpg305.9 KB · Views: 1
 -
 7cdc5d476f2d805f1b57462f056485ae.jpg357.3 KB · Views: 1
 -
 36db990ffc018c84c8f9828ef12a6ecf.jpg297.3 KB · Views: 1
 -
 7a9f4d2b9f9ed048930bf9f6d8ff0c22.jpg50 KB · Views: 1
 -
 c6a12a80c54000220a4a197f3f4d47cc.jpg322.9 KB · Views: 1
 -
 744671b30c4dd653597174f2a838c534.jpg277 KB · Views: 1
 -
 f8624f92208275d5d4f4cc93ddc5d620.jpg332.6 KB · Views: 0
Last edited: