To avoid these ads, REGISTER NOW!

Moisture in compressed air

Homerr

Well-known member
Joined
Mar 16, 2012
Messages
379
Location
Seattle, WA
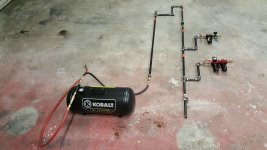
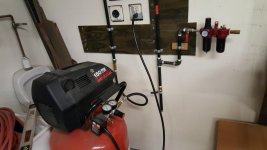
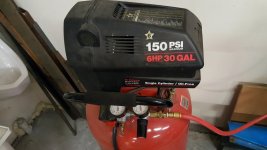
I've just gotten a Harbor Freight blast cabinet and am trying to media blast some steel wheels to paint. I'm new to blasting and a novice at compressor setup. I have a 30 gal. Craftsman compressor which was given to me by my brother-in-law in exchange for a smaller one. He also gave me the manifold in the pictures. I'm running off the top (dry) air fork in the manifold through a hose that has only had dry air in it before.

I'm spending about half my time clearing the blast gun since I have moisture in the system. I started last night with glass media which seemed too slow and was jamming with the moisture. There's occasionally enough that I can see the moisture streak across where I'm blasting. It took 2 hours yesterday to blast the first wheel - just the inner and outer face, not the area enclosed by the tire.

Tonight I tried letting the water out of the Husky brand deal - blew out for a minute, about half a shot worth of water came out. (I just looked it up, thought my BIL said it was a drier, but it looks like it's a filter.) Then I tried aluminum oxide blasting. I think I was spending about 2/3 the time clearing out the blast gun, but when it worked it worked pretty good.

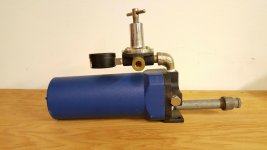
A neighbor gave me the blue thingamajig, they didn't know what it was as they had been given it. I can't see any name or number on it. Does it look like one of these air filters? https://www.nationaltoolwarehouse.c...8Vv9YAvPEgTET4BGnf1Jd-c0_DsiH5mW44xoCVOzw_wcB

Any suggestion for a reasonable drier I can get locally (in Seattle) tomorrow?


p.s. I did check the drain on the bottom of the compressor yesterday before starting all this, no water came out.
 

Attachments

  • 20170123_181029.jpg
    20170123_181029.jpg
    141.3 KB · Views: 175
  • 20170123_181624.jpg
    20170123_181624.jpg
    145.7 KB · Views: 151
  • 20170123_181602.jpg
    20170123_181602.jpg
    139.9 KB · Views: 174
  • 20170123_181132.jpg
    20170123_181132.jpg
    151.2 KB · Views: 156
  • 20170123_181045.jpg
    20170123_181045.jpg
    142 KB · Views: 162
  • 20170123_181038.jpg
    20170123_181038.jpg
    137.2 KB · Views: 165
  • 20170123_181034.jpg
    20170123_181034.jpg
    141.2 KB · Views: 163
Last edited:
To avoid these ads, REGISTER NOW!

md21722

Well-known member
Joined
Nov 30, 2015
Messages
1,840
Location
Mt Juliet, TN
You need an aftercooler, extra tank, or air drier. If you can find an extra tank, plumb it in series with your existing compressor. It will act as an air drier and drop a lot of moisture out of the air. If you can't find an extra tank, you'll need an after cooler, desiccant air drier or refrigerated air drier.
 

CNGsaves

Well-known member
Joined
Sep 26, 2012
Messages
13,233
Location
KS and OK
You're "trying the impossible" thinking you'll have dry air with that setup . . .
. . . . . not possible. :eyecrazy:

Instead put compressor in FARTHEST spot in garage and build AIRLINE System from either copper or black pipe steel. BEFORE the airline system, run air through Franzinator, aftercooler, etc. so you capture as much water as possible up front. Have at least 20 or 30 ft of airline pipe (copper or BPS) before your drop for the sand blaster. Put your desiccant dryer at that last drop before the blaster or any attempts you make to paint.

See TP Tools website link for Airline System example. This IS how you do it by running airline system up near ceiling and drops go UP first, then back down.
https://cached.tptools.com/Images/airline-piping-diagram.pdf
 

AJ1978

Well-known member
Joined
Apr 27, 2010
Messages
239
Location
Jamestown, PA
Also see TP tools for their gun conversion kit for imported blast cabinets
I bought one for my HF cabinet and that solved a ton of issues
Order some extra tips and gaskets and trust me you will thank me later..: well the forum because they put me wise to it!
After cooler or desiccant dryer from harbor freight piped right in before blast cabinet.
 

kevs79

Well-known member
Joined
Jan 5, 2017
Messages
68
Location
Kansas City, MO
I have that same compressor. I have not tried sand blasting but have painted a car and a truck with it. My set up was like others have mentioned. long hose from the compressor to a small 10-15 gallon horizontal tank. The incoming air comes in the end of the tank out out the top. I do have a very small Harbor Freight water separator mounted on the tank between the extra tank and the hose going to the gun. Works great no water at the spray gun, most drops in the extra tank.
 
OP
H

Homerr

Well-known member
Joined
Mar 16, 2012
Messages
379
Location
Seattle, WA
I've drawn this out to help understand it for my garage and build a parts list. It is more or less a mirror of the complete diagram from TPTools. A few questions:

1. Should I, or can I, use the 'Sharpe' air filter/regulator on the 'dry' circuit for blasting and paint? (The blue item in the original post.) I would get a new filter element.

2. The 'F' connection to the compressor - this should all be 'upward' from the compressor connection? IE no area for water to pool? (I forgot to but a 'V' at the end of the metal flex pipe.)

3. Connecting to the compressor - the TPTools graphic looks like the valve and metal flex hose are plumbed directly in to the storage tank. Per the original post pic I have a tank pressure dial with pressure relief valve, then a regulator, then a quick coupler. Should I just put a male quick coupler on the ball valve? Like this: compressor>quick coupler>ball valve>metal flex hose>black iron riser pipe

4. For the 'oil' circuit - should I get new, or just reuse the Husky brand setup? If new then presumably just get 'B' and 'C' from TPTools.

5. Do the drain valves need to be down low near the floor? Is this just to reduce drips splashing? Maximum volume for moisture in a taller drain line?

6. Have I missed anything?
 

Attachments

  • airlines.jpg
    airlines.jpg
    131.9 KB · Views: 102

pcmeiners

Well-known member
Joined
Aug 13, 2009
Messages
7,905
Location
In the only town in Pennsylvania, Bloomsburg.
"If you can find an extra tank, plumb it in series with your existing compressor"

When using anything needing high volume, a second tank will do very little in removing moisture, almost nothing, as both tanks will warm up. Coalescence filters will work to a degree, until the air going through it starts to warm up (in high volume use),then the amount of moisture dropping out will diminish; both an extra tank and coalescence filter are greatly influenced by air temperature. Best is to get an after cooler, of sufficient size it will bring the output temp to near ambient temperature, causing water to drop out.
 
Last edited:

md21722

Well-known member
Joined
Nov 30, 2015
Messages
1,840
Location
Mt Juliet, TN
"If you can find an extra tank, plumb it in series with your existing compressor"

When using anything needing high volume, a second tank will do very little in removing moisture, almost nothing, as both tanks will warm up. Coalescence filters will work to a degree, until the air going through it starts to warm up (in high volume use),then the amount of moisture dropping out will diminish; both an extra tank and coalescence filter are greatly influenced by air temperature. Best is to get an after cooler, of sufficient size it will bring the output temp to near ambient temperature, causing water to drop out.

My personal experience says the extra tank works great. No moisture comes out of my high volume air tools. In fact I get almost nothing out of my coalescing filter. I know I'm not the only one who has had success with this.
 

kevs79

Well-known member
Joined
Jan 5, 2017
Messages
68
Location
Kansas City, MO
My personal experience says the extra tank works great. No moisture comes out of my high volume air tools. In fact I get almost nothing out of my coalescing filter. I know I'm not the only one who has had success with this.

Agreed, works great for me also.
 

CNGsaves

Well-known member
Joined
Sep 26, 2012
Messages
13,233
Location
KS and OK
^ ^ Also, if OP puts his 2nd tank way down the line on his airline system near the Sand Blaster at his last drop, that 2nd tank WILL be much drier air and give him chance at more volume for blasting. Thus, put 2nd tank near the very end.
 

kevs79

Well-known member
Joined
Jan 5, 2017
Messages
68
Location
Kansas City, MO
I've drawn this out to help understand it for my garage and build a parts list. It is more or less a mirror of the complete diagram from TPTools. A few questions:

1. Should I, or can I, use the 'Sharpe' air filter/regulator on the 'dry' circuit for blasting and paint? (The blue item in the original post.) I would get a new filter element.

2. The 'F' connection to the compressor - this should all be 'upward' from the compressor connection? IE no area for water to pool? (I forgot to but a 'V' at the end of the metal flex pipe.)

3. Connecting to the compressor - the TPTools graphic looks like the valve and metal flex hose are plumbed directly in to the storage tank. Per the original post pic I have a tank pressure dial with pressure relief valve, then a regulator, then a quick coupler. Should I just put a male quick coupler on the ball valve? Like this: compressor>quick coupler>ball valve>metal flex hose>black iron riser pipe

4. For the 'oil' circuit - should I get new, or just reuse the Husky brand setup? If new then presumably just get 'B' and 'C' from TPTools.

5. Do the drain valves need to be down low near the floor? Is this just to reduce drips splashing? Maximum volume for moisture in a taller drain line?

6. Have I missed anything?

To be honest I had a very simple set up when I painted and had no water issues at all. Sometimes simpler is better. The only add ons I had was a very small Harbor Freight water separator at my extra tank but hardly ever got any water out of it. Most of it accumulated in the extra tank. My compressor was in the garage and the extra tank and painting was done in the backyard so it gave the air plenty of space to cool and drop the moisture.
 

timothylockhart

Well-known member
Joined
Dec 26, 2015
Messages
79
Location
Michigan
To be honest I had a very simple set up when I painted and had no water issues at all. Sometimes simpler is better. The only add ons I had was a very small Harbor Freight water separator at my extra tank but hardly ever got any water out of it. Most of it accumulated in the extra tank. My compressor was in the garage and the extra tank and painting was done in the backyard so it gave the air plenty of space to cool and drop the moisture.
I want to mess around with painting some scrap panels this summer,

I have a 33 gallon craftsman pro rated at 14.4 cfm @40... Will I still need an extra tank? I have a HF 8 gallon I upgraded from. And my dad's HF 8 aswell.

Or will the new compressor be enough?

Just looking for insight as why you ran a second tank thanks.

Sent from my LGLS991 using Tapatalk
 

kevs79

Well-known member
Joined
Jan 5, 2017
Messages
68
Location
Kansas City, MO
I want to mess around with painting some scrap panels this summer,

I have a 33 gallon craftsman pro rated at 14.4 cfm @40... Will I still need an extra tank? I have a HF 8 gallon I upgraded from. And my dad's HF 8 aswell.

Or will the new compressor be enough?

Just looking for insight as why you ran a second tank thanks.

Sent from my LGLS991 using Tapatalk

The main reason I used the extra tank was for water control. It did give a little more time before the compressor kicked on also. Mine is the oil less 20 gallon one so not near the CFM as yours.
 

timothylockhart

Well-known member
Joined
Dec 26, 2015
Messages
79
Location
Michigan
The main reason I used the extra tank was for water control. It did give a little more time before the compressor kicked on also. Mine is the oil less 20 gallon one so not near the CFM as yours.
Mines oil less as well but I'm not sure if I trust the cfm ratings they seem abnormally high to me, not sure if there a way to test,,,

But I could run my HF at the paint area to help control moisture? Probably would let me move the hose around better aswell........


Sent from my LGLS991 using Tapatalk
 
To avoid these ads, REGISTER NOW!

md21722

Well-known member
Joined
Nov 30, 2015
Messages
1,840
Location
Mt Juliet, TN
Mines oil less as well but I'm not sure if I trust the cfm ratings they seem abnormally high to me, not sure if there a way to test,,,

But I could run my HF at the paint area to help control moisture? Probably would let me move the hose around better aswell........


Sent from my LGLS991 using Tapatalk

If you have an extra tank it will drop a ton of moisture of out the system... I am not a physics major but it has something to do with the final expansion of air and cooling... My extra tank never went above ambient even though I was feeding it with dual 5 HP air compressors for over 40 minutes during testing... that's right, 10 HP running continuously for over 40 minutes.... My extra tank was a 60 gallon, not sure that the results would be the same with smaller, but it seems plausible that it would work OK...
 

Roberts210

Well-known member
Joined
Dec 21, 2015
Messages
3,177
Location
Missouri
Looking online at after coolers, why couldn't an automotive unit work? I've got access to a diesel salvage yard where lots of turbo-charged diesel trucks are parted out. Why couldn't a person use the intercooler for a diesel?
 

pcmeiners

Well-known member
Joined
Aug 13, 2009
Messages
7,905
Location
In the only town in Pennsylvania, Bloomsburg.
"I've got access to a diesel salvage yard where lots of turbo-charged diesel trucks are parted out."

Wish I had access to a truck salvage yard.

The commercial units on commercial trucks, such as Hayden 1230 (bare minimum, maybe under sized for 5hp compressor), Hayden 1260 (perfect size for 5-7.5hp), Hayden 1290 (over sized for 5hp, good for 7.5 or above), are great for after coolers, I have used all these sizes, but paid little for them on Ebay a few years back. These sizes have large inlet/outlets, swirl tubes, basically no restriction due to tube size. Mounted in front of a compressor flywheel, they will bring the air temp to ambient. Hopefully you find an equivalent of one of the above.

Example
http://www.ebay.com/itm/TRANSMISSIO...m5693ef71d1:m:meF36Qm5FaRItnMs9Vjxxhw&vxp=mtr
 
OP
H

Homerr

Well-known member
Joined
Mar 16, 2012
Messages
379
Location
Seattle, WA
This guy used an automotive oil cooler on his aftercooler.


I'm building a minimal black iron setup tonight (basically the peach and green portions of the previously posted diagram) and if that isn't enough then I'll probably build something like in the video.
 
OP
H

Homerr

Well-known member
Joined
Mar 16, 2012
Messages
379
Location
Seattle, WA
I went to Lowe's tonight and ended up getting the basic riser manifold setup and a Kobalt 7 gallon expansion tank. So this should be 2 steps better. I'll try it out with and without the 7 gallon tank tomorrow night when I get the riser mounted on the wall.

p.s. I did take the Sharpe unit apart and it has a dried out seal, I'll see if I can get another one. So this, adding more black iron piping, and the aftercooler are still possibilities.
 

Attachments

  • riser.jpg
    riser.jpg
    146.1 KB · Views: 173
Last edited:
OP
H

Homerr

Well-known member
Joined
Mar 16, 2012
Messages
379
Location
Seattle, WA
From scratch, but based on the diagram CNGsaves posted in post #4. I just stacked the 'green' and 'yellow' parts. I reused the Husky brand filters and regulators I already had. It was pretty easy to put together with a couple adjustable wrenches, pipe wrench, and a vise to hold things.

I suggest drawing it out first to get clear what you want and then making a parts list.
 

finn

Well-known member
Joined
Mar 27, 2005
Messages
16,253
Location
The UP, God's country
Looking online at after coolers, why couldn't an automotive unit work? I've got access to a diesel salvage yard where lots of turbo-charged diesel trucks are parted out. Why couldn't a person use the intercooler for a diesel?

Diesel trucks don't run 100 psi of boost, which may be an issue on a thin walled aluminum truck intercooler.
 

DerekV

Well-known member
Joined
Oct 12, 2016
Messages
1,070
Location
Central TX
Diesel trucks don't run 100 psi of boost, which may be an issue on a thin walled aluminum truck intercooler.


No, but trans/engine oil coolers are typically rated for higher pressures. Much higher than a charge air intercooler.
 

vette-kid

Well-known member
Joined
Jul 21, 2008
Messages
3,636
Location
Navarre, FL
Posting to follow this as well. I get HORRIBLE water problems with mine too. Living in FL probably doesn't help.
 

bluebolt

Well-known member
Joined
Dec 28, 2008
Messages
5,441
Location
Benton LA
I have 40 plus feet of black iron pipe, think it's 1" diameter, before my first air outlet. It is angled properly for drainage. I have no other cooler. I get zero water out of the outlet using my bead blaster cabinet even in the humid air in Louisiana.
 
OP
H

Homerr

Well-known member
Joined
Mar 16, 2012
Messages
379
Location
Seattle, WA
DRY AIR!

I mounted the manifold and first ran it without the expansion tank. I tried blasting with aluminum oxide. Compared to before being about 30% reliability it went to about 60%. I added the expansion tank and it was more like 70%. But now that I was blasting so much my stock light wasn't keeping up with the black dust cloud and it seemed like the pickup was now having issues.

So I switched out to glass bead media. Boom - 100% reliabilty!, 90% visibility, and speed about 60% of the alum. oxide. I'm blasting some steel wheels and it's gonna take 1.5 hours +/- per wheel, but at least it is a pleasure now instead of frustrating.

The compressor seemed to do fine with the expansion tank - it maintained 95psi for an hour, whereas before it would drop to around 80psi. But I was clearing the gun a lot and it would catch up.

I think I could live with the setup without the expansion tank, the manifold re-do only seemed to provide dry air. But the expansion tank also seemed to even out things. BTW, humidity is around 70% here tonight, previously it had been 85-95%, and it's been 40-55 degrees.
 

Attachments

  • 20170127_195756.jpg
    20170127_195756.jpg
    133.4 KB · Views: 61
  • comp1.jpg
    comp1.jpg
    133.7 KB · Views: 166
To avoid these ads, REGISTER NOW!
Top Bottom