To avoid these ads, REGISTER NOW!

My latest project(s) body hammer restoration

sevt_chevelle

Well-known member
Joined
Apr 14, 2011
Messages
128
Location
Northern Iowa
Thought I’d share a few pictures of my latest project(s), body hammer restorations. I started collecting old body tools about 10 years ago, everything from magic dent erasers, pneumatic pick hammers to just plain old hammers and dollies. Currently, I own about 150 hammers from Fairmount/Martin, Porter Ferguson, Plvmb/Proto, Herbrand, Heller, Bonney, Streamline, Snap-on and God knows what else. As far as dollies and spoons am guessing that number is north of 100 as well.
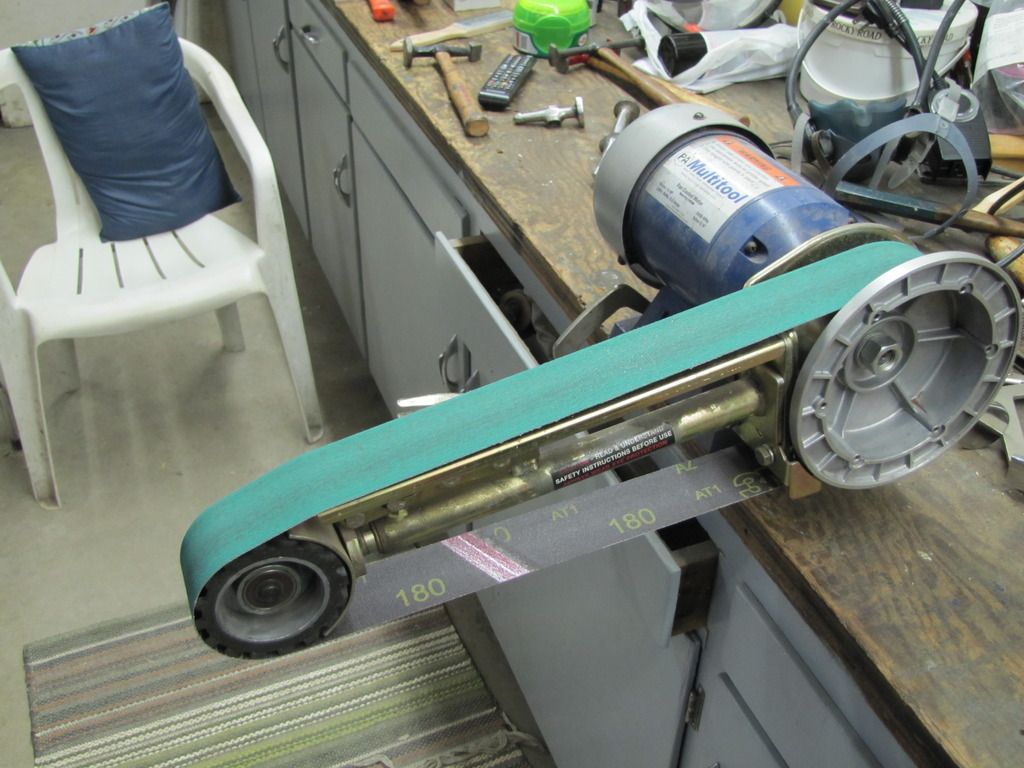
I start with some of the tools used to restore these body hammers. The first tool is a bench grinder with a multi-tool attachment setup for 2x48 sanding belts. Useful for dressing the working faces of the hammers, removing rust pits, dings/nicks and prep for final polishing. I bought mine from Trick Tools in Pella Iowa. I use 80, 180, 220, 400 and 1200 grit.

Always need good PPE, face shield and dust mask are must haves.

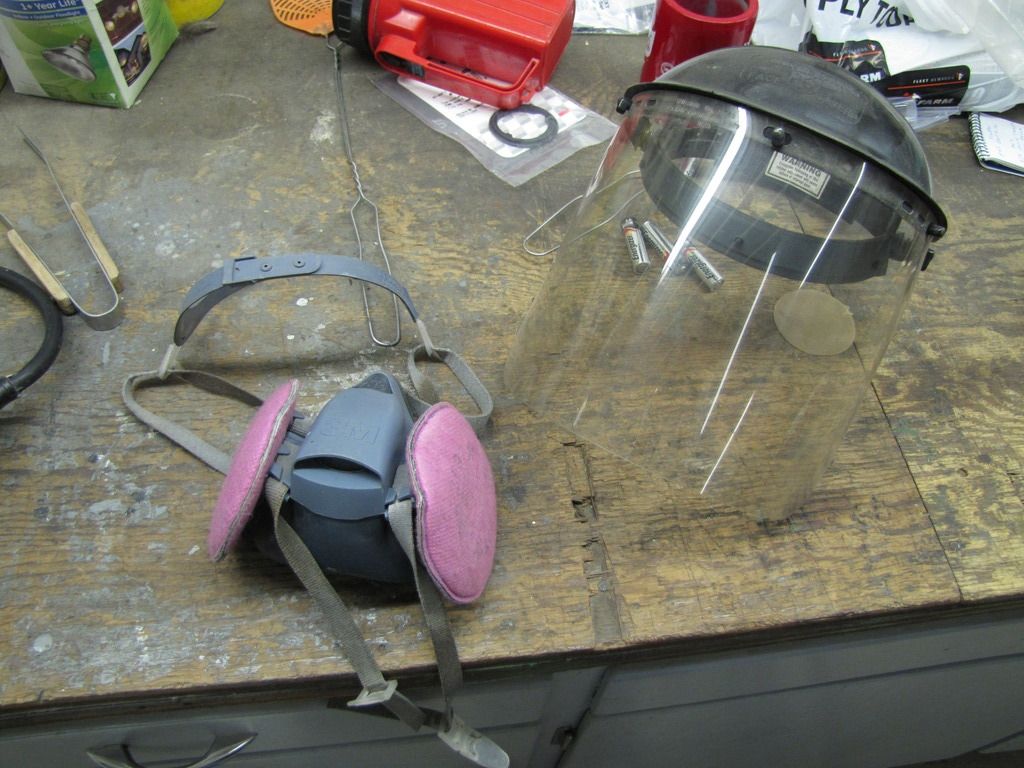
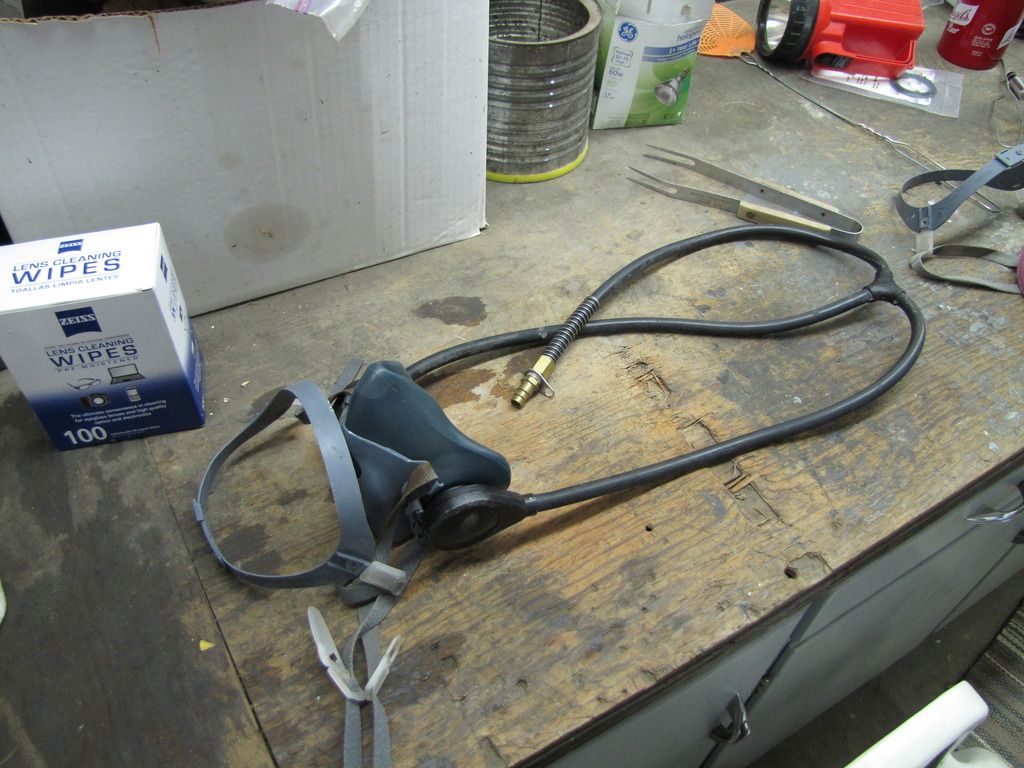
Since I have one I opted to use my SAS “fresh” air system for the vast majority of the time. Place it in a clean area of the shop and it pumps fresh air to you, only downside is that you have to drag a hose behind you.


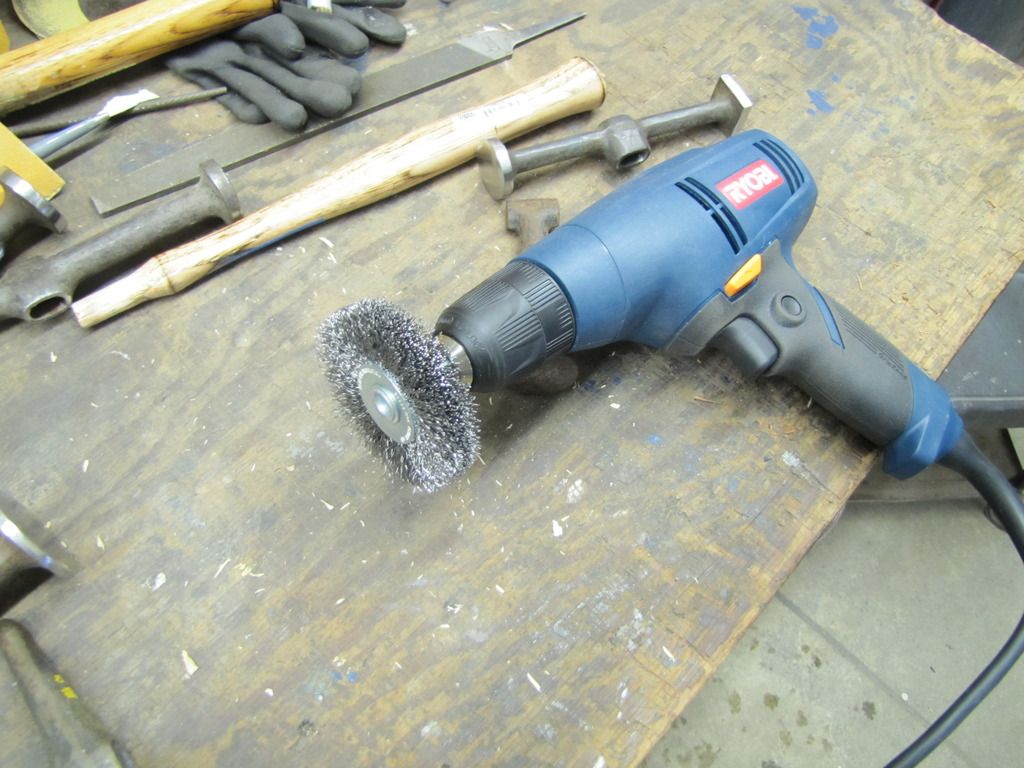
Wire wheel. All I’ll say is that after wire wheeling a few hammer heads I broke down and bought a bead blast cabinet. A wire wheel works for cleaning off paint and rust.
 
To avoid these ads, REGISTER NOW!
OP
S

sevt_chevelle

Well-known member
Joined
Apr 14, 2011
Messages
128
Location
Northern Iowa
There’s a picture of just some random hammers I picked out to start with, a couple of Streamline, Fairmount, and Proto.


I’ll start out with this odd Streamline hammer, it’s big it’s heavy and it has by far the large working face of any body hammer I own, plus I’ve never seen another one like it. As you can see it started out rusty and the face was dinged up and pitted.


Somehow I missed the progress pictures of wire wheeling and dressing the faces, but here I am fitting the new handle to the semi finished hammer head. At this point its wire wheeled and dressed with 400 grit from the bench grinder. Once am done fitting the handle I’ll start sanding the faces with finer grit paper working up to 2000 grit. If you notice on the handle I scribbled a F with an arrow pointing. This is so when am fitting the handle I can keep the same orientation of the hammer head and handle.
 
OP
S

sevt_chevelle

Well-known member
Joined
Apr 14, 2011
Messages
128
Location
Northern Iowa
The handle came coated with a lacquer or poly coating and had Genuine Hickory stamped into one of the flats. The coating actually looked good but the Genuine Hickory nameplate had to go so I sanded it flat with 80 and then 180. The handle came from Dagger tools, priced at about 6.50 is 13 inches in length and has IMO the preferred Octagonal sided shape verses the traditional oval shape.

For the handles I decided to try out a product for gun stock refinishing. I have a M1 Garand that I’m restoring and this product was highly recommended. It’s from Birchwood Casey and called Tru Oil and depending on the number of coats you can go from an eggshell sheen to a deep luster gloss.

These pictures really don’t show, but the replacement handles from Martin Tools part number HH42B which is patterned for the older Fairmount hammers came with a really crappy finish. It was rough uneven and just plain awful to look it, it sucked. The two outside handles are as they came from Martin, the two inner handles were sanded with 180 then had one coat of Tru Oil applied. One coat gave them a nice even eggshell sheen, you can also apply multiply coats then buff with 0000 steel wool to achieve a even nicer/smoother satin sheen.

 
OP
S

sevt_chevelle

Well-known member
Joined
Apr 14, 2011
Messages
128
Location
Northern Iowa
Fast forward a bit since I forgot to take pictures, but the head is painted handle finished and installed. This picture shows the fit of the handle and metal wedges driven in place. To get the finishing touch I took my 3 inch polisher with 80 grit then went to 320 grit for a nice smooth appearance.


Placed some sealant over the eye of the handle which helps keep the wood from drying out and the handle nice and tight on the hammer head.

Now the money shot, face sanded with 2000 grit and polished with a loose flannel wheel and white tripol compound. Overkill maybe, but the pictures don’t do this hammer justice! You could shave in the reflection and depth in the handle looks like its miles deep.


OP
S

sevt_chevelle

Well-known member
Joined
Apr 14, 2011
Messages
128
Location
Northern Iowa
This hammer I have no idea what brand it is am guessing an import model and came in a package deal as I surely wouldn’t have paid money for it. I found it tucked away in one of my hammer toolboxes and thought what the hell why not take it to the prom. At first glance it appeared to be a cast iron hammer, not good, despite the words Drop Forged cast on the bottom. The faces were rough and pitted but not from rust, looks like it went straight from the mold to a sand blaster then out the door. Did a ring test passed, did a quick spark test on the bench grinder passed as well. Since the hammer passed the cast iron tests I knew it was a good quality steel. I didn’t want to spend a lot of time on this hammer so it got a quick and dirty sand and polish job. Somewhere in the sanding process I nicked the handle and put a gouge in the wood. At first I was just gonna let it be, this is supposed to be a quick and dirty clean up job. Needless to say that gouge got sand out the old finish stripped off and handle sanded baby smooth. With the handle stripped and cleaned I wanted to try something different. So I grabbed my torch and proceeded to burn the wood with a nice hot flame. Got the appearance I wanted and then sanded it again with 180. With the handle still warm I blew off the handle with compressed air and applied one coat of Tru Oil. I must say for something that was just a quick and dirty clean up job this hammer is probably my favorite, just turned out far better then what I thought.


Some random pictures of some dollies that I did, removed all the dings, rust, sanded with 2000 grit then polished to a mirror like sheen.


OP
S

sevt_chevelle

Well-known member
Joined
Apr 14, 2011
Messages
128
Location
Northern Iowa
This is another hammer head I found just laying around. I don’t know much about the brand, ABC, I do have a few ABC branded hammers. They are what I will say a lower quality or tier but still good usable forged steel hammers. Am not one for modifying hammers but for this one I decided to make a clone of a discontinued Snap-on hammer a double reverse curve part number BF615.


To start went the bench vise clamped one end in and took my 4.5 angle grinder with a 36 grit flap disc. Once roughed out took it to my belt sander and smoothed out the heads up to 400 grit.


Cleaned up, rust and paint free. I masked the faces off but let a little exposed that way when it is painted I can come back with my 3 inch polisher and some 800 grit sand off the excess paint and have no tape lines.

Primed with Upol spray can acid etch#8. If you look at the upper right corner I have my heat gun keeping the hammer nice and warm.
 
OP
S

sevt_chevelle

Well-known member
Joined
Apr 14, 2011
Messages
128
Location
Northern Iowa
Painted.


Hammer handle installed, wedges driven in and sanded smooth with a coat of sealer applied to keep the wood from drying out and the handle nice and tight. I used one of the martin tools handles part number HH42B, the thing fit like a glove.


I also did a real quick torch flame job on the handle just enough to give some color. Also applied 4 coats of Tru Oil and got a nice deep gloss.

 
OP
S

sevt_chevelle

Well-known member
Joined
Apr 14, 2011
Messages
128
Location
Northern Iowa
Couple of progress pictures of a Fairmount 164. The face was rather pitted and dinged up, makes me wonder what it’s previous owner used it for.


Getting ready to sand smooth the remaining bits of the handle and nicked the fresh paint twice not even remotely happy with that one!


Nicks sanded out and re-sprayed and sealer applied.

Handle on the Fairmount 164. I applied 5-6 coats of Tru Oil then wet sanded with 2000 grit then buffed the handle.

Along with a different Streamline hammer that I did at the same time.


Little group photo.


Indexmill

Well-known member
Joined
Apr 12, 2013
Messages
1,413
Location
Central NC
Dude, I totally get it. I have done exactly the same with a number of ball pein hammers less the mirror finish. They just look great and are a pleasure to use.
 

jakemac

Well-known member
Joined
May 21, 2013
Messages
9,035
Location
New England
I've been doing the same thing, but you've taken the polishing much further than I have.
Nice job. :thumbup:
 

LXCam

ALLIANCE MEMBER
Joined
Apr 23, 2013
Messages
19,105
Location
AZ
Killer job you're doing! Mind if I give you some short cuts on polishing those. Get brown, red then blue scotch bright belts. Blue being the finest then get a stainless belt. The stainless will do the same job your doing with the 2000grit. I know the belts aren't cheap but at a minimum if you get a blue it'll really short cut all that effort.

Keep up the great job!
 
OP
S

sevt_chevelle

Well-known member
Joined
Apr 14, 2011
Messages
128
Location
Northern Iowa
Killer job you're doing! Mind if I give you some short cuts on polishing those. Get brown, red then blue scotch bright belts. Blue being the finest then get a stainless belt. The stainless will do the same job your doing with the 2000grit. I know the belts aren't cheap but at a minimum if you get a blue it'll really short cut all that effort.

Keep up the great job!

Can you tell me your source for purchasing the belts?
 

LXCam

ALLIANCE MEMBER
Joined
Apr 23, 2013
Messages
19,105
Location
AZ
Can you tell me your source for purchasing the belts?


Well I used to get them from Use-Enco which is now MSC Direct. But a while back one of the guys here sent me a link that looked pretty good for pricing, let me dig thru my PM's and see if I can find it. You might also try Lee Valley. I haven't bought belts from them but am pretty certain they'll have them. The stainless belt came from the guy that I bought my belt grind from. I've had it for years now and even though it doesn't see too much work its seen more then its fair share and still is in great shape.

Also there's always the old favorites too, just not cheap. But McMaster Carr and Graingers carry the belts.

Hopefully this link to McMaster works. But the pricing isn't bad for your size. Scotch bright style are 23 each and super duper polish ones are 8. BTW they don't specifically state Scotch Bright, they call them nylon impregnated with Alumina.

https://www.mcmaster.com/#sanding-belts/=166oacy

Well sure as **** it doesn't get you right there. The fastest method is to select your belt size off on the left. Once you've done that it really narrows down your choices.

Here's the place they guy here recommended. Pricing is really good for belts but I didn't find anything finer than a 400 grit.

http://popsupply.bizhosting.com/index.html

Burr king has a good selection and the pricing isn't tooo bad

http://www.burrking.com/catalog/p-100050/abrasive-belts

Well this took way too much effort. Those stainless belts are called cloth belts.

http://solutions.3m.com/wps/portal/...-Cloth-Belt-307EA?N=7581694+3293241209&rt=rud
 
Last edited:
OP
S

sevt_chevelle

Well-known member
Joined
Apr 14, 2011
Messages
128
Location
Northern Iowa
you still use them with the highly polished heads ?

No. The vast majority are show queens. As a person in the collision industry my everyday tools are modern Martin hammers/dollies and several slap hammers. Those I keep polished with about 800 grit.

I have a few random pics of the Plvmb 1429 that can be seen in the background a few times. Waiting on a decision of what new touch up HVLP gun to buy before I start on any more hammers.

Right now, I've got a Fairmount 151 or 150 cant remember, a Heller, and another ABC hammer but double offset all waiting in line just need to wetsand/buff and install the handles.
 
Last edited:
To avoid these ads, REGISTER NOW!
OP
S

sevt_chevelle

Well-known member
Joined
Apr 14, 2011
Messages
128
Location
Northern Iowa
I won’t call this one a restoration more like getting a ladder out so it doesn’t fall the entire length of the tree. This sad hammer came in a package deal, am guessing the seller felt sorry for it or just wanted it gone. My first thoughts were WTF, what kind of butchers do this kind of stuff to tools, but like a sad puppy it grew on me. The more I looked at it and thought about it I really wanted to make this hammer shine again.


The day came for this hammer’s make over I was really looking forward to this hammer and then I found this and instantly my heart sank. A nice crack in the face, game over.

Well, came close to tossing it the dumpster but fixed her up instead. Not the prettiest girl at the dance but far better then showing up with your mom. Took it to the bench grinder and ground down til the crack was gone and wore out a 36 grit flap disc as well.


Smokeshow69

Well-known member
Joined
Dec 7, 2012
Messages
8,366
Location
Pacific Northwest
No. The vast majority are show queens. As a person in the collision industry my everyday tools are modern Martin hammers/dollies and several slap hammers. Those I keep polished with about 800 grit.

I have a few random pics of the Plvmb 1429 that can be seen in the background a few times. Waiting on a decision of what new touch up HVLP gun to buy before I start on any more hammers.

Right now, I've got a Fairmount 151 or 150 cant remember, a Heller, and another ABC hammer but double offset all waiting in line just need to wetsand/buff and install the handles.


I am wondering where you source the proto/plvmb handles... They are different than today's round handles... Your work is over the top and all of a sudden I find myself wanting to start restoring vintage body tools :beer:
 

cajunfirehawk

Well-known member
Joined
Nov 29, 2011
Messages
2,566
Location
Ms Gulf Coast
Wondering what a guesstimate of man hours per hammer is?
Also, you mentioned; "show queens" please define; like you go to tool shows and show off your tools or you have a display in your garage/mancave?
Awesome work, kudos.:bowdown:
 

smokeyburb

Well-known member
Joined
Aug 20, 2014
Messages
163
Location
Southeast AZ
Gives me inspiration to tackle two very rusty dollies I got from my dad. I already worked a little on the deeply pitted Bonney hammer, but I filled the pits with MIG wire and sanded smooth with a 220 roloc disc. Some black rattle can to match what appeared to be original paint and then hung with a generic hardware store handle rubbed with BLO. I'm not a body man, just have a thing for old stuff, especially if it's labeled BONNEY.

Sent from my SCH-I545 using Tapatalk
 

Hammer1963

Well-known member
Joined
Jan 2, 2011
Messages
2,048
Location
Kentucky
Fabulous workmanship! As I stated on a previous thread that displayed your work, I am happy to know that I am not the only guy with this strange affliction. I will attempt to post some of the hammers I have reworked. Keep posting updates. I look forward to them
 
OP
S

sevt_chevelle

Well-known member
Joined
Apr 14, 2011
Messages
128
Location
Northern Iowa
By "show queen" I mean the hammers will enjoy a very nice retirement collecting dust in my toolbox. A display case would be pretty sweet but at probably 150 hammers and still growing that would have to be one mammoth sized display case.

As far as time, am guessing about 1 hr per coat of Tru oil, that includes wet sanding, drying and applying the oil. But I wait 1 week in between coats, probably could speed that up but it works for me.

Refurbishing the hammer heads really depends on the condition, dings, pits, rust all take some time to address. Was doing some final polishing on a Fairmount 150 or 151 and noticed a small pit and had to start all over, that was about 1-2 hours down the drain.

I spent about 1 hour wire wheeling an ABC hammer I haven't shown yet, after that I bought a Harbor Freight bench blaster. With 100 grit glass beads it takes seconds to clean a hammer.

The ABC Snap On 615 clone hammer that I show, am guessing 2 hrs in grinding down the profile and finishing sanding. Couple hours spent on the handle.
 
OP
S

sevt_chevelle

Well-known member
Joined
Apr 14, 2011
Messages
128
Location
Northern Iowa
Once I figure what new touch up HVLP paint gun to buy these guys are next. Got a Fairmount 150/151 and a Heller done but just need to wet sand and buff the handles.


Hammer1963

Well-known member
Joined
Jan 2, 2011
Messages
2,048
Location
Kentucky
Where do you get your proto/plvmb handles from or do you only use originals? Is there currently someone making new plvmb/proto handles?

I make my own octagonal handles from locally sourced Hickory and on I also use oval or round handles that have the proper size dimensions for the hammer head eye if I can buy them reasonably.

I have found a method of making them that works well for me. I have made handles for my Snap-on, Herbrand, Matco and Plvmb/Proto hammers with paint and stain as close as I can get to the originals.
 
OP
S

sevt_chevelle

Well-known member
Joined
Apr 14, 2011
Messages
128
Location
Northern Iowa
Not much of a progress report, somehow life always gets in the way. Couple pics of some no name hammer, hammer head on far right.

Ground the square end down to a reverse curve shape using a flap disc and a 4.5 grinder, finished the shaping a belt sander and 80 grit.


Painted.

Handle installed. I once again burnt the handle with a torch then stained it with Red Oak stain and applied 4-5 coats of Tru-oil. I then wet sanded then handles with 2000 grit and buffed to a high gloss.

I also sanded the paint off the flats of the hammer giving it a Snap-on kinda look.

 
OP
S

sevt_chevelle

Well-known member
Joined
Apr 14, 2011
Messages
128
Location
Northern Iowa
There are some pictures of the hammers I’ve added since January 2017, if I counted right there are 42 new hammers. We have some Fairmount, Porter Ferguson, early and late Martin, Streamline, Herbrand, Mac, Williams, Snap-on.


iajonesy

Well-known member
Joined
Feb 8, 2009
Messages
2,467
Location
Iowa
No wonder I can't find any body hammers in Iowa. You've cornered the market. Very nice job on the restos and very nice collection,too. Where are you located? I'm in Lisbon,about 20 miles east of Cedar Rapids.

Mike
 

SweetD

Well-known member
Joined
Feb 8, 2010
Messages
3,264
Location
Rhode Island
Wow, thanks so much for sharing!

Question from someone that knows nothing about body hammers:

When you buy them new, are they in the condition that you are restoring them to? Or are they not as highly polished?

:beer:

Dave
 
To avoid these ads, REGISTER NOW!
Top Bottom