To avoid these ads, REGISTER NOW!

my 4 post from advantage lifts

PoorOwner

Well-known member
Joined
Feb 10, 2007
Messages
5,032
Location
CA
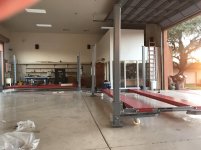
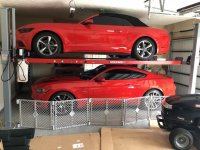
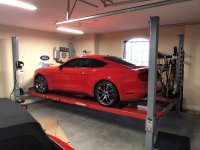
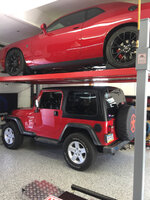
Hey guys, I just picked up my 4 post lift, it’s from advantage lifts

these are included in the price
- casters kit
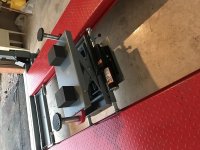
- rolling jack tray, plastic drip pans
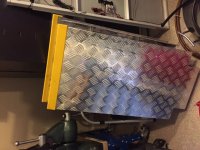
- include aluminum ramps. They are gusseted on the back completely in a grid pattern. It even have a rubber bumper to protect your head.
- 2 heavy duty wheel chocks
- height limit safety switch
- 120V motor that works on 20 amp circuit.. (no need for 30 amp breaker, etc)
- grease fitting on pulleys
- thick 5/8" base and top plates.
- warranty is 5 years, bumper to bumper

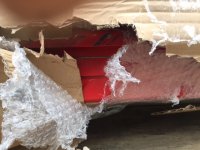
They put plywood under the bottom to avoid scratches (there was a little scrape on mine that happened during shipping). No structural damage.

There is no rust anywhere, even the bottom of the runways were media blasted and powder coated perfectly (saw some of the blasting media landed on the bottom). You can see one of my runway is upside down. The welds are nice, they scraped all the BBs / slags from welding and I also saw some grinding to make a nice to look at. Again, even on the bottom where people might not notice, they did a great job on details like this.

They have some good instruction videos on how to unload and set the whole thing up, which made me very comfortable on doing the installation myself.

Next you ask is it ALI certified, the answer is no, not yet. The owner told me the exact same lift is being tested at ALI now, but he can’t give me a sticker after the fact. ALI needs to keep track of serial numbers and built date, and cannot grant it retrospect.

I did a lot of research in this area, besides needing to be tested over 100% capacity etc, there are a couple of key items that a lift must have to get certification. One is a secondary fail safe: if the cable were to go slack, come off pulley, or break, it needs to catch the slot on the post and not fall down on you. The advantage 4 post does has a SECONDARY set of “dogs” that rides on the cable and will engage should the cable go slack. The other safety is that they have long bolts next the pulley to keep the cable were they should be. So the advantage lifts have these safety features covered in their current model. With the backlog of car projects I can not wait any longer. I can tell you this appears to be a good piece of equipment heavily built, with redundant safety features.

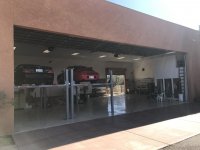
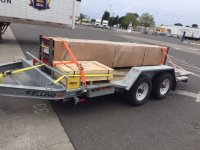
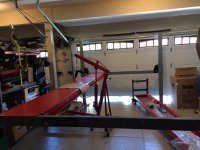
I will keep you guys updated. It seems the hardest part (unloading) is done. I used the cherry picker a lot on it and already gained experience hoisting the runway. We have a short and steep driveway and I took everything off the package and then pushed into the garage.

You can also see the wooden crate in my pics, that’s the air bridge jack.
 

Attachments

  • IMG_1308.JPG
    IMG_1308.JPG
    127.7 KB · Views: 450
  • IMG_1312.jpg
    IMG_1312.jpg
    132.9 KB · Views: 406
  • IMG_1313.JPG
    IMG_1313.JPG
    132.8 KB · Views: 414
  • IMG_1314.JPG
    IMG_1314.JPG
    135 KB · Views: 393
  • IMG_1318.JPG
    IMG_1318.JPG
    91.7 KB · Views: 429
  • IMG_1309.JPG
    IMG_1309.JPG
    110.1 KB · Views: 394
Last edited:
To avoid these ads, REGISTER NOW!
OP
P

PoorOwner

Well-known member
Joined
Feb 10, 2007
Messages
5,032
Location
CA
I'm watching, very close to doing the same brand. Is that the tall model?

It is the 9000 lb regular height. Their lifts go a little higher than the other lifts. For example the regular one has 71" under runway on locks, and the tall model has 83" under runway. Where as most lifts only offer 68" under and 79-81" for the tall model.
 
Last edited:

garagelogician

Well-known member
Joined
Jan 27, 2016
Messages
453
Location
Blaine, MN
They are a good looking lift, I was leaning that way and I'd buy one if it fit in my space better. BendPak HD-7W gets me the wider runway width I need in an overall narrower package...and I can get the extra rise without making it longer.

For guys with the space, its a great lift for a great price. I like that they include aluminum ramps, jack tray and caster kit as standard, I wish BendPak did that. Keep us updated.
 

scottmoyer

Well-known member
Joined
Mar 7, 2017
Messages
118
Location
Central FL
I ordered the Advantage Lift about 2 weeks ago. I can't wait to get it!! They are putting together the delivery after the Barrett-Jackson Palm Beach auction. I hope it comes in sooner then they estimated.
 
OP
P

PoorOwner

Well-known member
Joined
Feb 10, 2007
Messages
5,032
Location
CA
Hey guys, my lift is installed!

I cannot imagine doing it with only 1 person. You need to flip the ramp around, and get the runways at an angle then drop it back down, and even with 2 people it was a bit difficult as we have to push the hoist with the load.

I spent the previous weekend to run the 120v 20 amp circuit. My garage only has a 15 amp circuit! So I wired 20 amp gfci and new dedicated circuit with a motor rated shut off switch with padlock. (our electrical section have some helpful folks there helping me do everything to code)

Before assembly, I made sure I have space at the end of the garage to insert the linkage rod. I left 6 feet or close to the length of the rod. This is important if your garage is only 20' deep! Then after assembly move the lift with the caster closer.

My floor isn't very flat from grinding and thick broadcast, so the post wobbled a bit on it's own depending on where you put it, after putting it all together it is not a concern. You have 12"x12" 5/8" plates, it's not going to deform even if there is some gaps around the edges.

I was a bit intimidated running the cable, you have what seemed like 6 to 8 cables out of 4 cables at first. I understood long before there is a ramp with 4 swages, but a couple of them loop through the other pulleys and was a bit confusing at first. Eventually figured the ones not wrapped 180 around the pulleys are going to the posts. The cylinder pulled out effortlessly to allow the able to reach the top of the posts.

After that is the linkages, that took just a bit long to setup. By the way I followed the lengthy video on their website, it is much better than the manual. There isn't a way to test the linkage because it is sitting on the locks as you assemble it, so you really want to do it right the first time without testing, so you know the linkage will let the lift come down when you first test it.

There was some minor problem solving required. on one post I had to use a mallet on the slider because my floor is out of whack the post is at an angle, so it was binding. (imagine using the slider as a shim to move the post, not going to happen easily) I highly recommend putting in ALL the sliders while the post in flat on the floor, you can wiggle the post and they slip right in. On the bolt that the pump mounts there was some sand blast media and was chewing up the threads on the bolt, I had to use a restorer kit and clean it a few times. They give you some extra nuts and bolts which I was able to utilize.

It was getting late, so I waited until next morning to mount the pump and fill it with hydraulic oil. Then press the button on the pump, after seemed like a minute the cable starts to pull tight, I checked all the pulleys and let it right rise up. Everything is really quiet, just hear the pump motor and locks. I have read some lifts can shudder and make noise. Everything is real smooth on this lift. It was quiet coming down too, I forgot my rolling stool was under the runway holding up the lift from coming down. Surprising it did not damage the chair, seems like most of the weight go transferred to the post. With that removed, it descended to the ground with tons of bubble released at the end.

I will use the caster to move it further back so I can close the door with the ramps on. Then adjust the cable on 3 of the lower corners so the locks engage at the same time. On these lifts you don't level the runway, it will just sit the same as your garage slope. They sent me some touch up paint which matches the powdercoat, I touched up that shipping scratch. Everything looks great so far. I will let you know after using the lift for my projects.
 

Attachments

  • IMG_0037.JPG
    IMG_0037.JPG
    128.3 KB · Views: 554
  • IMG_0024.JPG
    IMG_0024.JPG
    100.8 KB · Views: 512
  • IMG_1340.jpg
    IMG_1340.jpg
    143.1 KB · Views: 508
  • IMG_1338.jpg
    IMG_1338.jpg
    137 KB · Views: 545
Last edited:

Gear Box

Well-known member
Joined
Mar 21, 2013
Messages
159
Location
Minnesota
Hey Poor , I got mine up and running this weekend to. Went with XLT model,best garage purchase ever.

3cb2f257cf02adbc840a96312216c855.jpg
 

Attachments

  • 3cb2f257cf02adbc840a96312216c855.jpg
    3cb2f257cf02adbc840a96312216c855.jpg
    376.5 KB · Views: 23

scottmoyer

Well-known member
Joined
Mar 7, 2017
Messages
118
Location
Central FL
I'm hoping to get the call this week that mine is ready. They said about 4 weeks after the Barrett Jackson Palm Beach Auction, and we're at that point now. Over the past few weeks, I've installed cabinets in the garage and have done a lot of clean up. I am now painting the walls. I'm going with a grey lower 1/3rd, an 8.5" red stripe bordered with black stripes and white at the top. I also plan to run two drops of 120V/20A this week with a red emergency cut off switch near the motor. I can't wait to get this thing in!!
 
OP
P

PoorOwner

Well-known member
Joined
Feb 10, 2007
Messages
5,032
Location
CA
Moving a little was not so easy. It wants to roll back to the original spot. I was able to hold it and press the lift button to engage the legs again.

Adjusting it took only 5 minutes. It was really easy. I measured the slot against the slider and find the 3 posts that are lower. Then parked it on the locks to release the cable tension. I used a masking tape to transfer this measurement, 3/8" , 3/4" etc taped on the threads of the cable and used the top nut to bring the cable up to the tape. I could see the one needing 3/4" cable was a bit slack. The adjustment brought all of them to a consistent tension and, then all the locks sound at exactly the same time.

Here is a picture of the lock sitting on the slot.
 

Attachments

  • IMG_1343.jpg
    IMG_1343.jpg
    120 KB · Views: 274
To avoid these ads, REGISTER NOW!
OP
P

PoorOwner

Well-known member
Joined
Feb 10, 2007
Messages
5,032
Location
CA
One of the reason I got the advantage lift is the 71" under runway height on locks. Many of the standard 4 post is only 68". my head clears the runway by 2".
. My ceiling puts me at around 52" up top lock so it is not likely I will get to use it when actually working on a car. But when I leave it up empty I go on parking under and walk around the garage easily.
 

Attachments

  • IMG_1346.jpg
    IMG_1346.jpg
    141.7 KB · Views: 257

jinman

Member
Joined
Oct 3, 2016
Messages
18
Location
Whiteford, MI
Congrats on the lift! I just had one installed last week. Be sure to install two of these light kits with the transformer and remote:https://www.amazon.com/dp/B01339G2F6/?tag=atomicindus08-20. Makes a big difference having all this light underneath! All for less than $40.

JimChevy, how/where did you attach that rope lighting to the lift so that it shines up at the car? Advantage offers a light kit for 200 and some bucks... I like the sound of your 40 dollar solution much more.:bounce: Any pics of your install?

PoorOwner, nice install and write up! I'm very close to getting an Advantage lift as well, only in the XLT edition. Seeing your pics and the one that GearBox posted has certainly swayed me. There's just something about the solid square tubing and deadbolt lock system that really puts my mind at ease when thinking about working under a car or storing one. Thanks!
 

scottmoyer

Well-known member
Joined
Mar 7, 2017
Messages
118
Location
Central FL
I got my email from Advantage, this morning, that I can pick up my lift on Wednesday. I'm hoping for a good end of week getting it installed!

I agree with jinman on the lights you installed. Can you post pics on what you did?
 

AdamIsAdam

Well-known member
Joined
Nov 28, 2014
Messages
65
Location
Long Island, NY
I've also decided on this lift after a lot of research. I like the square posts over C channel as well. Safety! Plus, they offer great feathers and value for the money.
 

sunsout

Member
Joined
Jan 31, 2018
Messages
5
Location
Arizona
New guy here, just wanted to say that I bought two of the 9K XLT's and couldn't be happier, so much so that I plan on getting another 9K XLT and a 11K. I went with one air over Hyd rolling jack and one airbag jack, haven't used those yet but will update after.
 

Attachments

  • IMG_0969.jpg
    IMG_0969.jpg
    147.6 KB · Views: 284
  • IMG_0978.jpg
    IMG_0978.jpg
    137.5 KB · Views: 312
  • IMG_0980.jpg
    IMG_0980.jpg
    141.4 KB · Views: 946
  • IMG_0988.jpg
    IMG_0988.jpg
    134 KB · Views: 315
OP
P

PoorOwner

Well-known member
Joined
Feb 10, 2007
Messages
5,032
Location
CA
New guy here, just wanted to say that I bought two of the 9K XLT's and couldn't be happier, so much so that I plan on getting another 9K XLT and a 11K. I went with one air over Hyd rolling jack and one airbag jack, haven't used those yet but will update after.

looks great sunsout.
you must be getting good at assembling it now.
How did you get the jack to raise up without hooking up the air? I have the same jack but have not plumbed the air to it yet.
attachment.php
 

sunsout

Member
Joined
Jan 31, 2018
Messages
5
Location
Arizona
looks great sunsout.
you must be getting good at assembling it now.
How did you get the jack to raise up without hooking up the air? I have the same jack but have not plumbed the air to it yet.
attachment.php


Yes, I must say the second one went together in under 2hrs. As far as the jack, we lifted it out of the create by the arms and it came up. Definitely a quality product.
 
OP
P

PoorOwner

Well-known member
Joined
Feb 10, 2007
Messages
5,032
Location
CA
oil change today, car on the 7th lock. Could have gone higher, but hood needs to be kept opened.
 

Attachments

  • IMG_1571.JPG
    IMG_1571.JPG
    100.9 KB · Views: 485
  • IMG_1569.JPG
    IMG_1569.JPG
    119 KB · Views: 498

[email protected]

Active member
Joined
Feb 28, 2018
Messages
39
Location
Louisville KY
My new XLT lift. Just have to finalize the electrical. Had one garage door raised and now going to raise the other one. Also purchased a liftmaster 8500w.


Love the lift.

Do u have the parts list for the light kit u guys installed?
 

Attachments

  • 79B193E7-3A61-491F-B769-1E50107A09ED.jpg
    79B193E7-3A61-491F-B769-1E50107A09ED.jpg
    156.9 KB · Views: 162
  • 3D6C78F9-8308-42C3-A8B6-852B4ED8ABEE.jpg
    3D6C78F9-8308-42C3-A8B6-852B4ED8ABEE.jpg
    130.4 KB · Views: 145
OP
P

PoorOwner

Well-known member
Joined
Feb 10, 2007
Messages
5,032
Location
CA
I just use this for my light for now it can aim upwards at any angle. it gets the job done.

milwaukee-specialty-power-tools-2360-20-64_1000.jpg
 
To avoid these ads, REGISTER NOW!
Top Bottom