
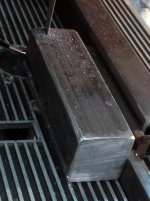
I finally got around to making a steel bench top for my 2 roller cabinets. It's 2' x 7' with 2" ID tubing on 12" centres. I have the bayonet hitch style receivers throughout the shop and wanted to be able to use 2 receivers for bigger tool mounting so opted for 12" centres.
Since I have no budget this was all salvaged material and there was no going out and buying seamless tubing. I had a nice 50" piece of 2" square solid bar stock sitting around so I decided to try and force a piece of it through the 24" sections of tubing using my 20 T press.

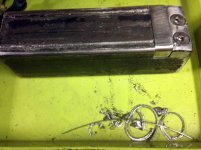
It almost worked and did work after the 2nd pass but the weld seam was gouging my 6" block as badly as I was removing the weld seam and I could see this wasn't going to do the other 7 sections. I cut a 1/2" x 1" section off one end of my slug and threaded a small section of it back on to act as a keeper for a piece of HSS tooling I'd ground to size creating a broach.

The 1st one was still a little grabby so I put a .005 shim under the tool bit and it all worked like a hot dam after that.

The gouges you see on the body of the slug were from before I added the HSS bit.

I plan to buy an air/hydraulic ram for my cherry picker in the future and I'll fab some mounts for that on my 20 T press so I can force this broach through in one swoop next time I need to do this.
Since I have no budget this was all salvaged material and there was no going out and buying seamless tubing. I had a nice 50" piece of 2" square solid bar stock sitting around so I decided to try and force a piece of it through the 24" sections of tubing using my 20 T press.
It almost worked and did work after the 2nd pass but the weld seam was gouging my 6" block as badly as I was removing the weld seam and I could see this wasn't going to do the other 7 sections. I cut a 1/2" x 1" section off one end of my slug and threaded a small section of it back on to act as a keeper for a piece of HSS tooling I'd ground to size creating a broach.
The 1st one was still a little grabby so I put a .005 shim under the tool bit and it all worked like a hot dam after that.
The gouges you see on the body of the slug were from before I added the HSS bit.
I plan to buy an air/hydraulic ram for my cherry picker in the future and I'll fab some mounts for that on my 20 T press so I can force this broach through in one swoop next time I need to do this.
Attachments


Last edited:
") . I was just doing down and dirty to get the job done quickly and stopped as soon as I got results. I thought of sharpening a slight angle on the leading edge and that may have been my next move but didn't need to. Looking at the build up it would work better by angling the bit and cutting a slight under cut into the bit and the debris wouldn't pile up like that. I only had to go 24" but for longer sections that would be the ticket.
. I was just doing down and dirty to get the job done quickly and stopped as soon as I got results. I thought of sharpening a slight angle on the leading edge and that may have been my next move but didn't need to. Looking at the build up it would work better by angling the bit and cutting a slight under cut into the bit and the debris wouldn't pile up like that. I only had to go 24" but for longer sections that would be the ticket. Much easier than the normal handle....