I have been slowly acquiring and implementing a mish-mash of HVAC components in my shop. The first installation was a 12k BTU window AC. I got it for free, but at some point on the trip home (on the back of my trailer), the face plate blew off. So now it's ugly, lol. But it's an old mechanical-switch unit. You flip it to "on" and it's ON. Nothing computerized.
Second addition was a "hot one" hanging 220v heater. I have found that the thermostat kinda ***** on it, so I just leave it turned all the way up, and I had been turning it on and off with the breaker.
So I have a heater and AC that basically are both either on or off.
Well, to tie them all together, I decided to make a thermostat controller.
Side note: I have used a Proliphix IP thermostat in my house since way before internet-connected thermostats were cool, lol. It was pretty expensive back in the day. It just uses a simple web interface to change the settings. It's a little clumsy by today's standards, BUT at least there is no "app" that will eventually be unsupported. It just works.
ANYWAY- I decided to pick up another Proliphix IP thermostat. I found one on ebay for $30 shipped. Great deal compared to the 10x that I paid for my original one, lol.
For the control cabinet I found an old CCTV power supply cabinet at the Habitat ReStore for $10. It was empty, but it still had its aluminum component plate inside, so I flipped it over and used the back to mount my devices.
I went to a local electronics surplus store and bought a couple 24vdc Moeller contactors, din rail, and a 24vdc power adapter ($10 total). I bench tested the contactors and they only draw 110ma on the coils when energized, so they'll be safe to run right off the thermostats outputs.
The 24vdc power supply provides power to the thermostat, and power for the coils of the contactors.
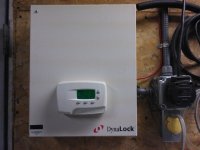
I mounted the control box right next to the 220v outlet (which already existed at eye-level when I bought the place). I disconnected the 220v outlet and passed the two hot legs through one contactor. I split one of the legs off to get 110v to run the 24vdc power supply, and to provide 110v for the AC unit. I passed that 110v leg across the other contactor, and mounted a 110v outlet below the 220v outlet.
I already had a live CAT5 in the ceiling above that I pulled last summer when I originally dreamed up the idea. So I just fished that down and connected it.
So basically, in "heat mode" when the temperature drops below the heat set point, the thermostat closes the heat contactor and the "Hot One" heater comes on. When in "cool mode", when the temperature rises above the cool set point the thermostat closes the other contactor and the window AC kicks on.
So not only did I gain a nice thermostat-controlled setup, I can use the web interface and kick on the heat or AC before I head out there. This will be great when its really hot or cold out.
PS- I know I have the wrong fittings on the small piece of conduit between the control cabinet and the 220v outlet. It was all I had in my junk bin.


Second addition was a "hot one" hanging 220v heater. I have found that the thermostat kinda ***** on it, so I just leave it turned all the way up, and I had been turning it on and off with the breaker.
So I have a heater and AC that basically are both either on or off.
Well, to tie them all together, I decided to make a thermostat controller.
Side note: I have used a Proliphix IP thermostat in my house since way before internet-connected thermostats were cool, lol. It was pretty expensive back in the day. It just uses a simple web interface to change the settings. It's a little clumsy by today's standards, BUT at least there is no "app" that will eventually be unsupported. It just works.
ANYWAY- I decided to pick up another Proliphix IP thermostat. I found one on ebay for $30 shipped. Great deal compared to the 10x that I paid for my original one, lol.
For the control cabinet I found an old CCTV power supply cabinet at the Habitat ReStore for $10. It was empty, but it still had its aluminum component plate inside, so I flipped it over and used the back to mount my devices.
I went to a local electronics surplus store and bought a couple 24vdc Moeller contactors, din rail, and a 24vdc power adapter ($10 total). I bench tested the contactors and they only draw 110ma on the coils when energized, so they'll be safe to run right off the thermostats outputs.
The 24vdc power supply provides power to the thermostat, and power for the coils of the contactors.
I mounted the control box right next to the 220v outlet (which already existed at eye-level when I bought the place). I disconnected the 220v outlet and passed the two hot legs through one contactor. I split one of the legs off to get 110v to run the 24vdc power supply, and to provide 110v for the AC unit. I passed that 110v leg across the other contactor, and mounted a 110v outlet below the 220v outlet.
I already had a live CAT5 in the ceiling above that I pulled last summer when I originally dreamed up the idea. So I just fished that down and connected it.
So basically, in "heat mode" when the temperature drops below the heat set point, the thermostat closes the heat contactor and the "Hot One" heater comes on. When in "cool mode", when the temperature rises above the cool set point the thermostat closes the other contactor and the window AC kicks on.
So not only did I gain a nice thermostat-controlled setup, I can use the web interface and kick on the heat or AC before I head out there. This will be great when its really hot or cold out.
PS- I know I have the wrong fittings on the small piece of conduit between the control cabinet and the 220v outlet. It was all I had in my junk bin.