To avoid these ads, REGISTER NOW!

Between 485 & 705 SQ/FT old farm garages reno- Detached and Attached 2 cars

Workspaces between 485 and 705 squarefeet.

jb3

Well-known member
Joined
May 2, 2014
Messages
14,914
Location
Rhode Island, USA
This is a newer version of a thread impacted by the photobucket incident. Unfortunately I lost a huge amount of images in that permanently, but have enough for a more garage oriented thread this time!

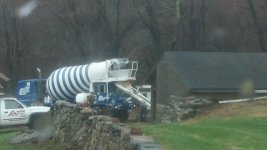
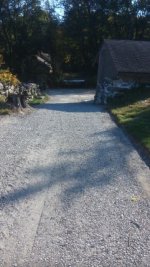
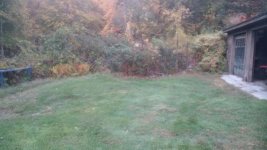
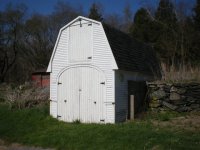
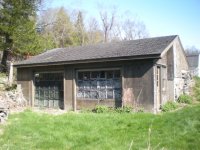
Back history is several years ago I bought an old colonial farm house on 3 acres in poor condition with 3 dilapidated outbuildings, and (so far) 10 dumpster worth of just garbage lying around the property. Ive spent most of my time working on the house and just cleaning up the mess of a totally abandoned property, but my dream is to get these outbuildings up and usable, and what will follow is my baby step thread of rehabbing these old structures on a paper thin budget over time to make it affordable.

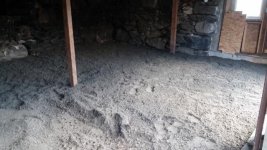
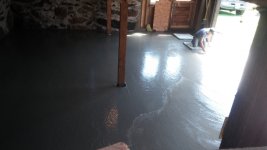
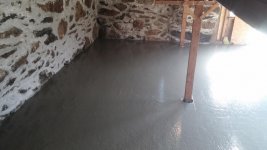
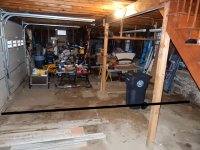
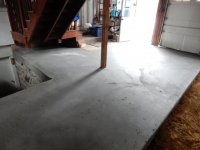
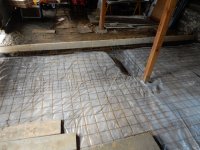
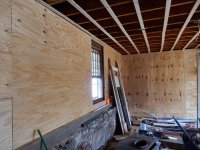
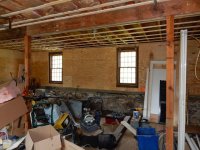
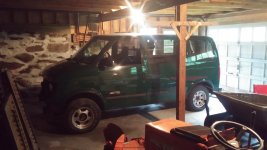
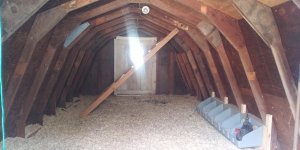
My starting point was an attached 2 car garage with a loft, approximately the length of a 4 car garage. This was a dirt floor structure, but solid construction.
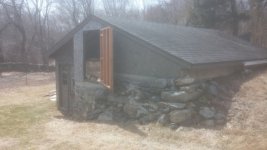
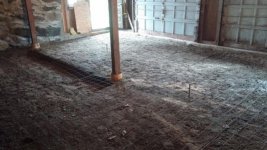
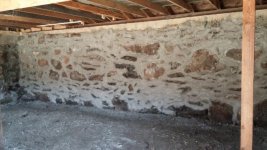
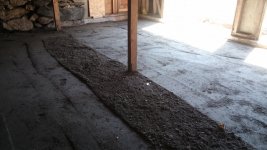
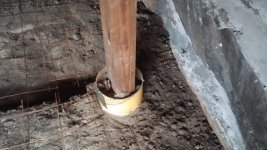
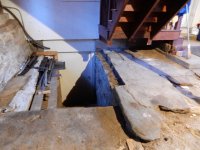
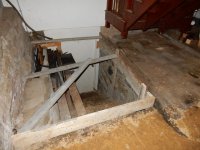
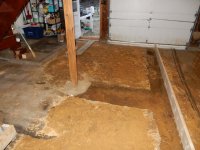
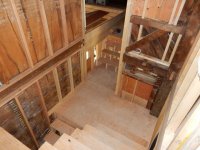
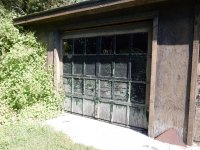
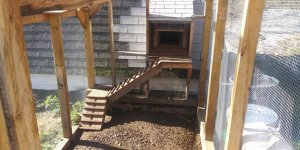
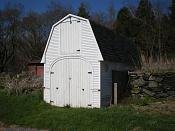
Next was a detached 2 car garage with a partial sunken foundation that was unfinished a long time ago and deteriorating from that, a detached 1 car garage as wide as a 2 car, and a little two story shed.

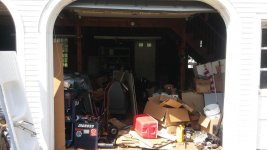
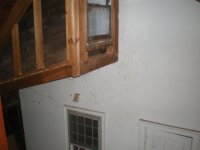
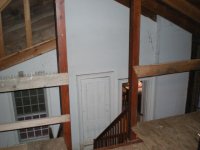
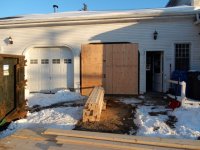
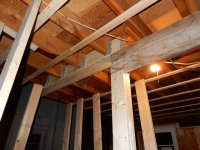
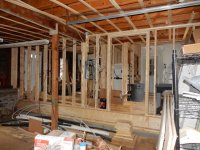
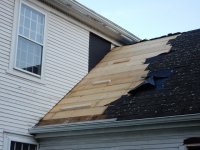
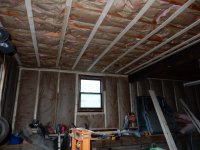
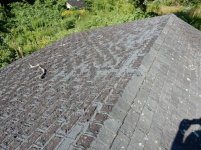
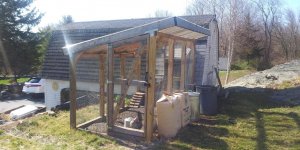
attached are some images of the buildings at their starting point. They were in rough shape, but there was potential
 

Attachments

  • 001 (5).JPG
    001 (5).JPG
    100.9 KB · Views: 325
  • 003 (4).JPG
    003 (4).JPG
    109.3 KB · Views: 334
  • 005.jpg
    005.jpg
    66.4 KB · Views: 330
  • 011.JPG
    011.JPG
    117.8 KB · Views: 334
  • 023.JPG
    023.JPG
    137.4 KB · Views: 322
  • 008 (2).JPG
    008 (2).JPG
    135.8 KB · Views: 309
Last edited:
To avoid these ads, REGISTER NOW!
OP
J

jb3

Well-known member
Joined
May 2, 2014
Messages
14,914
Location
Rhode Island, USA
all buildings had dirt floors, the attached garage was very heavily built out of spare timber from jobs the PO had done (a carpenter), and due to the size and length, and due to several major problems with the house layout, it was decided to take about a 3rd of it and convert it into living space, losing one garage door.

This move solved all problems with the house, and allowed expansion access to the loft from inside the house if I wanted to turn that into living space in the future as well.

couple of pictures of the initial layout of the attached garage. The attached garage had originally been an open sided horse barn, and covered a basement bulkhead and a stair up to the loft
 

Attachments

  • 006 (3).JPG
    006 (3).JPG
    86.7 KB · Views: 296
  • 009 (3).JPG
    009 (3).JPG
    84.3 KB · Views: 293
  • 005 (2).JPG
    005 (2).JPG
    90.2 KB · Views: 308
  • 004 (2).JPG
    004 (2).JPG
    91.8 KB · Views: 313
Last edited:
OP
J

jb3

Well-known member
Joined
May 2, 2014
Messages
14,914
Location
Rhode Island, USA
After flailing about a bit when I first moved in trying to work on everything at the same time and getting nowhere, I wrote out an extended list of how each building would get improved and in what order, by order of necessity. Trying to stick to this has been a challenge. The principle problem I had, was that I couldn't really put anything in them because they were so primitive.

I was trying to condense a commercial condo full of stuff from my business, and my personal family stuff into these spaces, and it just was not going to happen stacked on wet dirt, I needed concrete.

I was most excited about the brown rotten shed and liked the design. It had eave doors that could be opened and pinned, and with the garage doors open, there was a great breeze through the structure even in summer heat. I loved the half sunken foundation, and the potential to add a second story that could be driven into was there. First order of business was to clear out all the rotted stuff left in there by the PO
 

Attachments

  • 017 (2).jpg
    017 (2).jpg
    152.5 KB · Views: 292
  • stonegarage4.jpg
    stonegarage4.jpg
    129.9 KB · Views: 320
  • stonegarage3.jpg
    stonegarage3.jpg
    120.2 KB · Views: 322
  • 20150406_135647-1.jpg
    20150406_135647-1.jpg
    129.8 KB · Views: 315
  • 014 (2).JPG
    014 (2).JPG
    105.6 KB · Views: 328
Last edited:
OP
J

jb3

Well-known member
Joined
May 2, 2014
Messages
14,914
Location
Rhode Island, USA
the foundation was dry fit stone, so in order to go with concrete and try and make an effort to seal the building a little, I had a mason in there to point, then we dumped and leveled gravel, dug out an area for a future lift, and were able to pour

access to this building is very complicated for anything larger than a pickup truck due to stone walls and grade. I had to hire out a guy who had a small dump truck that could just squeeze by the building.

for the concrete truck we had to have access from the neighbors private road and I had to cut down a lot of brush
 

Attachments

  • 20150420_123437.jpg
    20150420_123437.jpg
    44 KB · Views: 310
  • 20150418_112449.jpg
    20150418_112449.jpg
    41 KB · Views: 320
  • 20150416_122456.jpg
    20150416_122456.jpg
    42.2 KB · Views: 310
  • 20150411_092321-1.jpg
    20150411_092321-1.jpg
    46.2 KB · Views: 305
  • 20150411_120315.jpg
    20150411_120315.jpg
    133.8 KB · Views: 300
  • 20150411_101855.jpg
    20150411_101855.jpg
    44.4 KB · Views: 301
  • 20150411_083605.jpg
    20150411_083605.jpg
    45.1 KB · Views: 321
OP
J

jb3

Well-known member
Joined
May 2, 2014
Messages
14,914
Location
Rhode Island, USA
some concrete pour pics, I needed concrete but could not afford to rebuild the shed before hand. I did not want to encase the wooden posts in concrete, so we put forms around them so could removed them or replace them in the future, and patch the circular hole

we ended up going quite thick, average 7 inches with almost 12 where the lift would go. I have an existing 10k lift I want to get in this building some how, some way
 

Attachments

  • 20150421_174547.jpg
    20150421_174547.jpg
    106.6 KB · Views: 289
  • 20150421_131429.jpg
    20150421_131429.jpg
    121.9 KB · Views: 275
  • 20150421_111312.jpg
    20150421_111312.jpg
    94.4 KB · Views: 278
  • 20150421_091604.jpg
    20150421_091604.jpg
    142.5 KB · Views: 294
  • 20150421_082359.jpg
    20150421_082359.jpg
    122.7 KB · Views: 281
  • 20150420_123328.jpg
    20150420_123328.jpg
    138.1 KB · Views: 282
OP
J

jb3

Well-known member
Joined
May 2, 2014
Messages
14,914
Location
Rhode Island, USA
While the shed work was taking place, I had laid down OSB as a "Floor" in the attached garage, and stacked it to the ceiling with stuff in places, including a project car you cannot see.

Once the concrete cured, I sifted through this stuff, got rid of tons of more rotten stuff, and transferred auto related and tool stuff to the shed, the project car(s) to that area of the yard, house related stuff to the loft, and crammed the rest into the end of the garage so I could begin my remodel of the house.

a couple pics of after that cleaning process. In one image the black line indicates where I needed to pour a new footer and foundation pad for the renovation. The plan was to take approximately 15 feet of the bulkhead/basement end of the garage, and convert that to a mudroom with laundry, and a bathroom

I pulled up some of the stone floor pieces that were laying down, if it had been more intact I may have considered keeping it, but only a few pieces were left, and at one point they had been skimmed with concrete. you can see some of the old floor where the bulkhead goes down
 

Attachments

  • DSCN3291.JPG
    DSCN3291.JPG
    107.1 KB · Views: 308
  • DSCN3295.JPG
    DSCN3295.JPG
    124 KB · Views: 307
  • DSCN3290.JPG
    DSCN3290.JPG
    117.9 KB · Views: 305
  • 20150819_144040.jpg
    20150819_144040.jpg
    139.3 KB · Views: 301
  • 20150802_161300.jpg
    20150802_161300.jpg
    153.8 KB · Views: 311
  • 001 (7).JPG
    001 (7).JPG
    106.2 KB · Views: 317
Last edited:

Dividing Creek

Well-known member
Joined
Nov 17, 2011
Messages
188
Location
Central Virginia
Cool project. Remember your first thread when you first bought the place but never saw the lost part of the one. Will eagerly follow this time. Love the stone you guys in NE often get to work around.
 

cash68

Keeper Of Rotor Hill
Joined
Feb 2, 2011
Messages
979
Location
Milwaukee, WI
This is a perfect example of why the standard attach image function on this site doesn't work well. Thumbnails are all tiny and the text doesn't go with the images, they're all at the bottom of the post.
 
OP
J

jb3

Well-known member
Joined
May 2, 2014
Messages
14,914
Location
Rhode Island, USA
Thanks for taking the time to repost - I remember your first thread, it was fun to read.

Cool project. Remember your first thread when you first bought the place but never saw the lost part of the one. Will eagerly follow this time. Love the stone you guys in NE often get to work around.

thanks! unfortunately I lost most of my house renovation images, but I still have a few
 
OP
J

jb3

Well-known member
Joined
May 2, 2014
Messages
14,914
Location
Rhode Island, USA
This is a perfect example of why the standard attach image function on this site doesn't work well. Thumbnails are all tiny and the text doesn't go with the images, they're all at the bottom of the post.

but they are still there. :bounce:

are they not blowing up when you click on them? I think I can blow the image up in the text, but im trying this time to write stuff that is just referencing below images instead, or make more posts with topical images to the single post.

Also these images are poor quality due to taking them off an old phone
 
OP
J

jb3

Well-known member
Joined
May 2, 2014
Messages
14,914
Location
Rhode Island, USA
the attached images show some of the inner garage pad pour. The reason I did a pad instead of gravel is I had this dream of being about to put a creeper on the pad from the basement access, under the future floor, and make easy plumbing repairs. As it turned out, I had less than 8 inches between them, so i had to console myself that the ever present mice would not be able to build as high a quality home under the bathroom.

couple issues we ran into was the town wanted me to dig a footer for this wall, and the post supporting the loft had so much weight on it (I had taken everything up the stairs to right there), that we didnt want to cut it for the pad, I ultimately cut it off later and sealed it, but it got poured around
 

Attachments

  • DSCN4565.JPG
    DSCN4565.JPG
    94.9 KB · Views: 244
  • DSCN4564.JPG
    DSCN4564.JPG
    102.6 KB · Views: 241
  • DSCN4291.JPG
    DSCN4291.JPG
    120.5 KB · Views: 237
  • DSCN4290.JPG
    DSCN4290.JPG
    115 KB · Views: 236
  • DSCN3690.JPG
    DSCN3690.JPG
    109.1 KB · Views: 228
  • DSCN3692.JPG
    DSCN3692.JPG
    112.7 KB · Views: 226
  • DSCN3691.JPG
    DSCN3691.JPG
    110.8 KB · Views: 243
Last edited:
OP
J

jb3

Well-known member
Joined
May 2, 2014
Messages
14,914
Location
Rhode Island, USA
another major problem with the attached garage/loft was the feature shown in these two images. Since the attached garage had been elevated to create the loft, it had interfered with an original house window, so they came up with this reverse dormer design to compensate for that window. Unfortunately I have no exterior image of it.

I will go on record stating this was one of the worst design decisions ever. In even a light snowfall, the prevailing wind would PACK that reverse dormer with snow level to the roof, and as a result I had major rot issues to deal with.

added is also an image of the floor plan modification, the garage is the top part of the image, new walls in the garage are dark. This plan shows how if we decide later, we can cut out a foundation wall and install the garage door again on the far side of the garage structure, and end up with an attached two car ultimately. This fact made it a much easier decision to remove one of the garage doors for this renovation
 

Attachments

  • 010 (3).JPG
    010 (3).JPG
    63.5 KB · Views: 205
  • 012 (2).JPG
    012 (2).JPG
    81.8 KB · Views: 203
  • firstfloornewplan.jpg
    firstfloornewplan.jpg
    111.5 KB · Views: 200
Last edited:
OP
J

jb3

Well-known member
Joined
May 2, 2014
Messages
14,914
Location
Rhode Island, USA
Here are some images showing the new floor going in for the garage converted to living space remodel. The floor was brought up to match the height of the house floor, which would put it about 2.5 feet above an eventual garage floor.

The bulkhead was covered up and that entrance was to become a basement closet/plumbing access room. The right side garage door was removed, and converted to exterior wall, and the entrance door moved to this area to match an existing back door that was in the garage.

The idea was a straight through hall from front to rear as part of the mud room.

I added one pic of some concrete with insulation, we blew it on the pour and should have extending a short section out, so had to fix that. This project was full of hundreds of the back and forth blunders when plans met reality, and reality crushed them
 

Attachments

  • DSCN5766.JPG
    DSCN5766.JPG
    105.8 KB · Views: 197
  • DSCN5416.JPG
    DSCN5416.JPG
    110.7 KB · Views: 188
  • DSCN5424.JPG
    DSCN5424.JPG
    103.9 KB · Views: 188
  • DSCN5415.JPG
    DSCN5415.JPG
    112.1 KB · Views: 183
  • DSCN5422.JPG
    DSCN5422.JPG
    119.2 KB · Views: 186
  • DSCN5411.JPG
    DSCN5411.JPG
    105.7 KB · Views: 180
  • DSCN4986.JPG
    DSCN4986.JPG
    115.9 KB · Views: 177
Last edited:
OP
J

jb3

Well-known member
Joined
May 2, 2014
Messages
14,914
Location
Rhode Island, USA
some images of a modification we had to make to the loft structure for head room-

I had taken the loft staircase out and later used the stringers to rebuild the basement stairs for the house, which were a death trap. I tried to reuse a lot of stuff as much as possible to keep material costs somewhere within reason
 

Attachments

  • DSCN5765.JPG
    DSCN5765.JPG
    114.2 KB · Views: 147
  • DSCN5761.JPG
    DSCN5761.JPG
    106.4 KB · Views: 147
  • DSCN5759.JPG
    DSCN5759.JPG
    119.4 KB · Views: 140
  • DSCN5423.JPG
    DSCN5423.JPG
    112 KB · Views: 141
OP
J

jb3

Well-known member
Joined
May 2, 2014
Messages
14,914
Location
Rhode Island, USA
a 2x6 dividing wall went up with provisions for a large fire door, these images are seen from both the garage side and new mudroom area. I had my rear handed to me by the permitting process, and had to bring a 200 year old structure up to current fire code outside the scope of my intended renovation in many places, but now that its done im happy about it. I was happy about it at the time as well, but it really threw a wrench in the project.

My situation was complicated due to the PO building most of this attached extended garage without a permit. I had submitted plans to remodel something that actually did not exist as far as the town was concerned, so a couple months of running around fixed that. Eventually a sympathetic building department guy just sort of eliminated the issue for me.
 

Attachments

  • DSCN5985.JPG
    DSCN5985.JPG
    125.6 KB · Views: 116
  • DSCN0533.JPG
    DSCN0533.JPG
    132.3 KB · Views: 124
OP
J

jb3

Well-known member
Joined
May 2, 2014
Messages
14,914
Location
Rhode Island, USA
couple images taken from the loft facing the house showing the new ceilings of living space, and the removal of the reverse dormer. The way this ended up working out is we built a new interior staircase with a mid landing, and from that landing there is a door that leads up between these two ceilings for loft access.
 

Attachments

  • DSCN1365.JPG
    DSCN1365.JPG
    111.1 KB · Views: 142
  • DSCN6373.JPG
    DSCN6373.JPG
    108.8 KB · Views: 139
  • DSCN1367.JPG
    DSCN1367.JPG
    104.6 KB · Views: 135
  • DSCN6368.JPG
    DSCN6368.JPG
    105.2 KB · Views: 134
OP
J

jb3

Well-known member
Joined
May 2, 2014
Messages
14,914
Location
Rhode Island, USA
That unfortunately is the extent of my interior renovation images unless I can get some off my wifes phone that I may have texted her. Im still ongoing with it doing finish work, but it is livable and works nicely as we had hoped, while sort of disappearing into the rest of the house. We tried to make changes that seems like they were always there.

Since garage images were in another file, I do have plenty of those still, so here are some images showing the insulation and plywood work in the attached garage. Taking an idea from this forum, I first insulated everything, then put up 3/4 plywood on all walls so I could hang anything anywhere when the sheetrock is up. My plan is all electrical will be conduit surface mounted, as I don't know what im going to hang just yet.

The walls are about 30% rough stone on the lower part for two sides, so I anticipated some work to get benches in and so on. My long term plan is to make one half of the garage into a small wood shop, and the rest for my wifes parking.
 

Attachments

  • DSCN2133.JPG
    DSCN2133.JPG
    111 KB · Views: 127
  • DSCN2135.JPG
    DSCN2135.JPG
    115.4 KB · Views: 122
  • DSCN2650.JPG
    DSCN2650.JPG
    118.7 KB · Views: 126
  • DSCN2652.JPG
    DSCN2652.JPG
    120.2 KB · Views: 123
  • DSCN2653.JPG
    DSCN2653.JPG
    125.4 KB · Views: 128

Pluribus

Well-known member
Joined
Dec 16, 2012
Messages
2,143
Location
Skagit County, WA
Thanks for taking the effort to re-post. You have some interesting challenges, and it's cool to see the problem-solving that went into making usable and functional space!
 
To avoid these ads, REGISTER NOW!
OP
J

jb3

Well-known member
Joined
May 2, 2014
Messages
14,914
Location
Rhode Island, USA
Thanks for taking the effort to re-post. You have some interesting challenges, and it's cool to see the problem-solving that went into making usable and functional space!

thanks! it has been a fun project. I am looking forward to finally being at a starting point to fit out a garage. its only be a few years :lol:
 
OP
J

jb3

Well-known member
Joined
May 2, 2014
Messages
14,914
Location
Rhode Island, USA
my wife just texted me these images, one shows the staircase from inside the house, which may make things a lot clearer on how you get into the loft. That door is into the garage loft space.

Several show the construction of the building which is circa 1825. "Straight" and "square", these are absurd modern concepts

I included a lathe image as the wood lathe was just wide boards nailed to the wall and split like an accordian down the wall along the grain, using millions of tiny iron nails. Every time I look at that the level of work involved blows my mind, must have taken them forever
 

Attachments

  • DSCN5808.JPG
    DSCN5808.JPG
    101.8 KB · Views: 166
  • DSCN6749.JPG
    DSCN6749.JPG
    113.3 KB · Views: 173
  • westwallafter.jpg
    westwallafter.jpg
    120.9 KB · Views: 170
  • DSCN2121.JPG
    DSCN2121.JPG
    110.3 KB · Views: 172
Last edited:
OP
J

jb3

Well-known member
Joined
May 2, 2014
Messages
14,914
Location
Rhode Island, USA
Once the house renovation reached a certain point, I needed to turn my attention back to the rapid deterioration of the brown building. Shown here is a van I placed in there a while ago, and the work space around an average sized car is decent.

The roof in particular was bad, and the left side garage door was rotten to the point of disintegrating while I was trying to lift and and smashing to the floor. The roof was replaced and the garage door I temporarily rigged, but both doors are awful rotten messes in general

My ultimate plan for this structure has changed daily for years, but now I have a good goal that makes financial sense, and level of work sense. It has been an experiment in just how long unpainted OSB can withstand wind and weather, and ive been pretty surprised by how long its lasted as a ruined wall covering, but id like to make some good changes this fall to get this building to a better level of finish for the winter
 

Attachments

  • DSCN6119.jpg
    DSCN6119.jpg
    78.7 KB · Views: 196
  • 20161130_081652.jpg
    20161130_081652.jpg
    107.7 KB · Views: 195
  • DSCN8762.JPG
    DSCN8762.JPG
    130 KB · Views: 194
  • DSCN8761.JPG
    DSCN8761.JPG
    141.5 KB · Views: 198
  • garage2.jpg
    garage2.jpg
    135.2 KB · Views: 212
  • DSCN8760.jpg
    DSCN8760.jpg
    80.3 KB · Views: 200
OP
J

jb3

Well-known member
Joined
May 2, 2014
Messages
14,914
Location
Rhode Island, USA
another catch up update to add. These images are of paving the drive, and running a gravel section and parking area down to my brown shed.

The original driveway was gone, and there was nothing near the shed, which has awkward, but will be ultimately very private access surrounded by stone walls and down in a little hollow. They graded down the slope a bit as getting 2wd vehicles up the hill proved to be quite a chore in anything but perfect, dry conditions.

Once this was done I was amazed at just how much room there actually was in front of that shed for parking, plenty for anything id like to have down there.

some before and after pics
 

Attachments

  • 20161019_151448.jpg
    20161019_151448.jpg
    40.9 KB · Views: 249
  • 20161018_151929.jpg
    20161018_151929.jpg
    51 KB · Views: 247
  • 20161018_065243.jpg
    20161018_065243.jpg
    140.3 KB · Views: 249
  • 20161018_065237.jpg
    20161018_065237.jpg
    140.5 KB · Views: 263
  • 20161018_070028.jpg
    20161018_070028.jpg
    35.7 KB · Views: 238
  • 20161019_151830.jpg
    20161019_151830.jpg
    37.4 KB · Views: 242
  • 20161019_165311.jpg
    20161019_165311.jpg
    142.9 KB · Views: 248
Last edited:

-Brent-

Well-known member
Joined
Dec 23, 2009
Messages
4,709
Location
Utah
This is a perfect example of why the standard attach image function on this site doesn't work well. Thumbnails are all tiny and the text doesn't go with the images, they're all at the bottom of the post.

They can be made to do so if attached after being uploaded. Regardless, that's a conversation for a different thread.


To the OP: Thanks for doing a new thread. These old buildings have a way of keeping you busy, don't they?
 

booch

Active member
Joined
Dec 14, 2014
Messages
41
Location
CT Shoreline
Glad to see the dead cat bounce back to life!
The outside shot of your attached garage looks great, as does the driveway and parking area.
 
OP
J

jb3

Well-known member
Joined
May 2, 2014
Messages
14,914
Location
Rhode Island, USA
They can be made to do so if attached after being uploaded. Regardless, that's a conversation for a different thread.


To the OP: Thanks for doing a new thread. These old buildings have a way of keeping you busy, don't they?

totally agree, ive become that guy who no one asks what im doing on the weekend. Its invariably fixing something at my house that would result in death or being maimed otherwise. Ive finally turned a corner on the house though and only have 5 to 10 more years of work
 
OP
J

jb3

Well-known member
Joined
May 2, 2014
Messages
14,914
Location
Rhode Island, USA
Glad to see the dead cat bounce back to life!
The outside shot of your attached garage looks great, as does the driveway and parking area.

thanks! we are pleased with how it turned out. I think once the driveway went in and the paint went on, it marked a change in the house from dilapidated nightmare to a pleasant live in project.
 

jbmatth

Well-known member
Joined
Jun 3, 2013
Messages
5,681
Location
Northern Ok.
Glad you posted the link to the new thread, I'll tag along again too. As they say it has so much potential.

JB
 
OP
J

jb3

Well-known member
Joined
May 2, 2014
Messages
14,914
Location
Rhode Island, USA
Much overdue update, mostly ive been finishing interior house bits over last two years, not much work on garages. (Small child work suspension)

The few things i did were decide to knock down the red building becuase was just too poor condition, and not really usable, and small white building i converted the second story into an ample chicken coop. Plans in the works to double the run size, estimate it can hold more than 20 chickens comfortably, but the run is just way too small for that

Couple attached images of the chicken coop shed conversion. I made this way more complicated than it needed to be, so now after a year of experience with the little beasts in residence, will make changes to do things just right.
 

Attachments

  • 20200414_091452.jpg
    20200414_091452.jpg
    147.3 KB · Views: 154
  • 20200414_091412.jpg
    20200414_091412.jpg
    146.7 KB · Views: 152
  • 20200414_091302.jpg
    20200414_091302.jpg
    146.1 KB · Views: 149
  • 20200414_091544.jpg
    20200414_091544.jpg
    147.9 KB · Views: 148
  • 001 (5).JPG
    001 (5).JPG
    5.5 KB · Views: 529
OP
J

jb3

Well-known member
Joined
May 2, 2014
Messages
14,914
Location
Rhode Island, USA
Here is whats left of the red building including a pic of what it used to look like. This building had a mixed foundstion of railroad ties and concrete. Had it knocked down but left the concrete in place. Plan is to make a patio inside it, and use the concrete foundations to put up a few privacy lattice frames. Its in a really good elevated spot in the yard for a fire pit
 

Attachments

  • 008 (2).JPG
    008 (2).JPG
    7.5 KB · Views: 526
  • 20200412_155420.jpg
    20200412_155420.jpg
    139 KB · Views: 151
  • 20200412_155357.jpg
    20200412_155357.jpg
    152.7 KB · Views: 178
OP
J

jb3

Well-known member
Joined
May 2, 2014
Messages
14,914
Location
Rhode Island, USA
Thanks folks!

To recap the last 2.5 years once we got almost finished with the renovation, my wife and i realized the house was too big for us and our daughter. There was a 6 month period where we were planning to sell, but couldnt do it yet until we had installed a septic system. A lot of conversations about do we stay? Do we go?

We loved the location and the land, but also didnt want this big old house and the work to own us instead of the reverse.

Saving up for the septic job gave use quite a lot of time to really consider it. (We bought our home with a functional cesspool right before a state law went into effect saying a home couldnt be sold without converting to septic or being connected to sewer)

Finally what we ended up doing is reconverting the house back to a 2 family. (It once was). I was able to turn it into a pair of two bedroom apartments and we rented out the second floor. This has made a real difference, now its a paying proposition to maintain the house, and we dont have a bunch of rooms full of stuff we dont use and dont go into. Also used it as a premise to really cut down on stuff in general.

Once that was done ive really been able to get back into cleaning up the land and working on the attached garage and outbuildings again, which brings up to present.
 
To avoid these ads, REGISTER NOW!
Top Bottom