To avoid these ads, REGISTER NOW!

Termites the other Carpenters working on Dad's garage

69gp

Well-known member
Joined
Jan 1, 2013
Messages
255
Location
MA
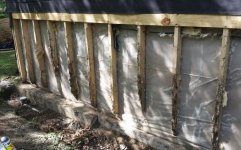
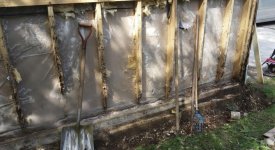
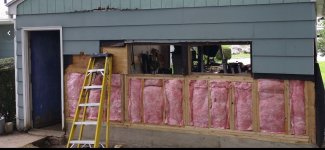
Termites the other Carpenters. Well I guess I never really knew how much damage termites can do. My dad who is 87 was pulling the siding off his garage. Told me that he has a small termite problem. He had the siding pulled off and one sheet of plywood. What I saw was let’s just say bad real bad. From what I could see the termites had eaten 95% of the sill and just about every stud up roughly 2'. Kept telling him its bad and it was going to be a lot of work to repair.
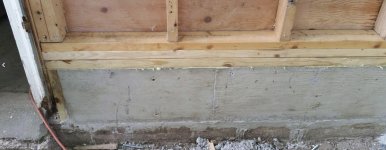
Brief history, the garage is about 40 years old. Did not have a pressure treated sill. Full frost wall with the area under the slab set up for a passive solar heat storage. 2x4 walls with sheetrock on the inside plywood with 12” wide Masonite siding. The wood walls only is about 4” from the ground.
After seeing that the studs were not supporting much behind the first plywood sheet he removed first thing to do was brace the wall up from the inside. Next up was to strip the outside wall. The bottom layer of plywood was removed, and all the insulation was removed. As you can see in the pictures I don’t know how it was supporting the roof.

I know you guys like pictures so I will be posting the repairs.

My first look at the walls.jpg

inside wall bracing.JPG

dads garage as found side wall.jpg
 
Last edited:
To avoid these ads, REGISTER NOW!
OP
6

69gp

Well-known member
Joined
Jan 1, 2013
Messages
255
Location
MA
you didn't notice any mud tunnels before it got to this bad?

Framing was only inches from the ground. Never had that problem at my house and my dad is 87.. I dont think it was on his radar
 
OP
6

69gp

Well-known member
Joined
Jan 1, 2013
Messages
255
Location
MA
Few more pics of what was found. We decided that we would try and work with the Sheetrock as opposed to ripping it all out.
 

Attachments

  • side wall cleaned up.jpg
    side wall cleaned up.jpg
    140.8 KB · Views: 273
  • as found side wall 4.jpg
    as found side wall 4.jpg
    151.2 KB · Views: 269
  • side wall front shot.JPG
    side wall front shot.JPG
    129.2 KB · Views: 280
  • side wall sheetrock saved.jpg
    side wall sheetrock saved.jpg
    134 KB · Views: 253
  • Walls as found 3.jpg
    Walls as found 3.jpg
    147.2 KB · Views: 288
OP
6

69gp

Well-known member
Joined
Jan 1, 2013
Messages
255
Location
MA
Do you think the other walls are ok? What made your young dad pull off the siding to begin with?

He wanted to replace a few pieces of siding that were pretty worn. 12" Masonite 40 years old it has seen better times. Siding is out of production and not on the market anymore.. What was he thinking!!!
 
Last edited:
OP
6

69gp

Well-known member
Joined
Jan 1, 2013
Messages
255
Location
MA
Start of framing. 2x6 glued, screwed and nailed to the top plywood.
 

Attachments

  • side wall cleaned up.jpg
    side wall cleaned up.jpg
    140.8 KB · Views: 210
  • nailed every 6 inches.JPG
    nailed every 6 inches.JPG
    118.3 KB · Views: 197
  • start of repairs glued screw and nailed.jpg
    start of repairs glued screw and nailed.jpg
    125.2 KB · Views: 213
  • 2x6 nailing detail.JPG
    2x6 nailing detail.JPG
    130.2 KB · Views: 213
  • corner.jpg
    corner.jpg
    138 KB · Views: 228

PoorOwner

Well-known member
Joined
Feb 10, 2007
Messages
5,032
Location
CA
are you going to get treatment for the soil etc, they are going to munch on the new studs
 
OP
6

69gp

Well-known member
Joined
Jan 1, 2013
Messages
255
Location
MA
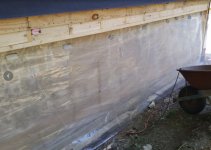
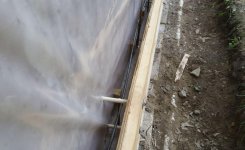
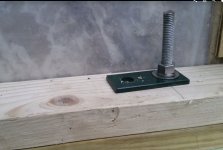
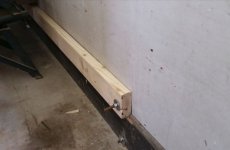
On going progress includes installing 1/2" plywood on the inside. This will serve 2 functions. first it will be used as a form for a concrete wall. The bottom of the plywood is protected by plastic and held to the concrete with tapered pressure treated block. Since the inside of the garage had sheet rock after 40 years it has seen a few dings. The plywood will cove the bottom 4' now and provide additional protection.

1/2" Hilti anchors were installed with threaded rod to pass up through the concrete wall that will be poured.
 

Attachments

  • inside plywood form lifted off the concrete.jpg
    inside plywood form lifted off the concrete.jpg
    148 KB · Views: 124
  • full sheets of plywood for inside finsih and concrete form.jpg
    full sheets of plywood for inside finsih and concrete form.jpg
    146.5 KB · Views: 144
  • plastic to protect the sheet rock and plywood on the inside.JPG
    plastic to protect the sheet rock and plywood on the inside.JPG
    105.8 KB · Views: 148
  • .5 inch Hilti anchor with threaded rod to secure new wall in place.JPG
    .5 inch Hilti anchor with threaded rod to secure new wall in place.JPG
    137.1 KB · Views: 152
  • tappered presure treated blocks to hold plywood in place.JPG
    tappered presure treated blocks to hold plywood in place.JPG
    126 KB · Views: 146
  • steel in place.jpg
    steel in place.jpg
    144.9 KB · Views: 155
OP
6

69gp

Well-known member
Joined
Jan 1, 2013
Messages
255
Location
MA
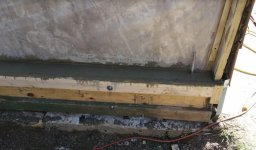
Raised the concrete wall by 10 inches. Used the old plywood to make a form for the outside wall. Used 1/2" pvc sleeve to slide a 3/8" rod through to the inside plywood. This will allow me to slide the rod out after the pour. The concrete mix was a 5000 pound mix with an additive for extra strength. A ******** was used to get rid of any air.
 

Attachments

  • Concrete 6.jpg
    Concrete 6.jpg
    129.2 KB · Views: 133
  • concrete 5.jpg
    concrete 5.jpg
    146.6 KB · Views: 136
  • Dad doing what he does best.. working.jpg
    Dad doing what he does best.. working.jpg
    135.5 KB · Views: 137
  • concrete form 3.jpg
    concrete form 3.jpg
    127.8 KB · Views: 133
  • Concrete form2.JPG
    Concrete form2.JPG
    143.4 KB · Views: 132
  • concrete form 1.jpg
    concrete form 1.jpg
    123 KB · Views: 142
OP
6

69gp

Well-known member
Joined
Jan 1, 2013
Messages
255
Location
MA
Sill seal installed with new pressure treated plate. 1/2" bolts securing the new wall in place. New studs, insulation and plywood glued and nailed
 

Attachments

  • form stripped off nice clean pour.jpg
    form stripped off nice clean pour.jpg
    145.5 KB · Views: 133
  • sill seal new pressure treated plate to start things off..JPG
    sill seal new pressure treated plate to start things off..JPG
    143.5 KB · Views: 138
  • New wall secured to concrete.JPG
    New wall secured to concrete.JPG
    99.8 KB · Views: 152
  • concrete corner.jpg
    concrete corner.jpg
    144.4 KB · Views: 145
  • New studs installed.jpg
    New studs installed.jpg
    123.6 KB · Views: 160
  • new insulation and plywood being installed.jpg
    new insulation and plywood being installed.jpg
    145.3 KB · Views: 151
  • liquid neals applied to the studs.jpg
    liquid neals applied to the studs.jpg
    142.6 KB · Views: 154

Jlbc212

Well-known member
Joined
Dec 7, 2013
Messages
1,530
Location
Northeast MA
Termites will eat right through pressure treated lumber. Some may die of the wood treatment from eating it, but there's a whole army of termites with wave after wave of invaders.
 
OP
6

69gp

Well-known member
Joined
Jan 1, 2013
Messages
255
Location
MA
Termites will eat right through pressure treated lumber. Some may die of the wood treatment from eating it, but there's a whole army of termites with wave after wave of invaders.

Well hopefully with another 10" of concrete between the ground and any wood that will help.
 

Angelfire

Well-known member
Joined
Mar 22, 2012
Messages
1,367
Location
New Mexico and Ireland
Far from a termite expert but here in the arid desert, they are notorious but will only go after wood if there is a water source. For whatever variety we have, keep the wall dry, no termites.
 

n20junkie

Well-known member
Joined
Aug 22, 2010
Messages
538
Location
Grand Island, NY
I think they can walk up the concrete. They will make tubes out of mud up the concrete and it becomes a termite highway.

Chemicals, and lots and lots of chemicals.
 

Jlbc212

Well-known member
Joined
Dec 7, 2013
Messages
1,530
Location
Northeast MA
I think they can walk up the concrete. They will make tubes out of mud up the concrete and it becomes a termite highway.

Chemicals, and lots and lots of chemicals.

The fact that termites will build mud tunnels up the side of a concrete wall combined with the fact that most of the United States is prone to having termites are the reasons why I would never place foam board directly up against the foundation and right up the wood sill. The termite tunnels will be hidden behind the foam board insulation.
 

Irish Mike

Well-known member
Joined
May 19, 2006
Messages
53
Location
SoCal.
Nice job on the repair! In Hawaii, the whole house is framed out of treated material, plywood and all...... Or treat with Termicide, the green smelly stuff.....
 
To avoid these ads, REGISTER NOW!

Bert_

Well-known member
Joined
Dec 24, 2016
Messages
9,876
Location
NW Iowa
I'm no carpenter so someone please correct me if I missed something but I'm pretty sure you created a hinge in that wall with the way you connected the new section of wall. Or does the plywood stiffen it up enough?
 
Last edited:

hangfirew8

Well-known member
Joined
Jul 14, 2008
Messages
879
Location
Central Maryland
Yes it is all about moisture. Termites can't eat dry wood.

Unfortunately many garages and sheds are built to draw moisture from the ground, not prevent it. End grain on concrete or dirt, no drip edges/clearance on T-111, siding, no inner wall convection, etc.

-HF
 

Irish Mike

Well-known member
Joined
May 19, 2006
Messages
53
Location
SoCal.
I'm no carpenter so someone please correct me if I missed something but I'm pretty sure you created a hinge in that wall with the way you connected the new section of wall. Or does the plywood stiffen it up enough?
The solid blocking nailed to the existing ply and new ply is sufficient. Both sides blocked with ply top and bottom would be even better.....
 

timewarp

Well-known member
Joined
Feb 24, 2008
Messages
272
Location
Silverdale, WA
The solid blocking nailed to the existing ply and new ply is sufficient. Both sides blocked with ply top and bottom would be even better.....

Even better would have been to run the new lower studs up alongside the existing upper studs (sistering them) rather than creating the joint in the middle of the structure of the wall.
 
OP
6

69gp

Well-known member
Joined
Jan 1, 2013
Messages
255
Location
MA
Even better would have been to run the new lower studs up alongside the existing upper studs (sistering them) rather than creating the joint in the middle of the structure of the wall.

This was a bearing wall. I thought that it would be better to make a good bearing surface. Glued screwed and nailed. plywood on both sides of the joint to stiffen it up I dont think its going to go anywhere. On the back wall I did sister the studs in. I will have a few pics of that later today.
 
OP
6

69gp

Well-known member
Joined
Jan 1, 2013
Messages
255
Location
MA
I'm no carpenter so someone please correct me if I missed something but I'm pretty sure you created a hinge in that wall with the way you connected the new section of wall. Or does the plywood stiffen it up enough?

This was a bearing wall. I thought that it would be better to make a good bearing surface. Glued screwed and nailed. plywood on both sides of the joint to stiffen it up I dont think its going to go anywhere
 
OP
6

69gp

Well-known member
Joined
Jan 1, 2013
Messages
255
Location
MA
Nice job on the repair! In Hawaii, the whole house is framed out of treated material, plywood and all...... Or treat with Termicide, the green smelly stuff.....

Thanks. He did have the soil around the garage treated.
 

Git

Well-known member
Joined
May 18, 2008
Messages
6,895
Location
S Cal
I thought the same thing about the 'hinged wall' when I saw it....

Anyways, I use the 'generic' version of Termidor - Taurus SC and you can buy it on Amazon. We don't have much of a termite problem, but it works great on ants and other bugs in SoCal

Taurus termiticide is a generic version of Termidor SC, with one difference being it’s a little less expensive (around 10%), it does contain the same fipronil 9.1% active ingredient as Termidor SC

https://www.amazon.com/gp/product/B0058DGMKG/?tag=atomicindus08-20

Amazon also sells Termidor (almost double the price - $73 versus $40)
https://www.amazon.com/dp/B015X6E0LU/?tag=atomicindus08-20
 

Attachments

  • 8132sorNz4L._SL1500_.jpg
    8132sorNz4L._SL1500_.jpg
    132.7 KB · Views: 29
  • 61-aM3xFdgL._SL1024_.jpg
    61-aM3xFdgL._SL1024_.jpg
    80.7 KB · Views: 25
Last edited:
OP
6

69gp

Well-known member
Joined
Jan 1, 2013
Messages
255
Location
MA
Back wall work included removing the bottom sheets of plywood, cutting all good studs back 15-1/2" and cutting the balance of damaged studs 6" above any sign of the damage.
 

Attachments

  • right side of pic is rebuilt sidewall and left is the rear wall that is being rebuilt.jpg
    right side of pic is rebuilt sidewall and left is the rear wall that is being rebuilt.jpg
    146.1 KB · Views: 55
  • Damaged wood removd red circle is hot air duct.jpg
    Damaged wood removd red circle is hot air duct.jpg
    151.3 KB · Views: 56
  • back wall studs out.jpg
    back wall studs out.jpg
    145.8 KB · Views: 55
  • bottom left corner of window.jpg
    bottom left corner of window.jpg
    150.5 KB · Views: 60
  • back righthad wall.jpg
    back righthad wall.jpg
    147.4 KB · Views: 63
  • damaged 2x4.jpg
    damaged 2x4.jpg
    148.4 KB · Views: 63
OP
6

69gp

Well-known member
Joined
Jan 1, 2013
Messages
255
Location
MA
Concrete form work. The concrete forms are only 3.5" thick. The concrete used is a custom blended mix that is incredibility strong. The concrete has a super plasticizer for superior strength.
 

Attachments

  • inside wall bracing for concrete.JPG
    inside wall bracing for concrete.JPG
    77.8 KB · Views: 41
  • ready for concrete.jpg
    ready for concrete.jpg
    141.6 KB · Views: 43
  • concrete form for back wall.jpg
    concrete form for back wall.jpg
    146.7 KB · Views: 42
  • top view of tappered presure treated blocks to hold plywood in place.jpg
    top view of tappered presure treated blocks to hold plywood in place.jpg
    143.1 KB · Views: 43
  • righthand corner steel and pressure treated blocks.JPG
    righthand corner steel and pressure treated blocks.JPG
    127.1 KB · Views: 48
OP
6

69gp

Well-known member
Joined
Jan 1, 2013
Messages
255
Location
MA
Sill installed, studs in and insulation.
 

Attachments

  • insulation.JPG
    insulation.JPG
    117.9 KB · Views: 56
  • complete rear wall framed.jpg
    complete rear wall framed.jpg
    133.1 KB · Views: 56
  • rear wall framed.jpg
    rear wall framed.jpg
    137.5 KB · Views: 54
  • Lefthand sill finished.jpg
    Lefthand sill finished.jpg
    129 KB · Views: 47
  • Pressure treated sill bolted down.jpg
    Pressure treated sill bolted down.jpg
    151.4 KB · Views: 42
OP
6

69gp

Well-known member
Joined
Jan 1, 2013
Messages
255
Location
MA
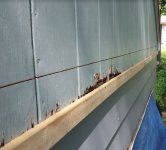
Plywood installed on the back wall. The top finish of the back of the garage was done with Texture 111. The bottom edge has seen better days. The damage was from water and not my little carpenter friends. Decided to cut this out and install a trim board here along with a drip edge over the top.
 

Attachments

  • Finished cut and primed.JPG
    Finished cut and primed.JPG
    115.3 KB · Views: 52
  • As close as I can get with my circular saw.JPG
    As close as I can get with my circular saw.JPG
    110.6 KB · Views: 46
  • temp straight edge installed.JPG
    temp straight edge installed.JPG
    100.5 KB · Views: 47
  • damaged T-111.JPG
    damaged T-111.JPG
    137.5 KB · Views: 47
  • rear wall plywood installed.jpg
    rear wall plywood installed.jpg
    143.9 KB · Views: 45
OP
6

69gp

Well-known member
Joined
Jan 1, 2013
Messages
255
Location
MA
Used 12" LP Smartside smooth siding. Matched perfectly to the 12" Masonite. Installed new door. Almost done. Just need to add paint.
 

Attachments

  • new siding 12 inches above grade.JPG
    new siding 12 inches above grade.JPG
    95.5 KB · Views: 56
  • New siding corner.jpg
    New siding corner.jpg
    144.5 KB · Views: 54
  • new siding installed.jpg
    new siding installed.jpg
    145.5 KB · Views: 52
  • Siding and new door installed..JPG
    Siding and new door installed..JPG
    138.8 KB · Views: 54

Bert_

Well-known member
Joined
Dec 24, 2016
Messages
9,876
Location
NW Iowa
This was a bearing wall. I thought that it would be better to make a good bearing surface. Glued screwed and nailed. plywood on both sides of the joint to stiffen it up I dont think its going to go anywhere. On the back wall I did sister the studs in. I will have a few pics of that later today.

I'm happy to see other ways to do stuff. The only way I've ever seen it done is to cut the existing stud, cut a stud to fit tightly below the old one, and sister a new board alongside that spans the joint.
 
OP
6

69gp

Well-known member
Joined
Jan 1, 2013
Messages
255
Location
MA
did you say this garage was solar? where is that?

nice job all around

The solar system is a passive hot air system. The garage foundation is 4' down with a 3" concrete slab that rest on top of the footing. the void from that slab to the underside of the garage floor is about 3'-6". In that space under the garage slab there are stones of various sizes from say 6" to 20". I know I washed and placed them there with my brothers a long time ago. So the way the system works is there is duct work that goes from the roof down to the bottom of the footing. The war air heats the rocks and retains the heat. This radiates up to the floor. During the winter I don't think it goes below 45 degrees in the winter time. And that is here in New England. Its old school but it works. I used almost the same setup up in a sun room in my house only It has a trombe wall. The stone area below the room is 8'x18' x 4' deep. But I got my wife to wash all the stone for that. With one small fan moving the air around that room does not go below 55 degrees during the winter as long as I do not go longer than 3 days with no sun. The no sun would be from snow building up on the roof windows.
 
To avoid these ads, REGISTER NOW!
Top Bottom