To avoid these ads, REGISTER NOW!

Mike's Garage

mbrew

Active member
Joined
Sep 16, 2014
Messages
32
Location
Ft. Worth
Hi, I’m Mike and my garage/shop is in Rendon Texas just south of Fort Worth.

I’m starting this thread mostly to help keep me accountable for making progress, but also because I’ve enjoyed looking at other people’s progress and ideas so I’ll add to the collective. I will mostly cover the garage side of the project here, but I’ll do another very similar thread at the Sawmill Creek forum on the wood shop.

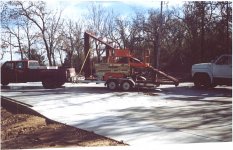
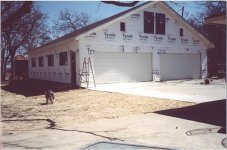
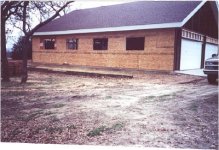
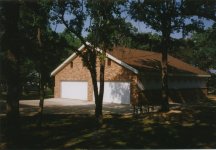
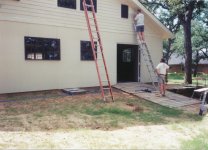
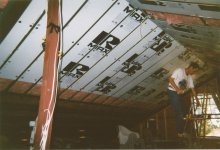
In November Of 1999 I closed on what should have been a very nice property. It had a nicely sized house and a large shop sitting on an acre lot in a semi-rural area. Unfortunately the house, the shop and the lot were all in deplorable condition. We worked on the house for a month before moving in on December 31, 1999 and even then, we were pretty much camping out. When we moved in everything had been cleaned and all the drywall repaired, but the kitchen and one of the baths were still torn down. We continued working on the house and the lot for the next two years and I finally got to where I could address the shop in late 2001. It became a priority because I wanted the wood shop to make the new woodwork for the house, something I still haven’t done. I had decided that I wanted two large and distinct areas, one for the garage and one for woodworking, but I didn’t see how I could make the building that was there into two large spaces. The structure was sound, but the building had never been finished and pretty much all the exterior cladding needed to be removed and replaced. I decided to have it brought down. We added to the existing slab and had a contractor put up a new building.

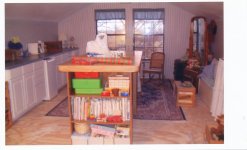
My wife very much wanted an area for a sewing and workshop of her own so that added the second floor and a great deal of complexity.

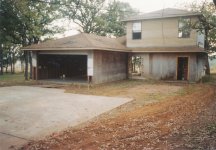
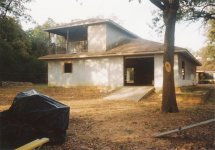
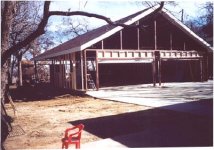
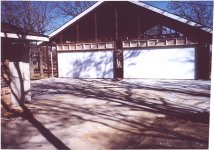
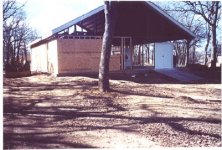
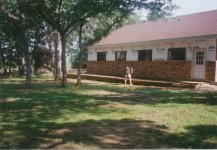
This is the building as it was when we bought the place and the just before demolition started. There were actually two buildings and the smaller one flooded regularly and was in very poor condition structurally. It went first then I took out several trees that the previous owner had saved. I hated to do it, but I really saw no alternative.
 

Attachments

  • 00xxxx Origonal shop  (1).jpg
    00xxxx Origonal shop (1).jpg
    163.2 KB · Views: 153
  • 02a Exterior (2).jpg
    02a Exterior (2).jpg
    155.4 KB · Views: 159
  • 02a Exterior (3).jpg
    02a Exterior (3).jpg
    158.4 KB · Views: 139
  • 02a Exterior (4).jpg
    02a Exterior (4).jpg
    151 KB · Views: 150
Last edited:
To avoid these ads, REGISTER NOW!
OP
M

mbrew

Active member
Joined
Sep 16, 2014
Messages
32
Location
Ft. Worth
The contractor did the demolition and then built the new structure. These pictures show how it was left for me. Basically it was a large car port with a conventional roof and garage doors on it. The structure is 40’ X 48’ and I don’t remember the height (19’?), but it is 2” inside a deed restriction. The wood in the pictures had already been added by me. We wanted the building to look as much like the house as possible, so it has conventional materials for the exterior. I had the contractor do the roof, because it was more than I thought I could handle on my own.

I made a huge mistake with the garage doors by having it framed for 7’ doors. They should have been 8’s. My ¾ ton truck with a headache rack barely fits, and my next truck will be 4WD. I think it will be tight.

One of the best benefits can be seen already. The driveway now actually attaches to the building.

My ceiling height was held to 9’ by the second story and the deed restriction on height. The steel floor joists will prove to be a problem.
 

Attachments

  • 02BBBB Sheathing (2).jpg
    02BBBB Sheathing (2).jpg
    32.4 KB · Views: 123
  • 02AAAA Contractor (7).jpg
    02AAAA Contractor (7).jpg
    87.3 KB · Views: 115
  • 02AAAA Contractor (6).jpg
    02AAAA Contractor (6).jpg
    72.7 KB · Views: 120
  • 02AAAA Contractor (2).jpg
    02AAAA Contractor (2).jpg
    113.9 KB · Views: 117
  • 02AAAA Contractor (1).jpg
    02AAAA Contractor (1).jpg
    121.8 KB · Views: 115
Last edited:
OP
M

mbrew

Active member
Joined
Sep 16, 2014
Messages
32
Location
Ft. Worth
I did the framing and lower sheathing mostly alone, but I did get a bit of help here and there from my grand kids and my wife. I had done a lot of favors for a guy and he and a buddy of his were to help me for a day to get this back wall done. I got a couple of hours out of them, then the girl friend called and that was the end of that help. My nephew saved my bacon and was a huge help in getting that wall done. He had also helped me finish the prep for the building demolition. In both cases I was very tired and his help was invaluable. Putting the top pieces of sheathing up on the gable ends was not my favorite part of the job. I did the front alone and it was nearly 20’ up. In the back it was as tall, but the ground sloped away from the building pretty quickly there and made it more treacherous to do.
 

Attachments

  • 02CCCC Wrapped (1).jpg
    02CCCC Wrapped (1).jpg
    106.3 KB · Views: 88
  • 02BBBB Sheathing (8).jpg
    02BBBB Sheathing (8).jpg
    119.1 KB · Views: 78
  • 02BBBB Sheathing (6).jpg
    02BBBB Sheathing (6).jpg
    33.6 KB · Views: 79
  • 02BBBB Sheathing (3).jpg
    02BBBB Sheathing (3).jpg
    36.2 KB · Views: 79
  • 02BBBB Sheathing (4).jpg
    02BBBB Sheathing (4).jpg
    29.8 KB · Views: 45
Last edited:
OP
M

mbrew

Active member
Joined
Sep 16, 2014
Messages
32
Location
Ft. Worth
I hired a contractor to put up the brick since I have no masonry skills. The brick had been on the property since we bought it. It was intended for the old building, but was never installed. The height to the wainscoting was decided by the number of bricks I had. It was very carefully calculated. Then recalculated. Then calculated again several more times. There was only a small stack of 50 or so bricks left when the job was done.
 

Attachments

  • 02CCCD Brickwork (1).jpg
    02CCCD Brickwork (1).jpg
    147 KB · Views: 89
  • 02CCCD Brickwork (4).jpg
    02CCCD Brickwork (4).jpg
    156.9 KB · Views: 92
  • 02CCCD Brickwork (5).jpg
    02CCCD Brickwork (5).jpg
    149.1 KB · Views: 91
Last edited:
OP
M

mbrew

Active member
Joined
Sep 16, 2014
Messages
32
Location
Ft. Worth
One of my grandsons helped me put up the long pieces of siding on the right side of the building. I don’t think there are any pictures of that side. My nephew was my savior in doing the siding on the back gable end. My wife did all the painting. She won’t allow me to. She says it takes too long to clean up after me. Darn. The kids helped me with the scaffolding that I rented for her.
 

Attachments

  • 02dddd Siding & Paint (12).jpg
    02dddd Siding & Paint (12).jpg
    148.9 KB · Views: 90
  • 02dddd Siding & Paint (9).jpg
    02dddd Siding & Paint (9).jpg
    93.5 KB · Views: 96
  • 02dddd Siding & Paint (4).jpg
    02dddd Siding & Paint (4).jpg
    119.5 KB · Views: 94
  • 02dddd Siding & Paint (5).jpg
    02dddd Siding & Paint (5).jpg
    151.3 KB · Views: 79
OP
M

mbrew

Active member
Joined
Sep 16, 2014
Messages
32
Location
Ft. Worth
I put all the flooring for the second floor up there by myself and laid the vast majority of it alone, but I needed help getting the drywall up there and my grandson was the lucky guy that got to help with that. He, my wife and my nephew helped hang it.
 

Attachments

  • 0309XX Attic (1).jpg
    0309XX Attic (1).jpg
    151.7 KB · Views: 87
  • 0309XX Attic (3).jpg
    0309XX Attic (3).jpg
    149.2 KB · Views: 83
  • 040731 Upstairs Drywall (5).jpg
    040731 Upstairs Drywall (5).jpg
    146.9 KB · Views: 94
OP
M

mbrew

Active member
Joined
Sep 16, 2014
Messages
32
Location
Ft. Worth
This is my wifes’ sewing room as it was several years ago. It’s the most finished part of the building although it needs wood trim and flooring still.
 

Attachments

  • 050000 Sewing Room (7).jpg
    050000 Sewing Room (7).jpg
    79 KB · Views: 87
  • 050000 Sewing Room (6).jpg
    050000 Sewing Room (6).jpg
    147 KB · Views: 90
  • 050000 Sewing Room (2).jpg
    050000 Sewing Room (2).jpg
    116.6 KB · Views: 80
OP
M

mbrew

Active member
Joined
Sep 16, 2014
Messages
32
Location
Ft. Worth
Great progress there, lots of nice space.

Thanks, I have one more post to bring it totally up to date, but I'm having trouble with the pictures for some reason. I do look forward to it functioning as it should. It doesn't just yet.
 

NES

Well-known member
Joined
Dec 22, 2013
Messages
488
Location
Illinois
Very nice garage that you have there. I like the double doors that you have. As well as how high up you placed the windows for the garage.
 
OP
M

mbrew

Active member
Joined
Sep 16, 2014
Messages
32
Location
Ft. Worth
Just after I took on the renovation of this property, I also took over a difficult to run and very disorganized department at work. I’m a military aircraft mechanic and disorganized is a very bad thing. Then 9/11 happened and we spent the next year in turmoil. My unit deployed for the war in ’03 and although I spent very little time deployed myself, the workload at home was pretty heavy. By ’06 I was worn out and doing very little on the property. I pretty much quit remodeling and construction totally in ’08. In ’09 I retired from the government but I needed another job and had trouble finding one in that economy so I had little money to spend. When I did finally get another job, it kept me pretty busy and I had lost momentum. The shop never got finished inside. Shop progress actually went backwards, and the building started looking more like a junk shop and a badly run warehouse than a workshop and garage.

That brings us to the first of this year. I’m fully retired, I have projects I want to do and I’m literally climbing over things to get around in what should be a sufficient amount of space. I can’t find things and I have no work space because there is junk everywhere. The pictures show the place in its current poor condition. I expect progress to be slow from here but consistent. I’ll post updates whenever there’s good progress on something or a project is completed.

The garage area is 24' X 40' with 9' ceilings and a soffit along the front wall for mechanicals to hide in.
 

Attachments

  • 20180309_151140.jpg
    20180309_151140.jpg
    150.2 KB · Views: 99
  • 20180309_151159.jpg
    20180309_151159.jpg
    149.2 KB · Views: 96
  • 20180309_151212.jpg
    20180309_151212.jpg
    159.4 KB · Views: 106
  • 20180309_151221.jpg
    20180309_151221.jpg
    154.9 KB · Views: 107
  • 20180309_151235.jpg
    20180309_151235.jpg
    157 KB · Views: 106
  • 20180309_151245.jpg
    20180309_151245.jpg
    155.6 KB · Views: 96
  • 20180309_151253.jpg
    20180309_151253.jpg
    155 KB · Views: 89
Last edited:
To avoid these ads, REGISTER NOW!
OP
M

mbrew

Active member
Joined
Sep 16, 2014
Messages
32
Location
Ft. Worth
Very nice garage that you have there. I like the double doors that you have. As well as how high up you placed the windows for the garage.

Thanks. A lot of people think that windows in a shop are heresy, but I like to see outside. In the garage part of the shop I can have the doors open, but in the wood shop part there had to be windows if I was to see out. The height was dictated by the amount of brick I had and also needing to Keep them above work bench height.
 
OP
M

mbrew

Active member
Joined
Sep 16, 2014
Messages
32
Location
Ft. Worth
Early this year I got motivated to start changing things and making some progress and I have done a little. I had a Harbor Freight motorcycle tire changer that had been stuck in a corner and was hard to get to so I decided to move it. While arranging a space for it, I wondered how much room I would need if I upgraded to a better machine so I started doing some research on various changers. I came across this one at a price that was to good to refuse and it is the first spot that has been improved. The light that is hanging above it came from the old Ford factory in Dallas Texas. Following WWII, my father worked there for a bit and in my last job I sold air conditioning parts out of a warehouse in that building. I have 2 of these lights that will be going in the shop and I like thinking that maybe my dad walked or worked under the light of them years ago.

I added some pictures of the tire machine being brought in. The top arm was removed when I picked it up. We loaded it on my trailer and I dropped it off the trailer to a pallet, then from the pallet to the floor. That's the new fatter me wrestling with the thing. It's a 470lb machine. Pretty heavy.
 

Attachments

  • 20180309_151447.jpg
    20180309_151447.jpg
    56.6 KB · Views: 112
  • 20180309_151504.jpg
    20180309_151504.jpg
    108.6 KB · Views: 103
  • 20180125_131731[1].jpg
    20180125_131731[1].jpg
    149.6 KB · Views: 38
  • 20180125_132041[1].jpg
    20180125_132041[1].jpg
    151.6 KB · Views: 44
  • 20180125_132308[1].jpg
    20180125_132308[1].jpg
    151.5 KB · Views: 48
Last edited:

Crank

Member
Joined
Sep 23, 2006
Messages
12
Cool lights Mike, great link that your dad and you may have worked under them and now they are in your workshop, I would run with that thought and feel pretty happy with myself.

Keep up the posts.
Regards
Shaun
 
OP
M

mbrew

Active member
Joined
Sep 16, 2014
Messages
32
Location
Ft. Worth
I also love the doors!

Thanks, the doors are not the ones seen in the exterior pictures above. I had specified insulated doors to the contractor and that's what I got, barely. A modern beer can has metal about as thick as those doors were and they had a 1/4" of foam insulation in them with no liner. One of them failed by literally cracking in half in 2012 and I had them replaced with really good doors then. I bought extra reinforcing for these (the bare metal horizontal pieces), and while I don't think they look as good with that installed, I'm hoping these will last the rest of my life and then some.
 
Last edited:
OP
M

mbrew

Active member
Joined
Sep 16, 2014
Messages
32
Location
Ft. Worth
I'm not normally a real nostalgic or sentimental kinda guy, but I do like the idea that the green light has a connection to my father. That cabinet that's on the wall behind the tire changer has some memories too. I was a young man running service stations for Exxon in the '80's. I took over the station near my house in Balch Springs. It was a real mess too. We cleaned the place up as best we could and the guys painted that cabinet. It wasn't a good job, but it looked better than it had. We used it for our tire patching supplies there also. It does bring back memories of the folks I worked with.

In the pictures above, there was a single string of lights that each had 10 bulbs in both the Garage and wood shop. I thought when I put them up that they would be there for a few weeks. Little did I know. Late last year, the string in the wood shop shorted and was blowing breakers and that meant I finally had to do something. The light in both sides of the shop had never been adequate, and while I didn't want to spend money on another temporary solution, I had to make some improvements. I bought one set of these for the garage. I replaced the bulbs with 12W 5000K LEDs from eBay. Then I took the string that had been in the garage, cut out the bad section of the wood shop lights and combined them into one string. I was able to go from 9 to 16 bulbs in the wood shop and I now had 24 bulbs in the garage. I was really liking it, but I thought if 24 bulbs are good, 48 would be better so I bought another string. This adds up to about 48K lumens which is probably half of what would be specked for a professional shop, but it's the best lighting I've worked under in years. My aircraft hangar wasn't well lit either and this easily exceeds what I had there. It's not a permanent solution, but it works well for now.

I can't stress how important lighting is. Lots of studies have shown that worker quality, productivity and attitude are affected by lighting or lack of it. I knew this, but put up with what lousy lighting for years anyway. The new lights made an instant difference. Flipping the switch brings a smile to my face and I'm now looking for reasons to spend time in the shop where before, I'd go out only when I really needed to do something. It made a huge difference.
 

Attachments

  • 20180402_055619[1].jpg
    20180402_055619[1].jpg
    150.5 KB · Views: 91
  • 20180402_055658[1].jpg
    20180402_055658[1].jpg
    154.7 KB · Views: 87
Last edited:

dchance

Well-known member
Joined
Oct 3, 2016
Messages
614
Location
OKC
Mike glad to see you back at it and cleanup organizing started.

Dwight
 
OP
M

mbrew

Active member
Joined
Sep 16, 2014
Messages
32
Location
Ft. Worth
I've been working steadily on the shop but there hasn't been much worth showing. I received a Harbor Freight flyer a while back and I normally chunk them. I took the time for some reason to look through this one and I'm glad I did. They advertised an updated version of their 44" tool box that's popular with many folks here. I had two of the old version and I was going to need a third. I like the new box better because it's deeper, but I had planned on storing ladders behind mine and needed the original version to be able to do that. Luckily they had some of the old ones left and I manged one for 20% off. This actually happened just before I put the lights in and it can be seen in the pictures above. Here are some pictures of it being unloaded. The motorcycle lift gets used for a lot of things around here.
 

Attachments

  • i-Dpgmr4j-X2.jpg
    i-Dpgmr4j-X2.jpg
    105.3 KB · Views: 15
  • i-PXmVSks-X2.jpg
    i-PXmVSks-X2.jpg
    90 KB · Views: 15
  • i-NP3CbBt-X2.jpg
    i-NP3CbBt-X2.jpg
    97.4 KB · Views: 16
Last edited:
OP
M

mbrew

Active member
Joined
Sep 16, 2014
Messages
32
Location
Ft. Worth
I have so much loose stuff lying around that it drives me nuts. I also have electrical cords and hoses everywhere and they tend to get tripped on a lot. This is two small projects to try and tame some of that. I had three separate battery chargers laying around. The big one always had the cords tangled up or falling off of it and it was so low that it was actually hard to move around the shop. The two smaller ones were always taking up counter space and their cords were always in the way. I built this cart into a charging station. I can put loose batteries on it to charge and can wheel it around a bit easier than I could the main charger. It also has its own extension cord and outlet strip. The cord management is much better and it only takes up a bit more room than the big charger did alone.

The vacuum was more of the same. The hose and cord were always under foot and getting under the wheels and I couldn't find the attachments much of the time. The cart for it isn't great workmanship, but man it has been a real winner already.

I've also gotten a little organizational work done on the north wall.
 

Attachments

  • i-JtDNLTW-XL.jpg
    i-JtDNLTW-XL.jpg
    93.6 KB · Views: 17
  • i-wqKmG9v-XL.jpg
    i-wqKmG9v-XL.jpg
    77.2 KB · Views: 17
  • i-HwHV5nX-XL.jpg
    i-HwHV5nX-XL.jpg
    65.6 KB · Views: 16
  • i-TXJS4ww-XL.jpg
    i-TXJS4ww-XL.jpg
    64.1 KB · Views: 18
  • i-xsCHwG3-X2.jpg
    i-xsCHwG3-X2.jpg
    110.2 KB · Views: 17
Last edited:
To avoid these ads, REGISTER NOW!
Top Bottom