To avoid these ads, REGISTER NOW!

40x48x14 Farm Shop

Farmallboy15

Well-known member
Joined
Jan 31, 2018
Messages
71
Location
Ohio
Well, now that things are starting to move along I figured I would start a build thread. I've been lurking for ideas to steal for the past couple of months and this forum has provided a wealth of information. For years we were working out of a small dingy shop at the bottom of hill, complete with majorly cracked concrete. Every time it rained, mud and water would run right into the garage doors. Now it has come time to build my dream shop. Originally we were going to build a 36x40 which was soon enlarged to 40x48. Anyways, stay tuned for the pictures.
 
To avoid these ads, REGISTER NOW!
OP
F

Farmallboy15

Well-known member
Joined
Jan 31, 2018
Messages
71
Location
Ohio
Starting site: A corn crib and a woodshed that had to be torn down. The woodshed was stacked with firewood up into the rafters...
 

Attachments

  • IMAG0152.jpg
    IMAG0152.jpg
    145.5 KB · Views: 302
  • IMAG0154.jpg
    IMAG0154.jpg
    145.6 KB · Views: 275
  • IMAG0157.jpg
    IMAG0157.jpg
    145.1 KB · Views: 270
  • IMAG0195.jpg
    IMAG0195.jpg
    98.8 KB · Views: 255
OP
F

Farmallboy15

Well-known member
Joined
Jan 31, 2018
Messages
71
Location
Ohio
Initial earthwork and material delivery:
 

Attachments

  • IMAG0254.jpg
    IMAG0254.jpg
    146.4 KB · Views: 194
  • IMAG0214.jpg
    IMAG0214.jpg
    142 KB · Views: 189
  • IMAG0204.jpg
    IMAG0204.jpg
    146.9 KB · Views: 198
OP
F

Farmallboy15

Well-known member
Joined
Jan 31, 2018
Messages
71
Location
Ohio
Posts set and roughing in utilities (in the mud):
 

Attachments

  • IMAG0261.jpg
    IMAG0261.jpg
    155.9 KB · Views: 252
  • IMAG0262.jpg
    IMAG0262.jpg
    154.2 KB · Views: 225
  • IMAG0266.jpg
    IMAG0266.jpg
    148.2 KB · Views: 212
OP
F

Farmallboy15

Well-known member
Joined
Jan 31, 2018
Messages
71
Location
Ohio
Rafters up and metal starting to go up:
 

Attachments

  • IMAG0276.jpg
    IMAG0276.jpg
    147.2 KB · Views: 269
  • IMAG0274.jpg
    IMAG0274.jpg
    147.5 KB · Views: 317
  • IMAG0290.jpg
    IMAG0290.jpg
    103.2 KB · Views: 273
  • IMAG0299.jpg
    IMAG0299.jpg
    145.2 KB · Views: 300
  • IMAG0302.jpg
    IMAG0302.jpg
    142.6 KB · Views: 282
  • IMAG0307.jpg
    IMAG0307.jpg
    149.5 KB · Views: 298
OP
F

Farmallboy15

Well-known member
Joined
Jan 31, 2018
Messages
71
Location
Ohio
Metal work finished. Concrete went in yesterday. All up to date!
 

Attachments

  • IMAG0350.jpg
    IMAG0350.jpg
    86.6 KB · Views: 409
  • IMAG0346.jpg
    IMAG0346.jpg
    97.9 KB · Views: 424
  • IMAG0340.jpg
    IMAG0340.jpg
    140.5 KB · Views: 410
  • IMAG0321.jpg
    IMAG0321.jpg
    147.9 KB · Views: 395
  • IMAG0318.jpg
    IMAG0318.jpg
    147.8 KB · Views: 360
OP
F

Farmallboy15

Well-known member
Joined
Jan 31, 2018
Messages
71
Location
Ohio
Almost forgot the prep and action shots on the concrete:
 

Attachments

  • output_4.jpg
    output_4.jpg
    158.4 KB · Views: 347
  • output_5.jpg
    output_5.jpg
    152.3 KB · Views: 294
  • output_6.jpg
    output_6.jpg
    159.8 KB · Views: 337

Deezler

Well-known member
Joined
Nov 1, 2011
Messages
240
Location
Southeast MI
Beautiful setting you've got there, and nice layout!

Whats the on-center on those purlins? Looks like at least 3 feet. Can the metal handle that? I'd be afraid it would buckle easily with any minor bump? And purlins on the inside too? For... inside sheathing? Any plans to insulate?
 
OP
F

Farmallboy15

Well-known member
Joined
Jan 31, 2018
Messages
71
Location
Ohio
Thanks for the compliments. I'm not sure what they set the girts at but I would agree it looks like about 3' (5 spaces, 14' tall). That's what it was engineered to so I hope the metal holds fine. A couple other outbuildings on the property have a similar spacing.

If you blow up the pictures, the interior purlins are also up. It will be getting 3" of open cell spray foam in the coming weeks along with OSB sheathing. Originally we were planning on R-19 fiberglass but our builder came back and said foam would only be $900 more.
 
Last edited:

welder57

Well-known member
Joined
Feb 26, 2011
Messages
414
You better not use spray foam on exterior panel. It will rust from the inside out, we void all warranty to metal building when spray foam is used. Just saying not a good long term idea...Great looking building!!
 
OP
F

Farmallboy15

Well-known member
Joined
Jan 31, 2018
Messages
71
Location
Ohio
You better not use spray foam on exterior panel. It will rust from the inside out, we void all warranty to metal building when spray foam is used. Just saying not a good long term idea...Great looking building!!

That is a valid point on the warranty. I will check with the builder tomorrow on that. Worst case, I could put some Tyvek on the inside of the exterior girts. There will be a vapor barrier between the foam and the OSB on the inside.

I was mostly concerned with panel removal with foam being sprayed on the steel. He assured me that open cell would allow panels to be replaced vs closed cell not allowing it. Steel is from H&H Metal Products and their website is less than helpful. http://www.hhmetalproducts.com/

Edit 5/7/18: This morning I confirmed with the metal manufacturer that foam sprayed direct to the metal would not affect the warranty. Additionally, with the vapor barrier there *should* not be any moisture getting to the foam.
 
Last edited:

Bert_

Well-known member
Joined
Dec 24, 2016
Messages
9,702
Location
NW Iowa
I'm curious why you made the choice to do 14' side walls? That gets to be a limiting factor pretty quickly with machinery. Most guys that plan to work on farm machinery do 16' or even 18' side walls.
 
OP
F

Farmallboy15

Well-known member
Joined
Jan 31, 2018
Messages
71
Location
Ohio
I'm curious why you made the choice to do 14' side walls? That gets to be a limiting factor pretty quickly with machinery. Most guys that plan to work on farm machinery do 16' or even 18' side walls.

So a little about me, I'm a 24 year old full time engineer. We are undergoing a remodel on the farm house while living closer to work. This property is really a hobby farm. We have about 100ac between the farm and my parents place which adjoin and we don't really have any massive equipment at this time. The largest door is 12'x12' and 12' is the maximum highway transport height. Also, my dad wanted a lift requiring 13' ceilings. This is what determined the height.

My minimum was to be able to get a International 1086 in the door. I really wanted a 16+' wide door to be able to fit a 4- (wide) row planter in but that didn't happen due to cost and heat loss. Eventually I hope to have a little more farm land but never intend to have anything over 6-row equipment. At some point I may have to enlarge the 12x12 door or just work on the wide stuff outside. I definitely will have to build a equipment storage building down the road.
 
OP
F

Farmallboy15

Well-known member
Joined
Jan 31, 2018
Messages
71
Location
Ohio
Well it has been a busy couple of weeks.

We got all the trenches dug for water and internet to the shop as well as underground power to the shop and underground to the house to replace the overhead wires. That was a lot of digging...

Also, the shop got insulation, OSB lining on the inside, which I'm not happy about because I was not planning on painting it (marked lines are to the inside of the shop) and the doors finally went up yesterday.

Now it is time to schedule the power company to come out and for me to find a new air compressor for the shop. I was considering an Eaton but have now settled on a new Quincy QT-5 or buying a used Quincy 325 pressure lubricated pump and going through it top to bottom. Any thoughts on the compressor dilemma?
 

Attachments

  • output_13.jpg
    output_13.jpg
    62.7 KB · Views: 340
  • output_12.jpg
    output_12.jpg
    137.7 KB · Views: 379
  • output_9.jpg
    output_9.jpg
    146.3 KB · Views: 356
  • output_8.jpg
    output_8.jpg
    150 KB · Views: 379
  • IMG952018052495183321535.jpg
    IMG952018052495183321535.jpg
    147.2 KB · Views: 300
  • IMG952018052495183256712.jpg
    IMG952018052495183256712.jpg
    151.5 KB · Views: 341
  • IMAG0353.jpg
    IMAG0353.jpg
    125.6 KB · Views: 383
OP
F

Farmallboy15

Well-known member
Joined
Jan 31, 2018
Messages
71
Location
Ohio
Another problem we have found with the OSB wall liner is that only about 10 screws per sheet were used to attach it to the walls. With the humidity, it was starting to bow pretty bad in spots. Yesterday I had to add quite a few more screws.

In other news, Sunday I was able to get the office built. Big enough for a desk, sofa and a beer fridge.

Yesterday we got 200 amps of underground power into the building, as well as a conversion to underground for the house.

I was also able to get my Bridgeport into the building with the help of my puppy.
 

Attachments

  • IMG_1595.JPG
    IMG_1595.JPG
    108.4 KB · Views: 439
  • IMG_1601.JPG
    IMG_1601.JPG
    90.2 KB · Views: 274
  • IMG_1608.JPG
    IMG_1608.JPG
    65.4 KB · Views: 273
  • IMAG0515.jpg
    IMAG0515.jpg
    147.9 KB · Views: 320
  • IMAG0494.jpg
    IMAG0494.jpg
    147.2 KB · Views: 284
  • IMAG0485.jpg
    IMAG0485.jpg
    146.3 KB · Views: 293
OP
F

Farmallboy15

Well-known member
Joined
Jan 31, 2018
Messages
71
Location
Ohio
Some more updates over the last month:

-The OSB wall liner was painted with barn and fence paint.

-Most of the conduit is run and I finally have lights. I used 19 of these: https://www.lightup.com/2ft-led-lin...200w-equiv-dimmable-10400-lumens-lumegen.html I utilized the 0-10V dimmers and placed them on the 8' spaced trusses. I wish I could have got them a little closer to the end walls but didn't want to run Unistrut spanning the gap. I still have a little conduit to run and wires to pull but I think I am finally getting the hang of pulling the wire. This has been my first time working with conduit and it has been a little bit of a learning curve.

-The Champion 7.5hp compressor is also in as well as the Forward I-10 lift.

Things are starting to look up but there is still a lot of work to do.
 

Attachments

  • IMAG0669.jpg
    IMAG0669.jpg
    146.6 KB · Views: 543
  • IMAG0670.jpg
    IMAG0670.jpg
    131.6 KB · Views: 481
  • IMAG0671.jpg
    IMAG0671.jpg
    110 KB · Views: 501
  • IMAG0672.jpg
    IMAG0672.jpg
    146.3 KB · Views: 505
To avoid these ads, REGISTER NOW!
OP
F

Farmallboy15

Well-known member
Joined
Jan 31, 2018
Messages
71
Location
Ohio
Brought the toolbox over today and got the preliminary air plumbing done. I'll be running 3/4" maxline at some point to the rest of the shop. Also we finally got to hear the new compressor run. It was quieter than expected and the lights don't dim on start up. Most importantly, the pups got some play time in.
 

Attachments

  • IMAG0683.jpg
    IMAG0683.jpg
    100.9 KB · Views: 285
  • IMAG0685.jpg
    IMAG0685.jpg
    65.7 KB · Views: 257
  • IMAG0686.jpg
    IMAG0686.jpg
    108.1 KB · Views: 264
OP
F

Farmallboy15

Well-known member
Joined
Jan 31, 2018
Messages
71
Location
Ohio
Made a little more progress today. Finally got a workbench built. Steev-o's bench was what sparked the idea. The opening on the right will hold another toolbox whenever I end up getting another one. Don't pay attention to the mess, I had to take all the tools out of the box to slide it under the bench.
 

Attachments

  • image_40638$IMAG0712.jpg
    image_40638$IMAG0712.jpg
    59.8 KB · Views: 211
  • IMAG0713 - Copy.jpg
    IMAG0713 - Copy.jpg
    130.6 KB · Views: 194
OP
F

Farmallboy15

Well-known member
Joined
Jan 31, 2018
Messages
71
Location
Ohio
It has been a while without much progress as I have been side tracked with other projects. Last weekend I built two storage shelves. One for general storage and one for oil and filters. I plan to line the oil shelf with HDPE so that any stray oil won't soak into the OSB.

Last night I was able to get the last of the trim up as well as the TV over the work bench. I also started the shelf behind my mill for tooling storage but I still have a little left to finish there.

This weekend I plan / hope to finish the last of the wiring and also run the 3/4 Maxline / Rapid Air system that should deliver today.
 

Attachments

  • IMG_1918.JPG
    IMG_1918.JPG
    90.4 KB · Views: 159
  • IMG_1917.JPG
    IMG_1917.JPG
    99.4 KB · Views: 142
  • IMG_1916.JPG
    IMG_1916.JPG
    95.3 KB · Views: 179
  • IMG_1915.JPG
    IMG_1915.JPG
    120.1 KB · Views: 170
  • IMG_1914.JPG
    IMG_1914.JPG
    102 KB · Views: 167
  • IMG_1913.JPG
    IMG_1913.JPG
    95 KB · Views: 171
  • IMG_1911.JPG
    IMG_1911.JPG
    95.2 KB · Views: 168
OP
F

Farmallboy15

Well-known member
Joined
Jan 31, 2018
Messages
71
Location
Ohio
Well I got a lot done this weekend! Saturday all of the conduit got finished. Today I got all of the wire pulled and connected up and started on installing the rapid air system. It's not quite as rapid as I hoped but still really cool. The straightener is worthless though... My ceiling fans finally reverse now and the outside dusk to dawn lights are up and working great as well! I'm starting to get very close!
 

Attachments

  • IMG_1949.jpg
    IMG_1949.jpg
    119.7 KB · Views: 203
  • IMG_1951.jpg
    IMG_1951.jpg
    111.2 KB · Views: 203
  • IMG_1952.jpg
    IMG_1952.jpg
    126.7 KB · Views: 216
  • IMG_1953.jpg
    IMG_1953.jpg
    108.2 KB · Views: 212
  • IMG_1954.jpg
    IMG_1954.jpg
    118.7 KB · Views: 219
  • IMG_1956.jpg
    IMG_1956.jpg
    109.4 KB · Views: 207
  • IMG_1958.jpg
    IMG_1958.jpg
    115.7 KB · Views: 203
OP
F

Farmallboy15

Well-known member
Joined
Jan 31, 2018
Messages
71
Location
Ohio
Officially done with the big stuff! Got all of my outlet covers on. The last welder outlet wired and lastly got the rapid air system in. After figuring out the best way to torque down the fittings and straighten the tube it went fairly fast.

As I said before the straightener they sell was completely worthless for me. You could get it straight on the ground but the second you pick it up it would bend. The best way to hang the tube for me was to mount all the clips. Mount the drop section to the tee. Stub out short pieces to the other sides of the tee and snap it into the clips. Trim the free end of the tube to length and attach it to the outlet. Then estimate the length to the next fitting and torque the fittings up on the wall. I trimmed to finish length up on the wall since it is hard to get a perfect length of cut when you are measuring a curved tube... Don't bother trying to get anything relatively straight until it is hanging in the clips...

It took me probably 4-5 hours to finish it by myself today and about another 3 hours last weekend with a helper to prep all the outlets and hang maybe a quarter of the shop. I used about 250' of a 300' 3/4" kit with 4 outlet drops plus the inlet from the compressor. Overall i'm very happy with it.
 

Attachments

  • IMG_2010.JPG
    IMG_2010.JPG
    97.7 KB · Views: 172
  • IMG_2001.JPG
    IMG_2001.JPG
    93.9 KB · Views: 170
  • IMG_1998.JPG
    IMG_1998.JPG
    99 KB · Views: 190
  • IMG_1997.JPG
    IMG_1997.JPG
    85.9 KB · Views: 159
  • IMG_1992.JPG
    IMG_1992.JPG
    92.8 KB · Views: 160
  • IMG_1994.JPG
    IMG_1994.JPG
    83.8 KB · Views: 156
  • IMG_1990.JPG
    IMG_1990.JPG
    86.1 KB · Views: 165
OP
F

Farmallboy15

Well-known member
Joined
Jan 31, 2018
Messages
71
Location
Ohio
Almost forgot some puppy pictures as well.
 

Attachments

  • IMG_1989.JPG
    IMG_1989.JPG
    144.3 KB · Views: 95
  • IMG_1988.JPG
    IMG_1988.JPG
    139.8 KB · Views: 80
  • IMG_1987.JPG
    IMG_1987.JPG
    138.5 KB · Views: 81
  • IMG_1986.JPG
    IMG_1986.JPG
    141.2 KB · Views: 88
  • IMG_2013.jpg
    IMG_2013.jpg
    120.3 KB · Views: 87
  • 42136584_10217464672394421_3216265261514489856_o.jpg
    42136584_10217464672394421_3216265261514489856_o.jpg
    155.7 KB · Views: 97
OP
F

Farmallboy15

Well-known member
Joined
Jan 31, 2018
Messages
71
Location
Ohio
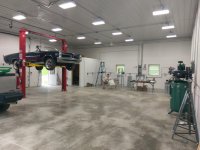
Well a lot has happened since the beginning of October. There will always be small projects but the shop is officially "done".

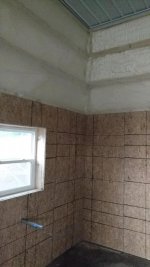
First, the shop sink was officially hooked up to the waterline we ran from the house this summer.

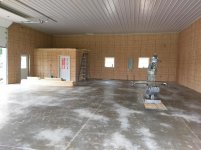
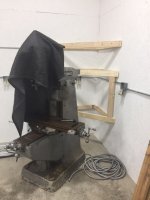
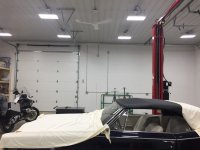
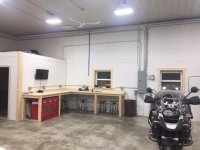
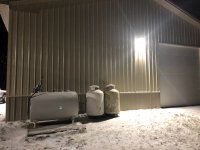
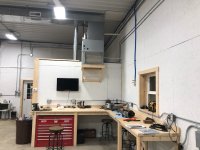
We also installed the furnace with A/C coils for next summer. It is a Concord 88/90,000 btu unit with a 94/96% efficiency. Initially, we intended to use a Reznor garage heater but for the same price as a 80% efficient unit we got ~94% efficiency plus the option of air conditioning. While waiting for the propane install the shop stayed at 54-56 degrees with 20-45 degree outside temperatures and just a plug in oil filled heater like you would put beside your couch. Last night we finally got the propane hooked up using (2) 120 gal tanks. It fired up and worked nicely with the ceiling fans running on low.

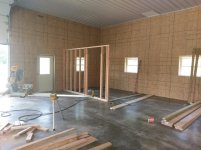
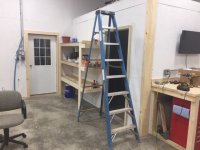
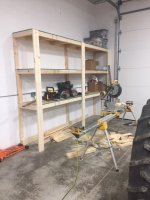
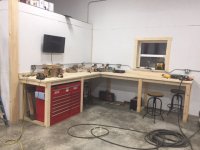
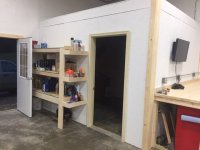
Note, since the furnace with A/C coils was just barely too tall to fit on top of the office (this wasn't the planned location) we had to build a cantilever shelf to hold it above the workbench. This messes with my light distribution on the bench but isn't terrible.

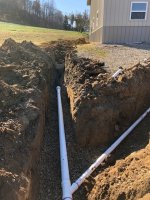
Between installing the furnace and getting propane, we dug more trenches. The first was a French drain on the top side of the shop running to the pond. The sink Y'ed into this after I transitioned to schedule 40 PVC from corrugated drain pipe to go under the driveway. Next we ran the rest of the 2" conduit to the old barn built in 1911 for underground power. I also threw a 3/4" conduit in case for some reason I want ethernet in there (baby cams for livestock?). Last week I pulled #2 aluminum XHHW through the conduit. I had planned on #4 but the supply house didn't have 450' of it and for $20 more I got the #2... I had 360 degrees of bends so it wasn't an easy pull... This whole underground operation eliminated the low hanging overhead line from the house that has been knocked out before by delivery trucks... It also put all ag buildings on the same meter vs the house.
 

Attachments

  • IMG_1165.jpg
    IMG_1165.jpg
    71.1 KB · Views: 151
  • IMG_1161.jpg
    IMG_1161.jpg
    117.5 KB · Views: 155
  • IMG_1160.jpg
    IMG_1160.jpg
    109.4 KB · Views: 149
  • IMG_1071.jpg
    IMG_1071.jpg
    73.4 KB · Views: 132
  • IMG_1064.jpg
    IMG_1064.jpg
    145.2 KB · Views: 134
OP
F

Farmallboy15

Well-known member
Joined
Jan 31, 2018
Messages
71
Location
Ohio
With everything on the shop being "finished" I have finally been able to start on some other projects. The first is rebuilding my Bridgeport. Also, here is a puppy picture from Thanksgiving for your viewing pleasure.


Currently, I am trying to investigate the possibility of tapping into the large natural gas pipe lines running through the property and eliminating the propane. It looks like it is about 1/3 of the cost...


Next summer the plan is to cut larger windows in the house and replace the siding with vinyl. Also, I plan to tackle building retaining walls, pouring a concrete ceiling for the 1909 root cellar and burying it all the way and reworking the artesian spring so that is not at the bottom of a depression in the yard (left over from the old spring house).
 

Attachments

  • IMG_1164.jpg
    IMG_1164.jpg
    113.9 KB · Views: 109
  • IMG_1163.jpg
    IMG_1163.jpg
    108.1 KB · Views: 106
  • IMG_2996.jpg
    IMG_2996.jpg
    68.1 KB · Views: 112
OP
F

Farmallboy15

Well-known member
Joined
Jan 31, 2018
Messages
71
Location
Ohio
Well, there hasn't been a whole lot of updates on the shop this winter but having heat has been a significant upgrade! The furnace really does not run a whole lot and recovers quickly when the doors have been open for a couple minutes.

I was able to get the Bridgeport rebuilt and running with a TECO VFD and I have made my first chips with it! I still need to buy a DRO at some point.

The focus recently has been trying to get the house ready. I ran CAT6 throughout the house and am gearing up for the large window and siding replacement project in the next month. Anyways, here are some pictures from the winter.
 

Attachments

  • 5.jpg
    5.jpg
    101.5 KB · Views: 140
  • 4.jpg
    4.jpg
    103.7 KB · Views: 144
  • 3.jpg
    3.jpg
    119.6 KB · Views: 160
  • 2.jpg
    2.jpg
    93.6 KB · Views: 139
  • 1.jpg
    1.jpg
    87.5 KB · Views: 149
  • 6.jpg
    6.jpg
    102.9 KB · Views: 137

skycrane

Member
Joined
Mar 5, 2019
Messages
10
Location
norcal
I'm getting quotes on a similar same sized building. What did the building, install and concrete cost? Looks great.
 
OP
F

Farmallboy15

Well-known member
Joined
Jan 31, 2018
Messages
71
Location
Ohio
I attached screenshots of the quote that we accepted. Concrete was $9k and change. Shell was $25k. Add in $10k for insulated and liner. Spray foam added $1k to this price. We also used more gravel than expected.

Wiring and the office was done myself.
 

Nick in WI

Well-known member
Joined
Nov 6, 2012
Messages
129
Great looking shop, I've enjoyed following along.

What lift did you end up choosing?
 

1953mercury

Well-known member
Joined
Nov 25, 2012
Messages
701
Location
Steamboat Springs CO
Nice shop, and the Bridgeport looks great. Really liking the blue paint job. Being a Ford guy much of my shop stuff is Ford blue. Should finish up the interior of mine this spring/summer and finally get moved in. I'm sure you are enjoying yours, and rightly so. No small chore building something that size. Cheers, Mike
 
To avoid these ads, REGISTER NOW!
Top Bottom