To avoid these ads, REGISTER NOW!

Project "Hot Rod Lincoln" (24 Hours of Lemons Build)

aka Larry

Well-known member
Joined
May 2, 2012
Messages
8,011
Location
Eastern, NC
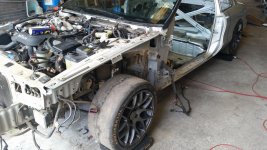
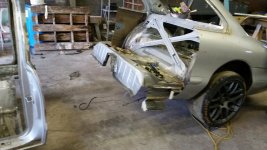
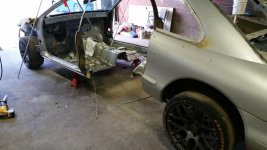
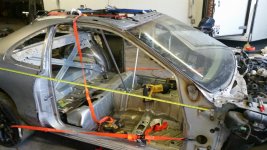
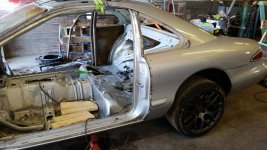
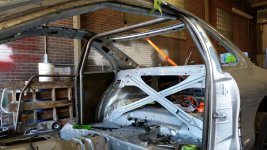
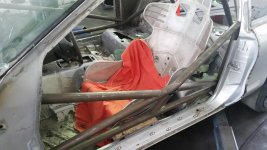
As some of you know I race in then 24 Hours of Lemons endurance racing series. This is my 10th season and it's what I love to do. My current car is a '93 Acura Integra, which has been great the past four years, so I have no plans to build another. However our sister team is owned by my buddy who races his "580SX" (240SX with a 351 V8) has decided he wanted to build a new car and of course I'm there to help. Enter what had been dubbed "Project Hot Rod Lincoln".

The car is a 1998 Lincoln Mark VIII LSC (chassis code FN10).

According to the factory the specs:

Engine: 4.6 L V8 (All-Aluminum 32V Intech)
Horsepower: 290 hp @5750 RPM
Torque: 295 lb-ft @4500 RPM
Transmission: 4R70W (4-speed auto)
Final Drive: 3.27:1
Wheel base 113.0"
Curb weight: 3,765 lbs

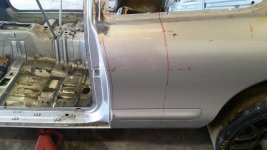
Back in 1998, this car was the top of the line as far as features and creature comforts from Ford. Air-ride suspension, built-in hands-free cellular phone, automatic headlights, powered memory seats, powered tilt steering, and the list goes on and on. Every bell and whistle they could throw at it. It also has and 8.8 rear diff, aluminum control arms, aluminum driveshaft, and aluminum hood.

If you see one of these sitting in someone's yard it's likely slammed to the ground, and not because the owner wanted a low rider, more likely the air bags failed and were too expensive to replace. This was the case for the car we started with, which had sat in the original owner's yard for the last 7 years sitting on the tires. The owner had moved on with another vehicle, and my buddy finally talked him into selling it.

In it's current state, it actually ran, albeit not too well, due to the fuel system being all gummed up. Once he replaced the fuel tank and pump with another from the pick-n-pull, it fired right up, and even the notoriously bad auto air-ride suspension still worked after a little tinkering with it.

Now that it was mobile, the first order of business to make it a race car was to outfit it with a proper set of wheels and brakes. The stock wheels are 15", which only allowed for single piston calipers and 11.5" front rotors and 10" rear. Not enough brake for such a heavy beast. Also the bolt pattern was the much less popular 5x10⁸, so the plan was to update the hubs to the current S550 platform ('15 Mustang GT) that uses the 5x114.3 pattern. Fortunately, S550 take-offs are available on Ebay for cheap, so he scored a set of 4-piston from calipers and 14" rotors along with a pair of rear calipers and 13" rotors for just $400.

For the rears, the new hubs were a direct replacement, but of course a bracket had to be fabricated to mount the new caliper with the larger rotor. Unfortunately I lost the pics of this custom bracket, but here's a shot of the new rear brakes in place:


attachment.php


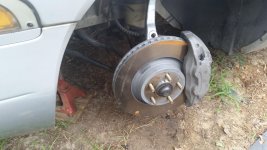
For the fronts, the new rotors had a hat with a deeper offset, so the rotor interfered with the tie rod end. The fix was to modify the spindle by moving it outward about 1/4" to gain the necessary clearance. Here you can see the modification along with the custom bracket to accommodate the new larger rotor and caliper.


attachment.php


Here is the new front rotor and caliper in place:


attachment.php


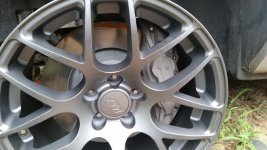
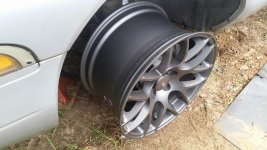
For wheels, he scored a set of these 18x10s on sale for $500:


attachment.php


Front clearance is very tight, but they do fit!

attachment.php


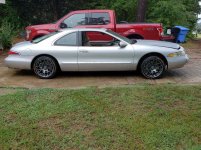
I had a set of used of Continental slicks that I ran on my Mustang GT track car so we swapped them onto the new wheel so we'd have a roller. It's amazing how a set of new wheels can turn an old man car into a hot rod. Here she is with her new shoes, looking bad ***, although with too much altitude at the moment.


attachment.php


More pics and progress coming later today. Stay tuned...
 

Attachments

  • 01_Front spindle.jpg
    01_Front spindle.jpg
    154.8 KB · Views: 2,916
  • 02_Front brake.jpg
    02_Front brake.jpg
    148.5 KB · Views: 2,896
  • 04_Rear brake.jpg
    04_Rear brake.jpg
    130.1 KB · Views: 2,892
  • 05_Front caliper clearance.jpg
    05_Front caliper clearance.jpg
    139.6 KB · Views: 2,902
  • 06_Front wheel.jpg
    06_Front wheel.jpg
    150.5 KB · Views: 2,890
  • 08_new shoes.jpg
    08_new shoes.jpg
    152.3 KB · Views: 2,900
To avoid these ads, REGISTER NOW!
OP
A

aka Larry

Well-known member
Joined
May 2, 2012
Messages
8,011
Location
Eastern, NC
Now that we had a running car with decent wheels and brakes it was time to move to my buddies shop to start building it into an actual race car. Before we started the tear down, we actually weighed it on a set or corner weighting scales, and it indeed weighed 3750 lbs as advertised.

Now it was time to put this beast on a serious diet. We got busy removing all the interior components along with the fenders and front bumper as seen here. Of course the fenders, doors, and bumper will go back on, but they had to be removed to gain access to other stuff we didn't need like the air compressor window motors, etc. We also removed the exhaust, fuel tank, driveshaft, and 4R70W transmission. The plan is to run a T45 ****** so we swapped it in to get a new weight number of 2450 lbs.


attachment.php


attachment.php


Next up was to remove more of the interior sheet metal that is not needed. The plasma cutter made short work of this portion:


attachment.php


Moving forward with more weight reduction, we removed the steel roof skin. This will be replaced with an aluminum panel when it's all said and done.


attachment.php


attachment.php
 

Attachments

  • 15_weight reduction.jpg
    15_weight reduction.jpg
    155.4 KB · Views: 2,860
  • 14_weight reduction.jpg
    14_weight reduction.jpg
    145.6 KB · Views: 2,858
  • 11b_plasma cut.jpg
    11b_plasma cut.jpg
    134 KB · Views: 2,867
  • 11_weight reduction.jpg
    11_weight reduction.jpg
    145.2 KB · Views: 2,865
  • 10_weight reduction.jpg
    10_weight reduction.jpg
    155.8 KB · Views: 2,871
OP
A

aka Larry

Well-known member
Joined
May 2, 2012
Messages
8,011
Location
Eastern, NC
At this point we were ready for the adventurous part of the build, removing 10" of the entire car to change the wheel base from 113.0" to 103.0"! If you are now asking "why", you clearly do not understand Lemons racing. In Lemons the answer to the question is never "why", but "why not!"

The plan is to remove 10", but not in one straight slice across the car. We would remove 1" from the sides and roof starting just behind the B-pillar, between it and the rear wheel. The 10" on the floor pan would be removed just behind the front seat, between it and the hump for the rear seat. This allows the stock door opening to remain intact.

Red lines showing where the cuts will be made on the sides:


attachment.php


Red lines showing where the floor pan will be cut:

attachment.php


We added a pair of EMT braces to the front half to ensure the B-pillar and forward would stay square:

attachment.php


And the surgery begins! Starting cut no.1 on the passenger side:


attachment.php


Cut no.2 on the passenger side:

attachment.php


Passenger side cuts complete:

attachment.php


Driver side cut complete:

attachment.php
 

Attachments

  • 18_surgery.jpg
    18_surgery.jpg
    134.5 KB · Views: 2,853
  • 19_surgery.jpg
    19_surgery.jpg
    74.5 KB · Views: 2,850
  • 20_surgery bracing.jpg
    20_surgery bracing.jpg
    153.4 KB · Views: 2,843
  • 21_surgery cut.jpg
    21_surgery cut.jpg
    149.8 KB · Views: 2,839
  • 22_surgery cut.jpg
    22_surgery cut.jpg
    105 KB · Views: 2,835
  • 23_surgery cut.jpg
    23_surgery cut.jpg
    147.5 KB · Views: 2,841
  • 24_surgery cut.jpg
    24_surgery cut.jpg
    144 KB · Views: 2,834
OP
A

aka Larry

Well-known member
Joined
May 2, 2012
Messages
8,011
Location
Eastern, NC
Time to cut the floor pan!

attachment.php


Initial floor pan cuts complete and she's in two halves!


attachment.php


attachment.php


attachment.php
 

Attachments

  • 25_surgery cut.jpg
    25_surgery cut.jpg
    147.3 KB · Views: 2,837
  • 27_surgery cut.jpg
    27_surgery cut.jpg
    152.1 KB · Views: 2,832
  • 28_surgery cut.jpg
    28_surgery cut.jpg
    147.4 KB · Views: 2,843
  • 29_surgery cut.jpg
    29_surgery cut.jpg
    140.8 KB · Views: 78
  • 31_surgery cut.jpg
    31_surgery cut.jpg
    155.7 KB · Views: 2,841
OP
A

aka Larry

Well-known member
Joined
May 2, 2012
Messages
8,011
Location
Eastern, NC
Now it's time to remove the 10" section from the floor pan in the front half of the car. Note the red cut line:

attachment.php


10" floor plan section after removal:

attachment.php


At this point there was a lot of trial and error on the fitment to rejoin the two halves. We marked measurement points along the body to guide us in reassembly, but it still took quite a bit of tweaking to get it just right. We used 3 jacks, and 4 ratchet straps to pull it back together during the process. This took quite a bit of time and effort, but we finally got the measurement within 1/32", which in our world qualifies as "close enough".

Here's one pic of the process:

attachment.php


At this point you can see it fits back together pretty darn well. In this pic we had the frame rails, floor, and roof stitch-welded in place. They will all be fully welded in the future of course, but most of the structural strength will be provided by the roll cage.


attachment.php


Now that the two halves are joined, it was time to start working on the roll cage. Since DOM isn't cheap, we started with EMT. Once we were happy with the fitment of the main hoop using EMT (we wasted 3 pieces trying BTW), we moved onto the actual DOM tubing and it fit perfectly as seen here:


attachment.php


Next up was the bars than run from the floor, up the A-pillar, along the roof, and connecting to the main hoop. Again we used EMT for testing, and even though this piece had bends in more than one plane, we got it right on the first attempt!

attachment.php


attachment.php


This is where we are on the build right now. I'll try to get more pics as we progress. Stay tuned!
 

Attachments

  • 32_surgery cut.jpg
    32_surgery cut.jpg
    139.5 KB · Views: 2,826
  • 33_surgery cut.jpg
    33_surgery cut.jpg
    131.5 KB · Views: 2,818
  • 36_final fit_01.jpg
    36_final fit_01.jpg
    151.9 KB · Views: 2,811
  • 36_final fit_02.jpg
    36_final fit_02.jpg
    152.5 KB · Views: 2,812
  • 37_main hoop fit.jpg
    37_main hoop fit.jpg
    154.5 KB · Views: 2,815
  • 38_a-pillar EMT fit_01.jpg
    38_a-pillar EMT fit_01.jpg
    147.8 KB · Views: 2,816
  • 39_a-pillar EMT fit_02.jpg
    39_a-pillar EMT fit_02.jpg
    154.3 KB · Views: 2,799
Last edited:
OP
A

aka Larry

Well-known member
Joined
May 2, 2012
Messages
8,011
Location
Eastern, NC
We started at 3,750 lbs, and in that stripped pic the total weight was indeed 2,450lbs. Also keep in mind that 2,450 lbs. number was before we removed 10" from the wheel base. We are hoping for something around 2,700 lbs. or less when it's all said and done.
 
Last edited:

driftpin

Well-known member
Joined
Dec 22, 2016
Messages
11,185
Location
Miami-Dade/Broward Co. Florida
Maybe Kenny Bell?

Back in the 1980's when the Mark VII LSC was released, it could be had with a BMW diesel. It was a inline sohc 6, 2.4 litre. Demand was low, it only lasted 2 years.

I like to read the oddballl builds like this, when you bring it to the track, people stare at it and try to figure out, "something doesn't look right!" paring that weight and shortening the wheelbase should make the handling dynamics better, and save wear & tear on tires and brakes. Thanks for the detailed posts.


Love it.
This is going to be insane.
You're doing a great job. Nicely done.

Reminds me of the limited SWB T-Bird back in the late 80s. I think Kenny Brown may have had something to do with it. Auto Kraft I believe did them after or something like that.

Here's one http://sc.tbkhomeworld.com/pics/swb003/index.htm
 

Toothaker

Well-known member
Joined
Nov 25, 2016
Messages
1,367
Location
Wichita, Kansas
Subscribed. I love watching all the imagination, engineering and skills it takes to produce something like this.

Dumb question: does anyone ever come up and try to actually buy your Lemons race car for $500? You've got $900 in just brakes and wheels alone.

I'm just wondering how it all works.

If anyone wonders what the deal is with $500, it's in the rules for 24 Hours of Lemons.

Edit: I misunderstood the rules. The organizers can buy the car for $500. I think I read somewhere that rule paraphrased in a misleading way.
 
Last edited:

M-technik-3

Well-known member
Joined
Feb 16, 2008
Messages
1,785
Location
Western Mass
Certain items aka safety are free items. Nice build, we have a beat to crude BMW E36 that we have run into the ground since 2012 and it see's about 3-4 races a year.
 

ttpete

Well-known member
Joined
Mar 8, 2011
Messages
6,737
Location
Dearborn, MI
Love it.
This is going to be insane.
You're doing a great job. Nicely done.

Reminds me of the limited SWB T-Bird back in the late 80s. I think Kenny Brown may have had something to do with it. Auto Kraft I believe did them after or something like that.

Here's one http://sc.tbkhomeworld.com/pics/swb003/index.htm

It should remind you. The MK VIII shared the same platform as the T-Bird.
 
To avoid these ads, REGISTER NOW!
OP
A

aka Larry

Well-known member
Joined
May 2, 2012
Messages
8,011
Location
Eastern, NC
Thanks for all the comments and for everyone taking the time to follow along on this crazy journey.


Finally found a fellow Lemons racer!

There are several of us here. I know ratdoggy is one as well. Got any info and pics about your car? Where do you race? We usually run CMP down in SC, Barber in AL, and Road Atlanta in GA in our cars,
 

CoogarXR

Well-known member
Joined
Jan 11, 2016
Messages
6,845
Location
Ohio
I used to have a 1993 Mark VIII back in 1999-ish. It was really a fun car to drive. But the parts were kind of expensive for me back then. And it always seemed to need something.

I did have a ball joint separate and drop the front end on the ground, lol. I think they wore out prematurely from the air ride always malfunctioning.

I'll be watching this too. What are your going to run for engine management? The original harness and computer, just stripped down?
 
OP
A

aka Larry

Well-known member
Joined
May 2, 2012
Messages
8,011
Location
Eastern, NC
I'll be watching this too. What are your going to run for engine management? The original harness and computer, just stripped down?


Yeah, that is the plan, at least initially. We'll need a custom tune to get rid of all the nannies if nothing else. If for some reason that doesn't work out, he has a Megasquirt from another build sitting in a box somewhere.


Thanks for following along.
 

LXCam

ALLIANCE MEMBER
Joined
Apr 23, 2013
Messages
19,089
Location
AZ
That's so incredibly cool Larry. You guys are doing an excellent job and I'd give anything to be a part of something like this. Ain't nuttin better then hacking something all to **** and making it cool and functional. Great job bro!


Hey I'm wondering something and considered maybe you've been down this road before thought I'd run it by you. I have a magnum roller that one of these days will become the track car. I will end up taking close to a foot out of it and it'll become a two door. How I intended on keeping everything aligned was to weld up some DOM underneath with a slide bar and everything finished off so the recievers butted together after I cut the shell away. that way I could just slide it together and detail the fitment. In my mind, that would keep the squareness of the car close to dead on. Have you guys ever tried something along those lines??


Anyhow keep up the detailed pics bud, I eat this stuff up!
 
Last edited:

ratdoggy

Well-known member
Joined
Mar 27, 2009
Messages
11,971
Location
Akron-Canton area OH
That's so incredibly cool Larry. You guys are doing an excellent job and I'd give anything to be a part of something like this. Ain't nuttin better then hacking something all to **** and making it cool and functional. Great job bro!


Hey I'm wondering something and considered maybe you've been down this road before thought I'd run it by you. I have a magnum roller that one of these days will become the track car. I will end up taking close to a foot out of it and it'll become a two door. How I intended on keeping everything aligned was to weld up some DOM underneath with a slide bar and everything finished off so the recievers butted together after I cut the shell away. that way I could just slide it together and detail the fitment. In my mind, that would keep the squareness of the car close to dead on. Have you guys ever tried something along those lines??


Anyhow keep up the detailed pics bud, I eat this stuff up!
Watch some episodes of "Project Binky" on Youtube.....They hack a Mini apart and put it back together
 
OP
A

aka Larry

Well-known member
Joined
May 2, 2012
Messages
8,011
Location
Eastern, NC
That's so incredibly cool Larry. You guys are doing an excellent job and I'd give anything to be a part of something like this. Ain't nuttin better then hacking something all to **** and making it cool and functional. Great job bro!


Thanks man. It should be something else when finished, but there is a ton more to do as I'm sure you know.


Hey I'm wondering something and considered maybe you've been down this road before thought I'd run it by you. I have a magnum roller that one of these days will become the track car. I will end up taking close to a foot out of it and it'll become a two door. How I intended on keeping everything aligned was to weld up some DOM underneath with a slide bar and everything finished off so the recievers butted together after I cut the shell away. that way I could just slide it together and detail the fitment. In my mind, that would keep the squareness of the car close to dead on. Have you guys ever tried something along those lines??


Funny you should mention that approach because that was pretty much my idea of how it should be done. I wanted to use tubing of mating diameters that would be telescopic so we could slide it right back together, all lined up. This is my buddy's project, and he does this his way 99% of the time, which is what we did this time. His method resulted in a ton of extra work IMO, but in the end we got it done so I guess that was the goal.

Thanks to you and everyone else for your comments and taking the time to follow along. Hopefully we'll work on it again this weekend and I'll have updates to post early next week.
 
Last edited:

corvettecrazy

Member
Joined
Apr 27, 2014
Messages
17
Pretty creative build and a lot of weight lost. Looking forward to seeing the progress!

I am interested in some pictures of the car as a whole to see the difference in look due to being shortened.

We also have a heavy car...
 

Attachments

  • Altimate Warrior.jpg
    Altimate Warrior.jpg
    148.6 KB · Views: 245

ttpete

Well-known member
Joined
Mar 8, 2011
Messages
6,737
Location
Dearborn, MI
Yeah, that is the plan, at least initially. We'll need a custom tune to get rid of all the nannies if nothing else. If for some reason that doesn't work out, he has a Megasquirt from another build sitting in a box somewhere.


Thanks for following along.

I'm pretty sure there's a top speed limiter. The company took one of those out to the salt back then, and basically removed the limiter along with lowering the car and ran somewhere around 160 mph. I worked in Ford product development at the time and did a bit of design work on the MK VIII.
 
OP
A

aka Larry

Well-known member
Joined
May 2, 2012
Messages
8,011
Location
Eastern, NC
I'm pretty sure there's a top speed limiter.

Were the speed limiters back then mostly based on the tire's speed ratings?

I'm sure this car has a speed limiter, which isn't usually an issue at some tracks we run, but at Road Atlanta with it's long back straight, it's got to go.
 

ttpete

Well-known member
Joined
Mar 8, 2011
Messages
6,737
Location
Dearborn, MI
Were the speed limiters back then mostly based on the tire's speed ratings?

I'm sure this car has a speed limiter, which isn't usually an issue at some tracks we run, but at Road Atlanta with it's long back straight, it's got to go.

What I was told was that it had to do with the FEAD (front engine accessory drive). You'll probably be simplifying yours anyway.

I worked a lot of vintage motorcycle races there. Did you know that up on the flag stand, after a vehicle comes out of the last turn, it drops out of sight for quite a distance up the front straight, then suddenly pops up into sight? Makes it difficult to identify the leader for both the white and checker flag laps.
 

bluebolt

Well-known member
Joined
Dec 28, 2008
Messages
5,435
Location
Benton LA
I'm pretty sure there's a top speed limiter. The company took one of those out to the salt back then, and basically removed the limiter along with lowering the car and ran somewhere around 160 mph. I worked in Ford product development at the time and did a bit of design work on the MK VIII.

They set a record of 181 MPH with a basically stock engine. ttps://www.hemmings.com/blog/2018/04/24/that-time-lincoln-built-a-land-speed-mark-viii-and-set-a-182-mph-record-at-bonneville/
 

kbs2244

Well-known member
Joined
Nov 11, 2006
Messages
14,065
On the re-aligning after cutting in half.
I had the chance to tour a limo shop.

They also cut Lincolns in half, but for the opposite reason.
They had a set of RR rails bolted to the shop floor with two little carts that fit into the frame in front of, and behind the cut line.

They would drive the car over the tracks, jack it up, position the carts and lower the car down into them.
After the cut (I cringed seeing a 12 mile Town Car getting the making sparks treatment) they pulled the front and back apart to fit in the frame extensions, new floor, side panels and such.

The RR rails with carts kept everything in line.

Maybe a little overkill for just one car, but they did over 100 a year.
As I was leaving a full semi of all black TC's was pulling in.
 
OP
A

aka Larry

Well-known member
Joined
May 2, 2012
Messages
8,011
Location
Eastern, NC
My buddy worked on the cage after work last week and got 95% of it mocked up. The harness bar still needs to be added, but we'll wait until we have the final seat installed first. The bats are just tacked in for now as we may need to adjust a few things before it's finished welded into place. Pics of the current progress on the cage:


attachment.php


attachment.php


attachment.php
 

Attachments

  • 42_cage mockup_01.jpg
    42_cage mockup_01.jpg
    139.8 KB · Views: 1,296
  • 42_cage mockup_02.jpg
    42_cage mockup_02.jpg
    149.4 KB · Views: 1,294
  • 42_cage mockup_03.jpg
    42_cage mockup_03.jpg
    148.4 KB · Views: 1,298
To avoid these ads, REGISTER NOW!
Top Bottom