To avoid these ads, REGISTER NOW!

Rare Battery Charger Restoration

don long

Well-known member
Joined
Mar 31, 2012
Messages
8,842
Location
southern california
I posted a before and after picture of my latest battery charger restoration
In the tool polishing thread.I was asked to show some in process pictures so I thought it would be a good idea to build a restoration thread on it

3 by don long, on Flickr

I found the charger several months ago on the internet and bought it.
It didn't work when I got it and it doesn't work now either.

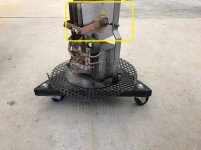
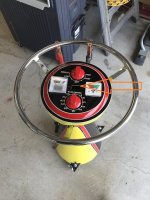
This is what I started with

IMG_3042 by don long, on Flickr

3a by don long, on Flickr


I started disassembling the charger to see what I needed to do to get started reconditioning it.

The body was a little ruff with big dents all around

IMG_3087 by don long, on Flickr


7b by don long, on Flickr


I removed the cable holder and sent it and the top ring out to the chrome shop.
I straightened up the body and welded up the extra holes.
I had bead blasted the top and refitted it to the top of the body

9 by don long, on Flickr


Next it was time to spread bondo on it and smooth it out before applying primer

10 by don long, on Flickr

12 by don long, on Flickr

The decision was made to follow the Signal Gas color scheme so I started with painting the entire body gloss black

13 by don long, on Flickr

After several attempts to design a paint scheme I decided on this

16 by don long, on Flickr

17 by don long, on Flickr

18 by don long, on Flickr

I straightened the top and primed it while trying to decide how the colors would go on it

20 by don long, on Flickr

I started by painting it black and after the paint dried I painted a red stripe on it along with painting a couple of other project pieces red.

21 by don long, on Flickr
 
Last edited:
To avoid these ads, REGISTER NOW!
OP
D

don long

Well-known member
Joined
Mar 31, 2012
Messages
8,842
Location
southern california
I got the chrome pieces back and started playing with them to see how the charger was taking shape. I could see that the top needed more color.
So when I painted the body of the charger yellow I also striped the top with yellow paint. (Sorry No Picture Of That)

22 by don long, on Flickr

It was time to start looking at the guts of the machine

27 by don long, on Flickr

The bottom needed some casters put on

28 by don long, on Flickr

And because I had no way to make the charger functional I trimmed the wires back and cleaned up the piece

29 by don long, on Flickr

It was all painted and time to start assembling the charger

30 by don long, on Flickr

The back

32 by don long, on Flickr

The front

33 by don long, on Flickr

Next I sent the charger over to my sign guy to have the top numbered, and lettered and the charger branded Signal gas

36 by don long, on Flickr

34 by don long, on Flickr

The charger will be ready to find a permanent home in the party garage after I find the light that goes in the open hole on the top of the charger.
 
Last edited:

Steve in Mi

Well-known member
Joined
Mar 13, 2007
Messages
1,042
Location
Mid Michigan
And because I had no way to make the charger functional I trimmed the wires back and cleaned up the piece

Are you saying that after all the work you put into this charger (and it is very pretty, nice job), it will not be functional? Why not?
 

Bears Fan

Well-known member
Joined
Jan 26, 2012
Messages
3,437
Location
Indiana
43473497242_70f94d4013_b.jpg


Amazing restore on the battery charger! That is so cool :thumbup: Great to see you posted a step by step process for us to see how you achieved such perfect results...

My question is when you get to the process of putting on a skim coat of bondo, what is your first step in smoothing it out? Do you start with a DA and some 80 grit?
 

bradpac

Well-known member
Joined
Sep 8, 2013
Messages
721
Location
Central TX
It's some great work and a beautiful piece, but the first question everyone asks is does it work.

If the original internals were beyond repair, perhaps you could find a working, more modern charger and install its internals into this machine.
 
OP
D

don long

Well-known member
Joined
Mar 31, 2012
Messages
8,842
Location
southern california
Don that is simply spectacular.:bowdown:

Thank you for sharing.:thumbup:

Thanks Steve
It was a fun project

Are you saying that after all the work you put into this charger (and it is very pretty, nice job), it will not be functional? Why not?

Steve
My moto is "I only make um look good . I don't make um run"
I have several chargers and don't need this one to work

43473497242_70f94d4013_b.jpg


Amazing restore on the battery charger! That is so cool :thumbup: Great to see you posted a step by step process for us to see how you achieved such perfect results...

My question is when you get to the process of putting on a skim coat of bondo, what is your first step in smoothing it out? Do you start with a DA and some 80 grit?

Good morning Bears Fan
Yes a D.A and 80 grit is a good starting point to knock off the rough edges and a hand block and 150 grit to finish it off for primer is what I used

It's some great work and a beautiful piece, but the first question everyone asks is does it work.

If the original internals were beyond repair, perhaps you could find a working, more modern charger and install its internals into this machine.

lunacy
Thanks for the visit. Yes I could have installed a small modern charger in the shell but this charger will just be sitting in the party garage on display in my new gas station that I'm currently putting together
 
To avoid these ads, REGISTER NOW!

Negen

Well-known member
Joined
Jul 15, 2015
Messages
1,909
Location
Seatltle WA
Great job.

Would be nice to see the charger functional again maybe with something modern on the inside bits.
 

Monza Harry

Well-known member
Joined
Dec 29, 2018
Messages
1,433
Location
Windsor ON
Don I just seen this thread, [due to recent posts] and the part of your charger that is giving you a nonperformance is likely the "Selenium Rectifiers" with that charger having a top power setting of only 55 Amps [lots of power in the 50's, today kind of in the lower middle] that would allow you to put 3 25Amp full wave rectifiers (in parallel) in place of that older technology and put it back into working order. That would be nice as it is visually stunning!
That rectangular hole that you wrote needed a Light, weren't most from that era Round, I immediately thought that there would be a 6-12 selector switch in that hole. Rectifiers link here:https://www.digikey.ca/en/products/...MIoL_rg5D_6wIVE4TICh3LQA-eEAYYASABEgKCbvD_BwE They would likely be happier mounted on a heat sink but for display and showing that it works would probably be ok without. As for your light if you haven't found one yet here is a possible starting place [obvious I know but?] Just some fodder to kick around. Harry
 

Attachments

  • Don Long's Battery Charger Internals Selenium Rect. boxed.jpg
    Don Long's Battery Charger Internals Selenium Rect. boxed.jpg
    61.8 KB · Views: 42
  • Don Long's Battery Charger Top w-Arrow.jpg
    Don Long's Battery Charger Top w-Arrow.jpg
    102.4 KB · Views: 42
To avoid these ads, REGISTER NOW!
Top Bottom